
Extended user guide
Page 3
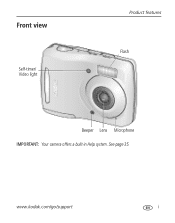
See page 35. www.kodak.com/go/support i Front view Self-timer/ Video light Product features Flash Beeper Lens Microphone IMPORTANT: Your camera offers a built-in Help system.
See page 35. www.kodak.com/go/support i Front view Self-timer/ Video light Product features Flash Beeper Lens Microphone IMPORTANT: Your camera offers a built-in Help system.
Extended user guide
Page 4
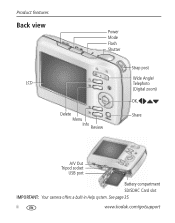
Product features Back view Power Mode Flash Shutter LCD Delete Menu Info Review Strap post Wide Angle/ Telephoto (Digital zoom) OK, Share A/V Out Tripod socket USB port Battery compartment SD/SDHC Card slot IMPORTANT: Your camera offers a built-in Help system. See page 35. ii www.kodak.com/go/support
Product features Back view Power Mode Flash Shutter LCD Delete Menu Info Review Strap post Wide Angle/ Telephoto (Digital zoom) OK, Share A/V Out Tripod socket USB port Battery compartment SD/SDHC Card slot IMPORTANT: Your camera offers a built-in Help system. See page 35. ii www.kodak.com/go/support

Extended user guide
Page 5
... strap 1 Loading the AA batteries 1 Turning on the camera 2 Setting the language and date/time 2 Storing pictures on an optional SD or SDHC Card 3 2 Taking pictures/videos 4 Taking pictures 4 Taking a video 4 Understanding the picture-taking icons 6 Know when your batteries need attention 6 Using the digital zoom 6 Using the flash 7 Using different modes... pictures/videos in different ways 18 A smarter way to find and enjoy your pictures 19 Understanding the review icons 20 Creating a slide show 21 www.kodak.com/go/support iii
... strap 1 Loading the AA batteries 1 Turning on the camera 2 Setting the language and date/time 2 Storing pictures on an optional SD or SDHC Card 3 2 Taking pictures/videos 4 Taking pictures 4 Taking a video 4 Understanding the picture-taking icons 6 Know when your batteries need attention 6 Using the digital zoom 6 Using the flash 7 Using different modes... pictures/videos in different ways 18 A smarter way to find and enjoy your pictures 19 Understanding the review icons 20 Creating a slide show 21 www.kodak.com/go/support iii

Extended user guide
Page 6
...in review 23 Cropping pictures 23 Editing videos 24 Selecting multiple pictures/videos 26 Copying pictures/videos 26 5 Doing more with your camera 27 Using the menu button to change settings 27 Using the Setup menu 29 6 Transferring, printing pictures 31 Printing pictures 32 ...Marking your pictures for print 34 7 Troubleshooting 35 Getting help from your camera 35 Troubleshooting 36 Getting help on the Web 39 8 Appendix 40 Camera specifications 40 Care and maintenance 42 Upgrading your software and firmware 42 Storage capacities 42 Important safety ...
...in review 23 Cropping pictures 23 Editing videos 24 Selecting multiple pictures/videos 26 Copying pictures/videos 26 5 Doing more with your camera 27 Using the menu button to change settings 27 Using the Setup menu 29 6 Transferring, printing pictures 31 Printing pictures 32 ...Marking your pictures for print 34 7 Troubleshooting 35 Getting help from your camera 35 Troubleshooting 36 Getting help on the Web 39 8 Appendix 40 Camera specifications 40 Care and maintenance 42 Upgrading your software and firmware 42 Storage capacities 42 Important safety ...

Extended user guide
Page 7
1 Setting up your camera Attaching the strap Loading the AA batteries Purchase extra batteries for your special event www.kodak.com/go/c122accessories www.kodak.com/go/support 1
1 Setting up your camera Attaching the strap Loading the AA batteries Purchase extra batteries for your special event www.kodak.com/go/c122accessories www.kodak.com/go/support 1
Extended user guide
Page 8
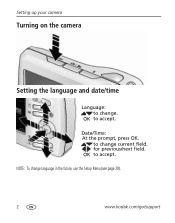
OK to accept. OK to accept. Date/Time: At the prompt, press OK. for previous/next field. Setting up your camera Turning on the camera Setting the language and date/time Language: to change current field. to change . NOTE: To change language in the future, use the Setup Menu (see page 29). 2 www.kodak.com/go/support
OK to accept. OK to accept. Date/Time: At the prompt, press OK. for previous/next field. Setting up your camera Turning on the camera Setting the language and date/time Language: to change current field. to change . NOTE: To change language in the future, use the Setup Menu (see page 29). 2 www.kodak.com/go/support

Extended user guide
Page 9
CAUTION: A card can only be inserted one way; Purchase accessories www.kodak.com/go/c122accessories www.kodak.com/go/support 3 Inserting or removing a card while the camera is on may cause damage. Setting up your camera Storing pictures on the camera. We recommend purchasing an SD or SDHC Card to conveniently store more pictures/videos. forcing it may damage the pictures, the card, or the camera. 1 Turn off the camera. 2 Insert a card until it clicks. 3 Turn on an optional SD or SDHC Card Your camera has internal memory.
CAUTION: A card can only be inserted one way; Purchase accessories www.kodak.com/go/c122accessories www.kodak.com/go/support 3 Inserting or removing a card while the camera is on may cause damage. Setting up your camera Storing pictures on the camera. We recommend purchasing an SD or SDHC Card to conveniently store more pictures/videos. forcing it may damage the pictures, the card, or the camera. 1 Turn off the camera. 2 Insert a card until it clicks. 3 Turn on an optional SD or SDHC Card Your camera has internal memory.
Extended user guide
Page 10
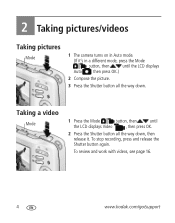
To stop recording, press and release the Shutter button again. Taking a video Mode 1 Press the Mode button, then until the LCD displays Auto , then press OK.) 2 Compose the picture. 3 Press the Shutter button all the way down . 2 Taking pictures/videos Taking pictures Mode 1 The camera turns on in Auto mode. (If it's in a different mode, press the Mode button, then until the LCD displays Video , then press OK. 2 Press the Shutter button all the way down , then release it. To review and work with videos, see page 16. 4 www.kodak.com/go/support
To stop recording, press and release the Shutter button again. Taking a video Mode 1 Press the Mode button, then until the LCD displays Auto , then press OK.) 2 Compose the picture. 3 Press the Shutter button all the way down . 2 Taking pictures/videos Taking pictures Mode 1 The camera turns on in Auto mode. (If it's in a different mode, press the Mode button, then until the LCD displays Video , then press OK. 2 Press the Shutter button all the way down , then release it. To review and work with videos, see page 16. 4 www.kodak.com/go/support

Extended user guide
Page 11
To review pictures/videos anytime, see page 22). Taking pictures/videos Reviewing the picture/video just taken After you may: Delete the current picture/video OK Play/pause a video NOTE: Audio is connected to a TV (see page 16. www.kodak.com/go/support 5 Audio can be heard when the video is played on a computer or when the camera is captured during video recording. While a picture/video is displayed, you take a picture/video, the LCD briefly displays the picture or the first frame of a video.
To review pictures/videos anytime, see page 22). Taking pictures/videos Reviewing the picture/video just taken After you may: Delete the current picture/video OK Play/pause a video NOTE: Audio is connected to a TV (see page 16. www.kodak.com/go/support 5 Audio can be heard when the video is played on a computer or when the camera is captured during video recording. While a picture/video is displayed, you take a picture/video, the LCD briefly displays the picture or the first frame of a video.

Extended user guide
Page 12
See page 10.) Purchase extra batteries for your special event www.kodak.com/go /support NOTE: You may notice decreased image quality when using digital zoom. 6 www.kodak.com/go /c122accessories Using the digital zoom 1 Use the LCD to frame your attention. (If you're viewing shortcuts, the battery level is always displayed. The zoom slider...
See page 10.) Purchase extra batteries for your special event www.kodak.com/go /support NOTE: You may notice decreased image quality when using digital zoom. 6 www.kodak.com/go /c122accessories Using the digital zoom 1 Use the LCD to frame your attention. (If you're viewing shortcuts, the battery level is always displayed. The zoom slider...

Extended user guide
Page 13
Off Never www.kodak.com/go/support 7 NOTE: Not available in shadow or is "backlit" (when the light is taken. Flash button Flash modes Auto Flash fires When the lighting conditions require it. Use when the subject is in Auto mode. A preflash fires, shrinking the eye pupil, before the picture is behind the subject). Fill (Flash On) Red-eye Reduction Preflash Every time you take a picture, regardless of the lighting conditions. Taking pictures/videos Using the flash Press the Flash button repeatedly until the LCD displays the desired flash mode.
Off Never www.kodak.com/go/support 7 NOTE: Not available in shadow or is "backlit" (when the light is taken. Flash button Flash modes Auto Flash fires When the lighting conditions require it. Use when the subject is in Auto mode. A preflash fires, shrinking the eye pupil, before the picture is behind the subject). Fill (Flash On) Red-eye Reduction Preflash Every time you take a picture, regardless of the lighting conditions. Taking pictures/videos Using the flash Press the Flash button repeatedly until the LCD displays the desired flash mode.

Extended user guide
Page 14
You can be heard when the video is played on a computer or when the camera is connected to a TV (see page 4.) Point-and-shoot simplicity when taking -it offers excellent image quality and ease of use. Audio can choose the ... surroundings, then press OK. Mode button Use this mode Auto Video Scene For General picture taking pictures in practically any situation. (See page 9.) 8 www.kodak.com/go/support Capturing video with sound. Taking pictures/videos Using different modes Press the Mode button, then until the LCD displays the mode that best suits...
You can be heard when the video is played on a computer or when the camera is connected to a TV (see page 4.) Point-and-shoot simplicity when taking -it offers excellent image quality and ease of use. Audio can choose the ... surroundings, then press OK. Mode button Use this mode Auto Video Scene For General picture taking pictures in practically any situation. (See page 9.) 8 www.kodak.com/go/support Capturing video with sound. Taking pictures/videos Using different modes Press the Mode button, then until the LCD displays the mode that best suits...

Extended user guide
Page 15
Flash and sounds are in shadow or "backlit." Bright beach scenes. www.kodak.com/go/support 9 Subjects at dusk. Action pictures of people in bright light. Reduces red eye of children in night scenes or low-light conditions. Close-ups of ... before you finish reading it, press OK. 3 Press OK to view scene mode descriptions. If the mode description turns off . For best results, place the camera on a steady surface or tripod. Action pictures. Taking pictures/videos Using Scene (SCN) modes Choose a Scene mode-for great pictures in bright light. For best...
Flash and sounds are in shadow or "backlit." Bright beach scenes. www.kodak.com/go/support 9 Subjects at dusk. Action pictures of people in bright light. Reduces red eye of children in night scenes or low-light conditions. Close-ups of ... before you finish reading it, press OK. 3 Press OK to view scene mode descriptions. If the mode description turns off . For best results, place the camera on a steady surface or tripod. Action pictures. Taking pictures/videos Using Scene (SCN) modes Choose a Scene mode-for great pictures in bright light. For best...

Extended user guide
Page 16
Shortcuts Press to choose a setting. To hide the shortcuts again, press . 2 Press to access functions like Exposure Compensation and Self-timer. (You'll see different functions in different modes.) 3 Press to show/hide shortcuts. 10 www.kodak.com/go/support The shortcuts appear. For quick access to the most popular capture and review functions: 1 Press the Info button. Taking pictures/videos Using shortcuts Your camera has a clean, uncluttered interface.
Shortcuts Press to choose a setting. To hide the shortcuts again, press . 2 Press to access functions like Exposure Compensation and Self-timer. (You'll see different functions in different modes.) 3 Press to show/hide shortcuts. 10 www.kodak.com/go/support The shortcuts appear. For quick access to the most popular capture and review functions: 1 Press the Info button. Taking pictures/videos Using shortcuts Your camera has a clean, uncluttered interface.

Extended user guide
Page 17
...first picture is taken 8 seconds later. 3 Compose the scene. You can turn on a tripod or steady surface. The camera takes the picture/pictures after a 2- For best results, place the camera on the self-timer using a shortcut (see page 10) or these steps: 1 Press the Menu button. To take a...procedure. Taking pictures/videos Using the self-timer Use the self-timer when you have time to ensure a steady Shutter button press. www.kodak.com/go/support 11 Press the Shutter button all the way down. Press to choose Self-timer, then press OK. 2 Press to choose a Self-timer...
...first picture is taken 8 seconds later. 3 Compose the scene. You can turn on a tripod or steady surface. The camera takes the picture/pictures after a 2- For best results, place the camera on the self-timer using a shortcut (see page 10) or these steps: 1 Press the Menu button. To take a...procedure. Taking pictures/videos Using the self-timer Use the self-timer when you have time to ensure a steady Shutter button press. www.kodak.com/go/support 11 Press the Shutter button all the way down. Press to choose Self-timer, then press OK. 2 Press to choose a Self-timer...
Extended user guide
Page 18
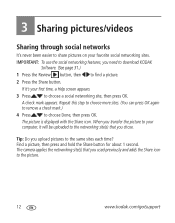
IMPORTANT: To use the social networking features, you upload pictures to the picture. 12 www.kodak.com/go/support Find a picture, then press and hold the Share button for about 1 second. If it's your computer, it will be uploaded to the networking site(s) ...download KODAK Software. (See page 31.) 1 Press the Review button, then to choose a social networking site, then press OK. Repeat this step to choose more sites. (You can press OK again to remove a check mark.) 4 Press to share pictures on your favorite social networking sites. A check mark appears. The camera applies...
IMPORTANT: To use the social networking features, you upload pictures to the picture. 12 www.kodak.com/go/support Find a picture, then press and hold the Share button for about 1 second. If it's your computer, it will be uploaded to the networking site(s) ...download KODAK Software. (See page 31.) 1 Press the Review button, then to choose a social networking site, then press OK. Repeat this step to choose more sites. (You can press OK again to remove a check mark.) 4 Press to share pictures on your favorite social networking sites. A check mark appears. The camera applies...
Extended user guide
Page 19
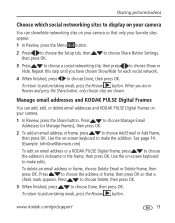
... mode, press the Review button. Sharing pictures/videos Choose which social networking sites to display on your camera You can add, edit, or delete email addresses and KODAK PULSE Digital Frames on your camera. 1 In Review, press the Share button. to choose Share Button Settings, 3 Press to choose .... To return to make the addition. Manage email addresses and KODAK PULSE Digital Frames You can show/hide networking sites on -screen keyboard to picture-taking mode, press the Review button. www.kodak.com/go/support 13 Repeat this step until you are in Review and press ...
... mode, press the Review button. Sharing pictures/videos Choose which social networking sites to display on your camera You can add, edit, or delete email addresses and KODAK PULSE Digital Frames on your camera. 1 In Review, press the Share button. to choose Share Button Settings, 3 Press to choose .... To return to make the addition. Manage email addresses and KODAK PULSE Digital Frames You can show/hide networking sites on -screen keyboard to picture-taking mode, press the Review button. www.kodak.com/go/support 13 Repeat this step until you are in Review and press ...

Extended user guide
Page 20
... Keyword (see Using the keyboard) to add a new one, then press OK. 4 Press to add keywords to choose OK, then press OK. 14 www.kodak.com/go/support Using the keyboard The keyboard appears when you need it. 1 Press to choose a letter, then press OK. 2 When finished, press to other pictures. Sharing...
... Keyword (see Using the keyboard) to add a new one, then press OK. 4 Press to add keywords to choose OK, then press OK. 14 www.kodak.com/go/support Using the keyboard The keyboard appears when you need it. 1 Press to choose a letter, then press OK. 2 When finished, press to other pictures. Sharing...

Extended user guide
Page 21
... same address, press , then press OK. When you transfer the marked pictures/videos to your computer, the software prompts you to their documentation.) IMPORTANT: Your camera offers a built-in Help system. Press to find a picture. 2 Press the Share button. 3 Press to more than one address, repeat this step. See page 35... emailing It's simple to mark pictures/videos so that they're ready to picture-taking mode, press the Review button. To return to email using KODAK Software. www.kodak.com/go/support 15
... same address, press , then press OK. When you transfer the marked pictures/videos to your computer, the software prompts you to their documentation.) IMPORTANT: Your camera offers a built-in Help system. Press to find a picture. 2 Press the Share button. 3 Press to more than one address, repeat this step. See page 35... emailing It's simple to mark pictures/videos so that they're ready to picture-taking mode, press the Review button. To return to email using KODAK Software. www.kodak.com/go/support 15

Extended user guide
Page 22
press again for 4X. ■ Press to pause/resume. NOTE: To delete protected pictures/videos, remove protection before deleting. (See page 17.) 16 www.kodak.com/go/support During playback: ■ Press to play a video. Press OK to reverse at 2X speed; press again for previous/next picture/video. 3 Press the... pictures/videos 1 Press the Review button. 2 Press for 4X. NOTE: Audio can be heard when the video is played on a computer or when the camera is connected to a TV (see page 18.) Playing a video Playback speed 4X 2X 1X 2X 4X Press OK to play at 2X speed; 4 Reviewing ...
press again for 4X. ■ Press to pause/resume. NOTE: To delete protected pictures/videos, remove protection before deleting. (See page 17.) 16 www.kodak.com/go/support During playback: ■ Press to play a video. Press OK to reverse at 2X speed; press again for previous/next picture/video. 3 Press the... pictures/videos 1 Press the Review button. 2 Press for 4X. NOTE: Audio can be heard when the video is played on a computer or when the camera is connected to a TV (see page 18.) Playing a video Playback speed 4X 2X 1X 2X 4X Press OK to play at 2X speed; 4 Reviewing ...


