
User Manual
Page 7
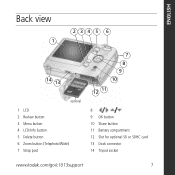
ENGLISH Back view 1 234 5 6 14 13 optional 1 LCD 2 Review button 3 Menu button 4 LCD/Info button 5 Delete button 6 Zoom button (Telephoto/Wide) 7 Strap post 7 8 9 10 12 11 8 9 OK button 10 Share button 11 Battery compartment 12 Slot for optional SD or SDHC card 13 Dock connector 14 Tripod socket www.kodak.com/go/c1013support 7
ENGLISH Back view 1 234 5 6 14 13 optional 1 LCD 2 Review button 3 Menu button 4 LCD/Info button 5 Delete button 6 Zoom button (Telephoto/Wide) 7 Strap post 7 8 9 10 12 11 8 9 OK button 10 Share button 11 Battery compartment 12 Slot for optional SD or SDHC card 13 Dock connector 14 Tripod socket www.kodak.com/go/c1013support 7

User Manual
Page 9
... your subject. W T D To use the auto focus framing marks. www.kodak.com/go/c1013support 9 Zoom indicator Optical zoom range Digital zoom range I If you are using digital zoom. NOTE: You may notice decreased image quality when using no zoom (1X... need to move further from your subject. Doing more with your camera Using the zoom button Use optical zoom to get a focused picture every time, remember: I Always use digital zoom in any Still mode: Press T (Telephoto) to zoom out...28 in. (70 cm) to your subject. 2 Press T (Telephoto) to zoom in . (10 x 15 cm) print.
... your subject. W T D To use the auto focus framing marks. www.kodak.com/go/c1013support 9 Zoom indicator Optical zoom range Digital zoom range I If you are using digital zoom. NOTE: You may notice decreased image quality when using no zoom (1X... need to move further from your subject. Doing more with your camera Using the zoom button Use optical zoom to get a focused picture every time, remember: I Always use digital zoom in any Still mode: Press T (Telephoto) to zoom out...28 in. (70 cm) to your subject. 2 Press T (Telephoto) to zoom in . (10 x 15 cm) print.

User Manual
Page 10
... conditions require it. Red-eye The flash fires twice-once, then again when the picture is behind the subject). Off Never. 10 www.kodak.com/go/easysharecenter Doing more with your camera Using the flash button Use the flash when you take pictures at night, indoors, or outdoors in heavy shadows. Press the...
... conditions require it. Red-eye The flash fires twice-once, then again when the picture is behind the subject). Off Never. 10 www.kodak.com/go/easysharecenter Doing more with your camera Using the flash button Use the flash when you take pictures at night, indoors, or outdoors in heavy shadows. Press the...
User Manual
Page 4
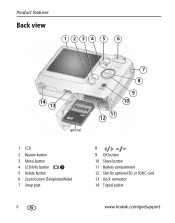
Product features Back view 1 234 5 6 14 13 optional 7 8 9 10 11 12 1 LCD 2 Review button 3 Menu button 4 LCD/Info button 5 Delete button 6 Zoom button (Telephoto/Wide) 7 Strap post 8 9 OK button 10 Share button 11 Battery compartment 12 Slot for optional SD or SDHC card 13 Dock connector 14 Tripod socket ii www.kodak.com/go/support
Product features Back view 1 234 5 6 14 13 optional 7 8 9 10 11 12 1 LCD 2 Review button 3 Menu button 4 LCD/Info button 5 Delete button 6 Zoom button (Telephoto/Wide) 7 Strap post 8 9 OK button 10 Share button 11 Battery compartment 12 Slot for optional SD or SDHC card 13 Dock connector 14 Tripod socket ii www.kodak.com/go/support
User Manual
Page 5
...an SD or SDHC card 3 2 Taking pictures/videos 4 Taking a picture 4 Taking a video 5 Using optical zoom 6 Using the flash 7 Using different picture-taking modes 8 Using camera Help 10 Understanding the picture-taking icons 11 3 Working with pictures/videos 12 Reviewing pictures/videos 12 Deleting pictures/videos 14 Using the menu button in review... 19 Viewing pictures by date, Favorites, or other tag 20 Selecting multiple pictures/videos 21 Understanding the review icons 22 4 Doing more with your camera 24 Changing picture-taking settings 24 www.kodak.com/go/support iii
...an SD or SDHC card 3 2 Taking pictures/videos 4 Taking a picture 4 Taking a video 5 Using optical zoom 6 Using the flash 7 Using different picture-taking modes 8 Using camera Help 10 Understanding the picture-taking icons 11 3 Working with pictures/videos 12 Reviewing pictures/videos 12 Deleting pictures/videos 14 Using the menu button in review... 19 Viewing pictures by date, Favorites, or other tag 20 Selecting multiple pictures/videos 21 Understanding the review icons 22 4 Doing more with your camera 24 Changing picture-taking settings 24 www.kodak.com/go/support iii

User Manual
Page 10
Reviewing the picture just taken After you take a picture or video, the LCD displays a quickview for approximately 10 seconds. (To exit the quickview sooner, press the Shutter button halfway.) The picture is saved unless you press the Delete button. When the framing marks turn green, press the Shutter button completely down. Delete Play a video. To review pictures/videos anytime, see page 12. 4 www.kodak.com/go/support 2 Taking pictures/videos Taking a picture 1 2 Framing marks Press the Shutter button halfway to focus and set exposure.
Reviewing the picture just taken After you take a picture or video, the LCD displays a quickview for approximately 10 seconds. (To exit the quickview sooner, press the Shutter button halfway.) The picture is saved unless you press the Delete button. When the framing marks turn green, press the Shutter button completely down. Delete Play a video. To review pictures/videos anytime, see page 12. 4 www.kodak.com/go/support 2 Taking pictures/videos Taking a picture 1 2 Framing marks Press the Shutter button halfway to focus and set exposure.

User Manual
Page 12
...when the picture quality reaches the limit for an acceptable 4 x 6-in. (10 x 15 cm) print. 6 www.kodak.com/go/support Release the button, then press it again. 2 Take the picture. Optical zoom range Digital zoom range I If you are using digital zoom. W TD I As you zoom, you can be as close as.... 2 Press Telephoto (T) to zoom in. Press Wide Angle (W) to move further from your subject. I Always use the auto focus framing marks (see Camera specifications, page 46. NOTE: You may notice decreased image quality when using no zoom (1X, wide angle), you need to zoom out.
...when the picture quality reaches the limit for an acceptable 4 x 6-in. (10 x 15 cm) print. 6 www.kodak.com/go/support Release the button, then press it again. 2 Take the picture. Optical zoom range Digital zoom range I If you are using digital zoom. W TD I As you zoom, you can be as close as.... 2 Press Telephoto (T) to zoom in. Press Wide Angle (W) to move further from your subject. I Always use the auto focus framing marks (see Camera specifications, page 46. NOTE: You may notice decreased image quality when using no zoom (1X, wide angle), you need to zoom out.

User Manual
Page 13
... again when the picture is behind the subject). Press the button repeatedly to -subject distance Zoom position Wide angle Telephoto Flash distance 0.6-3.2 m (2-10.5 ft) @ ISO 160 0.6-1.8 m (2-5.9 ft) @ ISO 160 Flash modes Flash fires Auto Flash When the lighting conditions require it. In low light..., hold the camera steady or use a tripod. Taking pictures/videos Using the flash Use the flash when you take pictures at night, indoors, or outdoors in heavy shadows. www.kodak.com/go/support 7 Flash-to scroll through flash modes ...
... again when the picture is behind the subject). Press the button repeatedly to -subject distance Zoom position Wide angle Telephoto Flash distance 0.6-3.2 m (2-10.5 ft) @ ISO 160 0.6-1.8 m (2-5.9 ft) @ ISO 160 Flash modes Flash fires Auto Flash When the lighting conditions require it. In low light..., hold the camera steady or use a tripod. Taking pictures/videos Using the flash Use the flash when you take pictures at night, indoors, or outdoors in heavy shadows. www.kodak.com/go/support 7 Flash-to scroll through flash modes ...

User Manual
Page 16
Turn on/off Help Scroll up/down 10 www.kodak.com/go/support Taking pictures/videos Using camera Help To better understand each menu option, use camera Help. Highlight a menu choice, then press the button.
Turn on/off Help Scroll up/down 10 www.kodak.com/go/support Taking pictures/videos Using camera Help To better understand each menu option, use camera Help. Highlight a menu choice, then press the button.

User Manual
Page 24
... Use Slide Show to highlight Begin Show, then press OK. To interrupt the Slide Show, press OK. 18 www.kodak.com/go/support to exit the menu. Auto options: The camera includes the first and last frames, then 2, 7, or 14 equally spaced frames. Working with pictures/videos Making a..., then press OK. Manual options: You choose the first and last frames; I Press the Menu button to find a 2 Press the Menu button. the camera chooses 2, 7, or 14 equally spaced frames. Each picture/video is displayed once. Press to highlight Video 4-, 9-, or Edit Video, then press OK. 16...
... Use Slide Show to highlight Begin Show, then press OK. To interrupt the Slide Show, press OK. 18 www.kodak.com/go/support to exit the menu. Auto options: The camera includes the first and last frames, then 2, 7, or 14 equally spaced frames. Working with pictures/videos Making a..., then press OK. Manual options: You choose the first and last frames; I Press the Menu button to find a 2 Press the Menu button. the camera chooses 2, 7, or 14 equally spaced frames. Each picture/video is displayed once. Press to highlight Video 4-, 9-, or Edit Video, then press OK. 16...

User Manual
Page 29
White-Printability is displayed during quickview and review. Working with pictures/videos Understanding blur warning icons A picture blur warning icon is still being determined. Green-Picture is sharp enough for an acceptable 4 x 6-inch (10 x 15 cm) print or sharpness is not sharp enough for an acceptable 4 x 6-inch (10 x 15 cm) print. Yellow-Picture may be sharp enough for an acceptable 4 x 6-inch (10 x 15 cm) print. Red-Picture is not determined. www.kodak.com/go/support 23
White-Printability is displayed during quickview and review. Working with pictures/videos Understanding blur warning icons A picture blur warning icon is still being determined. Green-Picture is sharp enough for an acceptable 4 x 6-inch (10 x 15 cm) print or sharpness is not sharp enough for an acceptable 4 x 6-inch (10 x 15 cm) print. Yellow-Picture may be sharp enough for an acceptable 4 x 6-inch (10 x 15 cm) print. Red-Picture is not determined. www.kodak.com/go/support 23
User Manual
Page 30
... time to access settings Self-timer 10 seconds-so you change them; Press Menu, Options , and OK to get the best results from your camera. 1 Press the Menu button. ...2 Press to exit the menu. I Press the Menu button to highlight a setting, then press OK. 3 Choose an option, then press OK. NOTE: To better understand each menu option, use camera... Help. others, until you change modes or turn off the camera. 4 Doing more with your camera Changing picture-taking settings You can change settings...
... time to access settings Self-timer 10 seconds-so you change them; Press Menu, Options , and OK to get the best results from your camera. 1 Press the Menu button. ...2 Press to exit the menu. I Press the Menu button to highlight a setting, then press OK. 3 Choose an option, then press OK. NOTE: To better understand each menu option, use camera... Help. others, until you change modes or turn off the camera. 4 Doing more with your camera Changing picture-taking settings You can change settings...

User Manual
Page 31
... fluorescent lighting without flash. Daylight-for pictures of people), the camera attempts to access settings Picture Size Choose a picture resolution. Off www.kodak.com/go / printsizes 10.1 MP 8.9 MP (3:2) 7.6 MP (16:9) 5.0 MP 3.1 MP Pictures at the highest resolution, largest file size Printing on EasyShare printer docks and photo printers HDTV format in high resolution...
... fluorescent lighting without flash. Daylight-for pictures of people), the camera attempts to access settings Picture Size Choose a picture resolution. Off www.kodak.com/go / printsizes 10.1 MP 8.9 MP (3:2) 7.6 MP (16:9) 5.0 MP 3.1 MP Pictures at the highest resolution, largest file size Printing on EasyShare printer docks and photo printers HDTV format in high resolution...
User Manual
Page 34
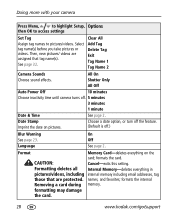
... highlight Setup, Options then OK to access settings Set Tag Assign tag names to pictures/videos. Shutter Only All Off Auto Power Off 10 minutes Choose inactivity time until camera turns off .) Blur Warning See page 23. Memory Card-deletes everything in internal memory including email addresses, tag names, and favorites;...Removing a card during formatting may damage the card. Language On Off See page 2. Internal Memory-deletes everything on pictures. formats the internal memory. 28 www.kodak.com/go/support Then, new pictures/ videos are assigned that are protected.
... highlight Setup, Options then OK to access settings Set Tag Assign tag names to pictures/videos. Shutter Only All Off Auto Power Off 10 minutes Choose inactivity time until camera turns off .) Blur Warning See page 23. Memory Card-deletes everything in internal memory including email addresses, tag names, and favorites;...Removing a card during formatting may damage the card. Language On Off See page 2. Internal Memory-deletes everything on pictures. formats the internal memory. 28 www.kodak.com/go/support Then, new pictures/ videos are assigned that are protected.
User Manual
Page 37
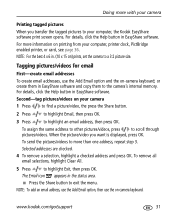
... best 4 x 6 in the status area. The Email icon appears in . (10 x 15 cm) prints, set the camera to your computer, the Kodak EasyShare software print screen opens. I Press the Share button to scroll through pictures/videos. Second-tag pictures/videos on printing from your camera 1 Press to find a picture/video, the press the Share button...
... best 4 x 6 in the status area. The Email icon appears in . (10 x 15 cm) prints, set the camera to your computer, the Kodak EasyShare software print screen opens. I Press the Share button to scroll through pictures/videos. Second-tag pictures/videos on printing from your camera 1 Press to find a picture/video, the press the Share button...
User Manual
Page 46
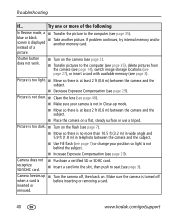
...page 27), or insert a card with available memory (see page 29). I Purchase a certified SD or SDHC card. Camera does not I Turn on . recognize SD/SDHC card. Try one or more than 10.5 ft (3.2 m) in wide angle and 5.9 ft (1.8 m) in Close-up I Make sure your position so light is... Clean the lens (see page 7). Troubleshooting If... Shutter button does not work. Make sure the camera is turned off , then back on the flash (see page 48). inserted or removed. 40 www.kodak.com/go/support I Take another memory card. blue or black screen is too light. If problem...
...page 27), or insert a card with available memory (see page 29). I Purchase a certified SD or SDHC card. Camera does not I Turn on . recognize SD/SDHC card. Try one or more than 10.5 ft (3.2 m) in wide angle and 5.9 ft (1.8 m) in Close-up I Make sure your position so light is... Clean the lens (see page 7). Troubleshooting If... Shutter button does not work. Make sure the camera is turned off , then back on the flash (see page 48). inserted or removed. 40 www.kodak.com/go/support I Take another memory card. blue or black screen is too light. If problem...
User Manual
Page 49
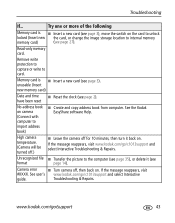
... is I Insert a new card (see page 3), move the switch on . If the message reappears, visit #XXXX. See the Kodak EasyShare software Help. Camera error I Reset the clock (see format page 14). Remove write protection to capture or write to internal memory memory card) (see page... 3). unusable (Insert new memory card) Date and time I Turn camera off for 10 minutes, then turn it (see page 2). High camera temperature. (Camera will be turned off.) I Create and copy address book from computer. Troubleshooting If... Unrecognized file I ...
... is I Insert a new card (see page 3), move the switch on . If the message reappears, visit #XXXX. See the Kodak EasyShare software Help. Camera error I Reset the clock (see format page 14). Remove write protection to capture or write to internal memory memory card) (see page... 3). unusable (Insert new memory card) Date and time I Turn camera off for 10 minutes, then turn it (see page 2). High camera temperature. (Camera will be turned off.) I Create and copy address book from computer. Troubleshooting If... Unrecognized file I ...

User Manual
Page 52
...: 100%. 8 Appendix Camera specifications For more specifications, visit www.kodak.com/go /support CCD, 4:3 aspect ratio; 10.3 MP (total), 10.3 MP (effective) Picture sizes- Taking lens-3X optical zoom aspheric lens f/2.7-f/4.8; 34 mm-102 mm (35 mm equivalent) Digital zoom-5.0X continuous advanced digital zoom Combined zoom-15X 46 www.kodak.com/go /c1013support. C1013/CD1013 10.1 MP: 3664...
...: 100%. 8 Appendix Camera specifications For more specifications, visit www.kodak.com/go /support CCD, 4:3 aspect ratio; 10.3 MP (total), 10.3 MP (effective) Picture sizes- Taking lens-3X optical zoom aspheric lens f/2.7-f/4.8; 34 mm-102 mm (35 mm equivalent) Digital zoom-5.0X continuous advanced digital zoom Combined zoom-15X 46 www.kodak.com/go /c1013support. C1013/CD1013 10.1 MP: 3664...
User Manual
Page 53
...: Wide: 0.6-3.2 m (2-10.5 ft.); G.711 (audio) Image storage-Optional SD or SDHC card the SD Card Association.) . (The SD logo is a trademark of Internal storage capacity-16 MB internal memory/11 MB available for image storage (1 MB equals one million bytes) Power-(2) Kodak oxy-alkaline digital camera batteries AA; (2) Kodak Ni-MH rechargeable digital camera batteries AA; (1) Kodak Ni...
...: Wide: 0.6-3.2 m (2-10.5 ft.); G.711 (audio) Image storage-Optional SD or SDHC card the SD Card Association.) . (The SD logo is a trademark of Internal storage capacity-16 MB internal memory/11 MB available for image storage (1 MB equals one million bytes) Power-(2) Kodak oxy-alkaline digital camera batteries AA; (2) Kodak Ni-MH rechargeable digital camera batteries AA; (1) Kodak Ni...
User Manual
Page 54
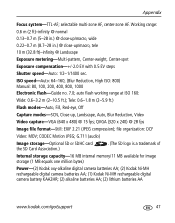
...the Kodak Web site at least 24 hours before using the camera. I Blow gently on the lens or LCD to remove dust and dirt. I Service agreements may be available in .) @ power off Weight-137 g (4.8 oz) without battery or card Care and maintenance I For digital camera disposal...USB cable model U-8, EasyShare camera dock or printer dock PictBridge support-Yes Self Timer-2 seconds, 10 seconds, or 2-shot White balance-Auto, Daylight, Tungsten, Fluorescent, Open Shade Auto power off-Selectable 1, 3, 5, 10 minutes Microphone-Yes (for at www.kodak.com/go/c1013support. 48 www.kodak.com/go/support ...
...the Kodak Web site at least 24 hours before using the camera. I Blow gently on the lens or LCD to remove dust and dirt. I Service agreements may be available in .) @ power off Weight-137 g (4.8 oz) without battery or card Care and maintenance I For digital camera disposal...USB cable model U-8, EasyShare camera dock or printer dock PictBridge support-Yes Self Timer-2 seconds, 10 seconds, or 2-shot White balance-Auto, Daylight, Tungsten, Fluorescent, Open Shade Auto power off-Selectable 1, 3, 5, 10 minutes Microphone-Yes (for at www.kodak.com/go/c1013support. 48 www.kodak.com/go/support ...


