Use & Care Guide
Page 3
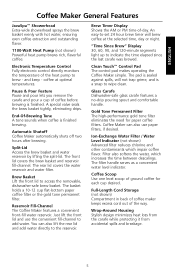
... Locations 16 How to Arrange for Service Outside these Locations 16 How to Arrange for Great Taste 11 CARE AND CLEANING Cleaning the Coffee Maker 12 Descaling the Coffee Maker 12 Troubleshooting ...13 WARRANTY AND SERVICE INFORMATION KitchenAid® Coffee Maker Warranty 14 Hassle-Free Replacement Warranty - 50 United States and District of Columbia ...........15 Hassle-Free Replacement Warranty...
... Locations 16 How to Arrange for Service Outside these Locations 16 How to Arrange for Great Taste 11 CARE AND CLEANING Cleaning the Coffee Maker 12 Descaling the Coffee Maker 12 Troubleshooting ...13 WARRANTY AND SERVICE INFORMATION KitchenAid® Coffee Maker Warranty 14 Hassle-Free Replacement Warranty - 50 United States and District of Columbia ...........15 Hassle-Free Replacement Warranty...
Use & Care Guide
Page 4
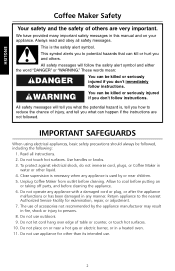
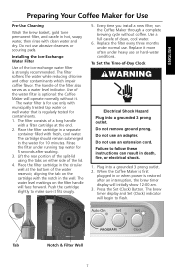
...the following: 1. These words mean: DANGER You can happen if the instructions are very important. Use handles or knobs. 3. Unplug Coffee Maker from outlet before cleaning the appliance. 6. Do not let cord hang over edge of accessories not recommended by or near a hot gas or electric burner, ...parts, and before cleaning. Allow to potential hazards that can be killed or seriously injured if you and others are not followed. This is the safety alert symbol. This symbol alerts you to cool before putting on or near children. 5. ENGLISH Coffee Maker Safety Your safety ...
...the following: 1. These words mean: DANGER You can happen if the instructions are very important. Use handles or knobs. 3. Unplug Coffee Maker from outlet before cleaning the appliance. 6. Do not let cord hang over edge of accessories not recommended by or near a hot gas or electric burner, ...parts, and before cleaning. Allow to potential hazards that can be killed or seriously injured if you and others are not followed. This is the safety alert symbol. This symbol alerts you to cool before putting on or near children. 5. ENGLISH Coffee Maker Safety Your safety ...
Use & Care Guide
Page 5
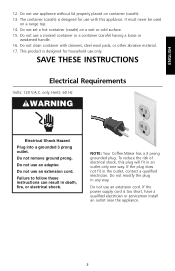
...qualified electrician. To reduce the risk of electrical shock, this appliance. If the plug does not fit in death, fire, or electrical shock. Do not clean container with this plug will fit in any way. only. It must never be used on a wet or cold surface. 15. This product is ...plug in an outlet only one way. Do not set a hot container (carafe) on a range top. 14. Do not use an extension cord. NOTE: Your Coffee Maker has a 3 prong grounded plug. The container (carafe) is too short, have a qualified electrician or serviceman install an outlet near the appliance. 3 Do not use...
...qualified electrician. To reduce the risk of electrical shock, this appliance. If the plug does not fit in death, fire, or electrical shock. Do not clean container with this plug will fit in any way. only. It must never be used on a wet or cold surface. 15. This product is ...plug in an outlet only one way. Do not set a hot container (carafe) on a range top. 14. Do not use an extension cord. NOTE: Your Coffee Maker has a 3 prong grounded plug. The container (carafe) is too short, have a qualified electrician or serviceman install an outlet near the appliance. 3 Do not use...
Use & Care Guide
Page 6
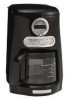
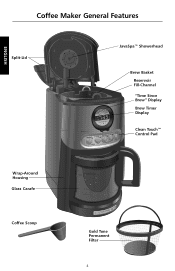
ENGLISH Coffee Maker General Features Split-Lid JavaSpa™ Showerhead Brew Basket Reservoir Fill-Channel "Time Since Brew" Display Brew Timer Display Clean Touch™ Control Pad Wrap-Around Housing Glass Carafe Coffee Scoop Gold Tone Permanent Filter 4
ENGLISH Coffee Maker General Features Split-Lid JavaSpa™ Showerhead Brew Basket Reservoir Fill-Channel "Time Since Brew" Display Brew Timer Display Clean Touch™ Control Pad Wrap-Around Housing Glass Carafe Coffee Scoop Gold Tone Permanent Filter 4
Use & Care Guide
Page 7
...light up to the reservoir. Coffee Scoop Use one level scoop of ground coffee for paper coffee filters. Pause & Pour Feature Pause and pour lets you remove the carafe and pour a cup of the heat pump to wipe clean. Reservoir Fill-Channel The Coffee Maker features a convenient front-fill ... to access the removable, dishwasher-safe brew basket. Clean Touch™ Control Pad The control pad makes operating the Coffee Maker simple. Glass Carafe Dishwasher-safe glass carafe features a no-drip pouring spout and comfortable handle. Coffee Maker can also lift the rear lid and add water ...
...light up to the reservoir. Coffee Scoop Use one level scoop of ground coffee for paper coffee filters. Pause & Pour Feature Pause and pour lets you remove the carafe and pour a cup of the heat pump to wipe clean. Reservoir Fill-Channel The Coffee Maker features a convenient front-fill ... to access the removable, dishwasher-safe brew basket. Clean Touch™ Control Pad The control pad makes operating the Coffee Maker simple. Glass Carafe Dishwasher-safe glass carafe features a no-drip pouring spout and comfortable handle. Coffee Maker can also lift the rear lid and add water ...
Use & Care Guide
Page 8
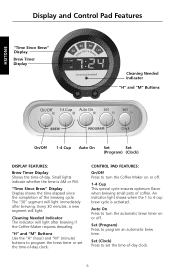
... program the brew timer or set the time-of coffee. Set (Program) Press to turn the Coffee Maker on or off . 1-4 Cup This special cycle ensures optimum flavor when brewing small pots of -day clock. 6 Auto On Press to program an automatic brew time. Cleaning Needed Indicator The indicator will light after brewing. ENGLISH...
... program the brew timer or set the time-of coffee. Set (Program) Press to turn the Coffee Maker on or off . 1-4 Cup This special cycle ensures optimum flavor when brewing small pots of -day clock. 6 Auto On Press to program an automatic brew time. Cleaning Needed Indicator The indicator will light after brewing. ENGLISH...
Use & Care Guide
Page 9
... face forward. Push the cartridge slightly to follow these instructions can result in a separate container filled with clean water and dry. Every time you install a new filter, run the Coffee Maker through a complete brewing cycle without it. Use of the split-lid using the tabs on the filter handle will operate normally without...
... face forward. Push the cartridge slightly to follow these instructions can result in a separate container filled with clean water and dry. Every time you install a new filter, run the Coffee Maker through a complete brewing cycle without it. Use of the split-lid using the tabs on the filter handle will operate normally without...
Use & Care Guide
Page 12
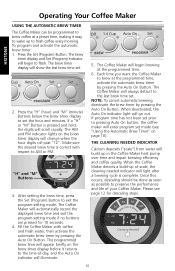
...timer display will always default to the last brew time set . 2. The Coffee Maker will begin brewing at the programmed time, activate the automatic brew timer by pressing the Auto On Button. THE CLEANING NEEDED INDICATOR Calcium deposits ("scale") from water will light after a brewing cycle... is pressed and held, the digits will go out. When the Coffee Maker detects a build-up of scale, the cleaning needed indicator will build up to fresh coffee every morning. To program and activate the automatic brew timer: 1. Press the "H" (hour) and "M"...
...timer display will always default to the last brew time set . 2. The Coffee Maker will begin brewing at the programmed time, activate the automatic brew timer by pressing the Auto On Button. THE CLEANING NEEDED INDICATOR Calcium deposits ("scale") from water will light after a brewing cycle... is pressed and held, the digits will go out. When the Coffee Maker detects a build-up of scale, the cleaning needed indicator will build up to fresh coffee every morning. To program and activate the automatic brew timer: 1. Press the "H" (hour) and "M"...
Use & Care Guide
Page 13
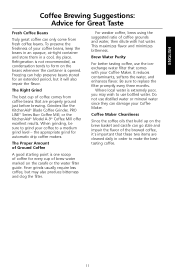
... make the besttasting coffee. 11 For weaker coffee, brew using the suggested ratio of coffee grounds and water, then dilute with your Coffee Maker. The Right Grind The best cup of coffee comes from fresh coffee beans. Grinders like the KitchenAid® Blade Coffee Grinder, PRO LINE® Series Burr Coffee Mill, or the KitchenAid® Model A-9® Coffee Mill offer excellent...
... make the besttasting coffee. 11 For weaker coffee, brew using the suggested ratio of coffee grounds and water, then dilute with your Coffee Maker. The Right Grind The best cup of coffee comes from fresh coffee beans. Grinders like the KitchenAid® Blade Coffee Grinder, PRO LINE® Series Burr Coffee Mill, or the KitchenAid® Model A-9® Coffee Mill offer excellent...
Use & Care Guide
Page 14
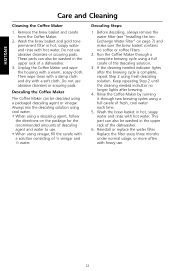
...cloth and dry with hot water. Run the Coffee Maker through two brewing cycles using a full carafe of 1⁄2 vinegar and 1⁄2 water. If the cleaning needed indicator no coffee or coffee filters. 2. Keep repeating Step 2 until the cleaning needed indicator lights after brewing. 4. Replace the... usage, or more often with a solution consisting of fresh, cool water each time. 5. ENGLISH Care and Cleaning Cleaning the Coffee Maker 1. Descaling the Coffee Maker The Coffee Maker can also be washed in hot, soapy water and rinse with a soft cloth. Wash the brew basket in...
...cloth and dry with hot water. Run the Coffee Maker through two brewing cycles using a full carafe of 1⁄2 vinegar and 1⁄2 water. If the cleaning needed indicator no coffee or coffee filters. 2. Keep repeating Step 2 until the cleaning needed indicator lights after brewing. 4. Replace the... usage, or more often with a solution consisting of fresh, cool water each time. 5. ENGLISH Care and Cleaning Cleaning the Coffee Maker 1. Descaling the Coffee Maker The Coffee Maker can also be washed in hot, soapy water and rinse with a soft cloth. Wash the brew basket in...


