Use & Care Guide
Page 3
... Proof of Purchase & Product Registration Inside Front Cover Coffee Maker Safety...2 Important Safeguards ...2 Electrical Requirements 3 FEATURES AND OPERATION Coffee Maker General Features 4 Display and Control Pad Features 6 Preparing Your Coffee Maker for Use 7 Pre-Use Cleaning ...7 Installing the ... The Cleaning Needed Indicator 10 Coffee Brewing Suggestions: Advice for Great Taste 11 CARE AND CLEANING Cleaning the Coffee Maker 12 Descaling the Coffee Maker 12 Troubleshooting ...13 WARRANTY AND SERVICE INFORMATION KitchenAid® Coffee Maker Warranty 14 Hassle-Free Replacement...
... Proof of Purchase & Product Registration Inside Front Cover Coffee Maker Safety...2 Important Safeguards ...2 Electrical Requirements 3 FEATURES AND OPERATION Coffee Maker General Features 4 Display and Control Pad Features 6 Preparing Your Coffee Maker for Use 7 Pre-Use Cleaning ...7 Installing the ... The Cleaning Needed Indicator 10 Coffee Brewing Suggestions: Advice for Great Taste 11 CARE AND CLEANING Cleaning the Coffee Maker 12 Descaling the Coffee Maker 12 Troubleshooting ...13 WARRANTY AND SERVICE INFORMATION KitchenAid® Coffee Maker Warranty 14 Hassle-Free Replacement...
Use & Care Guide
Page 4
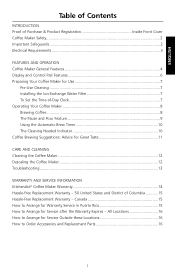
...not use . 2 Do not place on or near children. 5. Do not use appliance for examination, repair, or adjustment. 7. ENGLISH Coffee Maker Safety Your safety and the safety of injury, and tell you what the potential hazard is, tell you to persons. 8. WARNING You ... should always be followed, including the following: 1. Read all safety messages. Return appliance to cool before putting on your appliance. Unplug Coffee Maker from outlet before cleaning the appliance. 6. Always read and obey all instructions. 2. Use handles or knobs. 3. Allow to the nearest...
...not use . 2 Do not place on or near children. 5. Do not use appliance for examination, repair, or adjustment. 7. ENGLISH Coffee Maker Safety Your safety and the safety of injury, and tell you what the potential hazard is, tell you to persons. 8. WARNING You ... should always be followed, including the following: 1. Read all safety messages. Return appliance to cool before putting on your appliance. Unplug Coffee Maker from outlet before cleaning the appliance. 6. Always read and obey all instructions. 2. Use handles or knobs. 3. Allow to the nearest...
Use & Care Guide
Page 5
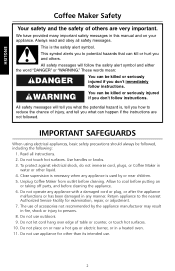
Do not use an extension cord. Do not use an adapter. NOTE: Your Coffee Maker has a 3 prong grounded plug. Do not use a cracked container or a container (carafe) having a loose or weakened handle. 16. Do not set a hot container (carafe) on a ...
Do not use an extension cord. Do not use an adapter. NOTE: Your Coffee Maker has a 3 prong grounded plug. Do not use a cracked container or a container (carafe) having a loose or weakened handle. 16. Do not set a hot container (carafe) on a ...
Use & Care Guide
Page 6
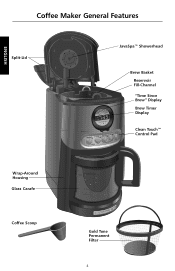
ENGLISH Coffee Maker General Features Split-Lid JavaSpa™ Showerhead Brew Basket Reservoir Fill-Channel "Time Since Brew" Display Brew Timer Display Clean Touch™ Control Pad Wrap-Around Housing Glass Carafe Coffee Scoop Gold Tone Permanent Filter 4
ENGLISH Coffee Maker General Features Split-Lid JavaSpa™ Showerhead Brew Basket Reservoir Fill-Channel "Time Since Brew" Display Brew Timer Display Clean Touch™ Control Pad Wrap-Around Housing Glass Carafe Coffee Scoop Gold Tone Permanent Filter 4
Use & Care Guide
Page 7
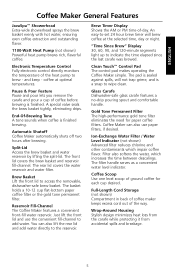
... comfortable handle. The filter handle serves as a convenient water level indicator. Coffee Scoop Use one level scoop of the way. Full-Length Cord Storage (not shown) Compartment in back of coffee maker keeps excess cord out of ground coffee for paper coffee filters. ENGLISH Coffee Maker General Features JavaSpa™ Showerhead Extra-wide showerhead sprays the brew...
... comfortable handle. The filter handle serves as a convenient water level indicator. Coffee Scoop Use one level scoop of the way. Full-Length Cord Storage (not shown) Compartment in back of coffee maker keeps excess cord out of ground coffee for paper coffee filters. ENGLISH Coffee Maker General Features JavaSpa™ Showerhead Extra-wide showerhead sprays the brew...
Use & Care Guide
Page 8
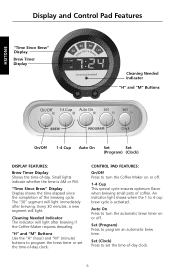
...Set (Clock) Press to program the brew timer or set the time-of -day clock. The "30" segment will light immediately after brewing if the Coffee Maker requires descaling. "H" and "M" Buttons Use the "H" (hour) and "M" (minute) buttons to set the time-of -day clock. 6 An indicator ...to turn the automatic brew timer on or off . Set (Program) Press to turn the Coffee Maker on or off . 1-4 Cup This special cycle ensures optimum flavor when brewing small pots of coffee. ENGLISH Display and Control Pad Features "Time Since Brew" Display Brew Timer Display Cleaning Needed Indicator...
...Set (Clock) Press to program the brew timer or set the time-of -day clock. The "30" segment will light immediately after brewing if the Coffee Maker requires descaling. "H" and "M" Buttons Use the "H" (hour) and "M" (minute) buttons to set the time-of -day clock. 6 An indicator ...to turn the automatic brew timer on or off . Set (Program) Press to turn the Coffee Maker on or off . 1-4 Cup This special cycle ensures optimum flavor when brewing small pots of coffee. ENGLISH Display and Control Pad Features "Time Since Brew" Display Brew Timer Display Cleaning Needed Indicator...
Use & Care Guide
Page 9
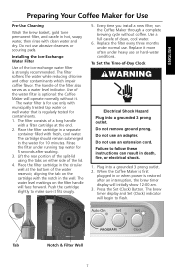
...1. Failure to make sure it . Press the Set (Clock) Button. The filter consists of the ion-exchange water filter is optional: the Coffee Maker will begin to flash. Do not remove ground prong. Place the filter cartridge in the circular well at the end. 2. Use a full ... grounded 3 prong outlet. 2. Place the filter cartridge in the water for 10 minutes. Every time you install a new filter, run the Coffee Maker through a complete brewing cycle without it fits snugly. 5. Replace the filter every three months under heavy use abrasive cleansers or scouring pads. To ...
...1. Failure to make sure it . Press the Set (Clock) Button. The filter consists of the ion-exchange water filter is optional: the Coffee Maker will begin to flash. Do not remove ground prong. Place the filter cartridge in the circular well at the end. 2. Use a full ... grounded 3 prong outlet. 2. Place the filter cartridge in the water for 10 minutes. Every time you install a new filter, run the Coffee Maker through a complete brewing cycle without it fits snugly. 5. Replace the filter every three months under heavy use abrasive cleansers or scouring pads. To ...
Use & Care Guide
Page 10
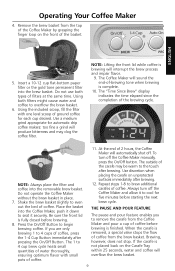
...Brew one pot of fresh, cool water and discard before brewing the first pot of the Coffee Maker. 8 A graduated scale on the tray - The digits on the Coffee Maker's carafe tray. Preparing Your Coffee Maker for 10 seconds. After filling the reservoir, place the carafe on the brew timer display ... automatically record the displayed time and exit clock-setting mode if no buttons are pressed for Use 4. The right side of water required. The Coffee Maker will go out. Press the "H" (hour) and "M" (minute) Buttons below the brew timer display to exit the clock-setting mode. Press...
...Brew one pot of fresh, cool water and discard before brewing the first pot of the Coffee Maker. 8 A graduated scale on the tray - The digits on the Coffee Maker's carafe tray. Preparing Your Coffee Maker for 10 seconds. After filling the reservoir, place the carafe on the brew timer display ... automatically record the displayed time and exit clock-setting mode if no buttons are pressed for Use 4. The right side of water required. The Coffee Maker will go out. Press the "H" (hour) and "M" (minute) Buttons below the brew timer display to exit the clock-setting mode. Press...
Use & Care Guide
Page 11
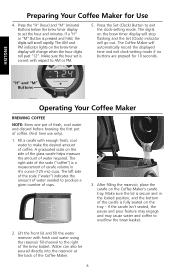
...flavor with one level scoop of ground coffee for five minutes before brewing. 8. The Coffee Maker will automatically shut off the Coffee Maker and allow it securely. Do not operate the Coffee Maker without the brew basket in place. 7. The outside of coffee from the brew basket. Use discretion ...gold tone permanent filter into the Coffee Maker, push it down to seat it to begin brewing coffee. Operating Your Coffee Maker 4. Remove the brew basket from the Coffee Maker and pour a cup of the basket. NOTE: Always place the filter and coffee into the removable brew basket. ...
...flavor with one level scoop of ground coffee for five minutes before brewing. 8. The Coffee Maker will automatically shut off the Coffee Maker and allow it securely. Do not operate the Coffee Maker without the brew basket in place. 7. The outside of coffee from the brew basket. Use discretion ...gold tone permanent filter into the Coffee Maker, push it down to seat it to begin brewing coffee. Operating Your Coffee Maker 4. Remove the brew basket from the Coffee Maker and pour a cup of the basket. NOTE: Always place the filter and coffee into the removable brew basket. ...
Use & Care Guide
Page 12
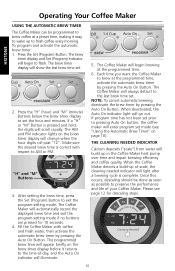
... will automatically record the displayed brew time and exit the program-setting mode if no buttons are pressed for descaling steps. 10 The Coffee Maker will change when the hour digits roll past "12". When deactivated, the Auto On indicator light will begin to flash. Once this...10). If program time has not been set . "H" and "M" Buttons 3. Press the Set (Program) Button. Operating Your Coffee Maker ENGLISH USING THE AUTOMATIC BREW TIMER The Coffee Maker can be done as soon as possible to exit the program-setting mode. The brew timer display and Set (Program) indicator...
... will automatically record the displayed brew time and exit the program-setting mode if no buttons are pressed for descaling steps. 10 The Coffee Maker will change when the hour digits roll past "12". When deactivated, the Auto On indicator light will begin to flash. Once this...10). If program time has not been set . "H" and "M" Buttons 3. Press the Set (Program) Button. Operating Your Coffee Maker ENGLISH USING THE AUTOMATIC BREW TIMER The Coffee Maker can be done as soon as possible to exit the program-setting mode. The brew timer display and Set (Program) indicator...
Use & Care Guide
Page 13
...KitchenAid® Model A-9® Coffee Mill offer excellent results. The Proper Amount of Ground Coffee A good starting point is extremely poor, you may also produce bitterness and clog the filter. It reduces contaminants, softens the water, and enhances flavor. The Right Grind The best cup of coffee for automatic drip coffee makers... of brew water marked on the carafe or the water filter guide. To preserve the freshness of coffee grounds and water, then dilute with your Coffee Maker. Be sure to form on the brew basket and carafe can help preserve beans stored for an extended...
...KitchenAid® Model A-9® Coffee Mill offer excellent results. The Proper Amount of Ground Coffee A good starting point is extremely poor, you may also produce bitterness and clog the filter. It reduces contaminants, softens the water, and enhances flavor. The Right Grind The best cup of coffee for automatic drip coffee makers... of brew water marked on the carafe or the water filter guide. To preserve the freshness of coffee grounds and water, then dilute with your Coffee Maker. Be sure to form on the brew basket and carafe can help preserve beans stored for an extended...
Use & Care Guide
Page 14
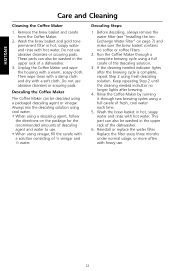
... Then wipe clean with a damp cloth and dry with hot water. Descaling the Coffee Maker The Coffee Maker can also be washed in hot, soapy water and rinse with a soft cloth. Rinse the Coffee Maker by running it through a complete brewing cycle using a full carafe of the descaling ... Step 2 until the cleaning needed indicator lights after brewing. 4. Remove the brew basket and carafe from the Coffee Maker. 2. ENGLISH Care and Cleaning Cleaning the Coffee Maker 1. Before descaling, always remove the water filter (see "Installing the IonExchange Water Filter" on page 7) and...
... Then wipe clean with a damp cloth and dry with hot water. Descaling the Coffee Maker The Coffee Maker can also be washed in hot, soapy water and rinse with a soft cloth. Rinse the Coffee Maker by running it through a complete brewing cycle using a full carafe of the descaling ... Step 2 until the cleaning needed indicator lights after brewing. 4. Remove the brew basket and carafe from the Coffee Maker. 2. ENGLISH Care and Cleaning Cleaning the Coffee Maker 1. Before descaling, always remove the water filter (see "Installing the IonExchange Water Filter" on page 7) and...
Use & Care Guide
Page 15
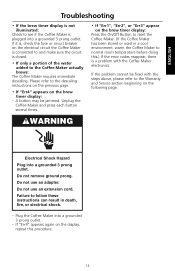
... cannot be jammed. If "Err4" appears again on the brew timer display: - A button may be fixed with the Coffee Maker electronics. Do not use an adapter. Plug the Coffee Maker into a grounded 3 prong outlet. Do not use an extension cord. Failure to follow these instructions can result in a .... • If "Err1", "Err2", or "Err3" appear on the brew timer display: Press the On/Off Button to reset the Coffee Maker. (If the Coffee Maker has been stored or used in death, fire, or electrical shock. - ENGLISH Troubleshooting • If the brew timer display is not illuminated...
... cannot be jammed. If "Err4" appears again on the brew timer display: - A button may be fixed with the Coffee Maker electronics. Do not use an adapter. Plug the Coffee Maker into a grounded 3 prong outlet. Do not use an extension cord. Failure to follow these instructions can result in a .... • If "Err1", "Err2", or "Err3" appear on the brew timer display: Press the On/Off Button to reset the Coffee Maker. (If the Coffee Maker has been stored or used in death, fire, or electrical shock. - ENGLISH Troubleshooting • If the brew timer display is not illuminated...
Use & Care Guide
Page 16
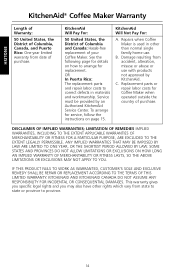
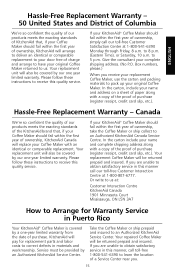
... APPLICABLE WARRANTIES OF MERCHANTABILITY OR FITNESS FOR A PARTICULAR PURPOSE, ARE EXCLUDED TO THE EXTENT LEGALLY PERMISSIBLE. See the following page for Coffee Maker when operated outside the country of your Coffee Maker. ENGLISH KitchenAid® Coffee Maker Warranty Length of Warranty: 50 United States, the District of Columbia, Canada, and Puerto Rico: One-year limited warranty from...
... APPLICABLE WARRANTIES OF MERCHANTABILITY OR FITNESS FOR A PARTICULAR PURPOSE, ARE EXCLUDED TO THE EXTENT LEGALLY PERMISSIBLE. See the following page for Coffee Maker when operated outside the country of your Coffee Maker. ENGLISH KitchenAid® Coffee Maker Warranty Length of Warranty: 50 United States, the District of Columbia, Canada, and Puerto Rico: One-year limited warranty from...
Use & Care Guide
Page 17
...these instructions to obtain satisfactory service in Puerto Rico Your KitchenAid® Coffee Maker is covered by an Authorized KitchenAid Service Center. If you receive your replacement Coffee Maker, use the carton and packing materials to an Authorized KitchenAid Service Center. Or write to us . Your replacement ... will arrange to deliver an identical or comparable replacement to your door free of charge and arrange to have your KitchenAid® Coffee Maker should fail within the first year of purchase (register receipt, credit card slip, etc.). In the carton include your...
...these instructions to obtain satisfactory service in Puerto Rico Your KitchenAid® Coffee Maker is covered by an Authorized KitchenAid Service Center. If you receive your replacement Coffee Maker, use the carton and packing materials to an Authorized KitchenAid Service Center. Or write to us . Your replacement ... will arrange to deliver an identical or comparable replacement to your door free of charge and arrange to have your KitchenAid® Coffee Maker should fail within the first year of purchase (register receipt, credit card slip, etc.). In the carton include your...
Use & Care Guide
Page 18
...Before calling for service, please review the Troubleshooting section on how to : Customer Interaction Centre KitchenAid Canada 1901 Minnesota Court Mississauga, ON L5N 3A7 To order accessories or replacement parts for your Coffee Maker in Mexico, call toll-free 1-800-807-6777. Box 218 St. Box 218 St.... Or write to: Customer Interaction Centre KitchenAid Canada 1901 Minnesota Court Mississauga, ON L5N 3A7 How to Arrange for Service Outside these Locations Consult your Coffee Maker in Mexico, call toll-free 01-800-024-17-17 (JV Distribuciones) Or 01...
...Before calling for service, please review the Troubleshooting section on how to : Customer Interaction Centre KitchenAid Canada 1901 Minnesota Court Mississauga, ON L5N 3A7 To order accessories or replacement parts for your Coffee Maker in Mexico, call toll-free 1-800-807-6777. Box 218 St. Box 218 St.... Or write to: Customer Interaction Centre KitchenAid Canada 1901 Minnesota Court Mississauga, ON L5N 3A7 How to Arrange for Service Outside these Locations Consult your Coffee Maker in Mexico, call toll-free 01-800-024-17-17 (JV Distribuciones) Or 01...


