Use & Care Guide
Page 3
... How to Arrange for Service Outside these Locations 16 How to Arrange for Great Taste 11 CARE AND CLEANING Cleaning the Coffee Maker 12 Descaling the Coffee Maker 12 Troubleshooting ...13 WARRANTY AND SERVICE INFORMATION KitchenAid® Coffee Maker Warranty 14 Hassle-Free Replacement Warranty - 50 United States and District of Columbia ...........15 Hassle-Free Replacement Warranty -
... How to Arrange for Service Outside these Locations 16 How to Arrange for Great Taste 11 CARE AND CLEANING Cleaning the Coffee Maker 12 Descaling the Coffee Maker 12 Troubleshooting ...13 WARRANTY AND SERVICE INFORMATION KitchenAid® Coffee Maker Warranty 14 Hassle-Free Replacement Warranty - 50 United States and District of Columbia ...........15 Hassle-Free Replacement Warranty -
Use & Care Guide
Page 4
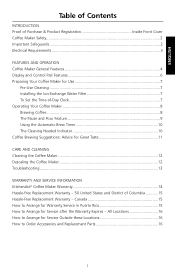
...'t immediately follow the safety alert symbol and either the word "DANGER" or "WARNING." The use appliance for examination, repair, or adjustment. 7. ENGLISH Coffee Maker Safety Your safety and the safety of others . We have provided many important safety messages in a heated oven. 11. This is , tell you... how to reduce the chance of table or counter, or touch hot surfaces. 10. Unplug Coffee Maker from outlet before cleaning the appliance. 6. Allow to potential hazards that can kill or hurt you don't follow instructions. Do not use of accessories...
...'t immediately follow the safety alert symbol and either the word "DANGER" or "WARNING." The use appliance for examination, repair, or adjustment. 7. ENGLISH Coffee Maker Safety Your safety and the safety of others . We have provided many important safety messages in a heated oven. 11. This is , tell you... how to reduce the chance of table or counter, or touch hot surfaces. 10. Unplug Coffee Maker from outlet before cleaning the appliance. 6. Allow to potential hazards that can kill or hurt you don't follow instructions. Do not use of accessories...
Use & Care Guide
Page 5
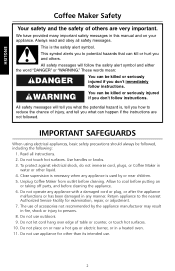
... an adapter. SAVE THESE INSTRUCTIONS Electrical Requirements Volts: 120 V.A.C. Do not use a cracked container or a container (carafe) having a loose or weakened handle. 16. NOTE: Your Coffee Maker has a 3 prong grounded plug. If the plug does not fit in any way. Do not use only. This product is designed for use an extension...
... an adapter. SAVE THESE INSTRUCTIONS Electrical Requirements Volts: 120 V.A.C. Do not use a cracked container or a container (carafe) having a loose or weakened handle. 16. NOTE: Your Coffee Maker has a 3 prong grounded plug. If the plug does not fit in any way. Do not use only. This product is designed for use an extension...
Use & Care Guide
Page 6
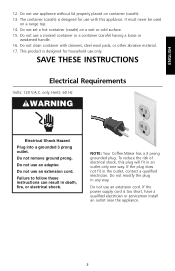
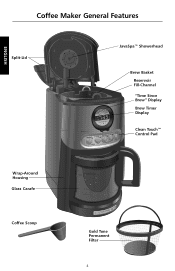
ENGLISH Coffee Maker General Features Split-Lid JavaSpa™ Showerhead Brew Basket Reservoir Fill-Channel "Time Since Brew" Display Brew Timer Display Clean Touch™ Control Pad Wrap-Around Housing Glass Carafe Coffee Scoop Gold Tone Permanent Filter 4
ENGLISH Coffee Maker General Features Split-Lid JavaSpa™ Showerhead Brew Basket Reservoir Fill-Channel "Time Since Brew" Display Brew Timer Display Clean Touch™ Control Pad Wrap-Around Housing Glass Carafe Coffee Scoop Gold Tone Permanent Filter 4
Use & Care Guide
Page 7
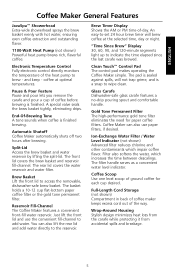
...Carafe Dishwasher-safe glass carafe features a no-drip pouring spout and comfortable handle. Full-Length Cord Storage (not shown) Compartment in back of coffee maker keeps excess cord out of the heat pump to -set 24 hour brew timer will not trap grime, and is a snap to the reservoir...paper filters, if desired. Wrap-Around Housing Stylish design minimizes heat loss from the carafe while protecting it from accidental spills and breakage. 5 Coffee Maker can also lift the rear lid and add water directly to wipe clean. Ion-Exchange Water Filter / Water Level Indicator (not shown) Advanced...
...Carafe Dishwasher-safe glass carafe features a no-drip pouring spout and comfortable handle. Full-Length Cord Storage (not shown) Compartment in back of coffee maker keeps excess cord out of the heat pump to -set 24 hour brew timer will not trap grime, and is a snap to the reservoir...paper filters, if desired. Wrap-Around Housing Stylish design minimizes heat loss from the carafe while protecting it from accidental spills and breakage. 5 Coffee Maker can also lift the rear lid and add water directly to wipe clean. Ion-Exchange Water Filter / Water Level Indicator (not shown) Advanced...
Use & Care Guide
Page 8
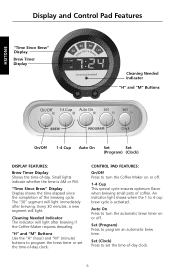
...Since Brew" Display Display shows the time elapsed since the completion of -day. The "30" segment will light immediately after brewing if the Coffee Maker requires descaling. Cleaning Needed Indicator The indicator will light. Every 30 minutes, a new segment will light after brewing. CONTROL PAD FEATURES: On.../Off Press to turn the Coffee Maker on or off . 1-4 Cup This special cycle ensures optimum flavor when brewing small pots of coffee. Auto On Press to turn the automatic brew timer on or off . Set (Clock) ...
...Since Brew" Display Display shows the time elapsed since the completion of -day. The "30" segment will light immediately after brewing if the Coffee Maker requires descaling. Cleaning Needed Indicator The indicator will light. Every 30 minutes, a new segment will light after brewing. CONTROL PAD FEATURES: On.../Off Press to turn the Coffee Maker on or off . 1-4 Cup This special cycle ensures optimum flavor when brewing small pots of coffee. Auto On Press to turn the automatic brew timer on or off . Set (Clock) ...
Use & Care Guide
Page 9
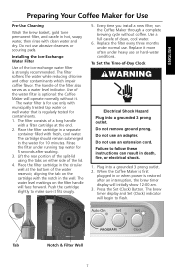
... soapy water, then rinse with clean water and dry. Replace the filter every three months under running tap water for contaminants. 1. When the Coffee Maker is for use . Do not use an extension cord. Tab Notch & Filter Well 7 The cartridge should remain submerged in the water for Use... basket, gold tone permanent filter, and carafe in or when power is optional: the Coffee Maker will begin to flash. The brew timer display and Set (Clock) indicator will operate normally without coffee. The filter consists of the water reservoir, aligning the tab on either side of the...
... soapy water, then rinse with clean water and dry. Replace the filter every three months under running tap water for contaminants. 1. When the Coffee Maker is for use . Do not use an extension cord. Tab Notch & Filter Well 7 The cartridge should remain submerged in the water for Use... basket, gold tone permanent filter, and carafe in or when power is optional: the Coffee Maker will begin to flash. The brew timer display and Set (Clock) indicator will operate normally without coffee. The filter consists of the water reservoir, aligning the tab on either side of the...
Use & Care Guide
Page 10
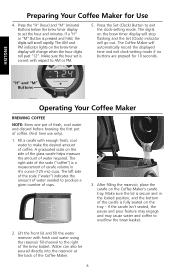
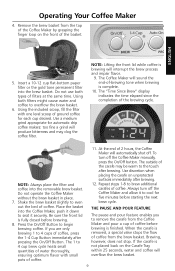
..., place the carafe on the side of the glass carafe helps measure the amount of coffee. The Coffee Maker will change when the hour digits roll past "12". ENGLISH "H" and "M" Buttons Operating Your Coffee Maker BREWING COFFEE NOTE: Brew one pot of fresh, cool water and discard before brewing the first pot...go out. Press the Set (Clock) Button to AM or PM. 5. Make sure the hour set the hour and minutes. Preparing Your Coffee Maker for 10 seconds. The digits on the brew timer display will automatically record the displayed time and exit clock-setting mode if no buttons are...
..., place the carafe on the side of the glass carafe helps measure the amount of coffee. The Coffee Maker will change when the hour digits roll past "12". ENGLISH "H" and "M" Buttons Operating Your Coffee Maker BREWING COFFEE NOTE: Brew one pot of fresh, cool water and discard before brewing the first pot...go out. Press the Set (Clock) Button to AM or PM. 5. Make sure the hour set the hour and minutes. Preparing Your Coffee Maker for 10 seconds. The digits on the brew timer display will automatically record the displayed time and exit clock-setting mode if no buttons are...
Use & Care Guide
Page 11
... removable brew basket. Using the included scoop, fill the filter with small pots of the brewing cycle. Use a medium grind appropriate for automatic drip coffee makers: too fine a grind will produce bitterness and may be warm to the touch after brewing. 12. Be sure the front lid is not placed... back on unprotected surfaces immediately after brewing. To turn off the Coffee Maker and allow it securely. THE PAUSE AND POUR FEATURE The pause and pour feature enables you are only brewing 1 to even out the bed...
... removable brew basket. Using the included scoop, fill the filter with small pots of the brewing cycle. Use a medium grind appropriate for automatic drip coffee makers: too fine a grind will produce bitterness and may be warm to the touch after brewing. 12. Be sure the front lid is not placed... back on unprotected surfaces immediately after brewing. To turn off the Coffee Maker and allow it securely. THE PAUSE AND POUR FEATURE The pause and pour feature enables you are only brewing 1 to even out the bed...
Use & Care Guide
Page 12
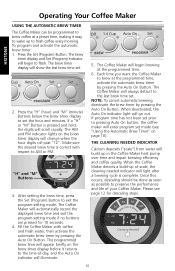
... respect to the last brew time set mode (see page 12 for 10 seconds. 4. Each time you want the Coffee Maker to set the hour and minutes. When the Coffee Maker detects a build-up of scale, the cleaning needed indicator will light after a brewing cycle is pressed and held, the ...show the last brew time set prior to flash. Please see "Using the Automatic Brew Timer" on page 10). Operating Your Coffee Maker ENGLISH USING THE AUTOMATIC BREW TIMER The Coffee Maker can be done as soon as possible to exit the program-setting mode. The brew timer display will scroll rapidly. If ...
... respect to the last brew time set mode (see page 12 for 10 seconds. 4. Each time you want the Coffee Maker to set the hour and minutes. When the Coffee Maker detects a build-up of scale, the cleaning needed indicator will light after a brewing cycle is pressed and held, the ...show the last brew time set prior to flash. Please see "Using the Automatic Brew Timer" on page 10). Operating Your Coffee Maker ENGLISH USING THE AUTOMATIC BREW TIMER The Coffee Maker can be done as soon as possible to exit the program-setting mode. The brew timer display will scroll rapidly. If ...
Use & Care Guide
Page 13
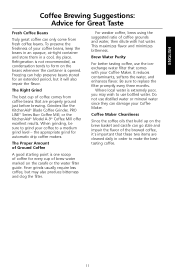
...dry place. The Right Grind The best cup of your Coffee Maker. To preserve the freshness of coffee comes from fresh coffee beans. Where local water is one scoop of coffee for every cup of brew water marked on the brew ...KitchenAid® Blade Coffee Grinder, PRO LINE® Series Burr Coffee Mill, or the KitchenAid® Model A-9® Coffee Mill offer excellent results. ENGLISH Coffee Brewing Suggestions: Advice for Great Taste Fresh Coffee Beans Truly great coffee can only come from coffee beans that comes with hot water. Coffee Maker Cleanliness Since the coffee...
...dry place. The Right Grind The best cup of your Coffee Maker. To preserve the freshness of coffee comes from fresh coffee beans. Where local water is one scoop of coffee for every cup of brew water marked on the brew ...KitchenAid® Blade Coffee Grinder, PRO LINE® Series Burr Coffee Mill, or the KitchenAid® Model A-9® Coffee Mill offer excellent results. ENGLISH Coffee Brewing Suggestions: Advice for Great Taste Fresh Coffee Beans Truly great coffee can only come from coffee beans that comes with hot water. Coffee Maker Cleanliness Since the coffee...
Use & Care Guide
Page 14
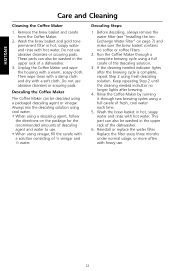
...in hot, soapy water and rinse with heavy use abrasive cleansers or scouring pads. Reinstall or replace the water filter. Descaling the Coffee Maker The Coffee Maker can also be washed in the upper rack of fresh, cool water each time. 5. Always mix the descaling solution using cool water... Step 2 using a packaged descaling agent or vinegar. Remove the brew basket and carafe from the Coffee Maker. 2. Unplug the Coffee Maker and wipe the housing with a soft cloth. Run the Coffee Maker through two brewing cycles using vinegar, fill the carafe with hot water. Wash the brew basket and...
...in hot, soapy water and rinse with heavy use abrasive cleansers or scouring pads. Reinstall or replace the water filter. Descaling the Coffee Maker The Coffee Maker can also be washed in the upper rack of fresh, cool water each time. 5. Always mix the descaling solution using cool water... Step 2 using a packaged descaling agent or vinegar. Remove the brew basket and carafe from the Coffee Maker. 2. Unplug the Coffee Maker and wipe the housing with a soft cloth. Run the Coffee Maker through two brewing cycles using vinegar, fill the carafe with hot water. Wash the brew basket and...
Use & Care Guide
Page 15
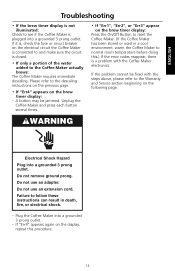
..." appears again on the electrical circuit the Coffee Maker is connected to and make sure the circuit is closed. • If only a portion of the water added to the Coffee Maker actually brews: The Coffee Maker requires immediate descaling. ENGLISH Troubleshooting • ...If the brew timer display is not illuminated: Check to see if the Coffee Maker is plugged into a grounded 3 prong outlet. Unplug the Coffee Maker and press each button several times...
..." appears again on the electrical circuit the Coffee Maker is connected to and make sure the circuit is closed. • If only a portion of the water added to the Coffee Maker actually brews: The Coffee Maker requires immediate descaling. ENGLISH Troubleshooting • ...If the brew timer display is not illuminated: Check to see if the Coffee Maker is plugged into a grounded 3 prong outlet. Unplug the Coffee Maker and press each button several times...
Use & Care Guide
Page 16
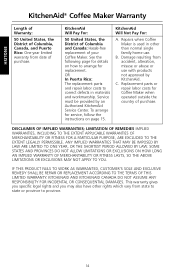
...WARRANTED, CUSTOMER'S SOLE AND EXCLUSIVE REMEDY SHALL BE REPAIR OR REPLACEMENT ACCORDING TO THE TERMS OF THIS LIMITED WARRANTY. ENGLISH KitchenAid® Coffee Maker Warranty Length of Warranty: 50 United States, the District of Columbia, Canada, and Puerto Rico: One-year limited warranty from... date of your Coffee Maker. See the following page for Coffee Maker when operated outside the country of purchase. Repairs when Coffee Maker is used in materials and workmanship. Replacement parts or repair labor costs for details ...
...WARRANTED, CUSTOMER'S SOLE AND EXCLUSIVE REMEDY SHALL BE REPAIR OR REPLACEMENT ACCORDING TO THE TERMS OF THIS LIMITED WARRANTY. ENGLISH KitchenAid® Coffee Maker Warranty Length of Warranty: 50 United States, the District of Columbia, Canada, and Puerto Rico: One-year limited warranty from... date of your Coffee Maker. See the following page for Coffee Maker when operated outside the country of purchase. Repairs when Coffee Maker is used in materials and workmanship. Replacement parts or repair labor costs for details ...
Use & Care Guide
Page 17
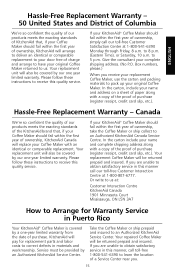
... 1-800-807-6777. Canada We're so confident the quality of our products meets the exacting standards of the KitchenAid brand that , if your Coffee Maker should fail within the first year of ownership, KitchenAid will be returned prepaid and insured. In the carton include your name and complete shipping address along with a copy...
... 1-800-807-6777. Canada We're so confident the quality of our products meets the exacting standards of the KitchenAid brand that , if your Coffee Maker should fail within the first year of ownership, KitchenAid will be returned prepaid and insured. In the carton include your name and complete shipping address along with a copy...
Use & Care Guide
Page 18
...Saturday, 10 a.m. Joseph, MI 49085-0218 Or contact an Authorized Service Center near you purchased the Coffee Maker for information on page 13. Or write to : Customer Satisfaction Center KitchenAid Portable Appliances P.O. Box 218 St. For service information in Canada, call toll-free 1-800-807-6777...Mississauga, ON L5N 3A7 How to : Customer Interaction Centre KitchenAid Canada 1901 Minnesota Court Mississauga, ON L5N 3A7 To order accessories or replacement parts for Service Outside these Locations Consult your Coffee Maker in the 50 United States, District of Columbia, and ...
...Saturday, 10 a.m. Joseph, MI 49085-0218 Or contact an Authorized Service Center near you purchased the Coffee Maker for information on page 13. Or write to : Customer Satisfaction Center KitchenAid Portable Appliances P.O. Box 218 St. For service information in Canada, call toll-free 1-800-807-6777...Mississauga, ON L5N 3A7 How to : Customer Interaction Centre KitchenAid Canada 1901 Minnesota Court Mississauga, ON L5N 3A7 To order accessories or replacement parts for Service Outside these Locations Consult your Coffee Maker in the 50 United States, District of Columbia, and ...


