Instruction Manual
Page 1
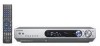
... enjoy the surround sound at the best condition. (These pages give shortcut explanations on how to connect the speaker system to the receiver, set up the speakers and play a source.) "Let's play DVD video software" ^& About the supplied remote control Compared to standard remote controls, the remote control supplied with this receiver has several operation modes. AUDIO VIDEO SURROUND RECEIVER VRS-7200 INSTRUCTION MANUAL KENWOOD CORPORATION Quick Start Reference Please read the operating instructions and obtain a proper understanding of the remote control and how to switch its design...
... enjoy the surround sound at the best condition. (These pages give shortcut explanations on how to connect the speaker system to the receiver, set up the speakers and play a source.) "Let's play DVD video software" ^& About the supplied remote control Compared to standard remote controls, the remote control supplied with this receiver has several operation modes. AUDIO VIDEO SURROUND RECEIVER VRS-7200 INSTRUCTION MANUAL KENWOOD CORPORATION Quick Start Reference Please read the operating instructions and obtain a proper understanding of the remote control and how to switch its design...
Instruction Manual
Page 3
... antenna (1) Remote control unit (1) Antenna adaptor (1) Batteries (R03/AAA) (2) Special features True home theater sound ⁄ ~ ‹ This receiver incorporates a wide variety of surround modes to bring you how to connect your video software and audio source. RDS (Radio Data System) tuner (For Europe and Australia) ª The receiver is divided into four sections, Preparations, Operations, Remote Control, and Additional Information. station name display, to show you have registered your components with the proper setup codes...
... antenna (1) Remote control unit (1) Antenna adaptor (1) Batteries (R03/AAA) (2) Special features True home theater sound ⁄ ~ ‹ This receiver incorporates a wide variety of surround modes to bring you how to connect your video software and audio source. RDS (Radio Data System) tuner (For Europe and Australia) ª The receiver is divided into four sections, Preparations, Operations, Remote Control, and Additional Information. station name display, to show you have registered your components with the proper setup codes...
Instruction Manual
Page 4
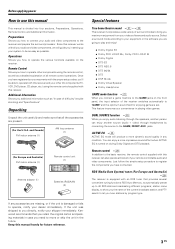
... to contact cleaner Do not use this manual 3 Unpacking 3 Special features 3 Contents 4 Names and functions of parts 5 Main unit 5 Remote control unit 6 Setting up the system 8 Connecting a DVD player 9 Connecting video components, audio components 10 Preparations Digital connections 11 Connecting the speakers 12 Connecting the speaker terminals ... 13 PRE OUT jacks connections ........ 14 Connecting to the GAME jacks / FRONT AUX jacks 14 Connecting the antennas 15 Preparing the remote control ....... 15 Let's play DVD video software 16 Preparing for playback...
... to contact cleaner Do not use this manual 3 Unpacking 3 Special features 3 Contents 4 Names and functions of parts 5 Main unit 5 Remote control unit 6 Setting up the system 8 Connecting a DVD player 9 Connecting video components, audio components 10 Preparations Digital connections 11 Connecting the speakers 12 Connecting the speaker terminals ... 13 PRE OUT jacks connections ........ 14 Connecting to the GAME jacks / FRONT AUX jacks 14 Connecting the antennas 15 Preparing the remote control ....... 15 Let's play DVD video software 16 Preparing for playback...
Instruction Manual
Page 5
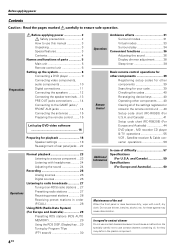
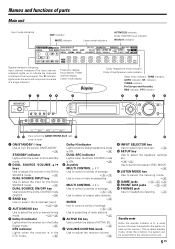
...¶ MULTI CONTROL @ / # Use to control a variety of settings. ^* Use to select of preset radio stations. • ENTER Use to control a variety of settings. ^* Use to presetting of radio stations. 7 ACTIVE EQ key ¶ Use to switch the status of ACTIVE EQ. ∞ 8 VOLUME CONTROL knob Use to adjust the receiver volume. £ ! 0 9 INPUT SELECTOR key Use to select input sources. £ 0 SETUP key Use to select the speakers' settings etc. ^* Use to back up to indicate the channels contained in the input signal. Names and functions of parts Main unit Input mode...
...¶ MULTI CONTROL @ / # Use to control a variety of settings. ^* Use to select of preset radio stations. • ENTER Use to control a variety of settings. ^* Use to presetting of radio stations. 7 ACTIVE EQ key ¶ Use to switch the status of ACTIVE EQ. ∞ 8 VOLUME CONTROL knob Use to adjust the receiver volume. £ ! 0 9 INPUT SELECTOR key Use to select input sources. £ 0 SETUP key Use to select the speakers' settings etc. ^* Use to back up to indicate the channels contained in the input signal. Names and functions of parts Main unit Input mode...
Instruction Manual
Page 6
... MUTE TOP MENU /SETUP MENU /SOUND VOLUME ENTER RETURN /EXIT ON SCREEN /GUIDE 8 6 P.CALL 4 ¢ - CHANNEL + 7 TUNING 1 ¡ TUNER DVD VIDEO1 VIDEO2 BAND AUX F.AUX GAME AUTO/MONO TV INPUT TV MUTE TV MODE DOLBY VIRTUAL RCV MODE LISTEN MODE STEREO TV VOLUME REMOTE SETUP For Europe and Australia RDS DISP. % PAGE fi PTY If the name of a function is different on the receiver and on the remote control, the name of the remote control key in this manual is...
... MUTE TOP MENU /SETUP MENU /SOUND VOLUME ENTER RETURN /EXIT ON SCREEN /GUIDE 8 6 P.CALL 4 ¢ - CHANNEL + 7 TUNING 1 ¡ TUNER DVD VIDEO1 VIDEO2 BAND AUX F.AUX GAME AUTO/MONO TV INPUT TV MUTE TV MODE DOLBY VIRTUAL RCV MODE LISTEN MODE STEREO TV VOLUME REMOTE SETUP For Europe and Australia RDS DISP. % PAGE fi PTY If the name of a function is different on the receiver and on the remote control, the name of the remote control key in this manual is...
Instruction Manual
Page 7
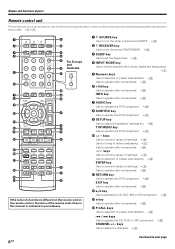
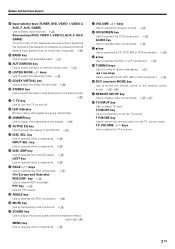
... Use to adjust the sound quality and the ambience effects. ™¢fl MENU key Use to operate other components. · ⁄ VOLUME %/ fi keys Use to adjust the receiver volume. £ ¤ ON SCREEN key Use to operate the DVD component. · GUIDE key Use to operate other components. · ¶ PAGE %/ fi keys Use to select input sources. £ Sources keys (DVD, VIDEO 1, VIDEO 2, AUX, F. TV MUTE key Use to the TV control mode. INPUT SEL. key ª Use to tuning of parts % Input selector keys (TUNER, DVD, VIDEO 1, VIDEO 2, AUX...
... Use to adjust the sound quality and the ambience effects. ™¢fl MENU key Use to operate other components. · ⁄ VOLUME %/ fi keys Use to adjust the receiver volume. £ ¤ ON SCREEN key Use to operate the DVD component. · GUIDE key Use to operate other components. · ¶ PAGE %/ fi keys Use to select input sources. £ Sources keys (DVD, VIDEO 1, VIDEO 2, AUX, F. TV MUTE key Use to the TV control mode. INPUT SEL. key ª Use to tuning of parts % Input selector keys (TUNER, DVD, VIDEO 1, VIDEO 2, AUX...
Instruction Manual
Page 8
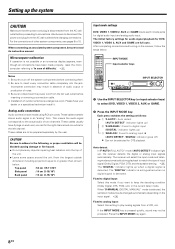
... no digital signal is pressed quickly, sound may result in an "analog" form. Press the INPUT MODE key again. 8 EN Setting up the system CAUTION Make sure that the power cord plug is disconnected from the AC wall outlet before inserting or removing a connection cable. 4. Be sure to select DVD, VIDEO 1, VIDEO 2, AUX or GAME. 2 Press the INPUT MODE key. Please have 2 plugs on the receiver, follow the steps below . INPUT MODE Input selector keys INPUT SELECTOR 1 Use the INPUT...
... no digital signal is pressed quickly, sound may result in an "analog" form. Press the INPUT MODE key again. 8 EN Setting up the system CAUTION Make sure that the power cord plug is disconnected from the AC wall outlet before inserting or removing a connection cable. 4. Be sure to select DVD, VIDEO 1, VIDEO 2, AUX or GAME. 2 Press the INPUT MODE key. Please have 2 plugs on the receiver, follow the steps below . INPUT MODE Input selector keys INPUT SELECTOR 1 Use the INPUT...

Instruction Manual
Page 10
Setting up the system Connecting video components, audio components Audio components AUDIO LINE OUT (Audio cord) Monitor TV VIDEO IN (Yellow RCA pin cord) MONITOR OUT L R IN AUX VIDEO IN VIDEO OUT VIDEO IN PLAY IN REC OUT PLAY IN VIDEO 2 VIDEO 1 Connecting video components (COMPONENT VIDEO) If you have connected the receiver to a video component with COMPONENT jacks, you can get a better picture quality than by connecting with COMPONENT jacks, see "Re-assignment of rear panel jacks" ™ When connecting the TV to the COMPONENT jacks, be sure to connect all the other...
Setting up the system Connecting video components, audio components Audio components AUDIO LINE OUT (Audio cord) Monitor TV VIDEO IN (Yellow RCA pin cord) MONITOR OUT L R IN AUX VIDEO IN VIDEO OUT VIDEO IN PLAY IN REC OUT PLAY IN VIDEO 2 VIDEO 1 Connecting video components (COMPONENT VIDEO) If you have connected the receiver to a video component with COMPONENT jacks, you can get a better picture quality than by connecting with COMPONENT jacks, see "Re-assignment of rear panel jacks" ™ When connecting the TV to the COMPONENT jacks, be sure to connect all the other...

Instruction Manual
Page 11
... "Input mode settings", "Reassignment of rear panel jacks" section carefully. 8™ DVD IN VIDEO 2 MONITOR IN OUT S VIDEO DIGITAL IN (ASSIGNABLE) COAX 2 (VIDEO 2) OPT 1 OPT 2 (VIDEO 1) (AUX) COAX 1 (DVD) S VIDEO IN (S VIDEO cord) Monitor TV (with S VIDEO jack) CD player or DVD player S VIDEO OUT (S VIDEO cord) Satellite Receivers (with S VIDEO jack) S VIDEO OUT (S VIDEO cord) DVD player (with S VIDEO jack) OPTICAL DIGITAL OUT (AUDIO) (Optical fiber cord) OPTICAL DIGITAL OUT (AUDIO) (Optical fiber cord) Component with DTS, Dolby Digital, or PCM OPTICAL DIGITAL OUT Connect the...
... "Input mode settings", "Reassignment of rear panel jacks" section carefully. 8™ DVD IN VIDEO 2 MONITOR IN OUT S VIDEO DIGITAL IN (ASSIGNABLE) COAX 2 (VIDEO 2) OPT 1 OPT 2 (VIDEO 1) (AUX) COAX 1 (DVD) S VIDEO IN (S VIDEO cord) Monitor TV (with S VIDEO jack) CD player or DVD player S VIDEO OUT (S VIDEO cord) Satellite Receivers (with S VIDEO jack) S VIDEO OUT (S VIDEO cord) DVD player (with S VIDEO jack) OPTICAL DIGITAL OUT (AUDIO) (Optical fiber cord) OPTICAL DIGITAL OUT (AUDIO) (Optical fiber cord) Component with DTS, Dolby Digital, or PCM OPTICAL DIGITAL OUT Connect the...

Instruction Manual
Page 14
... surround back speaker is connected to the GAME or FRONT AUX jacks on the front panel of digital audio input. Note that you use a component that the output from the PRE OUT jacks needs to be connected to connect two surround back speakers for playing a video game through the receiver. ¡ 14 EN Subwoofer Power amplifier Camcorder Powered subwoofer Game Player ¶ Connecting a speaker cord directly to a PRE OUT jack will not produce any sound from a portable video camera. INPUT SELECTOR R L SUB WOOFER SURROUND BACK PRE OUT FRONT AUX...
... surround back speaker is connected to the GAME or FRONT AUX jacks on the front panel of digital audio input. Note that you use a component that the output from the PRE OUT jacks needs to be connected to connect two surround back speakers for playing a video game through the receiver. ¡ 14 EN Subwoofer Power amplifier Camcorder Powered subwoofer Game Player ¶ Connecting a speaker cord directly to a PRE OUT jack will not produce any sound from a portable video camera. INPUT SELECTOR R L SUB WOOFER SURROUND BACK PRE OUT FRONT AUX...
Instruction Manual
Page 16
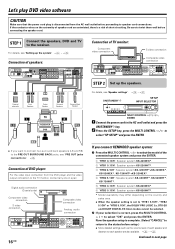
...R IN AUX L CENTER R SURR L FRONT R SURR BACK/ SW SPEAKERS (6-8Ω) SW LR C RS LS BS Powered subwoofer LS Front Speakers L Center Speaker Surround Speakers C Surround Back Speaker R RECEIVER RS DVD SW BS ÷ If you connect KENWOOD speaker system: 1 Press the MULTI CONTROL @ / # to select the model of each speaker and distance to each speaker are untwisted, there is correct, press the MULTI CONTROL % / fi to speaker cord connections. For details, see "Setting up the speakers. Digital audio connection (Coaxial code) Component video connection S video...
...R IN AUX L CENTER R SURR L FRONT R SURR BACK/ SW SPEAKERS (6-8Ω) SW LR C RS LS BS Powered subwoofer LS Front Speakers L Center Speaker Surround Speakers C Surround Back Speaker R RECEIVER RS DVD SW BS ÷ If you connect KENWOOD speaker system: 1 Press the MULTI CONTROL @ / # to select the model of each speaker and distance to each speaker are untwisted, there is correct, press the MULTI CONTROL % / fi to speaker cord connections. For details, see "Setting up the speakers. Digital audio connection (Coaxial code) Component video connection S video...
Instruction Manual
Page 17
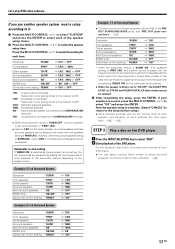
... low frequencies are also available. ) ~ ¡ STEP 3 Play a disc on the speaker setup. For the operation, also refer to the instruction manual for the back surround speakers cannot be selected only when the front speakers setting is set automatically to "FRNT LRG". ÷ Options "LRG" for the center speaker, surround speakers and back surround speakers can be selected. Subwoofer re-mix setting mode to the receiver is connected. In this case, the low-frequency signal can select various listen modes to enjoy surround...
... low frequencies are also available. ) ~ ¡ STEP 3 Play a disc on the speaker setup. For the operation, also refer to the instruction manual for the back surround speakers cannot be selected only when the front speakers setting is set automatically to "FRNT LRG". ÷ Options "LRG" for the center speaker, surround speakers and back surround speakers can be selected. Subwoofer re-mix setting mode to the receiver is connected. In this case, the low-frequency signal can select various listen modes to enjoy surround...

Instruction Manual
Page 18
... receiver's listening modes, make sure to complete the speaker settings (subwoofer, front, center, surround and surround back speakers) as follows; RECEIVER SETUP %/fi/@/#, ENTER SOUND ™ RCV MODE ON/STANDBY ENTER, MULTI CONTROL SETUP 1 Turn on the power to this receiver by pressing the SETUP key or selecting "EXIT" and then pressing the ENTER. 4 Select the setup method. 1 Select "SP SETUP" and press the ENTER to select the speaker setup method. 2 Use the MULTI CONTROL @ / # (or the @ / # keys) for playback Speaker settings To enable you selected...
... receiver's listening modes, make sure to complete the speaker settings (subwoofer, front, center, surround and surround back speakers) as follows; RECEIVER SETUP %/fi/@/#, ENTER SOUND ™ RCV MODE ON/STANDBY ENTER, MULTI CONTROL SETUP 1 Turn on the power to this receiver by pressing the SETUP key or selecting "EXIT" and then pressing the ENTER. 4 Select the setup method. 1 Select "SP SETUP" and press the ENTER to select the speaker setup method. 2 Use the MULTI CONTROL @ / # (or the @ / # keys) for playback Speaker settings To enable you selected...

Instruction Manual
Page 19
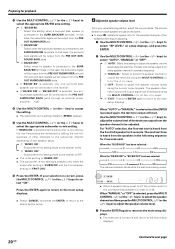
... front speakers setting. 1 "FRNT LRG" : Large front speakers are connected to the receiver. 2 "FRNT NML" : Average size front speakers are connected to the receiver. ÷ When the subwoofer setting is "SUBW ON", front speakers setting is "FRNT LRG" and a stereo source is played, the low frequencies may be selected when the front speakers have been set to "SURR NML". 0 Use the MULTI CONTROL # (or the # key) to accept the setting. ÷ The surround back speaker and subwoofer setting mode...
... front speakers setting. 1 "FRNT LRG" : Large front speakers are connected to the receiver. 2 "FRNT NML" : Average size front speakers are connected to the receiver. ÷ When the subwoofer setting is "SUBW ON", front speakers setting is "FRNT LRG" and a stereo source is played, the low frequencies may be selected when the front speakers have been set to "SURR NML". 0 Use the MULTI CONTROL # (or the # key) to accept the setting. ÷ The surround back speaker and subwoofer setting mode...
Instruction Manual
Page 20
... adjust the volume level of other channels to the subwoofer channel depending on setup displays, and press the ENTER. 2 Use the MULTI CONTROL @ / # (or the @ / # keys) to select "AUTO", "MANUAL" or "OFF". 1 "AUTO": Select this setting to adjust the speaker volume levels using the test tone. For "AUTO" selection, the first test tone is heard from the front left speaker for the corresponding speakers is turned off the volume level for 2 seconds. When "MANUAL" or "OFF" is selected, press the MULTI CONTROL @/# (or the @/# keys) to select the speaker channel...
... adjust the volume level of other channels to the subwoofer channel depending on setup displays, and press the ENTER. 2 Use the MULTI CONTROL @ / # (or the @ / # keys) to select "AUTO", "MANUAL" or "OFF". 1 "AUTO": Select this setting to adjust the speaker volume levels using the test tone. For "AUTO" selection, the first test tone is heard from the front left speaker for the corresponding speakers is turned off the volume level for 2 seconds. When "MANUAL" or "OFF" is selected, press the MULTI CONTROL @/# (or the @/# keys) to select the speaker channel...

Instruction Manual
Page 24
... the second input source for the DUAL SOURCE function. 2 "F. Adjusting the sound ACTIVE EQ %/fi/@/#, ENTER SOUND MUTE ∞ VOLUME %/fi RCV MODE VOLUME CONTROL ACTIVE EQ ∞ MULTI CONTROL %/fi/@/#, ENTER 2 Use the VOLUME CONTROL knob (or the VOLUME %/fi keys) to the video and headphone outputs. Lights up Adjusting the TONE (PCM stereo and analog stereo mode only) 1 Press the RCV MODE key on the remote control unit to set it to the receiver control mode. 2 Press the SOUND key. 3 Use the MULTI CONTROL @ / # (or...
... the second input source for the DUAL SOURCE function. 2 "F. Adjusting the sound ACTIVE EQ %/fi/@/#, ENTER SOUND MUTE ∞ VOLUME %/fi RCV MODE VOLUME CONTROL ACTIVE EQ ∞ MULTI CONTROL %/fi/@/#, ENTER 2 Use the VOLUME CONTROL knob (or the VOLUME %/fi keys) to the video and headphone outputs. Lights up Adjusting the TONE (PCM stereo and analog stereo mode only) 1 Press the RCV MODE key on the remote control unit to set it to the receiver control mode. 2 Press the SOUND key. 3 Use the MULTI CONTROL @ / # (or...
Instruction Manual
Page 27
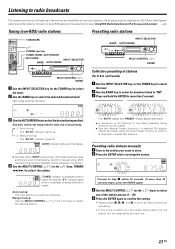
... stations in the memory and recall them by the new one -touch operation. Presetting radio stations manually 1 Tune to the station you store a station at a previously used preset, the old station will be preset. ÷ Use the Manual Preset function if a desired FM station cannot be received in monaural.) 4 Use the MULTI CONTROL % / fi (or the %/fi keys, TUNING 1/ ¡) to either auto or manual tuning. 1 Auto tuning: The "AUTO" indicator lights up in stereo. Each press switches the tuning method to select the station...
... stations in the memory and recall them by the new one -touch operation. Presetting radio stations manually 1 Tune to the station you store a station at a previously used preset, the old station will be preset. ÷ Use the Manual Preset function if a desired FM station cannot be received in monaural.) 4 Use the MULTI CONTROL % / fi (or the %/fi keys, TUNING 1/ ¡) to either auto or manual tuning. 1 Auto tuning: The "AUTO" indicator lights up in stereo. Each press switches the tuning method to select the station...

Instruction Manual
Page 34
...: ("Dolby D" indicator lights up) Main example of medium: Multi-channel digital source such as DVD. 1 "DOLBY D": DOLBY DIGITAL surround 2 "DOLBY D EX": DOLBY DIGITAL EX surround 3 "DOLBY D + PLIIx MOVIE": DOLBY DIGITAL surround + DOLBY PRO LOGIC IIx surround MOVIE mode *1 4 "DOLBY D + PLIIx MUSIC": DOLBY DIGITAL surround + DOLBY PRO LOGIC IIx surround MUSIC mode 5 "STEREO": Stereo playback*2 *1 Can be selected only when two surround back speakers are connected. *2 In Dolby Virtual Speaker and Dolby Headphone modes, the Dolby Digital signal input cannot be listened to in the stereo mode. ÷...
...: ("Dolby D" indicator lights up) Main example of medium: Multi-channel digital source such as DVD. 1 "DOLBY D": DOLBY DIGITAL surround 2 "DOLBY D EX": DOLBY DIGITAL EX surround 3 "DOLBY D + PLIIx MOVIE": DOLBY DIGITAL surround + DOLBY PRO LOGIC IIx surround MOVIE mode *1 4 "DOLBY D + PLIIx MUSIC": DOLBY DIGITAL surround + DOLBY PRO LOGIC IIx surround MUSIC mode 5 "STEREO": Stereo playback*2 *1 Can be selected only when two surround back speakers are connected. *2 In Dolby Virtual Speaker and Dolby Headphone modes, the Dolby Digital signal input cannot be listened to in the stereo mode. ÷...

Instruction Manual
Page 57
.... ÷ Select a surround mode. ÷ Adjust the speaker levels using the same type of cords (Component video cords, S VIDEO cords or yellow RCA video cords) correctly. 0 Audio cannot be recorded. ÷ Connect the equipment correctly by referring to DIGITAL MANUAL during playback of the digital source, and restart the playback from the AC wall outlet, switch the receiver OFF, remove the short-circuiting and turn the receiver ON again. ÷ The protection circuitry is activated because the output power is...
.... ÷ Select a surround mode. ÷ Adjust the speaker levels using the same type of cords (Component video cords, S VIDEO cords or yellow RCA video cords) correctly. 0 Audio cannot be recorded. ÷ Connect the equipment correctly by referring to DIGITAL MANUAL during playback of the digital source, and restart the playback from the AC wall outlet, switch the receiver OFF, remove the short-circuiting and turn the receiver ON again. ÷ The protection circuitry is activated because the output power is...
Instruction Manual
Page 58
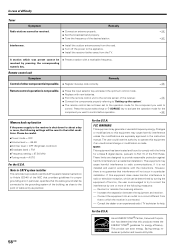
... optimum control mode. ÷ Replace with the instructions. Consult the dealer or an experienced radio / TV technician for the component you wish to which the receiver is connected. -- Note to the remote sensor of cable entry as close to the point of the receiver. % ÷ Connect the components properly referring to "Setting up function If the power supply to operate this equipment may generate or use radio frequency energy. The user...
... optimum control mode. ÷ Replace with the instructions. Consult the dealer or an experienced radio / TV technician for the component you wish to which the receiver is connected. -- Note to the remote sensor of cable entry as close to the point of the receiver. % ÷ Connect the components properly referring to "Setting up function If the power supply to operate this equipment may generate or use radio frequency energy. The user...


