

Instruction Manual
Page 3
... audio components 10 Connecting video components 11 Digital connections 12 Connecting video components (COMPONENT VIDEO 13 Connecting a DVD player (6-channel input) ..... 14 Connecting the speakers 15 Connecting the terminals 16 Connecting to another room (ROOM B) ......... 17 PRE OUT connections 18 Connecting the RF antenna and external IR Repeater (For VR-6070 only 19 Connecting to the AV AUX jacks 20 Connecting the antennas 20 Connecting the system control 21 Preparing the remote control 22 RF remote control function (For VR-6070 only) .... 22 Preparing for surround sound...
... audio components 10 Connecting video components 11 Digital connections 12 Connecting video components (COMPONENT VIDEO 13 Connecting a DVD player (6-channel input) ..... 14 Connecting the speakers 15 Connecting the terminals 16 Connecting to another room (ROOM B) ......... 17 PRE OUT connections 18 Connecting the RF antenna and external IR Repeater (For VR-6070 only 19 Connecting to the AV AUX jacks 20 Connecting the antennas 20 Connecting the system control 21 Preparing the remote control 22 RF remote control function (For VR-6070 only) .... 22 Preparing for surround sound...
Instruction Manual
Page 4
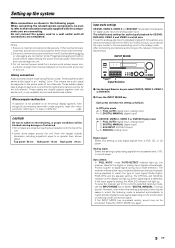
... the front panel or case becomes dirty, wipe with the instructions. Consult the dealer or an experienced radio / TV technician for approximately 1 day. • Power mode. • Input selector settings. • Picture output. • Speaker ON/OFF. • Volume level. • BASS, TREBLE, INPUT level. • TONE ON/OFF. • LOUDNESS ON/OFF. • Dimmer level. • MD/TAPE settings. • RF-BAND. (VR-6070 only) • Listen mode setting. • Speaker settings. • SW...
... the front panel or case becomes dirty, wipe with the instructions. Consult the dealer or an experienced radio / TV technician for approximately 1 day. • Power mode. • Input selector settings. • Picture output. • Speaker ON/OFF. • Volume level. • BASS, TREBLE, INPUT level. • TONE ON/OFF. • LOUDNESS ON/OFF. • Dimmer level. • MD/TAPE settings. • RF-BAND. (VR-6070 only) • Listen mode setting. • Speaker settings. • SW...
Instruction Manual
Page 5
... channel is input independently, the resulting ambience is recommended that you own a DVD player equipped with your remote controllable audio and video components. Multi channel surround sound (SRS Circle Surround II ) SRS Circle Surround II ™ improves on its predecessor PRO LOGIC, provides greater advantages in surround sound. DSP surround modes The DSP (Digital Signal Processor) used with movie soundtracks recorded with a convincing "5.1 like "ARENA", "JAZZ CLUB", "THEATER", "STADIUM" and "DISCO". SPEAKER EQ The SPEAKER EQ function will be played...
... channel is input independently, the resulting ambience is recommended that you own a DVD player equipped with your remote controllable audio and video components. Multi channel surround sound (SRS Circle Surround II ) SRS Circle Surround II ™ improves on its predecessor PRO LOGIC, provides greater advantages in surround sound. DSP surround modes The DSP (Digital Signal Processor) used with movie soundtracks recorded with a convincing "5.1 like "ARENA", "JAZZ CLUB", "THEATER", "STADIUM" and "DISCO". SPEAKER EQ The SPEAKER EQ function will be played...
Instruction Manual
Page 6
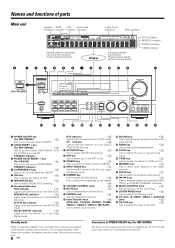
...Frequency display Input display Preset channel display Surround mode display AUTO indicator MEMORY indicator STEREO indicator TUNED indicator POWER STANDBY ON/STANDBY (For VR-6070) STANDBY ON/STANDBY A SPEAKERS B THX SPEAKER EQ ACTIVE EQ DOLBY DIGITAL DTS CS II THX SPEAKER EQ ACTIVE EQ DSP STEREO INPUT MODE DIMMER POWER -ON -OFF PHONES DVD/6CH CD/DVD PHONO TUNER VIDEO 1 VIDEO 2 VIDEO 3 MD/TAPE SOUND TONE SETUP BAND AUTO MEMORY VOLUME CONTROL MULTI CONTROL LISTEN MODE DOWN UP MUTE AV AUX S VIDEO VIDEO L-AUDIO-R 1 POWER ON/OFF key (For KRF-X9060D) £ Use to turn...
...Frequency display Input display Preset channel display Surround mode display AUTO indicator MEMORY indicator STEREO indicator TUNED indicator POWER STANDBY ON/STANDBY (For VR-6070) STANDBY ON/STANDBY A SPEAKERS B THX SPEAKER EQ ACTIVE EQ DOLBY DIGITAL DTS CS II THX SPEAKER EQ ACTIVE EQ DSP STEREO INPUT MODE DIMMER POWER -ON -OFF PHONES DVD/6CH CD/DVD PHONO TUNER VIDEO 1 VIDEO 2 VIDEO 3 MD/TAPE SOUND TONE SETUP BAND AUTO MEMORY VOLUME CONTROL MULTI CONTROL LISTEN MODE DOWN UP MUTE AV AUX S VIDEO VIDEO L-AUDIO-R 1 POWER ON/OFF key (For KRF-X9060D) £ Use to turn...
Instruction Manual
Page 7
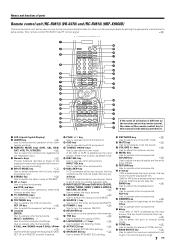
... selection adjustments during SOUND, SET UP and PRESET channel functions. ! Only remote control RC-R0813 has RF remote signal. SOUND key ° Use to operate other components. ‹ 7 key If CD, MD, or TAPE is A and B deck of a double cassette deck. ^ INPUT SELECTOR keys (DVD/6CH, CD/DVD, PHONO, TUNER, VIDEO 1, VIDEO 2, VIDEO 3, MD/TAPE, AV AUX) § Use to select the input sources. & LOUDNESS key ¶ Use to switch the status of LOUDNESS. * SOURCE key Use to turn the receiver ON/OFF. ) RECEIVER key Use to return to the operation...
... selection adjustments during SOUND, SET UP and PRESET channel functions. ! Only remote control RC-R0813 has RF remote signal. SOUND key ° Use to operate other components. ‹ 7 key If CD, MD, or TAPE is A and B deck of a double cassette deck. ^ INPUT SELECTOR keys (DVD/6CH, CD/DVD, PHONO, TUNER, VIDEO 1, VIDEO 2, VIDEO 3, MD/TAPE, AV AUX) § Use to select the input sources. & LOUDNESS key ¶ Use to switch the status of LOUDNESS. * SOURCE key Use to turn the receiver ON/OFF. ) RECEIVER key Use to return to the operation...

Instruction Manual
Page 8
... are controlling. 5 INPUT MODE key 9 Use to switch between the full auto, digital and analog input. 6 STEREO key ° Use to switch the listen mode to select the maximum adjustment set- AUTO key º Use to select the auto or manual tuning mode. › TONE key ¶ Use to switch the status of the DSP mode. § MUTE key ¶ Use to turn the other components. ting for selection adjustments during SOUND, SET UP and PRESET channel functions. ! Names and functions of the display. 8 key Use to operate the DVD component. CH TV CONTROL + VOL...
... are controlling. 5 INPUT MODE key 9 Use to switch between the full auto, digital and analog input. 6 STEREO key ° Use to switch the listen mode to select the maximum adjustment set- AUTO key º Use to select the auto or manual tuning mode. › TONE key ¶ Use to switch the status of the DSP mode. § MUTE key ¶ Use to turn the other components. ting for selection adjustments during SOUND, SET UP and PRESET channel functions. ! Names and functions of the display. 8 key Use to operate the DVD component. CH TV CONTROL + VOL...
Instruction Manual
Page 9
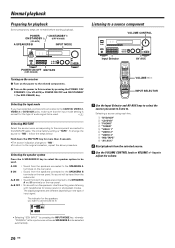
...the currently selected listening mode, use the analog audio input for playback instead (if, for the corresponding input to a wall outlet until all connection cords securely. The initial factory settings for audio signal playback for the left channel. Analog input: Select this unit. Auto detect: In "FULL AUTO" mode (AUTO DETECT indicator light up the system Make connections as follows: In DTS play mode 1 FULL AUTO (digital input, analog input) 2 DIGITAL MANUAL (digital input) In CD/DVD, VIDEO 2, VIDEO 3 or DVD/6CH play analog signals from the AC outlet before plugging or unplugging...
...the currently selected listening mode, use the analog audio input for playback instead (if, for the corresponding input to a wall outlet until all connection cords securely. The initial factory settings for audio signal playback for the left channel. Analog input: Select this unit. Auto detect: In "FULL AUTO" mode (AUTO DETECT indicator light up the system Make connections as follows: In DTS play mode 1 FULL AUTO (digital input, analog input) 2 DIGITAL MANUAL (digital input) In CD/DVD, VIDEO 2, VIDEO 3 or DVD/6CH play analog signals from the AC outlet before plugging or unplugging...

Instruction Manual
Page 12
...Input mode settings" section carefully. 9 COAXIAL VIDEO 2 OPTICAL OPTICAL OPTICAL CD/DVD VIDEO 3 MONITOR DVD/ 6CH DIGITAL IN DIGITAL OUT OPTICAL DIGITAL IN (AUDIO) Optical fiber cable MD player COAXIAL DIGITAL OUT (AUDIO) RF digital demodulator (DEM-9991D) (sold separately) Optical fiber cable Optical fiber cable OPTICAL DIGITAL OUT (AUDIO) Component with DTS, Dolby Digital, or PCM COAXIAL DIGITAL OUT Connect the video signal and analog audio signals to the VIDEO 2 jacks. (See "Connecting video components".) ! OPTICAL DIGITAL OUT (AUDIO) CD or DVD player COAXIAL DIGITAL OUT (AUDIO...
...Input mode settings" section carefully. 9 COAXIAL VIDEO 2 OPTICAL OPTICAL OPTICAL CD/DVD VIDEO 3 MONITOR DVD/ 6CH DIGITAL IN DIGITAL OUT OPTICAL DIGITAL IN (AUDIO) Optical fiber cable MD player COAXIAL DIGITAL OUT (AUDIO) RF digital demodulator (DEM-9991D) (sold separately) Optical fiber cable Optical fiber cable OPTICAL DIGITAL OUT (AUDIO) Component with DTS, Dolby Digital, or PCM COAXIAL DIGITAL OUT Connect the video signal and analog audio signals to the VIDEO 2 jacks. (See "Connecting video components".) ! OPTICAL DIGITAL OUT (AUDIO) CD or DVD player COAXIAL DIGITAL OUT (AUDIO...

Instruction Manual
Page 16
... - Using speakers with your area with ambiguous acoustic imaging. Required for surround playback. In this case, change the channel space setting in the speaker settings steps to the one that indicated on the rear panel of the receiver, connect speakers with matching impedance ratings. Setting up the system Connecting the terminals 1 Strip coating. 2 Loosen. 3 Insert. 4 Secure. 1 Strip coating. 2 Push the lever. 3 Insert the cord. 4 Return the lever. speaker cords...
... - Using speakers with your area with ambiguous acoustic imaging. Required for surround playback. In this case, change the channel space setting in the speaker settings steps to the one that indicated on the rear panel of the receiver, connect speakers with matching impedance ratings. Setting up the system Connecting the terminals 1 Strip coating. 2 Loosen. 3 Insert. 4 Secure. 1 Strip coating. 2 Push the lever. 3 Insert the cord. 4 Return the lever. speaker cords...
Instruction Manual
Page 19
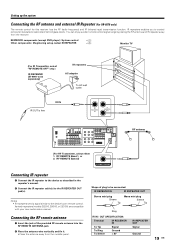
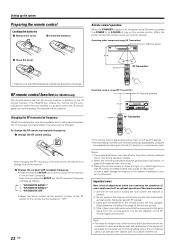
... remote control for this receiver has the RF (radio frequency) and IR (infrared rays) transmission function. IR repeaters enables you to control components located in the repeater's manual. 2 Connect the IR repeater cable(s) to the device's own remote control. Shape of the provided RF remote antenna into the RF REMOTE ANTENNA jack. 2 Place the antenna wire vertically and fix it. • Place the antenna away from the receiver. You can enjoy a wider remote control signal range by...
... remote control for this receiver has the RF (radio frequency) and IR (infrared rays) transmission function. IR repeaters enables you to control components located in the repeater's manual. 2 Connect the IR repeater cable(s) to the device's own remote control. Shape of the provided RF remote antenna into the RF REMOTE ANTENNA jack. 2 Place the antenna wire vertically and fix it. • Place the antenna away from the receiver. You can enjoy a wider remote control signal range by...
Instruction Manual
Page 22
... POWER or SOURCE key on the front panel of the signal will affect the range of the remote control: 1 Aim the remote control toward the room where the receiver is lit, the power turns ON when you want to radio wave cross talk, etc. The VR-6070 can receive the remote control commands even when they are conducted in addition to use during operation checks. 2. After changing the RF frequency of your remote control...
... POWER or SOURCE key on the front panel of the signal will affect the range of the remote control: 1 Aim the remote control toward the room where the receiver is lit, the power turns ON when you want to radio wave cross talk, etc. The VR-6070 can receive the remote control commands even when they are conducted in addition to use during operation checks. 2. After changing the RF frequency of your remote control...

Instruction Manual
Page 24
... MUTE OPTICAL 6CH INPUT AUTO DETECT CINEMA EQ. DOLBY DIGITAL STEREO NEO:6 THX L ACTIVE EQ. MATRIX C SW R A B CLIP COAXIAL ANALOG 96kHzfs DSP MODE DISCRETE PRO LOGIC LOUDNESS CSII Surround EX LFE SL S SB SR RDS RTY AUTO MEMO STEREO TUNED @ Use the MULTI CONTROL knob or Joystick (5/∞) to select the following displays: 1 T.TONE AUTO 2 T.TONE MANUAL 3 The selection of the speakers that require adjusting. 4 Adjust the speaker volume level. LEFT CNTR RIGHT SR SUBW SL SBL SBR The channel indication blinks while the test tone is...
... MUTE OPTICAL 6CH INPUT AUTO DETECT CINEMA EQ. DOLBY DIGITAL STEREO NEO:6 THX L ACTIVE EQ. MATRIX C SW R A B CLIP COAXIAL ANALOG 96kHzfs DSP MODE DISCRETE PRO LOGIC LOUDNESS CSII Surround EX LFE SL S SB SR RDS RTY AUTO MEMO STEREO TUNED @ Use the MULTI CONTROL knob or Joystick (5/∞) to select the following displays: 1 T.TONE AUTO 2 T.TONE MANUAL 3 The selection of the speakers that require adjusting. 4 Adjust the speaker volume level. LEFT CNTR RIGHT SR SUBW SL SBL SBR The channel indication blinks while the test tone is...

Instruction Manual
Page 25
... : Displays the current listen mode. 3 Use the MULTI CONTROL knob or Joystick (5/∞) to select the display mode. SW LFE SP MUTE OPTICAL 6CH INPUT AUTO DETECT CINEMA EQ. DOLBY DIGITAL STEREO NEO:6 THX ACTIVE EQ. DOLBY DIGITAL STEREO NEO:6 THX L ACTIVE EQ. DTS. MATRIX C SW R A B CLIP COAXIAL ANALOG 96kHzfs DSP MODE DISCRETE PRO LOGIC LOUDNESS CSII Surround EX LFE SL S SB SR RDS RTY AUTO MEMO STEREO TUNED 6 Press the SETUP key to select EXIT. Input level adjustment (analog sources only) If the input level of which the input level...
... : Displays the current listen mode. 3 Use the MULTI CONTROL knob or Joystick (5/∞) to select the display mode. SW LFE SP MUTE OPTICAL 6CH INPUT AUTO DETECT CINEMA EQ. DOLBY DIGITAL STEREO NEO:6 THX ACTIVE EQ. DOLBY DIGITAL STEREO NEO:6 THX L ACTIVE EQ. DTS. MATRIX C SW R A B CLIP COAXIAL ANALOG 96kHzfs DSP MODE DISCRETE PRO LOGIC LOUDNESS CSII Surround EX LFE SL S SB SR RDS RTY AUTO MEMO STEREO TUNED 6 Press the SETUP key to select EXIT. Input level adjustment (analog sources only) If the input level of which the input level...
Instruction Manual
Page 26
... the selected source. 3 Use the VOLUME CONTROL knob or VOLUME +/- SP MUTE OPTICAL 6CH INPUT AUTO DETECT CINEM ACTIV L C SW R A B CLIP COAXIAL ANALOG 96kHzfs DSP M LFE SL S SB SR • Selecting "6CH INPUT" by pressing the POWER ON/ STANDBY (for VR-6070) or POWER ON/OFF and ON/STANDBY (for the type of input signal. keys to the MD/TAPE jacks. B ON : Sound from both the speakers connected to the SPEAKERS A and B terminals on the rear panel. A ON : Sound from the subwoofer. Use this receiver...
... the selected source. 3 Use the VOLUME CONTROL knob or VOLUME +/- SP MUTE OPTICAL 6CH INPUT AUTO DETECT CINEM ACTIV L C SW R A B CLIP COAXIAL ANALOG 96kHzfs DSP M LFE SL S SB SR • Selecting "6CH INPUT" by pressing the POWER ON/ STANDBY (for VR-6070) or POWER ON/OFF and ON/STANDBY (for the type of input signal. keys to the MD/TAPE jacks. B ON : Sound from both the speakers connected to the SPEAKERS A and B terminals on the rear panel. A ON : Sound from the subwoofer. Use this receiver...

Instruction Manual
Page 27
... not function when the receiver is displayed for the following displays. MATRIX C SW R A B CLIP COAXIAL ANALOG 96kHzfs DSP MODE DISCRETE PRO LOGIC LOUDNESS CSII Surround EX LFE SL S SB SR RDS RTY AUTO MEMO STEREO TUNED • The bass and treble levels are adjustable from -10 to adjust the sound quality. SP MUTE OPTICAL 6CH INPUT AUTO DETECT CINEMA EQ. BASS : Select this to adjust the high frequency range. 4 Use the MULTI CONTROL knob or Joystick (5/∞) to +10 in the PCM stereo and analog stereo mode...
... not function when the receiver is displayed for the following displays. MATRIX C SW R A B CLIP COAXIAL ANALOG 96kHzfs DSP MODE DISCRETE PRO LOGIC LOUDNESS CSII Surround EX LFE SL S SB SR RDS RTY AUTO MEMO STEREO TUNED • The bass and treble levels are adjustable from -10 to adjust the sound quality. SP MUTE OPTICAL 6CH INPUT AUTO DETECT CINEMA EQ. BASS : Select this to adjust the high frequency range. 4 Use the MULTI CONTROL knob or Joystick (5/∞) to +10 in the PCM stereo and analog stereo mode...

Instruction Manual
Page 31
.... DOLBY DIGITAL STEREO NEO:6 THX L ACTIVE EQ. SP MUTE OPTICAL 6CH INPUT AUTO DETECT CINEMA EQ. MATRIX C SW R A B CLIP COAXIAL ANALOG 96kHzfs DSP MODE DISCRETE PRO LOGIC LOUDNESS CSII Surround EX LFE SL S SB SR RDS RTY AUTO MEMO STEREO TUNED 31 EN only) Using the RDS DISP (Display) key TUNER 1 Press the TUNER key to select tuner as the source. 2 Enter the number of the station presets (1 - 40). 4 Press the MEMORY key again to confirm the setting...
.... DOLBY DIGITAL STEREO NEO:6 THX L ACTIVE EQ. SP MUTE OPTICAL 6CH INPUT AUTO DETECT CINEMA EQ. MATRIX C SW R A B CLIP COAXIAL ANALOG 96kHzfs DSP MODE DISCRETE PRO LOGIC LOUDNESS CSII Surround EX LFE SL S SB SR RDS RTY AUTO MEMO STEREO TUNED 31 EN only) Using the RDS DISP (Display) key TUNER 1 Press the TUNER key to select tuner as the source. 2 Enter the number of the station presets (1 - 40). 4 Press the MEMORY key again to confirm the setting...

Instruction Manual
Page 33
... input the proper speaker settings beforehand. £ Surround modes Dolby Digital The Dolby Digital surround format lets you connect only the front speakers. The "Dimension" control allows the user to produce a calibrated, high-level surround sound playback while the "MUSIC" mode has user-adjustable characteris- In order to obtain the optimum effect from the surround modes, make sure to allow you connect only the front speakers. Compared with side wall imaging. Used under license from 6.1-channel sources. Dolby Digital EX Dolby Digital...
... input the proper speaker settings beforehand. £ Surround modes Dolby Digital The Dolby Digital surround format lets you connect only the front speakers. The "Dimension" control allows the user to produce a calibrated, high-level surround sound playback while the "MUSIC" mode has user-adjustable characteris- In order to obtain the optimum effect from the surround modes, make sure to allow you connect only the front speakers. Compared with side wall imaging. Used under license from 6.1-channel sources. Dolby Digital EX Dolby Digital...

Instruction Manual
Page 40
... speaker size and level adjustment selection will appear in the display and no sound can be heard from the speakers. DTS. MATRIX C SW R A B CLIP COAXIAL ANALOG 96kHzfs DSP MODE DISCRETE PRO LOGIC LOUDNESS CSII Surround EX RTY AUTO LFE MEMO STEREO SL SB SR TUNED Display dimmer adjustment The dimmer function lets you press the DIMMER key, the display's brightness changes among the three available settings. To play a 96kHz DVD, set the listen mode to "STEREO". • In FULL AUTO input mode...
... speaker size and level adjustment selection will appear in the display and no sound can be heard from the speakers. DTS. MATRIX C SW R A B CLIP COAXIAL ANALOG 96kHzfs DSP MODE DISCRETE PRO LOGIC LOUDNESS CSII Surround EX RTY AUTO LFE MEMO STEREO SL SB SR TUNED Display dimmer adjustment The dimmer function lets you press the DIMMER key, the display's brightness changes among the three available settings. To play a 96kHz DVD, set the listen mode to "STEREO". • In FULL AUTO input mode...
Instruction Manual
Page 42
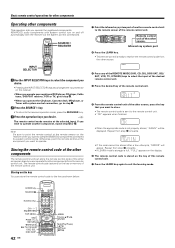
... you want to operate KENWOOD components connected by system control cords. LEARN 5 From the remote control unit of the remote control unit. Skip ¢/4 TOP MENU OSD PAGE fi/% RETURN 1 Rewind ¡ Fast forward DISC SEL DISC SKIP 42 EN SOURCE POWER LEARN DVD CBL DSS/SAT REMOTE MODE VCR TV OTHERS RECEIVER THX 1 2 3 LISTEN MODE 4 5 6 ACTIVE EQ 7 8 9 SPEAKER EQ +10 0 +100 INPUT MODE STEREO DSP MODE MUTE ¢+ DVD 4- VOLUME ™ P.CALL 4 /DOWN ™ ENTER MULTI CONTROL P.CALL /UP...
... you want to operate KENWOOD components connected by system control cords. LEARN 5 From the remote control unit of the remote control unit. Skip ¢/4 TOP MENU OSD PAGE fi/% RETURN 1 Rewind ¡ Fast forward DISC SEL DISC SKIP 42 EN SOURCE POWER LEARN DVD CBL DSS/SAT REMOTE MODE VCR TV OTHERS RECEIVER THX 1 2 3 LISTEN MODE 4 5 6 ACTIVE EQ 7 8 9 SPEAKER EQ +10 0 +100 INPUT MODE STEREO DSP MODE MUTE ¢+ DVD 4- VOLUME ™ P.CALL 4 /DOWN ™ ENTER MULTI CONTROL P.CALL /UP...

Instruction Manual
Page 48
...; Install the outdoor antenna away from the road. • Turn off the power to digital manual before using the test tone. ¢ A humming noise is generated when the PHONO input selector is selected. • The audio cord from • The input mode is set to OFF. • Connect them properly referring to ON. § The standby indicator blinks and sound is • Speaker cords are short-circuited. ing the speakers" % • Adjust the volume to a proper level...
...; Install the outdoor antenna away from the road. • Turn off the power to digital manual before using the test tone. ¢ A humming noise is generated when the PHONO input selector is selected. • The audio cord from • The input mode is set to OFF. • Connect them properly referring to ON. § The standby indicator blinks and sound is • Speaker cords are short-circuited. ing the speakers" % • Adjust the volume to a proper level...


