Instruction Manual
Page 2
... Before Use 4 Opening/Closing the Monitor and Power Switch 6 Removing/Attaching the Protection Panel 7 KVT-M707 Basic operations 8 Basic Operations of Remote Controller ... 10 Switch Screen Mode 12 Muting Audio Volume upon Reception of Phone call 13 Tuner Control 14 Displaying the Easy Control Panel Displaying the Tuner Control screen Displaying the Tuner Menu screen Seek Mode Auto Memory Manual Memory Preset Select Set Station Name Direct Search Traffic Information Search for Program Type Radio Text Disc Changer/CD player Control 20 Displaying the Easy Control Panel Displaying the Disc...
... Before Use 4 Opening/Closing the Monitor and Power Switch 6 Removing/Attaching the Protection Panel 7 KVT-M707 Basic operations 8 Basic Operations of Remote Controller ... 10 Switch Screen Mode 12 Muting Audio Volume upon Reception of Phone call 13 Tuner Control 14 Displaying the Easy Control Panel Displaying the Tuner Control screen Displaying the Tuner Menu screen Seek Mode Auto Memory Manual Memory Preset Select Set Station Name Direct Search Traffic Information Search for Program Type Radio Text Disc Changer/CD player Control 20 Displaying the Easy Control Panel Displaying the Disc...
Instruction Manual
Page 3
...54 Displaying the User I/F 1 screen Displaying the User I/F 2 screen Touch Panel Adjust Clock Security Code Setup Set Up Memory SIRIUS Setup 59 Displaying the SIRIUS Set Up screen DAB Set Up 60 Displaying the DAB Set Up screen Announcement Selection Sound Effects Menu Sound Effects Menu 62 Displaying the Control screen Displaying the Sound Effects Menu screen Audio Control 63 Displaying the Audio Control 1 screen Displaying the Audio Control 2 screen Equalizer 64 Displaying the Equalizer screen Tone curve setup Zone Control 66 Displaying the Zone Control screen Troubleshooting Guide 68...
...54 Displaying the User I/F 1 screen Displaying the User I/F 2 screen Touch Panel Adjust Clock Security Code Setup Set Up Memory SIRIUS Setup 59 Displaying the SIRIUS Set Up screen DAB Set Up 60 Displaying the DAB Set Up screen Announcement Selection Sound Effects Menu Sound Effects Menu 62 Displaying the Control screen Displaying the Sound Effects Menu screen Audio Control 63 Displaying the Audio Control 1 screen Displaying the Audio Control 2 screen Equalizer 64 Displaying the Equalizer screen Tone curve setup Zone Control 66 Displaying the Zone Control screen Troubleshooting Guide 68...
Instruction Manual
Page 4
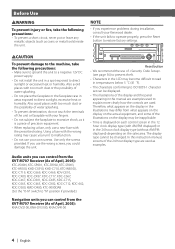
... experience problems during installation, consult your Kenwood dealer. • If the unit fails to operate properly, press the Reset button to restore factory settings. 2CAUTION To prevent damage to the machine, take the following precautions: • Make sure to ground the unit to a negative 12V DC power supply. • Do not install the unit in a spot exposed to "N" position if provided.) Navigation units you can be displayed. •...
... experience problems during installation, consult your Kenwood dealer. • If the unit fails to operate properly, press the Reset button to restore factory settings. 2CAUTION To prevent damage to the machine, take the following precautions: • Make sure to ground the unit to a negative 12V DC power supply. • Do not install the unit in a spot exposed to "N" position if provided.) Navigation units you can be displayed. •...
Instruction Manual
Page 9
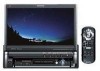
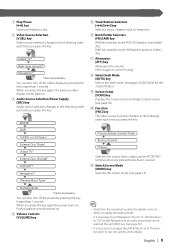
... accessory You can also turn off the video display by pressing the key longer than 1 second. q Switch Screen Mode [MODE] key Switches the screen mode. (see page 53) • It is pressed more than 1 second. English | 9 1 Play/Pause [38] key Pauses and replays a disc. 2 Video Source Selection [V.SEL] key Video source selection changes in the following order each time you press the key. Video/ TV* Rear view camera* Navigation* *Optional accessory You can...
... accessory You can also turn off the video display by pressing the key longer than 1 second. q Switch Screen Mode [MODE] key Switches the screen mode. (see page 53) • It is pressed more than 1 second. English | 9 1 Play/Pause [38] key Pauses and replays a disc. 2 Video Source Selection [V.SEL] key Video source selection changes in the following order each time you press the key. Video/ TV* Rear view camera* Navigation* *Optional accessory You can...

Instruction Manual
Page 11
... a station. w [2-ZONE] key TUNER TV DISC Turns Zone function on the navigation screen). r [MENU] key NAV Displays Main menu. q [OPEN] key TUNER TV DISC Opens or closes the monitor each time you press the key. (see page 16/26/34/38 for ) • It is on memory. NAV Switches between 2D and 3D map displays. 5 [V.SEL] key Video source selection changes in Shortcut 2. TV BAND: Switches to the function registered in Shortcut 1. NAV Jumps to rear iew camera video display. o [0] - [9] key TUNER...
... a station. w [2-ZONE] key TUNER TV DISC Turns Zone function on the navigation screen). r [MENU] key NAV Displays Main menu. q [OPEN] key TUNER TV DISC Opens or closes the monitor each time you press the key. (see page 16/26/34/38 for ) • It is on memory. NAV Switches between 2D and 3D map displays. 5 [V.SEL] key Video source selection changes in Shortcut 2. TV BAND: Switches to the function registered in Shortcut 1. NAV Jumps to rear iew camera video display. o [0] - [9] key TUNER...
Instruction Manual
Page 14
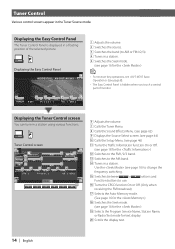
... 6 21 1 2 3 4 5 6 6 Adjusts the volume. 7 Calls the Tuner Menu. 8 Calls the Sound Effects Menu. (see page 62) 9 Displays the Source Select screen. (see page 44) p Calls the Setup Menu. (see page 46) q Turns the Traffic Information function On or Off. (see page 16 for the ) o Selects the Program Service Name, Station Name, or Radio Text mode for the ) w Switches to the AM band. t Switches between 1 to 6 buttons and Function buttons to use. Tuner Control Various control screens appear in a floating...
... 6 21 1 2 3 4 5 6 6 Adjusts the volume. 7 Calls the Tuner Menu. 8 Calls the Sound Effects Menu. (see page 62) 9 Displays the Source Select screen. (see page 44) p Calls the Setup Menu. (see page 46) q Turns the Traffic Information function On or Off. (see page 16 for the ) o Selects the Program Service Name, Station Name, or Radio Text mode for the ) w Switches to the AM band. t Switches between 1 to 6 buttons and Function buttons to use. Tuner Control Various control screens appear in a floating...

Instruction Manual
Page 16
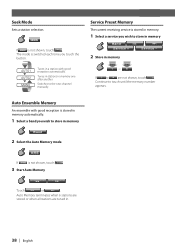
... switched in following order each time you wish to store in memory AM 2 Store in . • The operation ends automatically if you wish to the next channel manually. Continue to 6 are tuned in memory 2sec. 2sec. 1 - 6 If 1 to touch until the memory number appears. Tunes in stations in memory. 1 Select a station you touch the button. Manual Memory Stores the current receiving station in memory one after another. Seek Mode Sets a station selection. The mode...
... switched in following order each time you wish to store in memory AM 2 Store in . • The operation ends automatically if you wish to the next channel manually. Continue to 6 are tuned in memory 2sec. 2sec. 1 - 6 If 1 to touch until the memory number appears. Tunes in stations in memory. 1 Select a station you touch the button. Manual Memory Stores the current receiving station in memory one after another. Seek Mode Sets a station selection. The mode...

Instruction Manual
Page 18
... the audio source during traffic bulletin... • It is necessary to have Traffic Information function set to On in a station when its frequency is displayed automatically. Traffic Information screen 1 TUNER 2 3 1 13:50 4 TI 0 - 9 WXYZ When you do not operate within 10 seconds. When the traffic bulletin starts... Traffic Information 1 1 1 Adjusts the volume. 2 Calls the Sound Effects Menu. (see page 62) 3 Calls the Setup Menu. (see...
... the audio source during traffic bulletin... • It is necessary to have Traffic Information function set to On in a station when its frequency is displayed automatically. Traffic Information screen 1 TUNER 2 3 1 13:50 4 TI 0 - 9 WXYZ When you do not operate within 10 seconds. When the traffic bulletin starts... Traffic Information 1 1 1 Adjusts the volume. 2 Calls the Sound Effects Menu. (see page 62) 3 Calls the Setup Menu. (see...

Instruction Manual
Page 20
...; For Disc Changer/CD player playback and receiver key operations, see (see page 8). • The Easy Control Panel is held down. 8 Selects a disc. (Function of Disc Changer) t Switches the button display. Starts Fast Forward or Fast Rewind when it is hidden when you touch a central part of the monitor. 2 5 5 3 3 4 SRC CD CH D 1 D- q Repeats to play the Disc Changer/CD player using various functions. w Starts or stops Random Play (to play track...
...; For Disc Changer/CD player playback and receiver key operations, see (see page 8). • The Easy Control Panel is held down. 8 Selects a disc. (Function of Disc Changer) t Switches the button display. Starts Fast Forward or Fast Rewind when it is hidden when you touch a central part of the monitor. 2 5 5 3 3 4 SRC CD CH D 1 D- q Repeats to play the Disc Changer/CD player using various functions. w Starts or stops Random Play (to play track...
Instruction Manual
Page 24
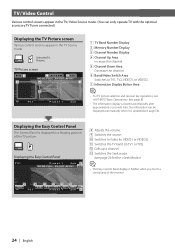
... Display Button Area • For TV picture selection and receiver key operations, see (see page 54). TV/ Video Control Various control screens appear in the TV/ Video Source mode. (You can be displayed automatically when it is updated (see page 8). • The information display is hidden when you touch a central area of the TV picture. Displaying the Easy Control Panel TV1 Preset 1 2ch 8 MODE:FULL AV-OUT:AV-IN1 8 Adjusts the volume. 9 Switches the source. q Switches the...
... Display Button Area • For TV picture selection and receiver key operations, see (see page 54). TV/ Video Control Various control screens appear in the TV/ Video Source mode. (You can be displayed automatically when it is updated (see page 8). • The information display is hidden when you touch a central area of the TV picture. Displaying the Easy Control Panel TV1 Preset 1 2ch 8 MODE:FULL AV-OUT:AV-IN1 8 Adjusts the volume. 9 Switches the source. q Switches the...

Instruction Manual
Page 25
... Sound Effects Menu. (see page 62) u Displays the Source Select screen. (see page 44) i Calls the Setup Menu. (see page 26) to use. h Seek Mode Indicator j Memory Number Display Displaying the TV Menu screen You can tune in a TV station using various functions. a Select a channel. Me n u TV Menu screen TV Preset Select Name Set 28 29 k Selects options from various function menus. t Calls the TV Menu. Switches to VIDEO1 or VIDEO2. ; Use the (see page 46) o Switches...
... Sound Effects Menu. (see page 62) u Displays the Source Select screen. (see page 44) i Calls the Setup Menu. (see page 26) to use. h Seek Mode Indicator j Memory Number Display Displaying the TV Menu screen You can tune in a TV station using various functions. a Select a channel. Me n u TV Menu screen TV Preset Select Name Set 28 29 k Selects options from various function menus. t Calls the TV Menu. Switches to VIDEO1 or VIDEO2. ; Use the (see page 46) o Switches...
Instruction Manual
Page 32
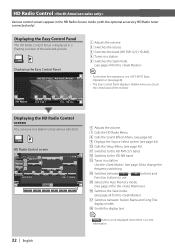
... - t Selects the Auto Memory mode. (See page 34 for the ) y Switches the Seek mode. (see page 34 for the ) • For receiver key operations, see (see page 34 for the ) u Switches between 1 to 6 buttons and Function buttons to the HD AM band. HD Radio Control Various control screens appear in the HD Radio Source mode. (with the optional accessory HD Radio tuner connected only) Displaying the Easy Control Panel The HD Radio Control Panel is no...
... - t Selects the Auto Memory mode. (See page 34 for the ) y Switches the Seek mode. (see page 34 for the ) • For receiver key operations, see (see page 34 for the ) u Switches between 1 to 6 buttons and Function buttons to the HD AM band. HD Radio Control Various control screens appear in the HD Radio Source mode. (with the optional accessory HD Radio tuner connected only) Displaying the Easy Control Panel The HD Radio Control Panel is no...
Instruction Manual
Page 38
... in memory Band 2 Select the Auto Memory mode AME If AME is stored in memory automatically. 1 Select a band you wish to 6 are tuned in memory one after another. The mode is not shown, touch Next . SEEK If SEEK is switched each time you wish to store in memory Band Service + Service - 2 Store in memory 2sec. 2sec. 1 - 6 If 1 to store in memory. 1 Select a service you touch the button. Seek Mode Sets a station...
... in memory Band 2 Select the Auto Memory mode AME If AME is stored in memory automatically. 1 Select a band you wish to 6 are tuned in memory one after another. The mode is not shown, touch Next . SEEK If SEEK is switched each time you wish to store in memory Band Service + Service - 2 Store in memory 2sec. 2sec. 1 - 6 If 1 to store in memory. 1 Select a service you touch the button. Seek Mode Sets a station...
Instruction Manual
Page 45
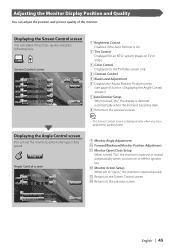
... opened quickly. Angle Control screen 9 9 10 10 11 AUTO OP-CL 12 M O N I M 7 7 6 8 1 Brightness Control Disabled if the Auto Dimmer is On. 2 Tint Control Displayed for an NTSC system image on TV or Video. 3 Color Control Displayed on or off the ignition key. Displaying the Angle Control screen You can set to "Quick", the monitor is opened or closed automatically when you have applied the parking brake. 9 Monitor Angle Adjustment p Forward/Backward Monitor Position Adjustment q Monitor Open/Close Setup When turned...
... opened quickly. Angle Control screen 9 9 10 10 11 AUTO OP-CL 12 M O N I M 7 7 6 8 1 Brightness Control Disabled if the Auto Dimmer is On. 2 Tint Control Displayed for an NTSC system image on TV or Video. 3 Color Control Displayed on or off the ignition key. Displaying the Angle Control screen You can set to "Quick", the monitor is opened or closed automatically when you have applied the parking brake. 9 Monitor Angle Adjustment p Forward/Backward Monitor Position Adjustment q Monitor Open/Close Setup When turned...
Instruction Manual
Page 52
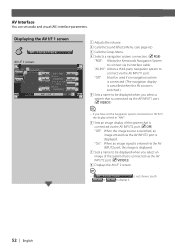
... AV source is switched.) 5 Sets a name to be displayed when you have set audio and visual (AV) interface parameters. Control during DVD Video or Video CD Playback AV Interface You can set the navigation system connection to "AV IN1", the display is fixed to "NAV". 6 Sets an image display of the system that is connected via the AV INPUT2 port is not shown, touch to display it. 52 | English Displaying the AV I/F 1 screen AV I /F 2 screen. •...
... AV source is switched.) 5 Sets a name to be displayed when you have set audio and visual (AV) interface parameters. Control during DVD Video or Video CD Playback AV Interface You can set the navigation system connection to "AV IN1", the display is fixed to "NAV". 6 Sets an image display of the system that is connected via the AV INPUT2 port is not shown, touch to display it. 52 | English Displaying the AV I/F 1 screen AV I /F 2 screen. •...
Instruction Manual
Page 53
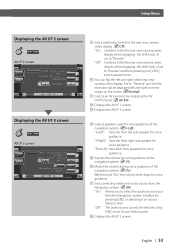
... OUTPUT port. ( AV-IN1) w Displays the AV I/F 1 screen. I N 1 9 10 11 13 Displaying the AV I/F 3 screen AV I /F 2 screen. "Off": Switches to the the rear view camera video display when engaging the shift knob of audio source from the Navigation system. ( Off) "On": Allows you to "Reverse" and then pressing the [V.SEL] switch several times. "F-Right": Uses the front right side speaker for voice guidance. English | 53 u Sets a selecting method of car to select the audio source input...
... OUTPUT port. ( AV-IN1) w Displays the AV I/F 1 screen. I N 1 9 10 11 13 Displaying the AV I/F 3 screen AV I /F 2 screen. "Off": Switches to the the rear view camera video display when engaging the shift knob of audio source from the Navigation system. ( Off) "On": Allows you to "Reverse" and then pressing the [V.SEL] switch several times. "F-Right": Uses the front right side speaker for voice guidance. English | 53 u Sets a selecting method of car to select the audio source input...
Instruction Manual
Page 56
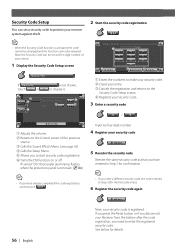
... completed the code registration, cannot touch S e t . • If you to start security code registration. 6 Turns the DSI function on or off. Note, the Security Code can set a security code to protect your security code. 3 Enter a security code 0 -9 Security 1 1 1 Adjusts the volume. 2 Returns to the Control screen of the previous source. 3 Calls the Sound Effects Menu. (see page 62) 4 Calls the Setup Menu. 5 Allows you enter a different security code, the screen returns...
... completed the code registration, cannot touch S e t . • If you to start security code registration. 6 Turns the DSI function on or off. Note, the Security Code can set a security code to protect your security code. 3 Enter a security code 0 -9 Security 1 1 1 Adjusts the volume. 2 Returns to the Control screen of the previous source. 3 Calls the Sound Effects Menu. (see page 62) 4 Calls the Setup Menu. 5 Allows you enter a different security code, the screen returns...
Instruction Manual
Page 63
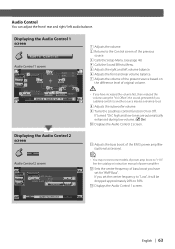
.... 8 Adjusts the subwoofer volume. 9 Turns the Loudness control function On or Off. Displaying the Audio Control 2 screen q Adjusts the bass boost of power amplifier. Audio Control 2 screen Me nu BMS AMP Bass 11 Flat BMS AMP FREQ 12 Normal 11 Low 12 • You may be dropped approximately 20% to the Control screen of the previous source. 3 Calls the Setup Menu. (see page 46) 4 Calls the Sound Effects Menu. 5 Adjusts the right and left audio balance. Before Use Audio Control You...
.... 8 Adjusts the subwoofer volume. 9 Turns the Loudness control function On or Off. Displaying the Audio Control 2 screen q Adjusts the bass boost of power amplifier. Audio Control 2 screen Me nu BMS AMP Bass 11 Flat BMS AMP FREQ 12 Normal 11 Low 12 • You may be dropped approximately 20% to the Control screen of the previous source. 3 Calls the Setup Menu. (see page 46) 4 Calls the Sound Effects Menu. 5 Adjusts the right and left audio balance. Before Use Audio Control You...
Instruction Manual
Page 68
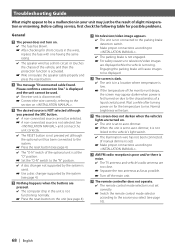
.... is displayed and the unit cannot be selected. A non-connected source is low. Nothing happens when the buttons are too close. Turn off the main unit. ? Use a disc changer supported by the system is activated. Engaging the parking brake will return. ? The screen is dark. ✔ The unit is in a location where temperature is not selected. Wire or insulate the speaker cable properly and press the reset button. ? Connect the wire correctly, referring...
.... is displayed and the unit cannot be selected. A non-connected source is low. Nothing happens when the buttons are too close. Turn off the main unit. ? Use a disc changer supported by the system is activated. Engaging the parking brake will return. ? The screen is dark. ✔ The unit is in a location where temperature is not selected. Wire or insulate the speaker cable properly and press the reset button. ? Connect the wire correctly, referring...
Instruction Manual
Page 69
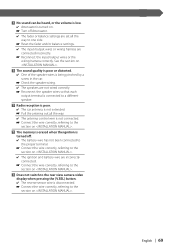
... balance settings. ✔ The input/output wires or wiring harness are not wired correctly. Radio reception is poor. ✔ The car antenna is not connected. Pull the antenna out all the way to the section on . The memory is erased when the ignition is disconnected. Does not switch to the section on . Check the speaker wiring. ✔ The speakers are connected incorrectly. Connect the wire correctly, referring to the rear view camera video display when...
... balance settings. ✔ The input/output wires or wiring harness are not wired correctly. Radio reception is poor. ✔ The car antenna is not connected. Pull the antenna out all the way to the section on . The memory is erased when the ignition is disconnected. Does not switch to the section on . Check the speaker wiring. ✔ The speakers are connected incorrectly. Connect the wire correctly, referring to the rear view camera video display when...


