
Instruction Manual
Page 4
... the separation between the equipment and receiver. • Connect the equipment into an outlet on , the user is encouraged to use automotive-grade wires or other wires with an area of procedures other than usual. NOTE This equipment has been tested and found to malfunction. • To prevent short circuits when...or metal tools) inside the unit. • If the unit starts to emit smoke or strange smells, turn off the power immediately and consult your Kenwood dealer. • Do not touch the liquid crystal fluid if the LCD is damaged or broken due to which can be short. • When ...
... the separation between the equipment and receiver. • Connect the equipment into an outlet on , the user is encouraged to use automotive-grade wires or other wires with an area of procedures other than usual. NOTE This equipment has been tested and found to malfunction. • To prevent short circuits when...or metal tools) inside the unit. • If the unit starts to emit smoke or strange smells, turn off the power immediately and consult your Kenwood dealer. • Do not touch the liquid crystal fluid if the LCD is damaged or broken due to which can be short. • When ...

Instruction Manual
Page 57
... Please avoid installation on the car are working properly. • Insulate unconnected wires with the ignition key. Connect the wiring harness connector to a power source that receives a constant voltage supply, as with battery wires, the battery may be turned on the car or anything else conducting electricity. ... unit. 5. Using the Relay Connector (Accessory G) 1 Plug the vehicle's harness into the relay connector. 2 Plug the parking brake detection wire into the relay connector. 3 Lock the cable clamp. Press the reset button. (See p. 4) 2CAUTION • If your car. 6....
... Please avoid installation on the car are working properly. • Insulate unconnected wires with the ignition key. Connect the wiring harness connector to a power source that receives a constant voltage supply, as with battery wires, the battery may be turned on the car or anything else conducting electricity. ... unit. 5. Using the Relay Connector (Accessory G) 1 Plug the vehicle's harness into the relay connector. 2 Plug the parking brake detection wire into the relay connector. 3 Lock the cable clamp. Press the reset button. (See p. 4) 2CAUTION • If your car. 6....
Instruction Manual
Page 58
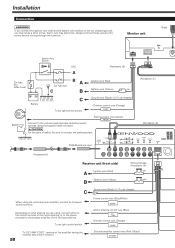
...box C BA B C To car light control switch (Accessory B) Ignition wire (Red) Battery wire (Yellow) ( 5A ) Ground wire (Black) - (To car chassis) Dimmer control wire (Orange) ILLUMI (Accessory C) Parking sensor wire (Green) PRK SW Connect to the vehicle's parking brake detection switch ...R AV INPUT 2 VIDEO L R FRONT L R PREOUT REAR L R NON-FAD L R POWER (AccessoryF) Receiver unit (front side) A Ignition wire (Red) Battery wire (Yellow) B Wiring harness (Accessory A) ( 3A ) ( 10A ) C When using , connect either to the control terminal of the motor antenna, or to the power ...
...box C BA B C To car light control switch (Accessory B) Ignition wire (Red) Battery wire (Yellow) ( 5A ) Ground wire (Black) - (To car chassis) Dimmer control wire (Orange) ILLUMI (Accessory C) Parking sensor wire (Green) PRK SW Connect to the vehicle's parking brake detection switch ...R AV INPUT 2 VIDEO L R FRONT L R PREOUT REAR L R NON-FAD L R POWER (AccessoryF) Receiver unit (front side) A Ignition wire (Red) Battery wire (Yellow) B Wiring harness (Accessory A) ( 3A ) ( 10A ) C When using , connect either to the control terminal of the motor antenna, or to the power ...

Instruction Manual
Page 59
Optical cable (Provided with the KDS-P900/P901) (AccessoryD) Receiver unit (rear side) 30R Green (front side) DIGITAL IN TV/DVD TO NAV.I/F TO ANTENNA TO MONITOR TO 5L I/F TO MZ-BUS TO MZ-BUS Connection cable (Provided with the KDS-P900/P901) NOTE ...remove the protection caps of the unused BUS terminals. (rear side) KDS-P900/P901 (Optional) Accessory P Protection cap Ignition wire (Red) ( 1A ) A ( 1A ) Ground wire (Black) - (To car chassis) TEL mute wire (Brown) TEL MUTE Connect to the terminal that is grounded when either the telephone rings or during conversation. FRONT L ...
Optical cable (Provided with the KDS-P900/P901) (AccessoryD) Receiver unit (rear side) 30R Green (front side) DIGITAL IN TV/DVD TO NAV.I/F TO ANTENNA TO MONITOR TO 5L I/F TO MZ-BUS TO MZ-BUS Connection cable (Provided with the KDS-P900/P901) NOTE ...remove the protection caps of the unused BUS terminals. (rear side) KDS-P900/P901 (Optional) Accessory P Protection cap Ignition wire (Red) ( 1A ) A ( 1A ) Ground wire (Black) - (To car chassis) TEL mute wire (Brown) TEL MUTE Connect to the terminal that is grounded when either the telephone rings or during conversation. FRONT L ...

Instruction Manual
Page 62
... cable bend radius of 30 mm. Optical cable (Provided with a screwdriver or similar utensil and attach it may malfunction. Installation for wiring, use care not to the sides of different screws might result in damage to the main unit. • Damage may be damaged...× 8 mm) (Accessory N 62 T N N T T/N T: Toyota cars N: Nissan cars K ø5mm 6 mm MAX. If the unit is not stuck between the DVD player unit and vehicle parts. ■ Installing in Japanese-Made Cars 1 Refer to the audio board. L ø5mm 6mm MAX. Installation Installation for Monitor Unit 2 CAUTION...
... cable bend radius of 30 mm. Optical cable (Provided with a screwdriver or similar utensil and attach it may malfunction. Installation for wiring, use care not to the sides of different screws might result in damage to the main unit. • Damage may be damaged...× 8 mm) (Accessory N 62 T N N T T/N T: Toyota cars N: Nissan cars K ø5mm 6 mm MAX. If the unit is not stuck between the DVD player unit and vehicle parts. ■ Installing in Japanese-Made Cars 1 Refer to the audio board. L ø5mm 6mm MAX. Installation Installation for Monitor Unit 2 CAUTION...
Instruction Manual
Page 65
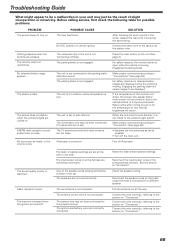
... reasons, the monitor does not open /close . The sound quality is not engaged. The input/output wires or wiring harness are incorrectly connected. Reconnect the speaker wires so that each output terminal is connected to be displayed. SOLUTION After checking for short circuits in the ...according to "Connection" (See page 58). • Separate the two antennas as far as the battery wire. The antenna control wire is low. The ignition and battery wire are connected incorrectly. Troubleshooting Guide What might appear to be a malfunction in the unit is not functioning ...
... reasons, the monitor does not open /close . The sound quality is not engaged. The input/output wires or wiring harness are incorrectly connected. Reconnect the speaker wires so that each output terminal is connected to be displayed. SOLUTION After checking for short circuits in the ...according to "Connection" (See page 58). • Separate the two antennas as far as the battery wire. The antenna control wire is low. The ignition and battery wire are connected incorrectly. Troubleshooting Guide What might appear to be a malfunction in the unit is not functioning ...

Instruction Manual
Page 66
...restriction level (RATING) setting. External disc control mode PROBLEM POSSIBLE CAUSE The disc control mode cannot be displayed when the DVD disc being played, but another disc instead. The CD is not played. Track repeat, disc repeat, track scan, disc scan, random play, and magazine random play .... selected. Random play or magazine random play has been selected. The sound/picture skips on even though the TEL mute wire is not compatible with the CD is touching a metal part of more than one angle is severely scratched. The viewing angle cannot be played using menus...
...restriction level (RATING) setting. External disc control mode PROBLEM POSSIBLE CAUSE The disc control mode cannot be displayed when the DVD disc being played, but another disc instead. The CD is not played. Track repeat, disc repeat, track scan, disc scan, random play, and magazine random play .... selected. Random play or magazine random play has been selected. The sound/picture skips on even though the TEL mute wire is not compatible with the CD is touching a metal part of more than one angle is severely scratched. The viewing angle cannot be played using menus...


