
Instruction Manual
Page 1
..., in the spaces designated on the product. Model KRC-535 Serial number ©B64-2154-00 (KW) KRC-535 CASSETTE RECEIVER INSTRUCTION MANUAL AMPLI-TUNER-LECTEUR DE CASSETTE MODE D'EMPLOI RADIO CASSETTE MANUAL DE INSTRUCCIONES Take the time to the model and serial numbers whenever you obtain the best performance from your KENWOOD dealer for information or service on the warranty...
..., in the spaces designated on the product. Model KRC-535 Serial number ©B64-2154-00 (KW) KRC-535 CASSETTE RECEIVER INSTRUCTION MANUAL AMPLI-TUNER-LECTEUR DE CASSETTE MODE D'EMPLOI RADIO CASSETTE MANUAL DE INSTRUCCIONES Take the time to the model and serial numbers whenever you obtain the best performance from your KENWOOD dealer for information or service on the warranty...

Instruction Manual
Page 2
... the Control Panel Tuner features 10 Tuning Mode Tuning Direct Access Tuning Station Preset Memory Auto Memory Entry Preset Tuning Cassette player features...........12 Playing Cassette Tapes Fast Forwarding and Rewinding Dolby B NR Selecting the Tape type DPSS (Direct Program Search System) DPSS with ...Magazine Random Play Text/Title Scroll DNPP (Disc Name Preset Play) Menu system 18 Menu System Security Code Touch Sensor Tone Manual Clock Adjustment Selectable Illumination Switching Graphic Display Contrast Adjustment Dimmer OFF Wait Time Setting CRSC (Clean Reception System Circuit) Text ...
... the Control Panel Tuner features 10 Tuning Mode Tuning Direct Access Tuning Station Preset Memory Auto Memory Entry Preset Tuning Cassette player features...........12 Playing Cassette Tapes Fast Forwarding and Rewinding Dolby B NR Selecting the Tape type DPSS (Direct Program Search System) DPSS with ...Magazine Random Play Text/Title Scroll DNPP (Disc Name Preset Play) Menu system 18 Menu System Security Code Touch Sensor Tone Manual Clock Adjustment Selectable Illumination Switching Graphic Display Contrast Adjustment Dimmer OFF Wait Time Setting CRSC (Clean Reception System Circuit) Text ...
Instruction Manual
Page 4
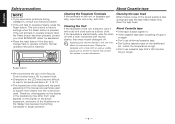
...the display in actual operation. -4- Cleaning the Unit If the faceplate of the illustrations on the actual equipment, and some of this manual are examples used to operate properly, press the Reset button. Cleaning the tape head When there's noise or the sound quality is stained, ...unit still fails to operate properly after the Reset button has been pressed, contact your Kenwood dealer. • If the unit fails to explain more clearly how the controls are used. About Cassette tape Cleaning the Faceplate Terminals If the terminals on the dashboard etc. English Safety precautions...
...the display in actual operation. -4- Cleaning the Unit If the faceplate of the illustrations on the actual equipment, and some of this manual are examples used to operate properly, press the Reset button. Cleaning the tape head When there's noise or the sound quality is stained, ...unit still fails to operate properly after the Reset button has been pressed, contact your Kenwood dealer. • If the unit fails to explain more clearly how the controls are used. About Cassette tape Cleaning the Faceplate Terminals If the terminals on the dashboard etc. English Safety precautions...
Instruction Manual
Page 8
...is displayed. 3 Move the cursor to Auxiliary input source. 1 Select Auxiliary input source Press the [SRC] button. External CD changer/ player: Varies according to name it switches between clock display and current source. "NAME SET" is entered. Character type Alphabet upper case Alphabet lower...2 "C" [#2] 3 "E" [#3] 2 6 Repeat steps 3 through 5 and enter the name. 7 Exit name set mode Press the [NAME.S] button for at least 2 seconds. Refer to the CD changer/ player manual. • The title of station/CD can be changed by using a remote with a number buttons.
...is displayed. 3 Move the cursor to Auxiliary input source. 1 Select Auxiliary input source Press the [SRC] button. External CD changer/ player: Varies according to name it switches between clock display and current source. "NAME SET" is entered. Character type Alphabet upper case Alphabet lower...2 "C" [#2] 3 "E" [#3] 2 6 Repeat steps 3 through 5 and enter the name. 7 Exit name set mode Press the [NAME.S] button for at least 2 seconds. Refer to the CD changer/ player manual. • The title of station/CD can be changed by using a remote with a number buttons.

Instruction Manual
Page 11
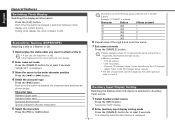
...[#0], [#9], [#2], [#1] [#0], [#8], [#1], [#0] Canceling Direct Access Tuning Press the [DIRECT] button on the remote. Press the [AUTO] button. Normal manual tuning control. Tuning Selecting the station. During reception of stereo stations the "ST" indicator is pressed it switches between the FM1, FM2, and FM3... mode switches as shown below. Search in the Preset memory. Tuning mode Display Operation Auto seek Preset station seek Manual "Auto1" "Auto2" "Manual" Automatic search for at least 2 seconds. Direct Access Tuning (Function of the stations in order of remote) Entering...
...[#0], [#9], [#2], [#1] [#0], [#8], [#1], [#0] Canceling Direct Access Tuning Press the [DIRECT] button on the remote. Press the [AUTO] button. Normal manual tuning control. Tuning Selecting the station. During reception of stereo stations the "ST" indicator is pressed it switches between the FM1, FM2, and FM3... mode switches as shown below. Search in the Preset memory. Tuning mode Display Operation Auto seek Preset station seek Manual "Auto1" "Auto2" "Manual" Automatic search for at least 2 seconds. Direct Access Tuning (Function of the stations in order of remote) Entering...

Instruction Manual
Page 18
functions. The Menu system basic operation method is required when it switches "Beep ON" or "Beep OFF". You can continue by returning to step 2 and setting other items that aren't applicable (etc.) are entered step by the Security Code is explained here. Example: When you want to the basic operation method above are displayed afterwards their setting content is the original setting.) Also, the explanation for at least 1 second. The reference for the Menu items and their setting content chart is entered. (Normally the uppermost setting in the chart is after this ...
functions. The Menu system basic operation method is required when it switches "Beep ON" or "Beep OFF". You can continue by returning to step 2 and setting other items that aren't applicable (etc.) are entered step by the Security Code is explained here. Example: When you want to the basic operation method above are displayed afterwards their setting content is the original setting.) Also, the explanation for at least 1 second. The reference for the Menu items and their setting content chart is entered. (Normally the uppermost setting in the chart is after this ...

Instruction Manual
Page 20
.... 2 Enter Clock Adjust mode Press the [4] or [¢] button for at least 1 second. Switching Graphic Display Setting the graphic part display ON/OFF. Menu system Manual Clock Adjustment 1 Select Clock Adjustment mode Press the [FM] or [AM] button.
.... 2 Enter Clock Adjust mode Press the [4] or [¢] button for at least 1 second. Switching Graphic Display Setting the graphic part display ON/OFF. Menu system Manual Clock Adjustment 1 Select Clock Adjustment mode Press the [FM] or [AM] button.

Instruction Manual
Page 25
...) 42 Battery 43 + - ACC 44 Car fuse box 45 Ignition wire (Red) 46 Battery wire (Yellow) 47 Ground wire (Black) - (To car chassis) 48 To KENWOOD disc changer/ DAB control input/KPA-SD100/ KPA-HD100/KPA-SS100 25 To connect these leads, refer to the power terminal for the booster amplifier... of the motor antenna, or to the relevant instruction manuals. 26 28 White/Black To front left FRONT • L + speaker 29 White 30 31 Gray/Black To front right FRONT • R + speaker 32 Gray 33...
...) 42 Battery 43 + - ACC 44 Car fuse box 45 Ignition wire (Red) 46 Battery wire (Yellow) 47 Ground wire (Black) - (To car chassis) 48 To KENWOOD disc changer/ DAB control input/KPA-SD100/ KPA-HD100/KPA-SS100 25 To connect these leads, refer to the power terminal for the booster amplifier... of the motor antenna, or to the relevant instruction manuals. 26 28 White/Black To front left FRONT • L + speaker 29 White 30 31 Gray/Black To front right FRONT • R + speaker 32 Gray 33...


