

Instruction Manual
Page 1
..., and in the spaces designated on the product. For your new monitor. Familiarity with installation and operation procedures will help you call upon your Kenwood product at www.Kenwoodusa.com © B64-3528-00/00 (WV) KOS-L702 WIDE TOUCH SCREEN MONITOR 7 page 2-11 INSTRUCTION MANUAL MONITEUR ECRAN LARGE TACTILE 7 page 12-21 MODE D'EMPLOI WIDE...
..., and in the spaces designated on the product. For your new monitor. Familiarity with installation and operation procedures will help you call upon your Kenwood product at www.Kenwoodusa.com © B64-3528-00/00 (WV) KOS-L702 WIDE TOUCH SCREEN MONITOR 7 page 2-11 INSTRUCTION MANUAL MONITEUR ECRAN LARGE TACTILE 7 page 12-21 MODE D'EMPLOI WIDE...
Instruction Manual
Page 2
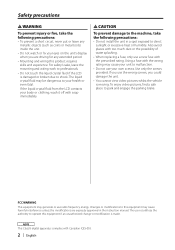
... complies with soap immediately. 2 CAUTION To prevent damage to the machine, take the following precautions: • Do not install the unit in the instruction manual. For safety's sake, leave the mounting and wiring work to professionals. • Do not touch the liquid crystal fluid if the... LCD is made. If you use your own screws. Safety precautions 2 WARNING To prevent injury or fire, take the following precautions: • To prevent a short circuit...
... complies with soap immediately. 2 CAUTION To prevent damage to the machine, take the following precautions: • Do not install the unit in the instruction manual. For safety's sake, leave the mounting and wiring work to professionals. • Do not touch the liquid crystal fluid if the... LCD is made. If you use your own screws. Safety precautions 2 WARNING To prevent injury or fire, take the following precautions: • To prevent a short circuit...

Instruction Manual
Page 3
...is stained, wipe it again with a hard cloth or using the monitor for details in actual operation. Old electrical and electronic equipment should be...waste byproducts. Cleaning the Unit If the faceplate of this manual are examples used to explain more clearly how the controls... problems during installation, consult your Kenwood dealer. • When you purchase optional accessories, check with your Kenwood dealer to make sure that have...the illustrations on the display may differ from the KOS-L702 (As of March, 2007): KOS-V500, KOS-V1000 • The illustrations of Old Electrical ...
...is stained, wipe it again with a hard cloth or using the monitor for details in actual operation. Old electrical and electronic equipment should be...waste byproducts. Cleaning the Unit If the faceplate of this manual are examples used to explain more clearly how the controls... problems during installation, consult your Kenwood dealer. • When you purchase optional accessories, check with your Kenwood dealer to make sure that have...the illustrations on the display may differ from the KOS-L702 (As of March, 2007): KOS-V500, KOS-V1000 • The illustrations of Old Electrical ...
Instruction Manual
Page 4
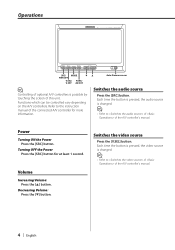
... FUNC/ V.OFF AV OUT Auto Dimmer sensor ⁄ Controlling of optional A/V controllers is possible by touching the screen of the A/V controller's manual. 4 | English Switches the audio source Press the [SRC] button. Switches the video source Press the [V.SEL] button. Power Turning ON the...;] button. Each time the button is pressed, the video source is changed . ⁄ • Refer to the instruction manual of the A/V controller's manual. Volume Increasing Volume: Press the [5] button. Functions which can be controlled vary depending on the A/V controllers. Each time the...
... FUNC/ V.OFF AV OUT Auto Dimmer sensor ⁄ Controlling of optional A/V controllers is possible by touching the screen of the A/V controller's manual. 4 | English Switches the audio source Press the [SRC] button. Switches the video source Press the [V.SEL] button. Power Turning ON the...;] button. Each time the button is pressed, the video source is changed . ⁄ • Refer to the instruction manual of the A/V controller's manual. Volume Increasing Volume: Press the [5] button. Functions which can be controlled vary depending on the A/V controllers. Each time the...

Instruction Manual
Page 5
... Justify picture mode Normal picture mode ⁄ • Refer to of of the A/V controller's manual. • When you select the Menu, Easy Control screen, or Navigation, the display is shown... Easy Control Panel Source Control Screen Picture Panel (OFF) ⁄ • Refer to of the A/V controller's manual. Press the [FUNC] button for at least 1 second, the AV output is pressed for at least 1 second.... can set the display off mode Press any button. The screen mode of the A/V controller's manual. Press the [FUNC] button. Exit the Display off mode for at the "AV OUTPUT" ...
... Justify picture mode Normal picture mode ⁄ • Refer to of of the A/V controller's manual. • When you select the Menu, Easy Control screen, or Navigation, the display is shown... Easy Control Panel Source Control Screen Picture Panel (OFF) ⁄ • Refer to of the A/V controller's manual. Press the [FUNC] button for at least 1 second, the AV output is pressed for at least 1 second.... can set the display off mode Press any button. The screen mode of the A/V controller's manual. Press the [FUNC] button. Exit the Display off mode for at the "AV OUTPUT" ...
Instruction Manual
Page 7
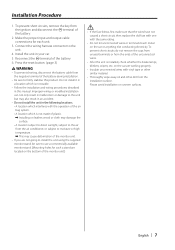
To prevent short circuits, remove the key from the negative terminal of the monitor unit. • If you are not going to install the unit using the supplied monitor stand, be sure to firmly stabilise this manual. Do not install it in a location which is installed, check whether the brake ... in malfunction or damage to the unit but may cause deformation of the battery during installation. • Be sure to use a commercially available monitor stand. (Mounting holes for each unit. 3. on the car are located on uneven surfaces. Make the proper input and output cable connections for...
To prevent short circuits, remove the key from the negative terminal of the monitor unit. • If you are not going to install the unit using the supplied monitor stand, be sure to firmly stabilise this manual. Do not install it in a location which is installed, check whether the brake ... in malfunction or damage to the unit but may cause deformation of the battery during installation. • Be sure to use a commercially available monitor stand. (Mounting holes for each unit. 3. on the car are located on uneven surfaces. Make the proper input and output cable connections for...
Instruction Manual
Page 8
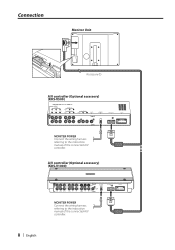
A/V controller (Optional accessory) (KOS-V1000) FM/ AM PRE OUT SUB REAR FRONT VIDEO AV IN 2 AV IN 1 VIDEO AV OUT 2 MONITOR POWER AV OUT 1 R-CAM V-IN MONITOR I/F POWER MONITER POWER Connect the wiring harness referring to the instruction manual of the connected A/V controller. 8 | English Connection Monitor Unit L ANTENNA FM/AM Accessory 1 A/V controller (Optional accessory) (KOS-V500) MONITER POWER Connect the wiring harness referring to the instruction manual of the connected A/V controller.
A/V controller (Optional accessory) (KOS-V1000) FM/ AM PRE OUT SUB REAR FRONT VIDEO AV IN 2 AV IN 1 VIDEO AV OUT 2 MONITOR POWER AV OUT 1 R-CAM V-IN MONITOR I/F POWER MONITER POWER Connect the wiring harness referring to the instruction manual of the connected A/V controller. 8 | English Connection Monitor Unit L ANTENNA FM/AM Accessory 1 A/V controller (Optional accessory) (KOS-V500) MONITER POWER Connect the wiring harness referring to the instruction manual of the connected A/V controller.
Instruction Manual
Page 11
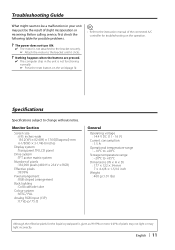
... may light incorrectly. Specifications Specifications subject to change without notice. Monitor Section Screen size : 6.95 inches wide 156.2(W) × 82.4(H) × 176.0(Diagonal) mm 6-1/8(W) × 3-1/4(H) inches Display system : Transparent TN LCD panel Drive system : TFT active matrix system Number of the connected...in the unit is not functioning normally. ☞ Press the reset button on the unit (page 3). ⁄ • Refer to the instruction manual of pixels : 336,960 pixels (480 H × 234 V × RGB) Effective pixels : 99.99% Pixel arrangement : RGB striped ...
... may light incorrectly. Specifications Specifications subject to change without notice. Monitor Section Screen size : 6.95 inches wide 156.2(W) × 82.4(H) × 176.0(Diagonal) mm 6-1/8(W) × 3-1/4(H) inches Display system : Transparent TN LCD panel Drive system : TFT active matrix system Number of the connected...in the unit is not functioning normally. ☞ Press the reset button on the unit (page 3). ⁄ • Refer to the instruction manual of pixels : 336,960 pixels (480 H × 234 V × RGB) Effective pixels : 99.99% Pixel arrangement : RGB striped ...


