
Instruction Manual
Page 2
...Changes or modifications not expressly approved by one or more of Conformity Trade Name: KENWOOD Products: DIGITAL MEDIA RECEIVER Model Name: KMM-BT728HD/KMM-X704/KMM-BT328U/KMM-BT328/ KMM-BT260U/KMM-BT228U/KMR-M328BT Responsible Party: JVCKENWOOD USA CORPORATION 2201 East Dominguez Street, Long Beach, CA 90810...handling may cause harmful interference to radio or television reception, which can radiate radio frequency energy and, if not installed and used in a residential installation. Información acerca de la eliminación de equipos eléctricos y electrónicos al final de...
...Changes or modifications not expressly approved by one or more of Conformity Trade Name: KENWOOD Products: DIGITAL MEDIA RECEIVER Model Name: KMM-BT728HD/KMM-X704/KMM-BT328U/KMM-BT328/ KMM-BT260U/KMM-BT228U/KMR-M328BT Responsible Party: JVCKENWOOD USA CORPORATION 2201 East Dominguez Street, Long Beach, CA 90810...handling may cause harmful interference to radio or television reception, which can radiate radio frequency energy and, if not installed and used in a residential installation. Información acerca de la eliminación de equipos eléctricos y electrónicos al final de...
Instruction Manual
Page 3
This device must not be installed and operated keeping the radiator at the time the User (hereinafter the "User") initially used the Product in the Product. 2. L'appareil doit accepter tout brouillage ... exempts de licence. L'exploitation est autorisée aux deux conditions suivantes : 1. CAUTION This equipment complies with the Licensed Software. Cet équipement doit être installé et utilisé en gardant une distance de 20 cm ou plus entre le radiateur et le corps humain. This Agreement shall be deemed...
This device must not be installed and operated keeping the radiator at the time the User (hereinafter the "User") initially used the Product in the Product. 2. L'appareil doit accepter tout brouillage ... exempts de licence. L'exploitation est autorisée aux deux conditions suivantes : 1. CAUTION This equipment complies with the Licensed Software. Cet équipement doit être installé et utilisé en gardant une distance de 20 cm ou plus entre le radiateur et le corps humain. This Agreement shall be deemed...

Instruction Manual
Page 8
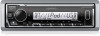
...displays or faceplates. • Operations are explained mainly using buttons on the stated page. Audio AMAZON ALEXA 28 Audio Settings 29 Display Settings 33 Installation/Connection 35 References 39 Maintenance More information Change the display information Troubleshooting 42 Specifications 45 How to provide clear explanations of explanation. This symbol on... settings HD RadioTM Tuner 8 Radio ...10 USB/iPod 11 Pandora 14 Spotify ...15 SiriusXM® Radio 17 AUX...20 Using Other Applications 20 KENWOOD Remote application Tuneln Radio/Tuneln Radio Pro Bluetooth 22 Bluetooth -
...displays or faceplates. • Operations are explained mainly using buttons on the stated page. Audio AMAZON ALEXA 28 Audio Settings 29 Display Settings 33 Installation/Connection 35 References 39 Maintenance More information Change the display information Troubleshooting 42 Specifications 45 How to provide clear explanations of explanation. This symbol on... settings HD RadioTM Tuner 8 Radio ...10 USB/iPod 11 Pandora 14 Spotify ...15 SiriusXM® Radio 17 AUX...20 Using Other Applications 20 KENWOOD Remote application Tuneln Radio/Tuneln Radio Pro Bluetooth 22 Bluetooth -

Instruction Manual
Page 20
... control) to select the desired station. 4 Press the volume knob (or press ENT IW on the remote control) to confirm. Broadcast starts automatically. Preparation: • Install the latest version of the number buttons (3, 4 or 5). Press T. To select a stored station: Press one of You can also connect the iPhone/iPod touch or...
... control) to select the desired station. 4 Press the volume knob (or press ENT IW on the remote control) to confirm. Broadcast starts automatically. Preparation: • Install the latest version of the number buttons (3, 4 or 5). Press T. To select a stored station: Press one of You can also connect the iPhone/iPod touch or...

Instruction Manual
Page 21
... device via Bluetooth. (Page 22) • Make sure the USB input terminal is not connected to any device when you connect via Bluetooth). Preparation: • Install the latest version of the unit (USB input terminal). "BOOKMARKED" appears and the information is stored to the USB input terminal. Spotify You can also...
... device via Bluetooth. (Page 22) • Make sure the USB input terminal is not connected to any device when you connect via Bluetooth). Preparation: • Install the latest version of the unit (USB input terminal). "BOOKMARKED" appears and the information is stored to the USB input terminal. Spotify You can also...

Instruction Manual
Page 26
...shaped connector (commercially available) 2 Press B SRC repeatedly to music from the [FUNCTION] menu. To return to exit. Using Other Applications KENWOOD Remote application You can listen to select AUX. 3 Turn on your device. 2 Connect your device before connecting. To use iPhone/iPod...Select [ON] for [IOS]. • For / / / / , "R.APP" indicator lights up the KENWOOD Remote application on the portable audio player and start playback. Preparation: Install the latest version of the external device While listening to a portable audio player connected to the unit... 1 Press...
...shaped connector (commercially available) 2 Press B SRC repeatedly to music from the [FUNCTION] menu. To return to exit. Using Other Applications KENWOOD Remote application You can listen to select AUX. 3 Turn on your device. 2 Connect your device before connecting. To use iPhone/iPod...Select [ON] for [IOS]. • For / / / / , "R.APP" indicator lights up the KENWOOD Remote application on the portable audio player and start playback. Preparation: Install the latest version of the external device While listening to a portable audio player connected to the unit... 1 Press...
Instruction Manual
Page 34
...... 1 Press on the screen of this unit appears on the unit to speak with your smartphone: https://www.kenwood.com/car/alexa Option B: Manual Pairing 1 Start up the Alexa mobile application and go to play music, get... the Alexa mobile application. You can ask Alexa to the "Devices" tab. 2 Tap the " + " icon at . • Install the latest version of your device. 3 Press on the unit to enter ALEXA source. • You may also press B SRC repeatedly ... application on your receiver ("KMM-BT728HD"/"KMM-X704"/ "KMM-BT328U"/"KMM-BT260U"/"KMR-M328BT") and follow the instructions.
...... 1 Press on the screen of this unit appears on the unit to speak with your smartphone: https://www.kenwood.com/car/alexa Option B: Manual Pairing 1 Start up the Alexa mobile application and go to play music, get... the Alexa mobile application. You can ask Alexa to the "Devices" tab. 2 Tap the " + " icon at . • Install the latest version of your device. 3 Press on the unit to enter ALEXA source. • You may also press B SRC repeatedly ... application on your receiver ("KMM-BT728HD"/"KMM-X704"/ "KMM-BT328U"/"KMM-BT260U"/"KMR-M328BT") and follow the instructions.

Instruction Manual
Page 41
.... • Do not connect Battery wire (yellow) and Ignition wire (red) to the car chassis or Ground wire (black) to professionals. See "Installing the unit (in the console of this unit to turn on page 36. 4 Connect the terminal of the car battery. 5 Press BSRC to the ...(D) Wiring harness (×1) (E) Extraction key (×2) (F) Screws* M5 × 7 mm (×4) M5 × 6 mm (×4) M4 × 8 mm (×1) * Supplied for the professional installer. Metal parts such as the heat sink and enclosure become hot. • Do not connect the wires of speakers to the car chassis or Ground...
.... • Do not connect Battery wire (yellow) and Ignition wire (red) to the car chassis or Ground wire (black) to professionals. See "Installing the unit (in the console of this unit to turn on page 36. 4 Connect the terminal of the car battery. 5 Press BSRC to the ...(D) Wiring harness (×1) (E) Extraction key (×2) (F) Screws* M5 × 7 mm (×4) M5 × 6 mm (×4) M4 × 8 mm (×1) * Supplied for the professional installer. Metal parts such as the heat sink and enclosure become hot. • Do not connect the wires of speakers to the car chassis or Ground...

Instruction Manual
Page 42
... arrows as shown on the top side Orientate the trim plate as illustrated before fitting. Using wrong screws might damage the unit. Installation/Connection Installing the unit (in-dash mounting) Installing the unit (without mounting sleeve) 1 Remove the mounting sleeve and trim plate from the unit. 2 Align the holes in place. 36 ENGLISH...
... arrows as shown on the top side Orientate the trim plate as illustrated before fitting. Using wrong screws might damage the unit. Installation/Connection Installing the unit (in-dash mounting) Installing the unit (without mounting sleeve) 1 Remove the mounting sleeve and trim plate from the unit. 2 Align the holes in place. 36 ENGLISH...

Instruction Manual
Page 43
... made, do not let the wire come out from the tab. Consult your car audio dealer. Installation/Connection Wiring connection Fuse (10 A) IMPORTANT We recommend installing the unit with a commercially available custom wiring harness specific for your car and leave this job to... the antenna control terminal in the vehicle (For / / / / / ) To the steering wheel remote control adapter (For ) To KENWOOD Marine Remote Control unit (optional...
... made, do not let the wire come out from the tab. Consult your car audio dealer. Installation/Connection Wiring connection Fuse (10 A) IMPORTANT We recommend installing the unit with a commercially available custom wiring harness specific for your car and leave this job to... the antenna control terminal in the vehicle (For / / / / / ) To the steering wheel remote control adapter (For ) To KENWOOD Marine Remote Control unit (optional...

Instruction Manual
Page 44
...No Part 1 For / 1.2 m/4 feet) : USB cable (DC 5 V 1.5 A) (approx. 2 For / : MIC (Microphone input terminal) (Page 22) 3 For : To KENWOOD Marine Remote Control unit, KCA-RC55MR (optional accessory) (Page 7) 4 For / (Page 22) : MIC (Microphone input terminal) 5 For / / / : Expansion port (12 V 500... terminals of this unit, securely connect the amplifier ground wire to the car chassis to prevent damage to the unit. Installation/Connection Connect external components Connect external amplifiers via output terminals".) Output terminals REAR: FRONT: SW: REAR/SW: Rear output...
...No Part 1 For / 1.2 m/4 feet) : USB cable (DC 5 V 1.5 A) (approx. 2 For / : MIC (Microphone input terminal) (Page 22) 3 For : To KENWOOD Marine Remote Control unit, KCA-RC55MR (optional accessory) (Page 7) 4 For / (Page 22) : MIC (Microphone input terminal) 5 For / / / : Expansion port (12 V 500... terminals of this unit, securely connect the amplifier ground wire to the car chassis to prevent damage to the unit. Installation/Connection Connect external components Connect external amplifiers via output terminals".) Output terminals REAR: FRONT: SW: REAR/SW: Rear output...

Instruction Manual
Page 49
... USB device. Connect a device (USB/iPod/iPhone), and change to "USB" when you connect a USB device while listening to access from your device. You have installed the latest version of thumbs up /thumbs down is compatible with another source. • "USB ERROR" appears. The skip limit has been reached. ENGLISH 43...
... USB device. Connect a device (USB/iPod/iPhone), and change to "USB" when you connect a USB device while listening to access from your device. You have installed the latest version of thumbs up /thumbs down is compatible with another source. • "USB ERROR" appears. The skip limit has been reached. ENGLISH 43...

Instruction Manual
Page 53
.../Load Preout Impedance / : 4 000 mV/10 kΩ : 5 000 mV/10 kΩ / / / : 2 500 mV/10 kΩ ≤ 600 Ω Operating Voltage 12 V DC car battery General Installation Size (W × H × D) Net Weight (includes Trimplate, Mounting Sleeve) 182 mm × 53 mm × 100 mm (7-3/16" × 2-1/16" × 3-15/16") / / / : 0.7 kg (1.5 lbs...
.../Load Preout Impedance / : 4 000 mV/10 kΩ : 5 000 mV/10 kΩ / / / : 2 500 mV/10 kΩ ≤ 600 Ω Operating Voltage 12 V DC car battery General Installation Size (W × H × D) Net Weight (includes Trimplate, Mounting Sleeve) 182 mm × 53 mm × 100 mm (7-3/16" × 2-1/16" × 3-15/16") / / / : 0.7 kg (1.5 lbs...
Quick Start Guide 1
Page 3
... environment and meets the FCC radio frequency (RF) Exposure Guidelines and RSS-102 of this Software License Agreement. This device must not be installed and operated keeping the radiator at the time the User (hereinafter the "User") initially used the Product in the Product (hereinafter the "... for commercial purpose or not. 4. Operation is prohibited to use separately from this Software License Agreement. Cet équipement doit être installé et utilisé en gardant une distance de 20 cm ou plus entre le radiateur et le corps humain. Such software shall not...
... environment and meets the FCC radio frequency (RF) Exposure Guidelines and RSS-102 of this Software License Agreement. This device must not be installed and operated keeping the radiator at the time the User (hereinafter the "User") initially used the Product in the Product (hereinafter the "... for commercial purpose or not. 4. Operation is prohibited to use separately from this Software License Agreement. Cet équipement doit être installé et utilisé en gardant une distance de 20 cm ou plus entre le radiateur et le corps humain. Such software shall not...

Quick Start Guide 1
Page 8
... wires that has the same rating. Basic procedure 1 Remove the key from heat dissipate metal parts. • After the unit is for the professional installer. on page 4. Secure the wires with a 12 V DC power supply, negative ground. • Disconnect the battery's negative terminal before wiring and ...; If your vehicle. Consult the car audio dealer. See "Wiring connection" on the top side Dashboard of the unit. See the following "Installing the unit (in parallel. • Mount the unit at an angle of your vehicle wiring harness does not have the ignition terminal, connect...
... wires that has the same rating. Basic procedure 1 Remove the key from heat dissipate metal parts. • After the unit is for the professional installer. on page 4. Secure the wires with a 12 V DC power supply, negative ground. • Disconnect the battery's negative terminal before wiring and ...; If your vehicle. Consult the car audio dealer. See "Wiring connection" on the top side Dashboard of the unit. See the following "Installing the unit (in parallel. • Mount the unit at an angle of your vehicle wiring harness does not have the ignition terminal, connect...

Quick Start Guide 1
Page 9
Using wrong screws might damage the unit. Installing the unit (without mounting sleeve) 1 Remove the mounting sleeve and...the unit. 2 Align the holes in the vehicle c Light blue/yellow: To the steering wheel remote control adapter or to KENWOOD Marine Remote Control unit (optional accessory) for / / / ) M5 × 7 mm (×4) M5 × ...;4) M4 × 8 mm (×1) Car fuse box Ignition switch Car fuse box Battery a Brown: To connect the KENWOOD navigation system, refer your navigation manual b Blue/white: To the power control terminal when using the optional power amplifier or ...
Using wrong screws might damage the unit. Installing the unit (without mounting sleeve) 1 Remove the mounting sleeve and...the unit. 2 Align the holes in the vehicle c Light blue/yellow: To the steering wheel remote control adapter or to KENWOOD Marine Remote Control unit (optional accessory) for / / / ) M5 × 7 mm (×4) M5 × ...;4) M4 × 8 mm (×1) Car fuse box Ignition switch Car fuse box Battery a Brown: To connect the KENWOOD navigation system, refer your navigation manual b Blue/white: To the power control terminal when using the optional power amplifier or ...
