Instruction Manual
Page 2
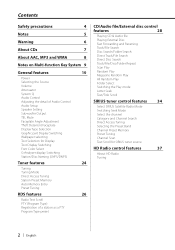
... features 10 Power Selecting the Source Volume Attenuator System Q Audio Control Adjusting the detail of Audio Control Audio Setup Speaker Setting Subwoofer Output TEL Mute Faceplate Angle Adjustment Theft Deterrent Faceplate Display Type Selection Graphic part Display Switching Wallpaper selecting Text Selection for Display Text Display Switching Font Color Select G-Analyzer display Switching Station/Disc Naming (SNPS/DNPS) Tuner features 24 Tuning Tuning Mode Direct Access Tuning Station Preset Memory Auto Memory Entry Preset Tuning RDS features 26 Radio Text Scroll PTY (Program Type...
... features 10 Power Selecting the Source Volume Attenuator System Q Audio Control Adjusting the detail of Audio Control Audio Setup Speaker Setting Subwoofer Output TEL Mute Faceplate Angle Adjustment Theft Deterrent Faceplate Display Type Selection Graphic part Display Switching Wallpaper selecting Text Selection for Display Text Display Switching Font Color Select G-Analyzer display Switching Station/Disc Naming (SNPS/DNPS) Tuner features 24 Tuning Tuning Mode Direct Access Tuning Station Preset Memory Auto Memory Entry Preset Tuning RDS features 26 Radio Text Scroll PTY (Program Type...
Instruction Manual
Page 3
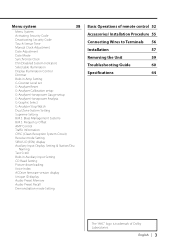
...Activating Security Code Deactivating Security Code Touch Sensor Tone Manual Clock Adjustment Date Adjustment Date Mode Synchronize Clock DSI (Disabled System Indicator) Selectable Illumination Display Illumination Control Dimmer Built-in Auxiliary input Setting CD Read Setting Picture downloading Voice Index ACDrive firmware version display Unique ID display Audio Preset Memory Audio Preset Recall Demonstration mode Setting Basic Operations of remote control 52 Accessories/ Installation Procedure 55 Connecting Wires to Terminals 56 Installation 57 Removing the Unit 59 Troubleshooting...
...Activating Security Code Deactivating Security Code Touch Sensor Tone Manual Clock Adjustment Date Adjustment Date Mode Synchronize Clock DSI (Disabled System Indicator) Selectable Illumination Display Illumination Control Dimmer Built-in Auxiliary input Setting CD Read Setting Picture downloading Voice Index ACDrive firmware version display Unique ID display Audio Preset Memory Audio Preset Recall Demonstration mode Setting Basic Operations of remote control 52 Accessories/ Installation Procedure 55 Connecting Wires to Terminals 56 Installation 57 Removing the Unit 59 Troubleshooting...
Instruction Manual
Page 4
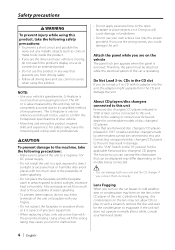
...'s display or use this product in a spot exposed to direct sunlight, excessive heat or humidity. The functions you connect them incorrectly. In such a situation, remove the disc and wait for connectable models of water splashing. • Do not place the faceplate (and the faceplate case) in 1998 or later can use a new fuse with your own screws. For safety's sake, leave the mounting and wiring work...
...'s display or use this product in a spot exposed to direct sunlight, excessive heat or humidity. The functions you connect them incorrectly. In such a situation, remove the disc and wait for connectable models of water splashing. • Do not place the faceplate (and the faceplate case) in 1998 or later can use a new fuse with your own screws. For safety's sake, leave the mounting and wiring work...

Instruction Manual
Page 5
... to ISO 8859-1 character set on the unit or faceplate get dirty, wipe them with your model and in your Kenwood dealer to make sure that they work where the service is not supported by any broadcasting station. • There are places in this manual where lit indicators are used. Reset button • We recommend the use of this unit for the first time, cancel the (page...
... to ISO 8859-1 character set on the unit or faceplate get dirty, wipe them with your model and in your Kenwood dealer to make sure that they work where the service is not supported by any broadcasting station. • There are places in this manual where lit indicators are used. Reset button • We recommend the use of this unit for the first time, cancel the (page...
Instruction Manual
Page 6
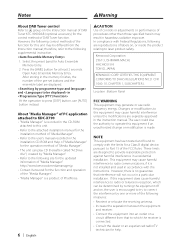
... Memory Entry. therefore, refer to operate this unit may cause harmful interference to press [DISP] button, use radio frequency energy. Press the [AME] button for Auto Ensemble Memory Entry. 2. NOTE This equipment has been tested and found to comply with the instructions. The user could lose the authority to the following site for the updated information of the function for a Class B digital device, pursuant to Part...
... Memory Entry. therefore, refer to operate this unit may cause harmful interference to press [DISP] button, use radio frequency energy. Press the [AME] button for Auto Ensemble Memory Entry. 2. NOTE This equipment has been tested and found to comply with the instructions. The user could lose the authority to the following site for the updated information of the function for a Class B digital device, pursuant to Part...
Instruction Manual
Page 11
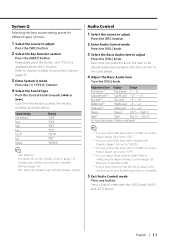
...5 Exit Audio Control mode Press any button. Refer to adjust Press the [VOL] knob. Adjustment Item Display Range Rear Volume *1 "Rear Volume" 0 - 35 Subwoofer level*2,3 "Sub-W Level" -15 - +15 Bass level*4 "Bass Level" -8 - +8 Middle level*4 "Middle Level" -8 - +8 Treble level*4 "Treble Level" -8 - +8 Balance "Balance" Left 15 - English | 11 Sound setting User memory Rock Pops Easy Top 40 Jazz Natural Display "USER" "ROCK" "POPS" "EASY" "TOP 40" "JAZZ" "NATURAL" • User memory: The values set on the (page 11). • Change each setting value with the Speaker setting...
...5 Exit Audio Control mode Press any button. Refer to adjust Press the [VOL] knob. Adjustment Item Display Range Rear Volume *1 "Rear Volume" 0 - 35 Subwoofer level*2,3 "Sub-W Level" -15 - +15 Bass level*4 "Bass Level" -8 - +8 Middle level*4 "Middle Level" -8 - +8 Treble level*4 "Treble Level" -8 - +8 Balance "Balance" Left 15 - English | 11 Sound setting User memory Rock Pops Easy Top 40 Jazz Natural Display "USER" "ROCK" "POPS" "EASY" "TOP 40" "JAZZ" "NATURAL" • User memory: The values set on the (page 11). • Change each setting value with the Speaker setting...
Instruction Manual
Page 12
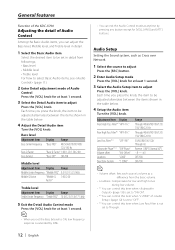
.../2.00 Factor" Treble level Adjustment Item Display Range Treble Center Frequency "Treble FRQ" 10.0/12.5/15.0/17.5 kHz 5 Exit the Detail Audio Control mode Press the [VOL] knob for at anytime by 20%. 12 | English Each time you press the knob, the item to be set the Bass Extend to adjust Press the [VOL] knob. Adjustment Item Display Front High Pass Filter*2 "HPF-F Fc" Rear High Pass...
.../2.00 Factor" Treble level Adjustment Item Display Range Treble Center Frequency "Treble FRQ" 10.0/12.5/15.0/17.5 kHz 5 Exit the Detail Audio Control mode Press the [VOL] knob for at anytime by 20%. 12 | English Each time you press the knob, the item to be set the Bass Extend to adjust Press the [VOL] knob. Adjustment Item Display Front High Pass Filter*2 "HPF-F Fc" Rear High Pass...
Instruction Manual
Page 13
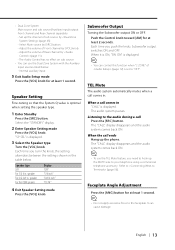
... . speaker For the OEM speaker Display "OFF" "5/4 inch" "6x9/6 inch" "O.E.M." 4 Exit Speaker Setting mode Press the [VOL] knob. When it is ON, "SW ON" is displayed. "SP SEL" is optimal when setting the speaker type. 1 Enter Standby Press the [SRC] button. Each time you need to hook up the MUTE wire to the audio during a call comes in the table below . - Set up the phone. Internal auxiliary input 5 Exit Audio Setup mode Press...
... . speaker For the OEM speaker Display "OFF" "5/4 inch" "6x9/6 inch" "O.E.M." 4 Exit Speaker Setting mode Press the [VOL] knob. When it is ON, "SW ON" is displayed. "SP SEL" is optimal when setting the speaker type. 1 Enter Standby Press the [SRC] button. Each time you need to hook up the MUTE wire to the audio during a call comes in the table below . - Set up the phone. Internal auxiliary input 5 Exit Audio Setup mode Press...
Instruction Manual
Page 16
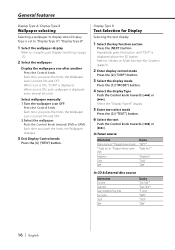
... Display "SNPS"* "Radio Text"* "Frequency" "Clock" "Date" In CD & External disc source Information Disc title Track title Track number & Play time Disc name Clock Date Display "Disc Title"* "Track Title"* "P-Time" "DNPS" "Clock" "Date" 16 | English Repeatedly press the button until "DISP" is set to "Display Type A"/ "Display Type B". 1 Select the wallpaper display Refer to (page 15). 2 Select the wallpaper Display the wallpapers one after another Press the Control knob. General features Display Type A/ Display Type B Wallpaper selecting Selecting...
... Display "SNPS"* "Radio Text"* "Frequency" "Clock" "Date" In CD & External disc source Information Disc title Track title Track number & Play time Disc name Clock Date Display "Disc Title"* "Track Title"* "P-Time" "DNPS" "Clock" "Date" 16 | English Repeatedly press the button until "DISP" is set to "Display Type A"/ "Display Type B". 1 Select the wallpaper display Refer to (page 15). 2 Select the wallpaper Display the wallpapers one after another Press the Control knob. General features Display Type A/ Display Type B Wallpaper selecting Selecting...
Instruction Manual
Page 18
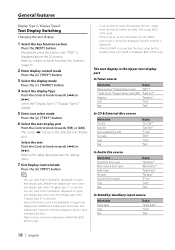
... the track number exceeds 1000 songs. (KDCX790 only) • If the contents of the information for setting items. 7 Exit Display Control mode Press the [6] ("RTN") button. • You can switch the information displayed in Upper text display part, Middle text display part and Lower text display part when "Display Type C" is selected. • You can switch the information displayed in the Upper text display part In Tuner source Information Display Station name or *1Program Service name...
... the track number exceeds 1000 songs. (KDCX790 only) • If the contents of the information for setting items. 7 Exit Display Control mode Press the [6] ("RTN") button. • You can switch the information displayed in Upper text display part, Middle text display part and Lower text display part when "Display Type C" is selected. • You can switch the information displayed in the Upper text display part In Tuner source Information Display Station name or *1Program Service name...

Instruction Manual
Page 39
... Control knob for at least 1 second. Select the "STANDBY" display. 2 Enter Menu mode Press the [MENU] button for at least 3 seconds. Resetting the Security Code function when the audio unit is first used after removed from stealing. • Set the Security Code when the (page 51) is set the Security Code with a 4 digit number of the Security Code and treasure it is displayed. When "MENU" is displayed, "Security Set" is displayed. Once the Security Code is activated...
... Control knob for at least 1 second. Select the "STANDBY" display. 2 Enter Menu mode Press the [MENU] button for at least 3 seconds. Resetting the Security Code function when the audio unit is first used after removed from stealing. • Set the Security Code when the (page 51) is set the Security Code with a 4 digit number of the Security Code and treasure it is displayed. When "MENU" is displayed, "Security Set" is displayed. Once the Security Code is activated...
Instruction Manual
Page 41
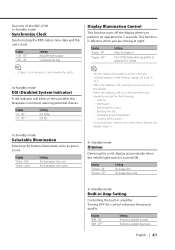
... flashes. The built-in amplifier. Turns off the display when you are driving at night. Display "AMP : ON" "AMP : OFF" Setting The built-in amplifier activates. The illumination color is green. • Set the Display Illumination Control when the (page 51) is set to synchronize the clock. Function of the KDC-X790 In Standby mode Synchronize Clock Synchronizing the RDS station time data and this control enhances the preout quality. Turning OFF this unit's clock. In Standby mode Dimmer...
... flashes. The built-in amplifier. Turns off the display when you are driving at night. Display "AMP : ON" "AMP : OFF" Setting The built-in amplifier activates. The illumination color is green. • Set the Display Illumination Control when the (page 51) is set to synchronize the clock. Function of the KDC-X790 In Standby mode Synchronize Clock Synchronizing the RDS station time data and this control enhances the preout quality. Turning OFF this unit's clock. In Standby mode Dimmer...
Instruction Manual
Page 46
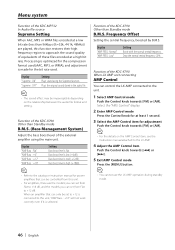
... used (AAC, MP3, or WMA), and adjustment is made for adjustment Push the Control knob towards [FM] or [AM]. Bass boost level is low (+6dB). Display "AMP FREQ : Normal" "AMP FREQ : Low" Setting Boost with the normal central frequency. Display "AMP Bass : Flat" "AMP Bass : +6" "AMP Bass : +12" "AMP Bass : +18" Setting Bass boost level is high (+18dB). Function of the KDC-X790 Other than Standby mode B.M.S. Bass boost level is flat. Menu system Function of the KDC-MP732 In Audio file source...
... used (AAC, MP3, or WMA), and adjustment is made for adjustment Push the Control knob towards [FM] or [AM]. Bass boost level is low (+6dB). Display "AMP FREQ : Normal" "AMP FREQ : Low" Setting Boost with the normal central frequency. Display "AMP Bass : Flat" "AMP Bass : +6" "AMP Bass : +12" "AMP Bass : +18" Setting Bass boost level is high (+18dB). Function of the KDC-X790 Other than Standby mode B.M.S. Bass boost level is flat. Menu system Function of the KDC-MP732 In Audio file source...
Instruction Manual
Page 47
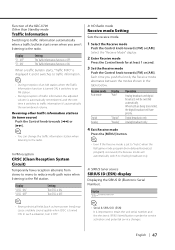
... time you aren't listening to the radio. The Traffic Information function is OFF. In HD Radio mode Receive mode Setting Sets the receive mode. 1 Select the Receive mode Push the Control knob towards [FM] or [AM]. The CRSC is ON. In SIRIUS tuner source SIRIUS ID (ESN) display Displaying the SIRIUS ID (Electronic Serial Number). Function of traffic information the adjusted volume is important to traffic information it switches to retain the unit serial number and the electronic SIRIUS Identification number...
... time you aren't listening to the radio. The Traffic Information function is OFF. In HD Radio mode Receive mode Setting Sets the receive mode. 1 Select the Receive mode Push the Control knob towards [FM] or [AM]. The CRSC is ON. In SIRIUS tuner source SIRIUS ID (ESN) display Displaying the SIRIUS ID (Electronic Serial Number). Function of traffic information the adjusted volume is important to traffic information it switches to retain the unit serial number and the electronic SIRIUS Identification number...
Instruction Manual
Page 50
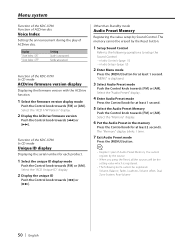
... KDC-X790 Function of ACDrive disc Voice Index Setting the announcement during the play of Audio Preset Memory. The memory cannot be registered. Volume, Balance, Fader, Loudness, Volume offset, Dual Zone System, Rear Volume 50 | English The "Memory" display blinks 1 time. 7 Exit Audio Preset mode Press the [MENU] button. • Register 1 pair of ACDrive disc. Display "Voice Index : ON" "Voice Index : OFF" Setting Guide is displayed. 3 Select Audio Preset mode Push the Control knob towards [FM] or [AM]. Select the "ACD F/W Version" display. 2 Display the ACDrive firmware...
... KDC-X790 Function of ACDrive disc Voice Index Setting the announcement during the play of Audio Preset Memory. The memory cannot be registered. Volume, Balance, Fader, Loudness, Volume offset, Dual Zone System, Rear Volume 50 | English The "Memory" display blinks 1 time. 7 Exit Audio Preset mode Press the [MENU] button. • Register 1 pair of ACDrive disc. Display "Voice Index : ON" "Voice Index : OFF" Setting Guide is displayed. 3 Select Audio Preset mode Push the Control knob towards [FM] or [AM]. Select the "ACD F/W Version" display. 2 Display the ACDrive firmware...
Instruction Manual
Page 53
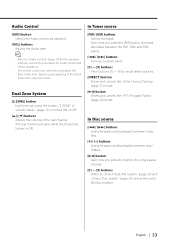
... (page 29), enters the track/ file/disc number. The rear channel activates while the Dual Zone System is turned ON or OFF. [5]/ [∞] buttons Adjusts the volume of the rear channel. English | 53 In Tuner source [FM]/ [AM] buttons Selects the band. Dual Zone System [2-ZONE] button Each time you press the button, "2 ZONE" of the Detail Audio item cannot be adjusted. [VOL] buttons Adjusts the Audio item. • Refer to (page 11...
... (page 29), enters the track/ file/disc number. The rear channel activates while the Dual Zone System is turned ON or OFF. [5]/ [∞] buttons Adjusts the volume of the rear channel. English | 53 In Tuner source [FM]/ [AM] buttons Selects the band. Dual Zone System [2-ZONE] button Each time you press the button, "2 ZONE" of the Detail Audio item cannot be adjusted. [VOL] buttons Adjusts the Audio item. • Refer to (page 11...
Instruction Manual
Page 55
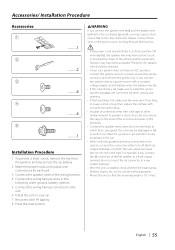
Make the proper input and output wire connections for each unit. 3. Reconnect the - wires or ground them to any metal part in the car. • When only two speakers are working properly. • Mount the unit so that in turn may start a fire. battery. 2. Connect the wiring harness connector to the car chassis (ground), you connect the + connector of the wiring harness. 4. Install the unit in the following order: ground, battery, ignition. 5. Always connect those wires to the power source running through...
Make the proper input and output wire connections for each unit. 3. Reconnect the - wires or ground them to any metal part in the car. • When only two speakers are working properly. • Mount the unit so that in turn may start a fire. battery. 2. Connect the wiring harness connector to the car chassis (ground), you connect the + connector of the wiring harness. 4. Install the unit in the following order: ground, battery, ignition. 5. Always connect those wires to the power source running through...
Instruction Manual
Page 60
... and balance settings. ✔ The input/output wires or wiring harness are set all the way to an external disc source. ? Even though Synchronize Clock is selected. ☞ High-pitched tone isn't compensated for when in Subwoofer preout. ? The Dimmer function does not work . ✔ The TEL mute wire is poor or distorted. ✔ One of slight misoperation or miswiring. The sound quality is not connected properly. ☞ Connect the wire correctly...
... and balance settings. ✔ The input/output wires or wiring harness are set all the way to an external disc source. ? Even though Synchronize Clock is selected. ☞ High-pitched tone isn't compensated for when in Subwoofer preout. ? The Dimmer function does not work . ✔ The TEL mute wire is poor or distorted. ✔ One of slight misoperation or miswiring. The sound quality is not connected properly. ☞ Connect the wire correctly...

Instruction Manual
Page 62
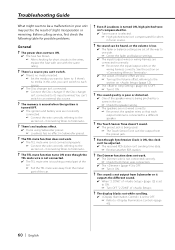
... "Mecha Error" code does not disappear, consult your nearest service center. Troubleshooting Guide Audio file source ? No sound can play . The disc magazine is quite dirty. The CD is upside-down. ➪ Load the CD correctly. The CD is scratched a lot. ➪ Clean the CD and load it isn't displayed correctly according to this unit has been removed. ➪ Replace it is turned ON. ✔...
... "Mecha Error" code does not disappear, consult your nearest service center. Troubleshooting Guide Audio file source ? No sound can play . The disc magazine is quite dirty. The CD is upside-down. ➪ Load the CD correctly. The CD is scratched a lot. ➪ Clean the CD and load it isn't displayed correctly according to this unit has been removed. ➪ Replace it is turned ON. ✔...
Instruction Manual
Page 63
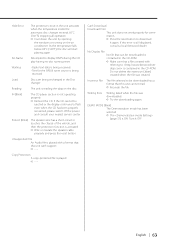
... the Disc changer. IN (Blink): The CD player section is activated. ➪ Wire or insulate the speaker cable properly and press the reset button. English | 63 Load: Discs are being received. Protect (Blink): The speaker wire has a short-circuit or touches the chassis of the vehicle, and then the protection function is not operating properly. ➪ Reinsert the CD. Can't Download: Download Error: This unit does not work properly for the SIRIUS tuner source is...
... the Disc changer. IN (Blink): The CD player section is activated. ➪ Wire or insulate the speaker cable properly and press the reset button. English | 63 Load: Discs are being received. Protect (Blink): The speaker wire has a short-circuit or touches the chassis of the vehicle, and then the protection function is not operating properly. ➪ Reinsert the CD. Can't Download: Download Error: This unit does not work properly for the SIRIUS tuner source is...


