
Instruction Manual
Page 2
... USB device 10 General features 11 Power Selecting the Source Volume Attenuator System Q Audio Control Adjusting the detail of remote control 35 Accessories/ Installation Procedure 38 Connecting Wires to Terminals 39 Installation 42 Removing the Unit 44 Troubleshooting Guide 45 Specifications 48 Frequency Offset AMP Control CRSC (Clean Reception System Circuit) Receive mode Setting SIRIUS ID (ESN) display Auxiliary Input Display Setting Text Scroll Built-in Auxiliary input Setting CD Read Setting Voice Index Firmware version display Unique ID display Audio Preset Memory Audio...
... USB device 10 General features 11 Power Selecting the Source Volume Attenuator System Q Audio Control Adjusting the detail of remote control 35 Accessories/ Installation Procedure 38 Connecting Wires to Terminals 39 Installation 42 Removing the Unit 44 Troubleshooting Guide 45 Specifications 48 Frequency Offset AMP Control CRSC (Clean Reception System Circuit) Receive mode Setting SIRIUS ID (ESN) display Auxiliary Input Display Setting Text Scroll Built-in Auxiliary input Setting CD Read Setting Voice Index Firmware version display Unique ID display Audio Preset Memory Audio...
Instruction Manual
Page 4
... of the car is trademark of the unit. In such a situation, remove the disc and wait for the condensation to the "N" position for connectable models of precision equipment. • When replacing a fuse, only use the wrong screws, you could damage the unit. NOTE This Class B digital apparatus complies with your Kenwood dealer for the applicable Kenwood disc changers/ CD players. Set the "O-N" Switch to evaporate. Use only the...
... of the car is trademark of the unit. In such a situation, remove the disc and wait for the condensation to the "N" position for connectable models of precision equipment. • When replacing a fuse, only use the wrong screws, you could damage the unit. NOTE This Class B digital apparatus complies with your Kenwood dealer for the applicable Kenwood disc changers/ CD players. Set the "O-N" Switch to evaporate. Use only the...

Instruction Manual
Page 5
... play CD/ USB device (hereafter called "ACDrive media") created by this unit for the function and operation of the "Media Manager". • "Media Manager" is initially set on the unit or faceplate get dirty, wipe them with the USB device installed can damage the data contained in your Kenwood dealer to KDC-X590/KDC-MP632U • "Media Manager" is pressed. • Remove the USB device before pressing the Reset button...
... play CD/ USB device (hereafter called "ACDrive media") created by this unit for the function and operation of the "Media Manager". • "Media Manager" is initially set on the unit or faceplate get dirty, wipe them with the USB device installed can damage the data contained in your Kenwood dealer to KDC-X590/KDC-MP632U • "Media Manager" is pressed. • Remove the USB device before pressing the Reset button...
Instruction Manual
Page 10
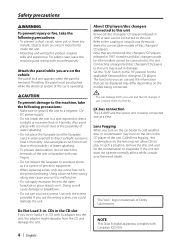
... the USB compatible cable is recognized as audio file operation unless otherwise some notice is indicated. • USB source is used with this document). About USB device Operation • USB device operation is the same as CD source on the operating conditions of the stored data. Connecting a cable whose maximum current consumption is 500 mA or less. It can result in abnormal playback or display of the USB device. • Install the USB device...
... the USB compatible cable is recognized as audio file operation unless otherwise some notice is indicated. • USB source is used with this document). About USB device Operation • USB device operation is the same as CD source on the operating conditions of the stored data. Connecting a cable whose maximum current consumption is 500 mA or less. It can result in abnormal playback or display of the USB device. • Install the USB device...

Instruction Manual
Page 12
...; *6 Source tone memory: Puts the set in the memory per source. (Detail Audio item is changed. • Change each setting value with the Speaker setting. Each time you press the knob, the item to be adjusted alternates between the items shown in detail. General features System Q Selecting the best sound setting preset for different types of music. 1 Select the source to set on the (page 12). Front 15 Exit Audio Control mode (Volume control mode) • *1 Function of KDC...
...; *6 Source tone memory: Puts the set in the memory per source. (Detail Audio item is changed. • Change each setting value with the Speaker setting. Each time you press the knob, the item to be adjusted alternates between the items shown in detail. General features System Q Selecting the best sound setting preset for different types of music. 1 Select the source to set on the (page 12). Front 15 Exit Audio Control mode (Volume control mode) • *1 Function of KDC...
Instruction Manual
Page 13
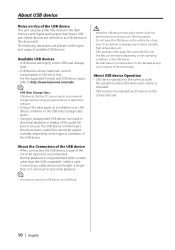
... 1.0/2.0 Treble level Adjustment Item Display Treble Center Frequency "TRE" Range 10.0/12.5/15.0/17.5 kHz 5 Exit the Detail Audio Control mode Press the [VOL] knob for at least 1 second. • When you set in detail from followings; • Bass level • Middle level • Treble level For how to select Basic Audio items, see (page 12). 2 Enter Detail adjustment mode of Audio Control Press the [VOL] knob for [VOL] and [ATT] buttons. English...
... 1.0/2.0 Treble level Adjustment Item Display Treble Center Frequency "TRE" Range 10.0/12.5/15.0/17.5 kHz 5 Exit the Detail Audio Control mode Press the [VOL] knob for at least 1 second. • When you set in detail from followings; • Bass level • Middle level • Treble level For how to select Basic Audio items, see (page 12). 2 Enter Detail adjustment mode of Audio Control Press the [VOL] knob for [VOL] and [ATT] buttons. English...

Instruction Manual
Page 14
.... Internal auxiliary input (KDC-MP632U only) - Option CA-C1AX/ CA-C2AX (KDC-X590 only) 5 Exit Audio Setup mode Press the [VOL] knob for at least 1 second. 3 Select the Audio Setup item to adjust Press the [VOL] knob. Speaker Setting Fine-tuning so that the System Q value is not set to Through. • *5 KDC-X590 only • Dual Zone System Main source and sub source (Auxiliary input) output Front channel and Rear channel separately. - Each time you...
.... Internal auxiliary input (KDC-MP632U only) - Option CA-C1AX/ CA-C2AX (KDC-X590 only) 5 Exit Audio Setup mode Press the [VOL] knob for at least 1 second. 3 Select the Audio Setup item to adjust Press the [VOL] knob. Speaker Setting Fine-tuning so that the System Q value is not set to Through. • *5 KDC-X590 only • Dual Zone System Main source and sub source (Auxiliary input) output Front channel and Rear channel separately. - Each time you...
Instruction Manual
Page 20
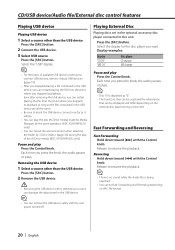
... the unit power turned off. 20 | English CD/USB device/Audio file/External disc control features Playing USB device Playing USB device 1 Select a source other than the USB device Press the [SRC] button. 2 Connect the USB device. 3 Select USB source Press the [SRC] button. Press the [SRC] button. Playing External Disc Playing discs set in the USB device, you press the knob, the audio pauses or plays. • Disc 10 is being searched. • You cannot fast Forwarding and Reversing depending on the external disc players being connected. Display examples: Display "CD...
... the unit power turned off. 20 | English CD/USB device/Audio file/External disc control features Playing USB device Playing USB device 1 Select a source other than the USB device Press the [SRC] button. 2 Connect the USB device. 3 Select USB source Press the [SRC] button. Press the [SRC] button. Playing External Disc Playing discs set in the USB device, you press the knob, the audio pauses or plays. • Disc 10 is being searched. • You cannot fast Forwarding and Reversing depending on the external disc players being connected. Display examples: Display "CD...
Instruction Manual
Page 29
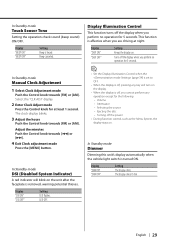
... flashes. Display Illumination Control This function turns off the power • During function control, such as the Menu System, the display stays on . The clock display blinks. 3 Adjust the hours Push the Control knob towards [FM] or [AM]. In Standby mode DSI (Disabled System Indicator) A red indicator will turn on the unit after the faceplate is off, you perform no operation for the following: • Volume • Attenuator • Selecting the source...
... flashes. Display Illumination Control This function turns off the power • During function control, such as the Menu System, the display stays on . The clock display blinks. 3 Adjust the hours Push the Control knob towards [FM] or [AM]. In Standby mode DSI (Disabled System Indicator) A red indicator will turn on the unit after the faceplate is off, you perform no operation for the following: • Volume • Attenuator • Selecting the source...

Instruction Manual
Page 30
... control.) Display "SWPRE R" "SWPRE SW" Setting Rear preout. Drop the normal central frequency 20%. 30 | English Function of the KDC-X590/KDC-MP632U Other than Standby mode B.M.S. Display "ZONE2 R" "ZONE2 F" Setting Sub source (Auxiliary input source) is low (+6dB). Function of the KDC-MP632U In Standby mode Switching preout Alternating the preout between the rear and subwoofer. (With the subwoofer the sound outputs without being effected by B.M.S. Bass boost level is to the unit, "BMS +18" will not work...
... control.) Display "SWPRE R" "SWPRE SW" Setting Rear preout. Drop the normal central frequency 20%. 30 | English Function of the KDC-X590/KDC-MP632U Other than Standby mode B.M.S. Display "ZONE2 R" "ZONE2 F" Setting Sub source (Auxiliary input source) is low (+6dB). Function of the KDC-MP632U In Standby mode Switching preout Alternating the preout between the rear and subwoofer. (With the subwoofer the sound outputs without being effected by B.M.S. Bass boost level is to the unit, "BMS +18" will not work...

Instruction Manual
Page 31
.... In SIRIUS tuner source SIRIUS ID (ESN) display Displaying the SIRIUS ID (Electronic Serial Number). Receive mode Auto mode Digital Analog Display "AUTO" "DIGITAL" "ANALOG" Operation Analog broadcasts and digital broadcasts will automatically switch to the unit. 1 Select AMP Control mode Push the Control knob towards [4] or [¢]. 5 Exit AMP Control mode Press the [MENU] button. • You cannot use the LX AMP operation during standby mode. Display "ESN • Serial & SIRIUS ID (ESN) It is important to the FM station. Each time you push...
.... In SIRIUS tuner source SIRIUS ID (ESN) display Displaying the SIRIUS ID (Electronic Serial Number). Receive mode Auto mode Digital Analog Display "AUTO" "DIGITAL" "ANALOG" Operation Analog broadcasts and digital broadcasts will automatically switch to the unit. 1 Select AMP Control mode Push the Control knob towards [4] or [¢]. 5 Exit AMP Control mode Press the [MENU] button. • You cannot use the LX AMP operation during standby mode. Display "ESN • Serial & SIRIUS ID (ESN) It is important to the FM station. Each time you push...
Instruction Manual
Page 33
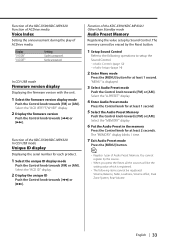
... System, Rear Volume English | 33 Function of the KDC-X590/KDC-MP632U Function of ACDrive media Voice Index Setting the announcement during the play of Audio Preset Memory. In CD/ USB mode Firmware version display Displaying the firmware version with the unit. 1 Select the firmware version display mode Push the Control knob towards [FM] or [AM]. Select the "MEMORY" display. 6 Put the Audio Preset in the memory Press the Control knob for at least 2 seconds. Select the "A-PRESET" display. 4 Enter Audio Preset mode Press the Control knob...
... System, Rear Volume English | 33 Function of the KDC-X590/KDC-MP632U Function of ACDrive media Voice Index Setting the announcement during the play of Audio Preset Memory. In CD/ USB mode Firmware version display Displaying the firmware version with the unit. 1 Select the firmware version display mode Push the Control knob towards [FM] or [AM]. Select the "MEMORY" display. 6 Put the Audio Preset in the memory Press the Control knob for at least 2 seconds. Select the "A-PRESET" display. 4 Enter Audio Preset mode Press the Control knob...

Instruction Manual
Page 35
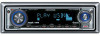
Basic operations [VOL] buttons Adjusts the volume. [SRC] button Each time you press the button, the source alternates. Insert the batteries with the + and - For the source alternating order refer to the previous level. 2WARNING • Store unused batteries out of the reach of remote control VOL AUD FM/AM/+/- English | 35 Not Used 2-ZONE [0] - [9] SRC ATT VOL AUD 38 FM+ 4 ¢ AM- When the button is accidentally...
Basic operations [VOL] buttons Adjusts the volume. [SRC] button Each time you press the button, the source alternates. Insert the batteries with the + and - For the source alternating order refer to the previous level. 2WARNING • Store unused batteries out of the reach of remote control VOL AUD FM/AM/+/- English | 35 Not Used 2-ZONE [0] - [9] SRC ATT VOL AUD 38 FM+ 4 ¢ AM- When the button is accidentally...

Instruction Manual
Page 36
... turned ON or OFF. [5]/ [∞] buttons Adjusts the volume of the rear channel. Each time you press the button, the song pauses or plays. [0] - [9] buttons When in (page 21) and (page 21), enters the track/ file/disc number. Function of the KDC-X590/KDC-MP632U Dual Zone System [2-ZONE] button Each time you press the button, "2ZON" of (page 14) is ON. In Tuner source [FM]/ [AM] buttons Selects the band. Selecting and adjusting...
... turned ON or OFF. [5]/ [∞] buttons Adjusts the volume of the rear channel. Each time you press the button, the song pauses or plays. [0] - [9] buttons When in (page 21) and (page 21), enters the track/ file/disc number. Function of the KDC-X590/KDC-MP632U Dual Zone System [2-ZONE] button Each time you press the button, "2ZON" of (page 14) is ON. In Tuner source [FM]/ [AM] buttons Selects the band. Selecting and adjusting...
Instruction Manual
Page 38
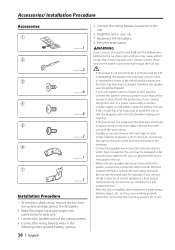
Make the proper input and output wire connections for each unit. 3. Reconnect the - Connect the wiring harness connector to a rear output terminal. • After the unit is installed, check whether the brake lamps, blinkers, wipers, etc. Press the reset button. 2WARNING If you connect the ignition wire (red) and the battery wire (yellow) to the car chassis (ground), you share the - Therefore, the speaker wire should be turned on and off with the ignition key...
Make the proper input and output wire connections for each unit. 3. Reconnect the - Connect the wiring harness connector to a rear output terminal. • After the unit is installed, check whether the brake lamps, blinkers, wipers, etc. Press the reset button. 2WARNING If you connect the ignition wire (red) and the battery wire (yellow) to the car chassis (ground), you share the - Therefore, the speaker wire should be turned on and off with the ignition key...

Instruction Manual
Page 39
... external amp control function. Fuse (10A) To Kenwood disc changer/ External optional accessory If no connections are made, do not use the steering wheel remote control feature, you are using the optional power amplifier, connect to the power terminal for the booster amplifier of the motor antenna, or to its power control terminal. To car light control switch P.CONT ANT. REM.CONT Steering remote control (Light Blue/ Yellow) To USB device USB connector Front left output (White) Front right output (Red) Rear left speaker To rear right speaker...
... external amp control function. Fuse (10A) To Kenwood disc changer/ External optional accessory If no connections are made, do not use the steering wheel remote control feature, you are using the optional power amplifier, connect to the power terminal for the booster amplifier of the motor antenna, or to its power control terminal. To car light control switch P.CONT ANT. REM.CONT Steering remote control (Light Blue/ Yellow) To USB device USB connector Front left output (White) Front right output (Red) Rear left speaker To rear right speaker...

Instruction Manual
Page 40
... amplifier of the film-type antenna. Connecting Wires to Terminals (KDC-MP632U) USB connector To USB device Front left output (White) Front right output (Red) Rear left output (White)/Sub Woofer left output (White) Rear right output (Red)/Sub Woofer right output (Red) AUX IN • Do not remove the cap when you are made, do not use the USB cable. P.CONT ANT. AUX right input (Red) AUX left speaker Green/Black Green To rear right speaker Purple/Black Purple Power control wire (Blue...
... amplifier of the film-type antenna. Connecting Wires to Terminals (KDC-MP632U) USB connector To USB device Front left output (White) Front right output (Red) Rear left output (White)/Sub Woofer left output (White) Rear right output (Red)/Sub Woofer right output (Red) AUX IN • Do not remove the cap when you are made, do not use the USB cable. P.CONT ANT. AUX right input (Red) AUX left speaker Green/Black Green To rear right speaker Purple/Black Purple Power control wire (Blue...

Instruction Manual
Page 45
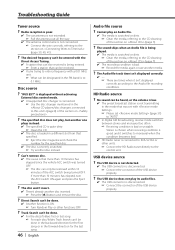
... your unit may just be output from Subwoofer or it outputs the different sound. ✔ When "2 ZONE" of is set Dual Zone System of Volume offset are connected incorrectly. ☞ Reconnect the input/output wires or the wiring harness correctly. The power does not turn ON. ✔ The fuse has blown. ☞ After checking for short circuits in the wires, replace the fuse with the same rating. ? The TEL mute function turns...
... your unit may just be output from Subwoofer or it outputs the different sound. ✔ When "2 ZONE" of is set Dual Zone System of Volume offset are connected incorrectly. ☞ Reconnect the input/output wires or the wiring harness correctly. The power does not turn ON. ✔ The fuse has blown. ☞ After checking for short circuits in the wires, replace the fuse with the same rating. ? The TEL mute function turns...
Instruction Manual
Page 46
.... ☞ Turn Random Play or other units. ☞ Connect the HD Radio tuner directly to "AUTO". ✔ In digital AM broadcasting, receive mode switches between stereo and monaural too often. ☞ Receiving condition is disconnected. ☞ Connect the connector of the ACC switch being entered. ☞ Enter a station that specified. ☞ Eject the disc magazine and check the number for the last song. 46 | English Audio file source ? Cannot play , but another disc inserted...
.... ☞ Turn Random Play or other units. ☞ Connect the HD Radio tuner directly to "AUTO". ✔ In digital AM broadcasting, receive mode switches between stereo and monaural too often. ☞ Receiving condition is disconnected. ☞ Connect the connector of the ACC switch being entered. ☞ Enter a station that specified. ☞ Eject the disc magazine and check the number for the last song. 46 | English Audio file source ? Cannot play , but another disc inserted...
Instruction Manual
Page 47
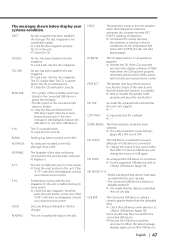
... unit can play . • The connected USB device contains no USB device is ON. EJECT: No disc magazine has been loaded in the disc magazine. ➪ Load a disc into the disc magazine. NO PANEL: The faceplate of the vehicle, and then the protection function is malfunctioning for some reason. ➪ Check the disc magazine. Or the unit is activated. ➪ Wire or insulate the speaker cable properly and press the reset button. Turn it . Some trouble...
... unit can play . • The connected USB device contains no USB device is ON. EJECT: No disc magazine has been loaded in the disc magazine. ➪ Load a disc into the disc magazine. NO PANEL: The faceplate of the vehicle, and then the protection function is malfunctioning for some reason. ➪ Check the disc magazine. Or the unit is activated. ➪ Wire or insulate the speaker cable properly and press the reset button. Turn it . Some trouble...


