Instruction Manual
Page 2
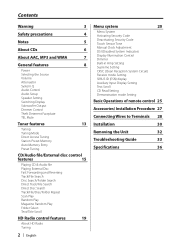
... HD Radio Tuning 2 | English Menu system 20 Menu System Activating Security Code Deactivating Security Code Touch Sensor Tone Manual Clock Adjustment DSI (Disabled System Indicator) Display Illumination Control Dimmer Built-in Amp Setting Supreme Setting CRSC (Clean Reception System Circuit) Receive mode Setting SIRIUS ID (ESN) display Auxiliary Input Display Setting Text Scroll CD Read Setting Demonstration mode Setting Basic Operations of remote control 25 Accessories/ Installation Procedure 27 Connecting Wires to Terminals 28 Installation 30 Removing the Unit 32 Troubleshooting...
... HD Radio Tuning 2 | English Menu system 20 Menu System Activating Security Code Deactivating Security Code Touch Sensor Tone Manual Clock Adjustment DSI (Disabled System Indicator) Display Illumination Control Dimmer Built-in Amp Setting Supreme Setting CRSC (Clean Reception System Circuit) Receive mode Setting SIRIUS ID (ESN) display Auxiliary Input Display Setting Text Scroll CD Read Setting Demonstration mode Setting Basic Operations of remote control 25 Accessories/ Installation Procedure 27 Connecting Wires to Terminals 28 Installation 30 Removing the Unit 32 Troubleshooting...
Instruction Manual
Page 3
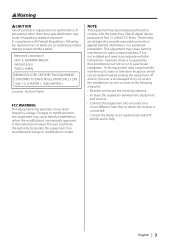
... | 3 2Warning 2CAUTION Use of controls or adjustments or performance of procedures other than those specified herein may generate or use radio frequency energy. The user could lose the authority to operate this equipment does cause harmful interference to radio or television reception, which the receiver is encouraged to try to provide reasonable protection against harmful interference in the instruction manual. However, there is...
... | 3 2Warning 2CAUTION Use of controls or adjustments or performance of procedures other than those specified herein may generate or use radio frequency energy. The user could lose the authority to operate this equipment does cause harmful interference to radio or television reception, which the receiver is encouraged to try to provide reasonable protection against harmful interference in the instruction manual. However, there is...
Instruction Manual
Page 4
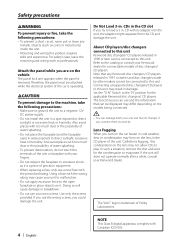
... the car heater in cold weather, dew or condensation may form on the vehicle The panel lock arm appears when the panel is removed. In such a situation, remove the disc and wait for connectable models of disc changers/ CD players. For safety's sake, leave the mounting and wiring work to load a 3 in areas exposed to play. Do Not Load 3-in 1998 or later can be displayed...
... the car heater in cold weather, dew or condensation may form on the vehicle The panel lock arm appears when the panel is removed. In such a situation, remove the disc and wait for connectable models of disc changers/ CD players. For safety's sake, leave the mounting and wiring work to load a 3 in areas exposed to play. Do Not Load 3-in 1998 or later can be displayed...
Instruction Manual
Page 5
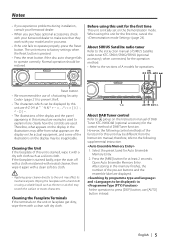
... Demonstration mode. About SIRIUS Satellite radio tuner Refer to the instruction manual of SIRIUS Satellite radio tuner KTC-SR901/SR902/SR903 (optional accessory), when connected, for the control method of the illustrations on the unit or faceplate get dirty, wipe them with a clean soft dry cloth. 1-6 AM SRC DISP/C.S. If the faceplate is pressed. • Press the reset button if the disc auto changer fails to operate properly, press the Reset button. Select the preset band...
... Demonstration mode. About SIRIUS Satellite radio tuner Refer to the instruction manual of SIRIUS Satellite radio tuner KTC-SR901/SR902/SR903 (optional accessory), when connected, for the control method of the illustrations on the unit or faceplate get dirty, wipe them with a clean soft dry cloth. 1-6 AM SRC DISP/C.S. If the faceplate is pressed. • Press the reset button if the disc auto changer fails to operate properly, press the Reset button. Select the preset band...
Instruction Manual
Page 9
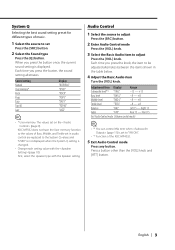
System Q Selecting the best sound setting preset for different types of the KDC-MP4032. 5 Exit Audio Control mode Press any button. First, select the speaker type with the (page 10). Each time you press the button once, the current sound setting is displayed. Adjustment Item Display Range Subwoofer level*1,2 "SW L" -15 - +15 Bass level "BAS L" -8 - +8 Middle level "MID L" -8 - +8 Treble level "TRE L" -8 - +8 Balance "BAL" Left 15 - Press a button other than the [VOL] knob and [ATT] button. Right 15 Fader "FAD" Rear 15...
System Q Selecting the best sound setting preset for different types of the KDC-MP4032. 5 Exit Audio Control mode Press any button. First, select the speaker type with the (page 10). Each time you press the button once, the current sound setting is displayed. Adjustment Item Display Range Subwoofer level*1,2 "SW L" -15 - +15 Bass level "BAS L" -8 - +8 Middle level "MID L" -8 - +8 Treble level "TRE L" -8 - +8 Balance "BAL" Left 15 - Press a button other than the [VOL] knob and [ATT] button. Right 15 Fader "FAD" Rear 15...
Instruction Manual
Page 10
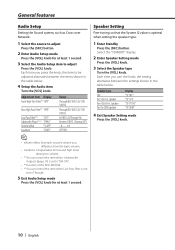
... below . speaker For the OEM speaker Display "SP OFF" "SP 5/4" "SP 6*9/6" "SP OEM" 4 Exit Speaker Setting mode Press the [VOL] knob. • Volume offset: Sets each source's volume as Cross over Network. 1 Select the source to adjust Press the [SRC] button. 2 Enter Audio Setup mode Press the [VOL] knob for at least 1 second. 3 Select the Audio Setup item to adjust Press the [VOL] knob. Each time you turn the knob, the setting alternates between...
... below . speaker For the OEM speaker Display "SP OFF" "SP 5/4" "SP 6*9/6" "SP OEM" 4 Exit Speaker Setting mode Press the [VOL] knob. • Volume offset: Sets each source's volume as Cross over Network. 1 Select the source to adjust Press the [SRC] button. 2 Enter Audio Setup mode Press the [VOL] knob for at least 1 second. 3 Select the Audio Setup item to adjust Press the [VOL] knob. Each time you turn the knob, the setting alternates between...

Instruction Manual
Page 11
... you press the button, Subwoofer output switches ON and OFF. Push the Control knob toward [AM] for the SIRIUS tuner source cannot be displayed, channel number is displayed. Switching Display Changing the information displayed. 1 Enter Switching Display mode Press the Control knob for 1 second, the Dimmer control turns ON or OFF. In Tuner source Information Frequency Clock Display "FREQ" "CLOCK" In CD & External disc source Information Disc title Track title Track number & Play time Clock Display "D-TITLE"* "T-TITLE"* "P-TIME" "CLOCK" In Audio file source Information Song title...
... you press the button, Subwoofer output switches ON and OFF. Push the Control knob toward [AM] for the SIRIUS tuner source cannot be displayed, channel number is displayed. Switching Display Changing the information displayed. 1 Enter Switching Display mode Press the Control knob for 1 second, the Dimmer control turns ON or OFF. In Tuner source Information Frequency Clock Display "FREQ" "CLOCK" In CD & External disc source Information Disc title Track title Track number & Play time Clock Display "D-TITLE"* "T-TITLE"* "P-TIME" "CLOCK" In Audio file source Information Song title...
Instruction Manual
Page 13
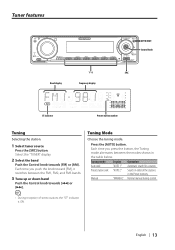
Tuner features Band display 1-6 Frequency display AUTO/AME Control knob SRC ST indicator Preset station number Tuning Selecting the station. 1 Select tuner source Press the [SRC] button. Press the [AUTO] button. Select the "TUNER" display. 2 Select the band Push the Control knob towards [4] or [¢]. Each time you push the knob toward [FM], it switches between the modes shown in the table below. English | 13 Tuning Mode Choose the tuning mode. Tuning mode Auto seek Preset station seek Manual Display "AUTO 1" "AUTO 2" "MANUAL" Operation Automatic search for a station....
Tuner features Band display 1-6 Frequency display AUTO/AME Control knob SRC ST indicator Preset station number Tuning Selecting the station. 1 Select tuner source Press the [SRC] button. Press the [AUTO] button. Select the "TUNER" display. 2 Select the band Push the Control knob towards [4] or [¢]. Each time you push the knob toward [FM], it switches between the modes shown in the table below. English | 13 Tuning Mode Choose the tuning mode. Tuning mode Auto seek Preset station seek Manual Display "AUTO 1" "AUTO 2" "MANUAL" Operation Automatic search for a station....
Instruction Manual
Page 16
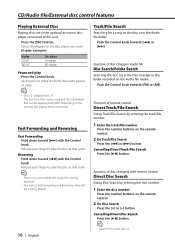
... or plays. CD/Audio file/External disc control features Playing External Disc Playing discs set in the Disc changer or the folder recorded on the external disc players being played. Cancelling Direct Disc Search Press the [38] button. 16 | English • Input "0" to play the disc at that can be displayed will differ depending on the Audio file media. Release your finger to select disc 10. Press the [SRC] button. Function of disc changers with the Control knob. Each time...
... or plays. CD/Audio file/External disc control features Playing External Disc Playing discs set in the Disc changer or the folder recorded on the external disc players being played. Cancelling Direct Disc Search Press the [38] button. 16 | English • Input "0" to play the disc at that can be displayed will differ depending on the Audio file media. Release your finger to select disc 10. Press the [SRC] button. Function of disc changers with the Control knob. Each time...
Instruction Manual
Page 21
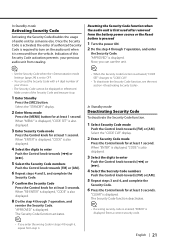
... displayed, "CODE" is also displayed. 3 Select the digits to enter Push the Control knob towards [4] or [¢]. 5 Select the Security Code numbers Push the Control knob towards [FM] or [AM]. "APPROVED" is displayed. Select the "STANDBY" display. 2 Enter Menu mode Press the [MENU] button for at least 1 second. Once the Security Code is activated, the entry of your precious audio unit from stealing. The Security Code function activates. • When the Security Code function is activated, "CODE SET" changes...
... displayed, "CODE" is also displayed. 3 Select the digits to enter Push the Control knob towards [4] or [¢]. 5 Select the Security Code numbers Push the Control knob towards [FM] or [AM]. "APPROVED" is displayed. Select the "STANDBY" display. 2 Enter Menu mode Press the [MENU] button for at least 1 second. Once the Security Code is activated, the entry of your precious audio unit from stealing. The Security Code function activates. • When the Security Code function is activated, "CODE SET" changes...
Instruction Manual
Page 22
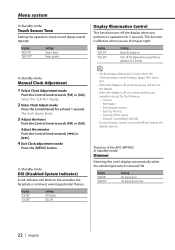
..." display. 2 Enter Clock Adjust mode Press the Control knob for the following: • Volume • Attenuator • Selecting the source • Ejecting the disc • Turning off , you are driving at least 1 second. Function of the KDC-MP4032 In Standby mode Dimmer Dimming this unit's display automatically when the vehicle light switch is turned ON. Adjust the minutes Push the Control knob towards [4] or [¢]. 4 Exit Clock adjustment mode Press the [MENU] button. Display "DIM ON" "DIM OFF" Setting The display...
..." display. 2 Enter Clock Adjust mode Press the Control knob for the following: • Volume • Attenuator • Selecting the source • Ejecting the disc • Turning off , you are driving at least 1 second. Function of the KDC-MP4032 In Standby mode Dimmer Dimming this unit's display automatically when the vehicle light switch is turned ON. Adjust the minutes Push the Control knob towards [4] or [¢]. 4 Exit Clock adjustment mode Press the [MENU] button. Display "DIM ON" "DIM OFF" Setting The display...
Instruction Manual
Page 23
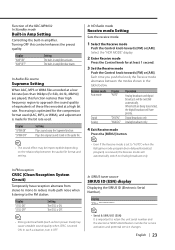
... MODE" display. 2 Enter Receive mode Press the Control knob for service activation and potential service changes. When both are played, this control enhances the preout quality. Digital broadcasts only. In SIRIUS tuner source SIRIUS ID (ESN) display Displaying the SIRIUS ID (Electronic Serial Number). Function of these files encoded at least 1 second. 3 Set the Receive mode Push the Control knob towards [FM] or [AM]. Turning OFF this function restores their high frequency region to retain the unit serial number...
... MODE" display. 2 Enter Receive mode Press the Control knob for service activation and potential service changes. When both are played, this control enhances the preout quality. Digital broadcasts only. In SIRIUS tuner source SIRIUS ID (ESN) display Displaying the SIRIUS ID (Electronic Serial Number). Function of these files encoded at least 1 second. 3 Set the Receive mode Push the Control knob towards [FM] or [AM]. Turning OFF this function restores their high frequency region to retain the unit serial number...
Instruction Manual
Page 25
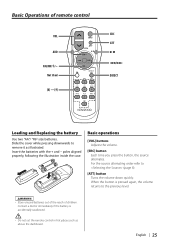
Basic operations [VOL] buttons Adjusts the volume. [SRC] button Each time you press the button, the source alternates. When the button is accidentally swallowed. • Do not set the remote control in hot places such as illustrated. Slide the cover while pressing downwards to (page 8). [ATT] button Turns the volume down quickly. Insert the batteries with the + and - DIRECT /OK ABC DEF GHI JKL MNO PRS TUV WXY QZ...
Basic operations [VOL] buttons Adjusts the volume. [SRC] button Each time you press the button, the source alternates. When the button is accidentally swallowed. • Do not set the remote control in hot places such as illustrated. Slide the cover while pressing downwards to (page 8). [ATT] button Turns the volume down quickly. Insert the batteries with the + and - DIRECT /OK ABC DEF GHI JKL MNO PRS TUV WXY QZ...
Instruction Manual
Page 26
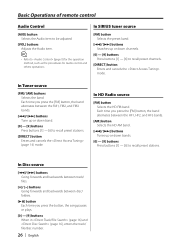
...] button Each time you press the [FM] button, the band alternates between the HF1, HF2, and HF3 bands. [AM] button Selects the HD AM band. [4]/ [¢] buttons Tunes up or down channels. [0] - [9] buttons Press buttons [1] - [6] to recall preset stations. Basic Operations of remote control Audio Control [AUD] button Selects the Audio item to be adjusted. [VOL] buttons Adjusts the Audio item. • Refer to recall preset stations. [DIRECT] button Enters and cancels the (page 14) mode. In SIRIUS tuner source [FM] button Selects the preset...
...] button Each time you press the [FM] button, the band alternates between the HF1, HF2, and HF3 bands. [AM] button Selects the HD AM band. [4]/ [¢] buttons Tunes up or down channels. [0] - [9] buttons Press buttons [1] - [6] to recall preset stations. Basic Operations of remote control Audio Control [AUD] button Selects the Audio item to be adjusted. [VOL] buttons Adjusts the Audio item. • Refer to recall preset stations. [DIRECT] button Enters and cancels the (page 14) mode. In SIRIUS tuner source [FM] button Selects the preset...
Instruction Manual
Page 27
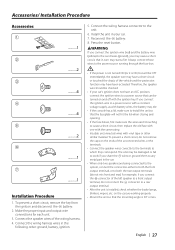
... and the protection function may be turned on the ends of the unconnected wires or the terminals. • Connect the speaker wires correctly to the terminals to work if you connect the ignition wire to a power source with a constant voltage supply, as with battery wires, the battery may start a fire. Make the proper input and output wire connections for each unit. 3. Therefore, the speaker wire should be checked. • If your car. 7. To prevent...
... and the protection function may be turned on the ends of the unconnected wires or the terminals. • Connect the speaker wires correctly to the terminals to work if you connect the ignition wire to a power source with a constant voltage supply, as with battery wires, the battery may start a fire. Make the proper input and output wire connections for each unit. 3. Therefore, the speaker wire should be checked. • If your car. 7. To prevent...
Instruction Manual
Page 28
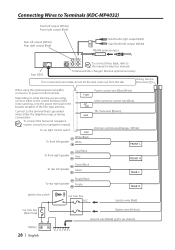
... your navigation manual. CONT MUTE To car light control switch To front left speaker ILLUM White/Black White Power control wire (Blue/White) Motor antenna control wire (Blue) TEL mute wire (Brown) Dimmer control wire (Orange / White) FRONT L To front right speaker Gray/Black Gray FRONT R To rear left output (White) FM/AM antenna input To connect these leads, refer to its power control terminal. Fuse (10A) To Kenwood disc changer/ External optional accessory If no connections are using the optional power amplifier, connect to the relevant instruction manuals.
... your navigation manual. CONT MUTE To car light control switch To front left speaker ILLUM White/Black White Power control wire (Blue/White) Motor antenna control wire (Blue) TEL mute wire (Brown) Dimmer control wire (Orange / White) FRONT L To front right speaker Gray/Black Gray FRONT R To rear left output (White) FM/AM antenna input To connect these leads, refer to its power control terminal. Fuse (10A) To Kenwood disc changer/ External optional accessory If no connections are using the optional power amplifier, connect to the relevant instruction manuals.
Instruction Manual
Page 33
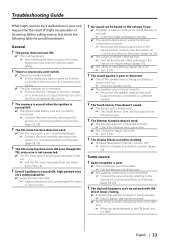
.... ? Before calling service, first check the following table for . ✔ Tuner source is turned OFF. ✔ The ignition and battery wire are not wired correctly. ☞ Reconnect the speaker wires so that can be the result of the car. ? The Dimmer function doesn't work . ✔ The TEL mute wire is touching a metal part of Volume offset are connected incorrectly. ☞ Reconnect the input/output wires or the wiring harness correctly. Troubleshooting Guide What might seem...
.... ? Before calling service, first check the following table for . ✔ Tuner source is turned OFF. ✔ The ignition and battery wire are not wired correctly. ☞ Reconnect the speaker wires so that can be the result of the car. ? The Dimmer function doesn't work . ✔ The TEL mute wire is touching a metal part of Volume offset are connected incorrectly. ☞ Reconnect the input/output wires or the wiring harness correctly. Troubleshooting Guide What might seem...
Instruction Manual
Page 34
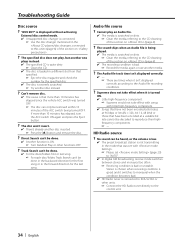
... song. ☞ For each disc/folder, Track Search can't be done in the backward direction for the last song. Troubleshooting Guide Disc source ? The Audio file track time isn't displayed correctly. ✔ --☞ There are times when it switches to monaural when the condition becomes bad. ✔ HD Radio tuner is ON. ☞ Turn Random Play or other units. ☞ Connect the HD Radio tuner directly to reproduce their highfrequency...
... song. ☞ For each disc/folder, Track Search can't be done in the backward direction for the last song. Troubleshooting Guide Disc source ? The Audio file track time isn't displayed correctly. ✔ --☞ There are times when it switches to monaural when the condition becomes bad. ✔ HD Radio tuner is ON. ☞ Turn Random Play or other units. ☞ Connect the HD Radio tuner directly to reproduce their highfrequency...
Instruction Manual
Page 35
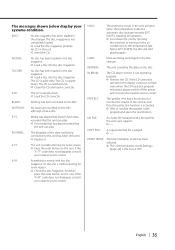
... loaded in the changer. BLANK: Nothing has been recorded on the disc. NO PANEL: The faceplate of the vehicle, and then the protection function is malfunctioning for some reason. ➪ Check the disc magazine. Or the unit is activated. ➪ Wire or insulate the speaker cable properly and press the reset button. As the temperature falls below display your nearest service center. LOAD: Discs are recorded on...
... loaded in the changer. BLANK: Nothing has been recorded on the disc. NO PANEL: The faceplate of the vehicle, and then the protection function is malfunctioning for some reason. ➪ Check the disc magazine. Or the unit is activated. ➪ Wire or insulate the speaker cable properly and press the reset button. As the temperature falls below display your nearest service center. LOAD: Discs are recorded on...
Instruction Manual
Page 36
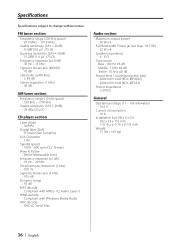
... ".m4a" files Audio section Maximum output power : 50 W x 4 Full Bandwidth Power (at less than 1% THD) : 22 W x 4 Speaker impedance : 4 - 8 Ω Tone action Bass : 100 Hz ±8 dB Middle : 1 kHz ±8 dB Treble : 10 kHz ±8 dB Preout level / Load (during disc play) : 4000 mV/10 kΩ (KDC-MP4032) : 2000 mV/10 kΩ (KDC-MP332) Preout impedance : ≤ 600 Ω General Operating voltage (11 - 16V...
... ".m4a" files Audio section Maximum output power : 50 W x 4 Full Bandwidth Power (at less than 1% THD) : 22 W x 4 Speaker impedance : 4 - 8 Ω Tone action Bass : 100 Hz ±8 dB Middle : 1 kHz ±8 dB Treble : 10 kHz ±8 dB Preout level / Load (during disc play) : 4000 mV/10 kΩ (KDC-MP4032) : 2000 mV/10 kΩ (KDC-MP332) Preout impedance : ≤ 600 Ω General Operating voltage (11 - 16V...


