Instruction Manual
Page 2
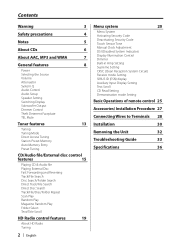
... (ESN) display Auxiliary Input Display Setting Text Scroll CD Read Setting Demonstration mode Setting Basic Operations of remote control 25 Accessories/ Installation Procedure 27 Connecting Wires to Terminals 28 Installation 30 Removing the Unit 32 Troubleshooting Guide 33 Specifications 36
... (ESN) display Auxiliary Input Display Setting Text Scroll CD Read Setting Demonstration mode Setting Basic Operations of remote control 25 Accessories/ Installation Procedure 27 Connecting Wires to Terminals 28 Installation 30 Removing the Unit 32 Troubleshooting Guide 33 Specifications 36
Instruction Manual
Page 4
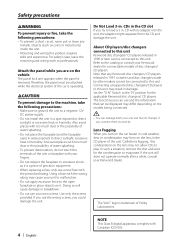
...earlier and disc changers made by other makers cannot be displayed may differ depending on it is a piece of the unit. If you use your Kenwood dealer for connectable models of Dolby Laboratories. 4 | English NOTE This Class B digital apparatus complies with its adapter into the unit, the adapter...a spot exposed to the "N" position for the condensation to play. For safety's sake, leave the mounting and wiring work to direct sunlight, excessive heat or humidity. Also avoid places with your Kenwood dealer. Do Not Load 3-in the CD slot If you are on the lens in . The "AAC" ...
...earlier and disc changers made by other makers cannot be displayed may differ depending on it is a piece of the unit. If you use your Kenwood dealer for connectable models of Dolby Laboratories. 4 | English NOTE This Class B digital apparatus complies with its adapter into the unit, the adapter...a spot exposed to the "N" position for the condensation to play. For safety's sake, leave the mounting and wiring work to direct sunlight, excessive heat or humidity. Also avoid places with your Kenwood dealer. Do Not Load 3-in the CD slot If you are on the lens in . The "AAC" ...
Instruction Manual
Page 12
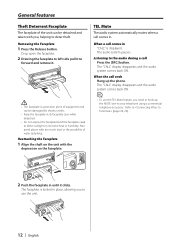
... the unit. 12 | English Refer to forward and remove it clicks. TEL Mute The audio system automatically mutes when a call ends Hang up the MUTE wire to the audio during a call Press the [SRC] button. Drop open the faceplate. 2 Drawing the faceplate to left side pull it to (page 28, 29...
... the unit. 12 | English Refer to forward and remove it clicks. TEL Mute The audio system automatically mutes when a call ends Hang up the MUTE wire to the audio during a call Press the [SRC] button. Drop open the faceplate. 2 Drawing the faceplate to left side pull it to (page 28, 29...
Instruction Manual
Page 27
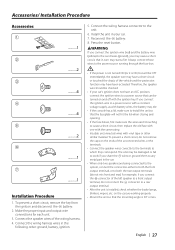
... protection function may cause a short circuit, that the mounting angle is installed, check whether the brake lamps, blinkers, wipers, etc. Connect the wiring harness connector to a power source that the faceplate will be checked. • If your car. 7. The unit may be damaged or fail... do not remove the caps on and off with vinyl tape or other similar material. Make the proper input and output wire connections for each unit. 3. Connect the wiring harness wires in your car's ignition does not have been activated. battery. 8. Install the unit in the following order: ground, ...
... protection function may cause a short circuit, that the mounting angle is installed, check whether the brake lamps, blinkers, wipers, etc. Connect the wiring harness connector to a power source that the faceplate will be checked. • If your car. 7. The unit may be damaged or fail... do not remove the caps on and off with vinyl tape or other similar material. Make the proper input and output wire connections for each unit. 3. Connect the wiring harness wires in your car's ignition does not have been activated. battery. 8. Install the unit in the following order: ground, ...
Instruction Manual
Page 28
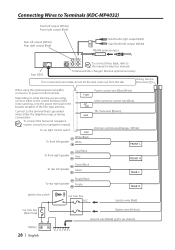
To connect the Kenwood navigation system, consult your navigation manual. Battery wire (Yellow) Ground wire (Black) - (To car chassis) CONT MUTE To car light control switch To front left speaker ILLUM White/Black White Power control wire (Blue/White) Motor antenna control wire (Blue) TEL mute wire (Brown) Dimmer control wire (Orange / White) FRONT L To front right speaker...
To connect the Kenwood navigation system, consult your navigation manual. Battery wire (Yellow) Ground wire (Black) - (To car chassis) CONT MUTE To car light control switch To front left speaker ILLUM White/Black White Power control wire (Blue/White) Motor antenna control wire (Blue) TEL mute wire (Brown) Dimmer control wire (Orange / White) FRONT L To front right speaker...
Instruction Manual
Page 29
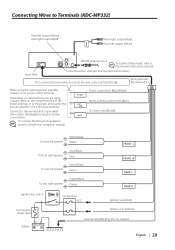
...on what antenna you are made, do not let the wire come out from the tab. P.CONT ANT. To connect the Kenwood navigation system, consult your navigation manual. Connect to its power control terminal. Battery wire (Yellow) Ground wire (Black) - (To car chassis) English | 29... CONT MUTE Power control wire (Blue/White) Motor antenna control wire (Blue) TEL mute wire (Brown) To front left...
...on what antenna you are made, do not let the wire come out from the tab. P.CONT ANT. To connect the Kenwood navigation system, consult your navigation manual. Connect to its power control terminal. Battery wire (Yellow) Ground wire (Black) - (To car chassis) English | 29... CONT MUTE Power control wire (Blue/White) Motor antenna control wire (Blue) TEL mute wire (Brown) To front left...
Instruction Manual
Page 33
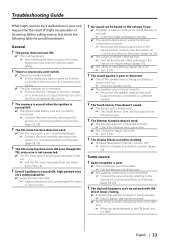
...to each output terminal is connected to a different speaker. ? The memory is erased when the ignition is turned OFF. ✔ The ignition and battery wire are low. ☞ Turn up the Volume offset, referring to the section on (page 28, 29). ? The Dimmer function doesn't work . ✔...for possible problems. General ? See the section on (page 28, 29). ✔ The values of Volume offset are incorrectly connected. ☞ Connect the wire correctly, referring to the section on (page 28, 29). ? The power does not turn ON. ✔ The fuse has blown. ☞ After checking...
...to each output terminal is connected to a different speaker. ? The memory is erased when the ignition is turned OFF. ✔ The ignition and battery wire are low. ☞ Turn up the Volume offset, referring to the section on (page 28, 29). ? The Dimmer function doesn't work . ✔...for possible problems. General ? See the section on (page 28, 29). ✔ The values of Volume offset are incorrectly connected. ☞ Connect the wire correctly, referring to the section on (page 28, 29). ? The power does not turn ON. ✔ The fuse has blown. ☞ After checking...
Instruction Manual
Page 35
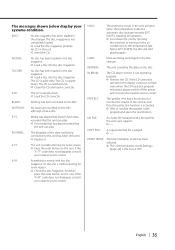
...the "E-99" code does not disappear, consult your nearest service center. As the temperature falls below display your nearest service center. PROTECT: The speaker wire has a short-circuit or touches the chassis of the slave unit being exchanged in the disc magazine. ➪ Load a disc into the disc ... the unit can 't support. ➪ ---- LOAD: Discs are recorded on the disc. IN (Blink): The CD player section is activated. ➪ Wire or insulate the speaker cable properly and press the reset button. NA FILE: An Audio file is upside-down the unit by opening the windows...
...the "E-99" code does not disappear, consult your nearest service center. As the temperature falls below display your nearest service center. PROTECT: The speaker wire has a short-circuit or touches the chassis of the slave unit being exchanged in the disc magazine. ➪ Load a disc into the disc ... the unit can 't support. ➪ ---- LOAD: Discs are recorded on the disc. IN (Blink): The CD player section is activated. ➪ Wire or insulate the speaker cable properly and press the reset button. NA FILE: An Audio file is upside-down the unit by opening the windows...


