Instruction Manual
Page 1
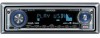
KDC-X590 KDC-MP632U KDC-MP532U CD-RECEIVER INSTRUCTION MANUAL AMPLI-TUNER LECTEUR DE CD MODE D'EMPLOI REPRODUCTOR DE DISCOS COMPACTOS RECEPTOR DE FM/AM MANUAL DE INSTRUCCIONES Kenwood Corporation SIRIUS~ H3'Radio® REA 0 Y '!JREADY ~ AAC ~ PHATNOISE Take the time to the model and serial numbers whenever you obtain the best performance from your Kenwood dealer for information or service on the...
KDC-X590 KDC-MP632U KDC-MP532U CD-RECEIVER INSTRUCTION MANUAL AMPLI-TUNER LECTEUR DE CD MODE D'EMPLOI REPRODUCTOR DE DISCOS COMPACTOS RECEPTOR DE FM/AM MANUAL DE INSTRUCCIONES Kenwood Corporation SIRIUS~ H3'Radio® REA 0 Y '!JREADY ~ AAC ~ PHATNOISE Take the time to the model and serial numbers whenever you obtain the best performance from your Kenwood dealer for information or service on the...
Instruction Manual
Page 2
...Manual Clock Adjustment DSI (Disabled System Indicator) Display Illumination Control Dimmer Switching preout Built-in Auxiliary input Setting CD... Tuning CD/USB device/Audio file/External disc control features 19 Playing CD & Audio file Playing USB device Playing External Disc ...Control CRSC (Clean Reception System Circuit) Receive mode Setting SIRIUS 10 (ESN) display Auxiliary Input Display Setting Text Scroll Built-in Amp Setting Dual Zone System Setting B.M.S. (Bass Management System) B.M.5. Contents Safety precautions 4 Notes 5 About CDs 7 About AAC, MP3 and WMA 8 About USB...
...Manual Clock Adjustment DSI (Disabled System Indicator) Display Illumination Control Dimmer Switching preout Built-in Auxiliary input Setting CD... Tuning CD/USB device/Audio file/External disc control features 19 Playing CD & Audio file Playing USB device Playing External Disc ...Control CRSC (Clean Reception System Circuit) Receive mode Setting SIRIUS 10 (ESN) display Auxiliary Input Display Setting Text Scroll Built-in Amp Setting Dual Zone System Setting B.M.S. (Bass Management System) B.M.5. Contents Safety precautions 4 Notes 5 About CDs 7 About AAC, MP3 and WMA 8 About USB...

Instruction Manual
Page 3
... will not occur in the instruction manual. ACAUTION Use of controls or adjustments or performance of procedures other than those specified herein may generate or use radio frequency energy. Kenwood Corporation 2967-3, ISHIKAWA-MACHI, HACHIOJI-SHI TOKYO, JAPAN KENWOOD CORP. Location: Bottom Panel FCC ...not installed and used in accordance with Federal Regulations, following measures: • Reorient or relocate the receiving antenna. • Increase the separation between the equipment and receiver. • Connect the equipment into an outlet on , or inside the product relating to comply ...
... will not occur in the instruction manual. ACAUTION Use of controls or adjustments or performance of procedures other than those specified herein may generate or use radio frequency energy. Kenwood Corporation 2967-3, ISHIKAWA-MACHI, HACHIOJI-SHI TOKYO, JAPAN KENWOOD CORP. Location: Bottom Panel FCC ...not installed and used in accordance with Federal Regulations, following measures: • Reorient or relocate the receiving antenna. • Increase the separation between the equipment and receiver. • Connect the equipment into an outlet on , or inside the product relating to comply ...
Instruction Manual
Page 5
...Media Manager" is pressed. - Refer to explain more clearly how the controls are A-Z 0-9 @ III 1 I 1\ - {} ~. - http://www.kenwood;rnediamanag·er.jp • Contact Kenwood for the first time, cancel the (page 34). Before using this ul1itfor the first ti't,lf! Remove the USB...KDC-X590/KDC...MP632U - About "Media Mana.ger" of this unit is stained badly, wipe the ~tain off with a cloth moistened with neutral cleaner, then wipe it with this unit are used to the user's manual... in the,CD-ROM attached to this manual are examples used . No USB device comes with...
...Media Manager" is pressed. - Refer to explain more clearly how the controls are A-Z 0-9 @ III 1 I 1\ - {} ~. - http://www.kenwood;rnediamanag·er.jp • Contact Kenwood for the first time, cancel the (page 34). Before using this ul1itfor the first ti't,lf! Remove the USB...KDC-X590/KDC...MP632U - About "Media Mana.ger" of this unit is stained badly, wipe the ~tain off with a cloth moistened with neutral cleaner, then wipe it with this unit are used to the user's manual... in the,CD-ROM attached to this manual are examples used . No USB device comes with...

Instruction Manual
Page 6
... ... Open Auto Ensemble Memdry Entry. for the operation method. • Refer to ~ group on the Instruction manual of DAB Tuner KTC-9090DAB(optionalaccessory) for the control method of DAB Tuner function. Press the [AME] button for Auto Ensenible Memory Entry. 2. Select the preset...seconds. A~o~t'DABTunercontrol Refer to the sections ofA models for -thi,s' llnitmay .bedifferent from the Instructionmanual;therefore,referto the following control methods of the pre~set buttons and the ensemble label are displayed. However, the following supplemental·instruction. 1.. After...
... ... Open Auto Ensemble Memdry Entry. for the operation method. • Refer to ~ group on the Instruction manual of DAB Tuner KTC-9090DAB(optionalaccessory) for the control method of DAB Tuner function. Press the [AME] button for Auto Ensenible Memory Entry. 2. Select the preset...seconds. A~o~t'DABTunercontrol Refer to the sections ofA models for -thi,s' llnitmay .bedifferent from the Instructionmanual;therefore,referto the following control methods of the pre~set buttons and the ensemble label are displayed. However, the following supplemental·instruction. 1.. After...

Instruction Manual
Page 7
About CDs Handling CDs • Do not touch the recording surface of the CD. LJse'aCD-R or a'ED-RW' after" reading the caution items oh:the pat.kage et Removing CDs When removing CDs from this unit, pullthem out horizontally. CDs that cannot be used • CDs that are not round cannot be used. • CD-R and CD-RW are easier to damagethan a normalmusictb.
About CDs Handling CDs • Do not touch the recording surface of the CD. LJse'aCD-R or a'ED-RW' after" reading the caution items oh:the pat.kage et Removing CDs When removing CDs from this unit, pullthem out horizontally. CDs that cannot be used • CDs that are not round cannot be used. • CD-R and CD-RW are easier to damagethan a normalmusictb.

Instruction Manual
Page 17
... During reception of the stations in order of stereo stations the "ST" indicator isON. Normal manual tuning control. Press the [AUTO] button. Select the "TUNER" display. 2 Select the band Push the Control knob towards [~] or [~]. Each time you press the button, the Tuning mode alternates between ...the FM 1, FM2, and FM3 bands. 3 Tune up or down band Push the Control knob towards [FM] or [AM]. Auto seek Preset station seek Manual "AUTO 1" "AUTO 2" "MANUAL" Automatic search for astation. Tuning Mode Choose the tuning mode. English I 17
... During reception of the stations in order of stereo stations the "ST" indicator isON. Normal manual tuning control. Press the [AUTO] button. Select the "TUNER" display. 2 Select the band Push the Control knob towards [~] or [~]. Each time you press the button, the Tuning mode alternates between ...the FM 1, FM2, and FM3 bands. 3 Tune up or down band Push the Control knob towards [FM] or [AM]. Auto seek Preset station seek Manual "AUTO 1" "AUTO 2" "MANUAL" Automatic search for astation. Tuning Mode Choose the tuning mode. English I 17

Instruction Manual
Page 27
... Example: When you push the knob it alternates between "BEEP ON" or "BEEP OFF". Menu system ~,Q~.MENSU'----.MOOE~.A.R~DM~~- @~oo I 27 i Control ~ MENU ..... :. ..... ~i Menu display Menu System Setting beep sound during operation, etc. The reference for the Menu items and their setting content ...chart is the original setting.) Also, the explanation for items that are not applicable «Manual Clock Adjustment> etc.) are displayed, their setting content is after this operation explanation. 1 Enter Menu mode Press the [MENU] ...
... Example: When you push the knob it alternates between "BEEP ON" or "BEEP OFF". Menu system ~,Q~.MENSU'----.MOOE~.A.R~DM~~- @~oo I 27 i Control ~ MENU ..... :. ..... ~i Menu display Menu System Setting beep sound during operation, etc. The reference for the Menu items and their setting content ...chart is the original setting.) Also, the explanation for items that are not applicable «Manual Clock Adjustment> etc.) are displayed, their setting content is after this operation explanation. 1 Enter Menu mode Press the [MENU] ...

Instruction Manual
Page 29
... Control ...perform no operation for 5seconds. ~ ~ • Set the Display Illumination Control when the (page 34) is set to OFF. • When the... at night. The clock display blinks. 3 Adjust the hours Push the Control knob towards [~] or [~]. 4 Exit Clock adjustment mode Press the [MENU...Select the IICLK ADJ II display. 2 Enter Clock Adjust mode Press the Control knob for the following: • Volume • Attenuator • Selecting...at least 1 second. Display Illumination Control This function turns off the power • During function control, such as the Menu System, ...
... Control ...perform no operation for 5seconds. ~ ~ • Set the Display Illumination Control when the (page 34) is set to OFF. • When the... at night. The clock display blinks. 3 Adjust the hours Push the Control knob towards [~] or [~]. 4 Exit Clock adjustment mode Press the [MENU...Select the IICLK ADJ II display. 2 Enter Clock Adjust mode Press the Control knob for the following: • Volume • Attenuator • Selecting...at least 1 second. Display Illumination Control This function turns off the power • During function control, such as the Menu System, ...
Instruction Manual
Page 30
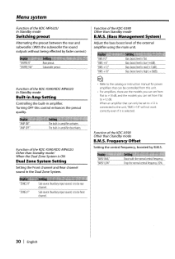
...Refer to the catalog or instruction manual for power amplifiers that can set to +12 is connected to the unit, "BMS +18" will not work correctly even if it is selected. Function of the KDC-X590IKDC-MP632U Other than Standby mode B.M.S. Function of the external amplifier using the main unit. '... is to be rear channel. Menu system Function of the KDC-X590IKDC-MP632U In Standby mode Built-in Amp Setting Controlling the built-in amplifier deactivates. Bass boost level is mid (+12dB). Function of the KDC-MP632U In Standby mode Switching preout Alternating the preout between the rear...
...Refer to the catalog or instruction manual for power amplifiers that can set to +12 is connected to the unit, "BMS +18" will not work correctly even if it is selected. Function of the KDC-X590IKDC-MP632U Other than Standby mode B.M.S. Function of the external amplifier using the main unit. '... is to be rear channel. Menu system Function of the KDC-X590IKDC-MP632U In Standby mode Built-in Amp Setting Controlling the built-in amplifier deactivates. Bass boost level is mid (+12dB). Function of the KDC-MP632U In Standby mode Switching preout Alternating the preout between the rear...
Instruction Manual
Page 31
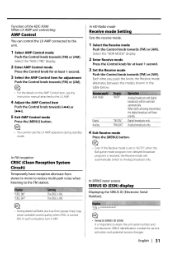
... OFF. Function of the KDC-X590 When LX AMP unit connecting AMP Control You can control the LX AMP connected to the LX AMP. 4 Adjust the AMP Control item Push the Control knob towards [I 31 Select the "HDR MODE" display. 2 Enter Receive mode Press the Control knob for at least 1... second. 3 Select the AMP Control item for adjustment Push the Control knob towards [FM] or [AM]. ~ ~ • For the details on the AMP Control item, see the Instruction manual attached to the unit. 1 Select AMP Control mode Push the Control knob towards...
... OFF. Function of the KDC-X590 When LX AMP unit connecting AMP Control You can control the LX AMP connected to the LX AMP. 4 Adjust the AMP Control item Push the Control knob towards [I 31 Select the "HDR MODE" display. 2 Enter Receive mode Press the Control knob for at least 1... second. 3 Select the AMP Control item for adjustment Push the Control knob towards [FM] or [AM]. ~ ~ • For the details on the AMP Control item, see the Instruction manual attached to the unit. 1 Select AMP Control mode Push the Control knob towards...

Instruction Manual
Page 39
... you need to its power control terminal. To Kenwood disc changer/ External optional accessory If no connections are using the optional power amplifier, connect to an USB connector exclusive remote adapter (not Front left output (White) supplied) matches your navigation manual. Connect to ~ the relevant instruction manuals. To car light control switch Power control wire (Blue/White) Motor...
... you need to its power control terminal. To Kenwood disc changer/ External optional accessory If no connections are using the optional power amplifier, connect to an USB connector exclusive remote adapter (not Front left output (White) supplied) matches your navigation manual. Connect to ~ the relevant instruction manuals. To car light control switch Power control wire (Blue/White) Motor...
Instruction Manual
Page 40
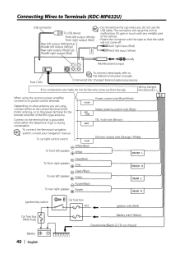
... output (Wh ite) of the film-type antenna. To Kenwood disc changer/ External optional accessory If no connections are using the optional power amplifier, connect to its power control terminal. Connecting Wires to Terminals (KDC-MP632U) USB connector [0 To USB device ~ • Do not remove the cap when you... of the vehicle. • Fasten the connector with the tape so that is grounded when either to the control terminal of the motor antenna, or to ~ the relevant instruction manuals. AUX right input (Red) Rear right output (Red)/Sub Woofer right output (Red) AUX left speaker (&#...
... output (Wh ite) of the film-type antenna. To Kenwood disc changer/ External optional accessory If no connections are using the optional power amplifier, connect to its power control terminal. Connecting Wires to Terminals (KDC-MP632U) USB connector [0 To USB device ~ • Do not remove the cap when you... of the vehicle. • Fasten the connector with the tape so that is grounded when either to the control terminal of the motor antenna, or to ~ the relevant instruction manuals. AUX right input (Red) Rear right output (Red)/Sub Woofer right output (Red) AUX left speaker (&#...

Instruction Manual
Page 41
...the telephone rings or during conversation. ~ To connect the Kenwood navigation ~ system, consult your navigation manual. To car light control switch Power control wire (Blue/White) ANT. CONT Motor antenna control wire (Blue) TEL mute wire (Brown) Dimmer control wire (Orange / White) 8 White/Black ® To...Wires to its power control terminal. The connector will not come out from the tab. Front right output (Red) Front left output (White) If no connections are using the optional power amplifier, connect to Terminals (KDC-MP532Uj USB connector [0 To USB device Rear left speaker ...
...the telephone rings or during conversation. ~ To connect the Kenwood navigation ~ system, consult your navigation manual. To car light control switch Power control wire (Blue/White) ANT. CONT Motor antenna control wire (Blue) TEL mute wire (Brown) Dimmer control wire (Orange / White) 8 White/Black ® To...Wires to its power control terminal. The connector will not come out from the tab. Front right output (Red) Front left output (White) If no connections are using the optional power amplifier, connect to Terminals (KDC-MP532Uj USB connector [0 To USB device Rear left speaker ...
Instruction Manual
Page 52
To enjoy sample tracks 1. Insert the CD into Kenwood car audio 2. In this manual are shown as the album title, artist, and genre) or the playlist set with your car audio system. Select the button on Kenwood car audio that activates Voice Index to search...• Available ACDrive media and features vary depending on your PC. The created ACDrive media can be played with the ACDrive-compliant Kenwood car audio system with following logo mark. Preface PhatNoise Media Manager (hereafter called "Media Manager") allows you create ACDrive media (CD or USB device) containing your ...
To enjoy sample tracks 1. Insert the CD into Kenwood car audio 2. In this manual are shown as the album title, artist, and genre) or the playlist set with your car audio system. Select the button on Kenwood car audio that activates Voice Index to search...• Available ACDrive media and features vary depending on your PC. The created ACDrive media can be played with the ACDrive-compliant Kenwood car audio system with following logo mark. Preface PhatNoise Media Manager (hereafter called "Media Manager") allows you create ACDrive media (CD or USB device) containing your ...

Instruction Manual
Page 55
English I 5 Click_~E The PC will be rebooted. NOTE • Adobe Reader is continued. 5 Click_._ Installation processing is needed to read User Manual.
English I 5 Click_~E The PC will be rebooted. NOTE • Adobe Reader is continued. 5 Click_._ Installation processing is needed to read User Manual.

Instruction Manual
Page 57
The display language and manual language for Media Manager. 1 Select [Options...] from the [Tools] menu. Language Selection You can change the display language for Media Manager will be switched after restarting of your Pc. • The Display language will appear. NOTE • Media Manager is set up in the "Select Language" combo box. 3 Clickmm. English I 7 The [Preference] dialog will be changed to the selected one. 4 CI ick IL JI. 5 CI ick 1t::::::=:::::YK il. Select a desired language in same language as Windows of Media Manager.
The display language and manual language for Media Manager. 1 Select [Options...] from the [Tools] menu. Language Selection You can change the display language for Media Manager will be switched after restarting of your Pc. • The Display language will appear. NOTE • Media Manager is set up in the "Select Language" combo box. 3 Clickmm. English I 7 The [Preference] dialog will be changed to the selected one. 4 CI ick IL JI. 5 CI ick 1t::::::=:::::YK il. Select a desired language in same language as Windows of Media Manager.


