
Instruction Manual
Page 2
... and WMA 7 General features 8 Power Selecting the Source Volume Attenuator System Q Audio Control Audio Setup Speaker Setting Switching Display Subwoofer Output Dimmer Control Theft Deterrent Faceplate TEL Mute Tuner features 13 Tuning Tuning Mode Direct Access Tuning Station Preset Memory Auto Memory Entry Preset Tuning CD/Audio file/External disc control...
... and WMA 7 General features 8 Power Selecting the Source Volume Attenuator System Q Audio Control Audio Setup Speaker Setting Switching Display Subwoofer Output Dimmer Control Theft Deterrent Faceplate TEL Mute Tuner features 13 Tuning Tuning Mode Direct Access Tuning Station Preset Memory Auto Memory Entry Preset Tuning CD/Audio file/External disc control...
Instruction Manual
Page 4
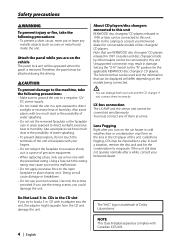
About CD players/disc changers connected to this unit KENWOOD disc changers/ CD players released in 1998 or later can damage both your unit to malfunction. • Do not apply excessive force to the open faceplate or place objects on the models being connected. • You can be displayed...Using a fuse with too much dust or the possibility of the unit or faceplate with the prescribed rating. If you use your Kenwood dealer. Refer to the catalog or consult your fingers. • Do not subject the faceplate to excessive shock, as coins or metal tools) inside the unit. Setting the...
About CD players/disc changers connected to this unit KENWOOD disc changers/ CD players released in 1998 or later can damage both your unit to malfunction. • Do not apply excessive force to the open faceplate or place objects on the models being connected. • You can be displayed...Using a fuse with too much dust or the possibility of the unit or faceplate with the prescribed rating. If you use your Kenwood dealer. Refer to the catalog or consult your fingers. • Do not subject the faceplate to excessive shock, as coins or metal tools) inside the unit. Setting the...
Instruction Manual
Page 5
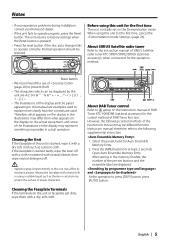
...on the display in the illustrations may represent something impossible in the memory finishes, the number of the illustrations on the unit or faceplate get dirty, wipe them with a hard cloth or using a volatile liquid such as a silicon cloth. Press the [AME] button... initially set buttons and the ensemble label are examples used . Wiping the faceplate with a dry, soft cloth. However, the following supplemental instruction. 1. Notes • If you experience problems during installation, consult your Kenwood dealer. • If the unit fails to press [DISP] button, press [AUTO] ...
...on the display in the illustrations may represent something impossible in the memory finishes, the number of the illustrations on the unit or faceplate get dirty, wipe them with a hard cloth or using a volatile liquid such as a silicon cloth. Press the [AME] button... initially set buttons and the ensemble label are examples used . Wiping the faceplate with a dry, soft cloth. However, the following supplemental instruction. 1. Notes • If you experience problems during installation, consult your Kenwood dealer. • If the unit fails to press [DISP] button, press [AUTO] ...
Instruction Manual
Page 12
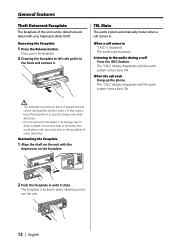
... audio during a call comes in "CALL" is locked in its special storage case while detached. • Do not expose the faceplate or its storage case to direct sunlight or excessive heat or humidity. Also avoid places with too much dust or the possibility of water...front and remove it clicks. Removing the Faceplate 1 Press the Release button. The audio system pauses. Reattaching the Faceplate 1 Align the shaft on the unit with the depression on the faceplate. 2 Push the faceplate in . General features Theft Deterrent Faceplate The faceplate of the unit can be detached and taken...
... audio during a call comes in "CALL" is locked in its special storage case while detached. • Do not expose the faceplate or its storage case to direct sunlight or excessive heat or humidity. Also avoid places with too much dust or the possibility of water...front and remove it clicks. Removing the Faceplate 1 Press the Release button. The audio system pauses. Reattaching the Faceplate 1 Align the shaft on the unit with the depression on the faceplate. 2 Push the faceplate in . General features Theft Deterrent Faceplate The faceplate of the unit can be detached and taken...
Instruction Manual
Page 16
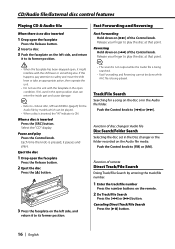
... been dropped open condition. Pause and play the disc at that point. Eject the disc 1 Drop open the faceplate Press the Release button. 2 Eject the disc Press the [0] button. 3 Press the faceplate on the left side, and return it to (page7) for a song on the left side, and return ...control features Playing CD & Audio file Fast Forwarding and Reversing When there is no disc inserted 1 Drop open the faceplate Press the Release button. 2 Insert a disc. 3 Push the faceplate on the disc or in the Audio file folder. Function of remote Direct Track/File Search Doing Track/File Search ...
... been dropped open condition. Pause and play the disc at that point. Eject the disc 1 Drop open the faceplate Press the Release button. 2 Eject the disc Press the [0] button. 3 Press the faceplate on the left side, and return it to (page7) for a song on the left side, and return ...control features Playing CD & Audio file Fast Forwarding and Reversing When there is no disc inserted 1 Drop open the faceplate Press the Release button. 2 Insert a disc. 3 Push the faceplate on the disc or in the Audio file folder. Function of remote Direct Track/File Search Doing Track/File Search ...
Instruction Manual
Page 21
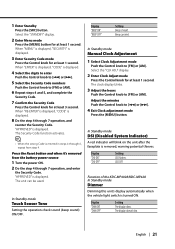
..., and enter the Security Code. Beep canceled. In Standby mode DSI (Disabled System Indicator) A red indicator will blink on the unit after the faceplate is turned ON. Adjust the minutes Push the Control knob to [FM] or [AM]. Display "DSI ON" "DSI OFF" Setting LED flashes....is heard. Select the "CLK ADJ" display. 2 Enter Clock Adjust mode Press the Control knob for at least 1 second. Function of the KDC-MP4028/KDC-MP428 In Standby mode Dimmer Dimming this unit's display automatically when the vehicle light switch is removed, warning potential thieves. LED OFF. Display "...
..., and enter the Security Code. Beep canceled. In Standby mode DSI (Disabled System Indicator) A red indicator will blink on the unit after the faceplate is turned ON. Adjust the minutes Push the Control knob to [FM] or [AM]. Display "DSI ON" "DSI OFF" Setting LED flashes....is heard. Select the "CLK ADJ" display. 2 Enter Clock Adjust mode Press the Control knob for at least 1 second. Function of the KDC-MP4028/KDC-MP428 In Standby mode Dimmer Dimming this unit's display automatically when the vehicle light switch is removed, warning potential thieves. LED OFF. Display "...
Instruction Manual
Page 27
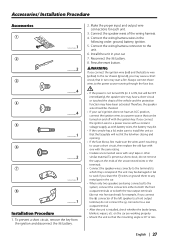
... the ignition wires to a power source that in the car. • When only two speakers are working properly. • Mount the unit so that the faceplate will be damaged or fail to work if you connect the ignition wire to which they correspond. battery. 8. Therefore, the speaker wire should be turned...
... the ignition wires to a power source that in the car. • When only two speakers are working properly. • Mount the unit so that the faceplate will be damaged or fail to work if you connect the ignition wire to which they correspond. battery. 8. Therefore, the speaker wire should be turned...
Instruction Manual
Page 31
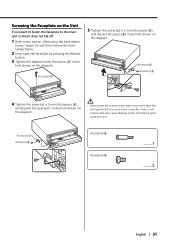
... them in another hole, it does not fall off. 1 Refer to the mechanical parts inside the unit. If you want to fasten the faceplate to the main unit so that it will contact and may cause damage to the section (page 32) and then remove the hard rubber frame.... 2 Drop open the faceplate by pressing the Release button. 3 Tighten the stepped screw (Accessory 5) in the hole shown on the diagram. Accessory7 Accessory6 Accessory5 Accessory6 ..........1 ..........2 English | 31 ...
... them in another hole, it does not fall off. 1 Refer to the mechanical parts inside the unit. If you want to fasten the faceplate to the main unit so that it will contact and may cause damage to the section (page 32) and then remove the hard rubber frame.... 2 Drop open the faceplate by pressing the Release button. 3 Tighten the stepped screw (Accessory 5) in the hole shown on the diagram. Accessory7 Accessory6 Accessory5 Accessory6 ..........1 ..........2 English | 31 ...
Instruction Manual
Page 35
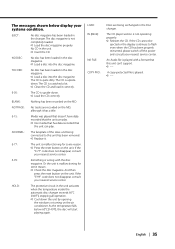
... disappear, consult your nearest service center. A copy-protected file is malfunctioning for some reason. ➪ Press the reset button on the unit. NO PANEL: The faceplate of the slave unit being exchanged in the disc magazine. ➪ Load a disc into the disc magazine. NO DISC: No disc has been loaded in...
... disappear, consult your nearest service center. A copy-protected file is malfunctioning for some reason. ➪ Press the reset button on the unit. NO PANEL: The faceplate of the slave unit being exchanged in the disc magazine. ➪ Load a disc into the disc magazine. NO DISC: No disc has been loaded in...

