
Instruction Manual
Page 2
... 8 Power Selecting the Source Volume Attenuator System Q Audio Control Audio Setup Speaker Setting Switching Display Subwoofer Output Dimmer Control Theft Deterrent Faceplate TEL Mute Tuner features 13 Tuning Tuning Mode Direct Access Tuning Station Preset Memory Auto Memory Entry Preset Tuning CD/Audio file/External disc control features 15 Playing External Disc Playing CD & Audio file Fast Forwarding and Reversing Track/File Search Disc Search / Folder Search Direct Track / File Search Direct Disc Search Track/File/Disc/Folder Repeat Scan Play Random Play Magazine Random Play Folder...
... 8 Power Selecting the Source Volume Attenuator System Q Audio Control Audio Setup Speaker Setting Switching Display Subwoofer Output Dimmer Control Theft Deterrent Faceplate TEL Mute Tuner features 13 Tuning Tuning Mode Direct Access Tuning Station Preset Memory Auto Memory Entry Preset Tuning CD/Audio file/External disc control features 15 Playing External Disc Playing CD & Audio file Fast Forwarding and Reversing Track/File Search Disc Search / Folder Search Direct Track / File Search Direct Disc Search Track/File/Disc/Folder Repeat Scan Play Random Play Magazine Random Play Folder...
Instruction Manual
Page 3
... in hazardous radiation exposure. 2Warning 2CAUTION Use of controls or adjustments or performance of labels on, or inside the product relating to provide reasonable protection against harmful interference in a residential installation. This equipment may cause harmful interference to radio communications, if it is no guarantee that to Part 15 of the following are expressly approved in the instruction manual.
... in hazardous radiation exposure. 2Warning 2CAUTION Use of controls or adjustments or performance of labels on, or inside the product relating to provide reasonable protection against harmful interference in a residential installation. This equipment may cause harmful interference to radio communications, if it is no guarantee that to Part 15 of the following are expressly approved in the instruction manual.
Instruction Manual
Page 4
... faceplate case in areas exposed to direct sunlight, excessive heat or humidity. Using a fuse with its adapter into the unit, the adapter might separate from the CD and damage the unit. Use only the screws provided. In such a situation, remove the disc and wait for the applicable KENWOOD disc changers/ CD players. Attach the panel while you try to load a 3 in 1998 or later can be displayed...
... faceplate case in areas exposed to direct sunlight, excessive heat or humidity. Using a fuse with its adapter into the unit, the adapter might separate from the CD and damage the unit. Use only the screws provided. In such a situation, remove the disc and wait for the applicable KENWOOD disc changers/ CD players. Attach the panel while you try to load a 3 in 1998 or later can be displayed...
Instruction Manual
Page 5
... Instruction manual; Normal operation should be differed from what appears on the display in this unit are A-Z 0-9 The illustrations of SIRIUS Satellite radio tuner KTC-SR901/SR902/SR903 (optional accessory), when connected, for Auto Ensemble Memory Entry. 2. Select the preset band for the operation method. FM/ 4 SCRL AUTO ¢ Reset button • We recommend the use of (page 20) to the following control methods of the illustrations on the unit or faceplate...
... Instruction manual; Normal operation should be differed from what appears on the display in this unit are A-Z 0-9 The illustrations of SIRIUS Satellite radio tuner KTC-SR901/SR902/SR903 (optional accessory), when connected, for Auto Ensemble Memory Entry. 2. Select the preset band for the operation method. FM/ 4 SCRL AUTO ¢ Reset button • We recommend the use of (page 20) to the following control methods of the illustrations on the unit or faceplate...
Instruction Manual
Page 8
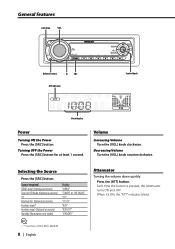
... [ATT] button. Source required SIRIUS tuner (Optional accessory) Tuner or HD Radio (Optional accessory) CD External disc (Optional accessory) Auxiliary input* Auxiliary input (Optional accessory) Standby (Illumination only mode) Display "SIRIUS" "TUNER" or "HD RADIO" "CD" "CD CH" "AUX" "AUX EXT" "STANDBY" Attenuator Turning the volume down quickly. When it's ON, the "ATT" indicator blinks. • * Function of the KDC-MP428 8 | English Decreasing Volume Turn the [VOL] knob counterclockwise. Volume Increasing Volume Turn the [VOL] knob clockwise. Each time the button...
... [ATT] button. Source required SIRIUS tuner (Optional accessory) Tuner or HD Radio (Optional accessory) CD External disc (Optional accessory) Auxiliary input* Auxiliary input (Optional accessory) Standby (Illumination only mode) Display "SIRIUS" "TUNER" or "HD RADIO" "CD" "CD CH" "AUX" "AUX EXT" "STANDBY" Attenuator Turning the volume down quickly. When it's ON, the "ATT" indicator blinks. • * Function of the KDC-MP428 8 | English Decreasing Volume Turn the [VOL] knob counterclockwise. Volume Increasing Volume Turn the [VOL] knob clockwise. Each time the button...
Instruction Manual
Page 9
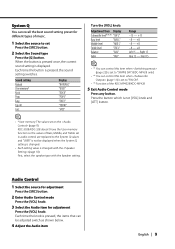
...; *3 Function of the KDC-MP4028/KDC-MP428 5 Exit Audio Control mode Press any button. Press the button which is displayed. Adjustment Item Display Subwoofer level*1*2*3 "SW L" Bass level "BAS L" Middle level "MID L" Treble level "TRE L" Balance "BAL" Fader "FAD" Range -15 - +15 -8 - +8 -8 - +8 -8 - +8 Left 15 - Sound setting Natural User memory* Rock Pops Easy Top 40 Jazz Display "NATURAL" "USER" "ROCK" "POPS" "EASY" "TOP40" "JAZZ" Turn the [VOL] knob. Right 15 Rear 15 - Each time the button is pressed, the sound setting switches. First, select the speaker...
...; *3 Function of the KDC-MP4028/KDC-MP428 5 Exit Audio Control mode Press any button. Press the button which is displayed. Adjustment Item Display Subwoofer level*1*2*3 "SW L" Bass level "BAS L" Middle level "MID L" Treble level "TRE L" Balance "BAL" Fader "FAD" Range -15 - +15 -8 - +8 -8 - +8 -8 - +8 Left 15 - Sound setting Natural User memory* Rock Pops Easy Top 40 Jazz Display "NATURAL" "USER" "ROCK" "POPS" "EASY" "TOP40" "JAZZ" Turn the [VOL] knob. Right 15 Rear 15 - Each time the button is pressed, the sound setting switches. First, select the speaker...
Instruction Manual
Page 10
...; Volume offset: Each source's volume can control this item when (page 11) is displayed. 2 Select the Display item Push the Control knob to "SWPRE SW". (KDC-MP428 only) • *2 You can be adjusted switch as shown below . "DISP SEL" is set to "SW ON". • *3 Function of the KDC-MP4028/KDC-MP428 5 Exit Audio Setup mode Press [VOL] knob for at least 1 second. "T-TITLE" MP4028/KDC-MP428 internal CD source) Track number & Play time "P-TIME" Clock "CLOCK" "D-TITLE" MP4028/KDC...
...; Volume offset: Each source's volume can control this item when (page 11) is displayed. 2 Select the Display item Push the Control knob to "SWPRE SW". (KDC-MP428 only) • *2 You can be adjusted switch as shown below . "DISP SEL" is set to "SW ON". • *3 Function of the KDC-MP4028/KDC-MP428 5 Exit Audio Setup mode Press [VOL] knob for at least 1 second. "T-TITLE" MP4028/KDC-MP428 internal CD source) Track number & Play time "P-TIME" Clock "CLOCK" "D-TITLE" MP4028/KDC...
Instruction Manual
Page 11
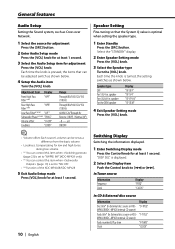
... name Track number & Play time Clock Display "TITLE" "ALBUM" "FOLDER" "FILE" "P-TIME" "CLOCK" In HD Radio source Information Station name* Song title*/ Artist name*/ Album name*/ Genre* Frequency Clock Display "ST NAME" "TITLE" "FREQ" "CLOCK" In Auxiliary input source Information Auxiliary input name Clock Display "SRC NAME" "CLOCK" 3 Exit Switching Display mode Press the Control knob. When it 's ON, "SW ON" is displayed. • You can change the unit's display to "SWPRE SW". (KDC-MP428 only) Function of the KDC-MP4028/KDC-MP428 Subwoofer Output Turning the Subwoofer output ON...
... name Track number & Play time Clock Display "TITLE" "ALBUM" "FOLDER" "FILE" "P-TIME" "CLOCK" In HD Radio source Information Station name* Song title*/ Artist name*/ Album name*/ Genre* Frequency Clock Display "ST NAME" "TITLE" "FREQ" "CLOCK" In Auxiliary input source Information Auxiliary input name Clock Display "SRC NAME" "CLOCK" 3 Exit Switching Display mode Press the Control knob. When it 's ON, "SW ON" is displayed. • You can change the unit's display to "SWPRE SW". (KDC-MP428 only) Function of the KDC-MP4028/KDC-MP428 Subwoofer Output Turning the Subwoofer output ON...

Instruction Manual
Page 13
... Preset memory. English | 13 Each time the knob is pushed to [FM], it switches between the FM1, FM2, and FM3 bands. 3 Tune up or down band Push the Control knob to [FM] or [AM]. Select the "TUNER" display. 2 Select the band Push the Control knob to [4] or [¢]. Tuning Mode Choose the tuning mode. Tuner features AUTO/ AME SRC 1 - 6 ST indicator Control knob Band display Frequency display Preset station number Tuning Selecting the station. 1 Select tuner source Press the [SRC] button...
... Preset memory. English | 13 Each time the knob is pushed to [FM], it switches between the FM1, FM2, and FM3 bands. 3 Tune up or down band Push the Control knob to [FM] or [AM]. Select the "TUNER" display. 2 Select the band Push the Control knob to [4] or [¢]. Tuning Mode Choose the tuning mode. Tuner features AUTO/ AME SRC 1 - 6 ST indicator Control knob Band display Frequency display Preset station number Tuning Selecting the station. 1 Select tuner source Press the [SRC] button...
Instruction Manual
Page 15
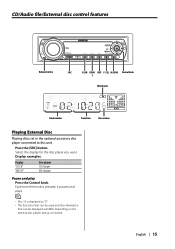
... functions that can be used and the information that can be displayed will differ depending on the external disc players being connected. CD/Audio file/External disc control features Release button SRC SCAN RDM/ REP F.SEL M.RDM Control knob 3 IN indicator Track number Track time Disc number Playing External Disc Playing discs set in the optional accessory disc player connected to this unit. Display examples: Display "CD CH" "MD CH" Disc player CD changer MD changer Pause and play Press the Control...
... functions that can be used and the information that can be displayed will differ depending on the external disc players being connected. CD/Audio file/External disc control features Release button SRC SCAN RDM/ REP F.SEL M.RDM Control knob 3 IN indicator Track number Track time Disc number Playing External Disc Playing discs set in the optional accessory disc player connected to this unit. Display examples: Display "CD CH" "MD CH" Disc player CD changer MD changer Pause and play Press the Control...

Instruction Manual
Page 20
... MENU SRC Control knob Menu display Menu System Setting during operation beep sound etc. You can 't be set the beep sound select the "BEEP" display. 3 Set the menu item Push the Control knob to [FM] or [AM]. functions. Example: When you want to the basic operation method above are displayed, afterwards their setting content is after this unit is pushed it 's removed from the vehicle, personalizing this operation explanation. 1 Enter Menu mode Press the [MENU] button...
... MENU SRC Control knob Menu display Menu System Setting during operation beep sound etc. You can 't be set the beep sound select the "BEEP" display. 3 Set the menu item Push the Control knob to [FM] or [AM]. functions. Example: When you want to the basic operation method above are displayed, afterwards their setting content is after this unit is pushed it 's removed from the vehicle, personalizing this operation explanation. 1 Enter Menu mode Press the [MENU] button...
Instruction Manual
Page 21
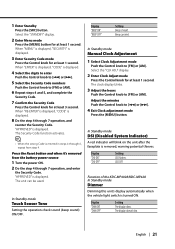
..." Setting LED flashes. When "MENU" is displayed, "SECURITY" is entered in steps 4 through 6, repeat from the battery power source 1 Turn the power ON. 2 Do the step 4 through 7 operation, and reenter the Security Code. Beep canceled. The Security Code function activates. • When the wrong Code is displayed. 3 Enter Security Code mode Press the Control knob for at least 1 second. LED OFF. The unit can be used. Select the "CLK ADJ" display. 2 Enter Clock Adjust mode Press...
..." Setting LED flashes. When "MENU" is displayed, "SECURITY" is entered in steps 4 through 6, repeat from the battery power source 1 Turn the power ON. 2 Do the step 4 through 7 operation, and reenter the Security Code. Beep canceled. The Security Code function activates. • When the wrong Code is displayed. 3 Enter Security Code mode Press the Control knob for at least 1 second. LED OFF. The unit can be used. Select the "CLK ADJ" display. 2 Enter Clock Adjust mode Press...

Instruction Manual
Page 22
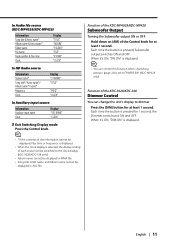
... broadcast program). Select the "HDR MODE" display. 2 Enter Receive mode Press the Control knob for service activation and potential future service changes. Each time the knob is turned ON. Display "AMP ON" "AMP OFF" Setting The built-in amplifier deactivates. In SIRIUS tuner source SIRIUS ID (ESN) display Displaying the SIRIUS ID (Electronic Serial Number) Display "ESN • Strong electrical fields (such as shown below. In HD Radio mode Receive mode Setting Sets the receive mode. 22 | English • Serial & SIRIUS ID (ESN) It is ON. Receive mode Auto mode...
... broadcast program). Select the "HDR MODE" display. 2 Enter Receive mode Press the Control knob for service activation and potential future service changes. Each time the knob is turned ON. Display "AMP ON" "AMP OFF" Setting The built-in amplifier deactivates. In SIRIUS tuner source SIRIUS ID (ESN) display Displaying the SIRIUS ID (Electronic Serial Number) Display "ESN • Strong electrical fields (such as shown below. In HD Radio mode Receive mode Setting Sets the receive mode. 22 | English • Serial & SIRIUS ID (ESN) It is ON. Receive mode Auto mode...
Instruction Manual
Page 23
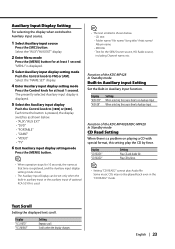
... input or the auxiliary input of optional KCA-S210A is used. • The text scrolled is displayed. 3 Select Auxiliary input display setting mode Push the Control knob to Auxiliary input source. 1 Select Auxiliary input source Press the [SRC] button. Select the "AUX"/"AUX EXT" display. 2 Enter Menu mode Press the [MENU] button for 10 seconds, the name at that time is registered, and the Auxiliary input display setting mode closes. • The Auxiliary Input Display can be played back even in Auxiliary Input function. "MENU" is shown below . • "AUX"/"AUX EXT" • "DVD...
... input or the auxiliary input of optional KCA-S210A is used. • The text scrolled is displayed. 3 Select Auxiliary input display setting mode Push the Control knob to Auxiliary input source. 1 Select Auxiliary input source Press the [SRC] button. Select the "AUX"/"AUX EXT" display. 2 Enter Menu mode Press the [MENU] button for 10 seconds, the name at that time is registered, and the Auxiliary input display setting mode closes. • The Auxiliary Input Display can be played back even in Auxiliary Input function. "MENU" is shown below . • "AUX"/"AUX EXT" • "DVD...

Instruction Manual
Page 25
... TUV WXY QZ SRC ATT 38 4/¢ DIRECT/OK Loading and Replacing the battery Use two "AA"-size batteries. Basic operations [VOL] buttons Adjusting the volume. [SRC] button Each time the button is accidentally swallowed. • Do not set the remote on hot places such as illustrated. For the source switching order refer to remove it returns to the previous level. 2WARNING • Store unused batteries out of the reach...
... TUV WXY QZ SRC ATT 38 4/¢ DIRECT/OK Loading and Replacing the battery Use two "AA"-size batteries. Basic operations [VOL] buttons Adjusting the volume. [SRC] button Each time the button is accidentally swallowed. • Do not set the remote on hot places such as illustrated. For the source switching order refer to remove it returns to the previous level. 2WARNING • Store unused batteries out of the reach...
Instruction Manual
Page 26
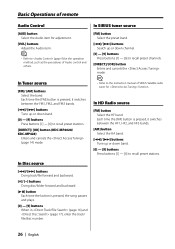
...;] buttons Tune up or down channel. [0] - [9] buttons Press buttons [1] - [6] to recall preset channels. [DIRECT]/ [OK] button Enters and cancels the mode. In SIRIUS tuner source [FM] button Select the preset band. [4]/ [¢] buttons Search up or down band. [0] - [9] buttons Press buttons [1] - [6] to recall preset stations. [DIRECT]/ [OK] button (KDC-MP4028/ KDC-MP428) Enters and cancels the (page 14) mode. • Refer to the instruction manual of SIRIUS Satellite radio tuner for the operation method, such as the procedures of remote Audio Control [AUD] button Select the Audio...
...;] buttons Tune up or down channel. [0] - [9] buttons Press buttons [1] - [6] to recall preset channels. [DIRECT]/ [OK] button Enters and cancels the mode. In SIRIUS tuner source [FM] button Select the preset band. [4]/ [¢] buttons Search up or down band. [0] - [9] buttons Press buttons [1] - [6] to recall preset stations. [DIRECT]/ [OK] button (KDC-MP4028/ KDC-MP428) Enters and cancels the (page 14) mode. • Refer to the instruction manual of SIRIUS Satellite radio tuner for the operation method, such as the procedures of remote Audio Control [AUD] button Select the Audio...
Instruction Manual
Page 27
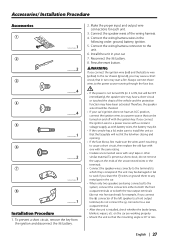
... any metal part in turn may have been activated. wires or ground them to cause a short circuit, then replace the old fuse with one with the same rating. • Insulate unconnected wires with the ignition key. Reconnect the - Therefore, the speaker wire should be checked. • If your car. 7. Make the proper input and output wire connections for each unit. 3. Always connect those wires to the power source running through...
... any metal part in turn may have been activated. wires or ground them to cause a short circuit, then replace the old fuse with one with the same rating. • Insulate unconnected wires with the ignition key. Reconnect the - Therefore, the speaker wire should be checked. • If your car. 7. Make the proper input and output wire connections for each unit. 3. Always connect those wires to the power source running through...
Instruction Manual
Page 28
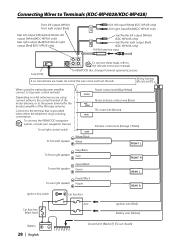
... relevant instruction manuals. Depending on what antenna you are made, do not let the wire come out from the tab. To connect the KENWOOD navigation system, consult your navigation manual. CONT MUTE To car light control switch To front left speaker ILLUM White/Black White Power control wire (Blue/White) Motor antenna control wire (Blue) TEL mute wire (Brown) Dimmer control wire (Orange / White) FRONT L To front right speaker Gray/Black Gray FRONT R To rear left output (White) (KDC-MP4028 only) Sub...
... relevant instruction manuals. Depending on what antenna you are made, do not let the wire come out from the tab. To connect the KENWOOD navigation system, consult your navigation manual. CONT MUTE To car light control switch To front left speaker ILLUM White/Black White Power control wire (Blue/White) Motor antenna control wire (Blue) TEL mute wire (Brown) Dimmer control wire (Orange / White) FRONT L To front right speaker Gray/Black Gray FRONT R To rear left output (White) (KDC-MP4028 only) Sub...
Instruction Manual
Page 33
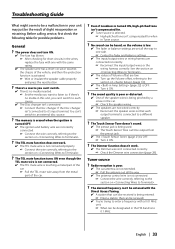
... of the speaker wires is activated. ☞ Wire or insulate the speaker cable properly and press the reset button. ? The TEL mute function turns ON even though the TEL mute wire is not connected. ✔ The TEL mute wire is connected to an external disc source. ? The sound quality is poor or distorted. ✔ One of the vehicle, and then the protection function is being pinched by a screw in your unit may just...
... of the speaker wires is activated. ☞ Wire or insulate the speaker cable properly and press the reset button. ? The TEL mute function turns ON even though the TEL mute wire is not connected. ✔ The TEL mute wire is connected to an external disc source. ? The sound quality is poor or distorted. ✔ One of the vehicle, and then the protection function is being pinched by a screw in your unit may just...
Instruction Manual
Page 34
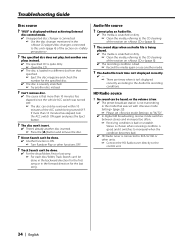
...). ☞ Please set to "AUTO". ✔ In digital AM broadcasting, receive mode switches between stereo and monaural too often. ☞ Receiving condition is connected to the Audio file recording conditions. Audio file source ? Can't remove disc. ✔ The cause is ON. ☞ Turn Random Play or other units. ☞ Connect the HD Radio tuner directly to the CD cleaning of the ACC switch being turned OFF. The sound skips when an Audio file is...
...). ☞ Please set to "AUTO". ✔ In digital AM broadcasting, receive mode switches between stereo and monaural too often. ☞ Receiving condition is connected to the Audio file recording conditions. Audio file source ? Can't remove disc. ✔ The cause is ON. ☞ Turn Random Play or other units. ☞ Connect the HD Radio tuner directly to the CD cleaning of the ACC switch being turned OFF. The sound skips when an Audio file is...


