Instruction Manual
Page 2
...CDs 6 About MP3 and WMA 7 General features 8 Power Selecting the Source Volume Attenuator System Q Audio Control Audio Setup Speaker Setting Switching Display Dimmer Control Theft Deterrent Faceplate TEL Mute Tuner features 12 Tuning Tuning Mode Station Preset Memory Auto Memory Entry Preset Tuning CD... Indicator) CRSC (Clean Reception System Circuit) Receive mode Setting SIRIUS ID (ESN) display Auxiliary Input Display Setting Text Scroll CD Read Setting Demonstration mode Setting Basic Operations of remote 22 Accessories/ Installation Procedure 24 Connecting Wires to Terminals 25...
...CDs 6 About MP3 and WMA 7 General features 8 Power Selecting the Source Volume Attenuator System Q Audio Control Audio Setup Speaker Setting Switching Display Dimmer Control Theft Deterrent Faceplate TEL Mute Tuner features 12 Tuning Tuning Mode Station Preset Memory Auto Memory Entry Preset Tuning CD... Indicator) CRSC (Clean Reception System Circuit) Receive mode Setting SIRIUS ID (ESN) display Auxiliary Input Display Setting Text Scroll CD Read Setting Demonstration mode Setting Basic Operations of remote 22 Accessories/ Installation Procedure 24 Connecting Wires to Terminals 25...
Instruction Manual
Page 5
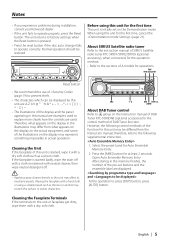
... first time This unit is stained, wipe it with a dry, soft cloth. Notes • If you experience problems during installation, consult your Kenwood dealer. • If the unit fails to explain more clearly how the controls are used to operate properly, press the Reset button. The unit...• Applying spray cleaner directly to the following control methods of the pre-set on the Instruction manual of DAB Tuner KTC-9090DAB (optional accessory) for the control method of this unit for the first time, cancel the (page 21). AUTO About DAB Tuner control Refer to operate correctly...
... first time This unit is stained, wipe it with a dry, soft cloth. Notes • If you experience problems during installation, consult your Kenwood dealer. • If the unit fails to explain more clearly how the controls are used to operate properly, press the Reset button. The unit...• Applying spray cleaner directly to the following control methods of the pre-set on the Instruction manual of DAB Tuner KTC-9090DAB (optional accessory) for the control method of this unit for the first time, cancel the (page 21). AUTO About DAB Tuner control Refer to operate correctly...

Instruction Manual
Page 6
... reading the caution items on the CD. CD accessories Don't use it . When using a new CD If the CD center hole or outside rim has burrs, use disc type accessories. CDs that can't be used • CDs that hasn't been finalized can only play discs which do not have the mark. • A CD-R or CD-RW that aren't round can...
... reading the caution items on the CD. CD accessories Don't use it . When using a new CD If the CD center hole or outside rim has burrs, use disc type accessories. CDs that can't be used • CDs that hasn't been finalized can only play discs which do not have the mark. • A CD-R or CD-RW that aren't round can...
Instruction Manual
Page 8
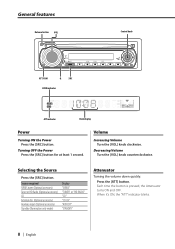
... SCRL + CS DISP - Decreasing Volume Turn the [VOL] knob counterclockwise. Source required SIRIUS tuner (Optional accessory) Tuner or HD Radio (Optional accessory) CD External disc (Optional accessory) Auxiliary input (Optional accessory) Standby (Illumination only mode) Display "SIRIUS" "TUNER" or "HD RADIO" "CD" "CD CH" "AUX EXT" "STANDBY" Attenuator Turning the volume down quickly. When it's ON, the...
... SCRL + CS DISP - Decreasing Volume Turn the [VOL] knob counterclockwise. Source required SIRIUS tuner (Optional accessory) Tuner or HD Radio (Optional accessory) CD External disc (Optional accessory) Auxiliary input (Optional accessory) Standby (Illumination only mode) Display "SIRIUS" "TUNER" or "HD RADIO" "CD" "CD CH" "AUX EXT" "STANDBY" Attenuator Turning the volume down quickly. When it's ON, the...
Instruction Manual
Page 14
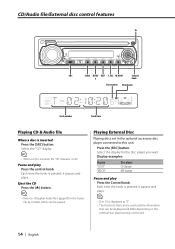
... the [0] button. • Refer to this unit. Press the [SRC] button. Display examples: Display "CD CH" "MD CH" Disc player CD changer MD changer Pause and play Press the control knob. CD/Audio file/External disc control features 0 ATT DIM VOL AUD SET UP Q MENU OFF SCAN RDM REP F.SEL... RDM/ REP F.SEL M.RDM Control 3 knob Disc number IN indicator Track number Track time Playing CD & Audio file When a disc is ON. Playing External Disc Playing discs set in the optional accessory disc player connected to (page7) for the disc player you want. Pause and play Press the ...
... the [0] button. • Refer to this unit. Press the [SRC] button. Display examples: Display "CD CH" "MD CH" Disc player CD changer MD changer Pause and play Press the control knob. CD/Audio file/External disc control features 0 ATT DIM VOL AUD SET UP Q MENU OFF SCAN RDM REP F.SEL... RDM/ REP F.SEL M.RDM Control 3 knob Disc number IN indicator Track number Track time Playing CD & Audio file When a disc is ON. Playing External Disc Playing discs set in the optional accessory disc player connected to (page7) for the disc player you want. Pause and play Press the ...
Instruction Manual
Page 22
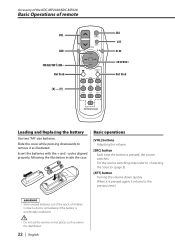
... down quickly. poles aligned properly, following the illustration inside the case. When it is pressed again, it as above the dashboard. 22 | English Accessory of the KDC-MP2028/KDC-MP228 Basic Operations of children. For the source switching order refer to the previous level. 2WARNING • Store unused batteries out of the reach of...
... down quickly. poles aligned properly, following the illustration inside the case. When it is pressed again, it as above the dashboard. 22 | English Accessory of the KDC-MP2028/KDC-MP228 Basic Operations of children. For the source switching order refer to the previous level. 2WARNING • Store unused batteries out of the reach of...

Instruction Manual
Page 24
... unit may be OFF immediately), the speaker wire may start a fire. battery. 8. To prevent a short circuit, remove the key from the ignition and disconnect the - Accessories/ Installation Procedure Accessories 1 ..........1 2 ..........2 3 ..........4 4 ..........4 5 ..........1 Installation Procedure 1.
... unit may be OFF immediately), the speaker wire may start a fire. battery. 8. To prevent a short circuit, remove the key from the ignition and disconnect the - Accessories/ Installation Procedure Accessories 1 ..........1 2 ..........2 3 ..........4 4 ..........4 5 ..........1 Installation Procedure 1.
Instruction Manual
Page 25
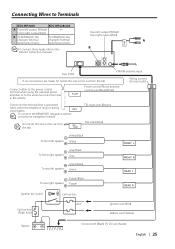
P.CONT Power control/Motor antenna control wire (Blue/White) Connect to Terminals KDC-MP2028 KDC-MP228/228 A Front left output (White)/ - Do not let the wire come out from the tab. Connecting Wires to the terminal that is ... output (White)/ Rear right output (Red) changer/ External changer/ External A optional accessory optional accessory FRONT To connect these leads, refer to the antenna control terminal in the vehicle. Front right output (Red) B To KENWOOD disc To KENWOOD disc Rear left speaker Green/Black Green To rear right speaker Purple/Black Purple...
P.CONT Power control/Motor antenna control wire (Blue/White) Connect to Terminals KDC-MP2028 KDC-MP228/228 A Front left output (White)/ - Do not let the wire come out from the tab. Connecting Wires to the terminal that is ... output (White)/ Rear right output (Red) changer/ External changer/ External A optional accessory optional accessory FRONT To connect these leads, refer to the antenna control terminal in the vehicle. Front right output (Red) B To KENWOOD disc To KENWOOD disc Rear left speaker Green/Black Green To rear right speaker Purple/Black Purple...

Instruction Manual
Page 26
... with a screwdriver or similar utensil and attach it may malfunction (for example, the sound may occur if a screwdriver or similar tool is used with the accessory screws. If the unit is installed securely in the unit (two locations on each side) with the vehicle mounting bracket and secure the unit with...
... with a screwdriver or similar utensil and attach it may malfunction (for example, the sound may occur if a screwdriver or similar tool is used with the accessory screws. If the unit is installed securely in the unit (two locations on each side) with the vehicle mounting bracket and secure the unit with...


