Instruction Manual
Page 1
... KDC-MP228 KDC-228 CD-RECEIVER INSTRUCTION MANUAL AMPLI-TUNER-LECTEUR DE CD MODE D'EMPLOI REPRODUCTOR DE DISCOS COMPACTOS RECEPTOR DE FM/AM MANUAL DE INSTRUCCIONES Take the time to the model and serial numbers whenever you obtain the best performance from your new CD-receiver. Model KDC-MP2028/MP228/228 Serial number © B64-2926-10/01 (KW) Refer to read through this instruction manual. For your KENWOOD dealer for information or service...
... KDC-MP228 KDC-228 CD-RECEIVER INSTRUCTION MANUAL AMPLI-TUNER-LECTEUR DE CD MODE D'EMPLOI REPRODUCTOR DE DISCOS COMPACTOS RECEPTOR DE FM/AM MANUAL DE INSTRUCCIONES Take the time to the model and serial numbers whenever you obtain the best performance from your new CD-receiver. Model KDC-MP2028/MP228/228 Serial number © B64-2926-10/01 (KW) Refer to read through this instruction manual. For your KENWOOD dealer for information or service...
Instruction Manual
Page 2
... Scan Play Random Play Magazine Random Play Folder Select Text/Title Scroll HD Radio control features 17 Tuning Menu system 18 Menu System Security Code Touch Sensor Tone Manual Clock Adjustment DSI (Disabled System Indicator) CRSC (Clean Reception System Circuit) Receive mode Setting SIRIUS ID (ESN) display Auxiliary Input Display Setting Text Scroll CD Read Setting Demonstration mode Setting Basic Operations of remote 22 Accessories/ Installation Procedure 24 Connecting Wires to Terminals 25 Installation 26 Removing the Unit 28 Troubleshooting Guide 29 Specifications 32...
... Scan Play Random Play Magazine Random Play Folder Select Text/Title Scroll HD Radio control features 17 Tuning Menu system 18 Menu System Security Code Touch Sensor Tone Manual Clock Adjustment DSI (Disabled System Indicator) CRSC (Clean Reception System Circuit) Receive mode Setting SIRIUS ID (ESN) display Auxiliary Input Display Setting Text Scroll CD Read Setting Demonstration mode Setting Basic Operations of remote 22 Accessories/ Installation Procedure 24 Connecting Wires to Terminals 25 Installation 26 Removing the Unit 28 Troubleshooting Guide 29 Specifications 32...
Instruction Manual
Page 4
... precautions: • Make sure to ground the unit to a negative 12V DC power supply. • Do not install the unit in areas exposed to this unit. Do Not Load 3-in damage. In such a situation, remove the disc and wait for the applicable KENWOOD disc changers/ CD players. If you could damage the unit. The functions that can be connected simultaneously. Called lens fogging, CDs may result in...
... precautions: • Make sure to ground the unit to a negative 12V DC power supply. • Do not install the unit in areas exposed to this unit. Do Not Load 3-in damage. In such a situation, remove the disc and wait for the applicable KENWOOD disc changers/ CD players. If you could damage the unit. The functions that can be connected simultaneously. Called lens fogging, CDs may result in...
Instruction Manual
Page 5
... memory finishes, the number of DAB Tuner KTC-9090DAB (optional accessory) for Auto Ensemble Memory Entry. 2. Notes • If you experience problems during installation, consult your Kenwood dealer. • If the unit fails to press [DISP] button, press [AUTO] button. Normal operation should be displayed by this unit are used. AUTO About DAB Tuner control Refer to explain more clearly how the controls are A-Z 0-9 • The illustrations of DAB Tuner function. Select the preset...
... memory finishes, the number of DAB Tuner KTC-9090DAB (optional accessory) for Auto Ensemble Memory Entry. 2. Notes • If you experience problems during installation, consult your Kenwood dealer. • If the unit fails to press [DISP] button, press [AUTO] button. Normal operation should be displayed by this unit are used. AUTO About DAB Tuner control Refer to explain more clearly how the controls are A-Z 0-9 • The illustrations of DAB Tuner function. Select the preset...
Instruction Manual
Page 7
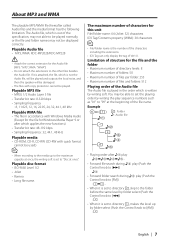
... • CD-ROM, CD-R, CD-RW (CD-RW with copy protection cannot be used.) • When recording to the media up by folder select (Push the Control knob to the other files besides the Audio file. Playable Audio file • MP3, WMA: KDC-MP2028/KDC-MP228 • Attach the correct extension for the file and the folder • Maximum number of directory levels: 8 • Maximum number of folders...
... • CD-ROM, CD-R, CD-RW (CD-RW with copy protection cannot be used.) • When recording to the media up by folder select (Push the Control knob to the other files besides the Audio file. Playable Audio file • MP3, WMA: KDC-MP2028/KDC-MP228 • Attach the correct extension for the file and the folder • Maximum number of directory levels: 8 • Maximum number of folders...
Instruction Manual
Page 8
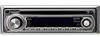
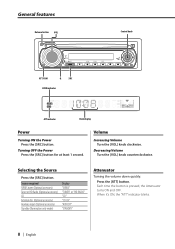
...) Auxiliary input (Optional accessory) Standby (Illumination only mode) Display "SIRIUS" "TUNER" or "HD RADIO" "CD" "CD CH" "AUX EXT" "STANDBY" Attenuator Turning the volume down quickly. Each time the button is pressed, the Attenuator turns ON and OFF. When it's ON, the "ATT" indicator blinks. 8 | English Decreasing Volume Turn the [VOL] knob counterclockwise. Turning OFF the Power Press the [SRC] button for at least 1 second. Selecting the Source Press the [SRC] button. AUTO AME ATT indicator Clock display Power Turning...
...) Auxiliary input (Optional accessory) Standby (Illumination only mode) Display "SIRIUS" "TUNER" or "HD RADIO" "CD" "CD CH" "AUX EXT" "STANDBY" Attenuator Turning the volume down quickly. Each time the button is pressed, the Attenuator turns ON and OFF. When it's ON, the "ATT" indicator blinks. 8 | English Decreasing Volume Turn the [VOL] knob counterclockwise. Turning OFF the Power Press the [SRC] button for at least 1 second. Selecting the Source Press the [SRC] button. AUTO AME ATT indicator Clock display Power Turning...
Instruction Manual
Page 9
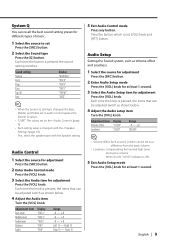
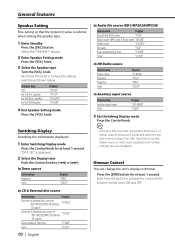
... sound setting switches. First, select the speaker type with the (page 10). Each time the knob is changed with the Speaker setting. Each time the button is not [VOL] knob and [ATT] button. Audio Control 1 Select the source for adjustment Press the [SRC] button. 2 Enter Audio Control mode Press the [VOL] knob. 3 Select the Audio item for adjustment Press the [VOL] knob. System Q You can recall the best sound setting preset for different types of music. 1 Select the source to set as...
... sound setting switches. First, select the speaker type with the (page 10). Each time the knob is changed with the Speaker setting. Each time the button is not [VOL] knob and [ATT] button. Audio Control 1 Select the source for adjustment Press the [SRC] button. 2 Enter Audio Control mode Press the [VOL] knob. 3 Select the Audio item for adjustment Press the [VOL] knob. System Q You can recall the best sound setting preset for different types of music. 1 Select the source to set as...
Instruction Manual
Page 10
... (MP3 only) & Artist name "ALBUM" Folder name "FOLDER" File name "FILE" Track number & Play time "P-TIME" Clock "CLOCK" In HD Radio source Information Station name Song title Frequency Clock Display "ST NAME" "TITLE" "FREQ" "CLOCK" In Auxiliary input source Information Auxiliary input name Clock Display "SRC NAME" "CLOCK" 3 Exit Switching Display mode Press the Control knob. Dimmer Control You can change the unit's display to [4] or [¢]. Press the [DIM] button for at least 1 second. Each time the knob is optimal when setting the speaker...
... (MP3 only) & Artist name "ALBUM" Folder name "FOLDER" File name "FILE" Track number & Play time "P-TIME" Clock "CLOCK" In HD Radio source Information Station name Song title Frequency Clock Display "ST NAME" "TITLE" "FREQ" "CLOCK" In Auxiliary input source Information Auxiliary input name Clock Display "SRC NAME" "CLOCK" 3 Exit Switching Display mode Press the Control knob. Dimmer Control You can change the unit's display to [4] or [¢]. Press the [DIM] button for at least 1 second. Each time the knob is optimal when setting the speaker...

Instruction Manual
Page 12
...AUTO AME SRC 1 - 6 AUTO/ Control AME knob ST indicator Band display Frequency display Preset station number Tuning Selecting the station. 1 Select tuner source Press the [SRC] button. Select the "TUNER" display. 2 Select the band Push the Control knob to [4] or [¢]. Tuning Mode Choose the tuning mode. Tuner features ATT DIM VOL AUD SET UP Q MENU OFF SCAN RDM REP SCRL + CS DISP - Tuning mode Auto seek Preset station seek Manual Display "AUTO 1" "AUTO 2" "MANUAL" Operation Automatic search for a station. Each time the button is pressed, the Tuning mode switches...
...AUTO AME SRC 1 - 6 AUTO/ Control AME knob ST indicator Band display Frequency display Preset station number Tuning Selecting the station. 1 Select tuner source Press the [SRC] button. Select the "TUNER" display. 2 Select the band Push the Control knob to [4] or [¢]. Tuning Mode Choose the tuning mode. Tuner features ATT DIM VOL AUD SET UP Q MENU OFF SCAN RDM REP SCRL + CS DISP - Tuning mode Auto seek Preset station seek Manual Display "AUTO 1" "AUTO 2" "MANUAL" Operation Automatic search for a station. Each time the button is pressed, the Tuning mode switches...
Instruction Manual
Page 14
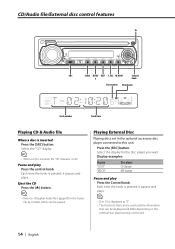
... plays. Eject the CD Press the [0] button. • Refer to this unit. Playing External Disc Playing discs set in the optional accessory disc player connected to (page7) for the disc player you want. Display examples: Display "CD CH" "MD CH" Disc player CD changer MD changer Pause and play Press the control knob. Each time the knob is displayed as "0". • The functions that can be used and the information that can be displayed will differ depending on the external disc players...
... plays. Eject the CD Press the [0] button. • Refer to this unit. Playing External Disc Playing discs set in the optional accessory disc player connected to (page7) for the disc player you want. Display examples: Display "CD CH" "MD CH" Disc player CD changer MD changer Pause and play Press the control knob. Each time the knob is displayed as "0". • The functions that can be used and the information that can be displayed will differ depending on the external disc players...
Instruction Manual
Page 19
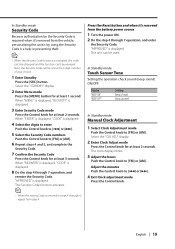
... clock display blinks. 3 Adjust the hours Push the Control knob to [FM] or [AM]. In Standby mode Manual Clock Adjustment 1 Select Clock Adjustment mode Push the Control knob to [FM] or [AM]. In Standby mode Touch Sensor Tone Setting the operation check sound (beep sound) ON/OFF. Select the "STANDBY" display. 2 Enter Menu mode Press the [MENU] button for at least 1 second. The Security Code function activates. In Standby mode Security Code Because authorization by using the Security Code is a help in...
... clock display blinks. 3 Adjust the hours Push the Control knob to [FM] or [AM]. In Standby mode Manual Clock Adjustment 1 Select Clock Adjustment mode Push the Control knob to [FM] or [AM]. In Standby mode Touch Sensor Tone Setting the operation check sound (beep sound) ON/OFF. Select the "STANDBY" display. 2 Enter Menu mode Press the [MENU] button for at least 1 second. The Security Code function activates. In Standby mode Security Code Because authorization by using the Security Code is a help in...
Instruction Manual
Page 20
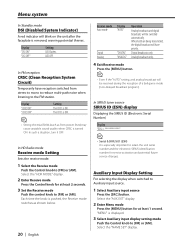
.... In SIRIUS tuner source SIRIUS ID (ESN) display Displaying the SIRIUS ID (Electronic Serial Number) Display "ESN In HD Radio mode Receive mode Setting Sets the receive mode. 1 Select the Receive mode Push the Control knob to Auxiliary input source. 1 Select Auxiliary input source Press the [SRC] button. Each time the knob is pushed, the Receive mode switches as from stereo to mono to reduce multi-path noise when listening to [FM] or [AM]. Auxiliary Input Display Setting For selecting the display when switched to [FM] or [AM]. Select the "NAME SET" display. Menu system...
.... In SIRIUS tuner source SIRIUS ID (ESN) display Displaying the SIRIUS ID (Electronic Serial Number) Display "ESN In HD Radio mode Receive mode Setting Sets the receive mode. 1 Select the Receive mode Push the Control knob to Auxiliary input source. 1 Select Auxiliary input source Press the [SRC] button. Each time the knob is pushed, the Receive mode switches as from stereo to mono to reduce multi-path noise when listening to [FM] or [AM]. Auxiliary Input Display Setting For selecting the display when switched to [FM] or [AM]. Select the "NAME SET" display. Menu system...
Instruction Manual
Page 21
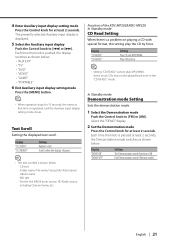
...; "AUX EXT" • "TV" • "DVD" • "VIDEO" • "GAME" • "PORTABLE" 6 Exit Auxiliary input display setting mode Press the [MENU] button. • When operation stops for at least 2 seconds. MD title - Some music CDs may not be played back even in the "CD READ2" mode. Each time the knob is pushed, the display switches as shown below. Display "CD READ1" "CD READ2" Setting Play CD and MP3/WMA. Display "DEMO ON" "DEMO OFF" Setting The Demonstration mode function is displayed. 5 Select the Auxiliary input display Push the Control...
...; "AUX EXT" • "TV" • "DVD" • "VIDEO" • "GAME" • "PORTABLE" 6 Exit Auxiliary input display setting mode Press the [MENU] button. • When operation stops for at least 2 seconds. MD title - Some music CDs may not be played back even in the "CD READ2" mode. Each time the knob is pushed, the display switches as shown below. Display "CD READ1" "CD READ2" Setting Play CD and MP3/WMA. Display "DEMO ON" "DEMO OFF" Setting The Demonstration mode function is displayed. 5 Select the Auxiliary input display Push the Control...
Instruction Manual
Page 22
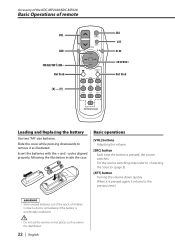
... pressing downwards to remove it returns to (page 8). [ATT] button Turning the volume down quickly. For the source switching order refer to the previous level. 2WARNING • Store unused batteries out of the reach of remote VOL AUD FM/AM/FM+/AM- Not Used [0] - [9] SRC ATT VOL AUD 38 FM+ 4 ¢ AM- Accessory of the KDC-MP2028/KDC-MP228 Basic Operations of children. DIRECT /OK ABC DEF...
... pressing downwards to remove it returns to (page 8). [ATT] button Turning the volume down quickly. For the source switching order refer to the previous level. 2WARNING • Store unused batteries out of the reach of remote VOL AUD FM/AM/FM+/AM- Not Used [0] - [9] SRC ATT VOL AUD 38 FM+ 4 ¢ AM- Accessory of the KDC-MP2028/KDC-MP228 Basic Operations of children. DIRECT /OK ABC DEF...

Instruction Manual
Page 23
... recall preset channels. Audio Control [AUD] button Select the Audio item for the operation method, such as the procedures of Audio control and others. In Tuner source [FM]/ [AM] buttons Select the band. English | 23 Each time the [FM] button is pressed, it switches between the FM1, FM2, and FM3 bands. [4]/ [¢] buttons Tune up or down band. [0] - [9] buttons Press buttons [1] - [6] to (page 9) for adjustment. [VOL] buttons Adjust the Audio item. • Refer to recall preset stations...
... recall preset channels. Audio Control [AUD] button Select the Audio item for the operation method, such as the procedures of Audio control and others. In Tuner source [FM]/ [AM] buttons Select the band. English | 23 Each time the [FM] button is pressed, it switches between the FM1, FM2, and FM3 bands. [4]/ [¢] buttons Tune up or down band. [0] - [9] buttons Press buttons [1] - [6] to (page 9) for adjustment. [VOL] buttons Adjust the Audio item. • Refer to recall preset stations...

Instruction Manual
Page 24
... the protection function may cause a short circuit, that in the car. • When only two speakers are working properly. • Mount the unit so that the mounting angle is 30° or less. 24 | English Accessories/ Installation Procedure Accessories 1 ..........1 2 ..........2 3 ..........4 4 ..........4 5 ..........1 Installation Procedure 1. To prevent a short circuit, remove the key from the ignition and disconnect the - Make the proper input and output wire connections for each unit. 3. battery. 8. Press the reset button...
... the protection function may cause a short circuit, that in the car. • When only two speakers are working properly. • Mount the unit so that the mounting angle is 30° or less. 24 | English Accessories/ Installation Procedure Accessories 1 ..........1 2 ..........2 3 ..........4 4 ..........4 5 ..........1 Installation Procedure 1. To prevent a short circuit, remove the key from the ignition and disconnect the - Make the proper input and output wire connections for each unit. 3. battery. 8. Press the reset button...
Instruction Manual
Page 25
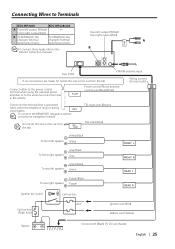
... Power control/Motor antenna control wire (Blue/White) Connect to the antenna control terminal in the vehicle. FM/AM antenna input Wiring harness (Accessory1) Connect either to the power control terminal when using the optional power amplifier, or to the terminal that is grounded when either the telephone rings or during MUTE conversation. Connecting Wires to the B relevant instruction manuals. Ground wire (Black) - (To car chassis) English | 25 Front right output (Red) B To KENWOOD disc To KENWOOD disc Rear left output (White)/ Rear right output...
... Power control/Motor antenna control wire (Blue/White) Connect to the antenna control terminal in the vehicle. FM/AM antenna input Wiring harness (Accessory1) Connect either to the power control terminal when using the optional power amplifier, or to the terminal that is grounded when either the telephone rings or during MUTE conversation. Connecting Wires to the B relevant instruction manuals. Ground wire (Black) - (To car chassis) English | 25 Front right output (Red) B To KENWOOD disc To KENWOOD disc Rear left output (White)/ Rear right output...
Instruction Manual
Page 29
... inserted. ☞ Set the media you can't switch to each output terminal is connected to a different speaker. ? The TEL mute function turns ON even though the TEL mute wire is not connected. ✔ The TEL mute wire is touching a metal part of the vehicle, and then the protection function is activated. ☞ Wire or insulate the speaker cable properly and press the reset button. ? Radio reception is poor. ✔ The car antenna is not extended...
... inserted. ☞ Set the media you can't switch to each output terminal is connected to a different speaker. ? The TEL mute function turns ON even though the TEL mute wire is not connected. ✔ The TEL mute wire is touching a metal part of the vehicle, and then the protection function is activated. ☞ Wire or insulate the speaker cable properly and press the reset button. ? Radio reception is poor. ✔ The car antenna is not extended...
Instruction Manual
Page 30
... bad. ✔ HD Radio tuner is that specified. ☞ Eject the disc magazine and check the number for the last song. Can't remove disc. ✔ The cause is connected to KCA-S210A or other functions OFF. ? The MP3/WMA track time isn't displayed correctly. ✔ --- ☞ There are times when it isn't displayed correctly according to the control unit. Troubleshooting Guide Disc source ? The sound skips when an MP3/WMA is loaded in the...
... bad. ✔ HD Radio tuner is that specified. ☞ Eject the disc magazine and check the number for the last song. Can't remove disc. ✔ The cause is connected to KCA-S210A or other functions OFF. ? The MP3/WMA track time isn't displayed correctly. ✔ --- ☞ There are times when it isn't displayed correctly according to the control unit. Troubleshooting Guide Disc source ? The sound skips when an MP3/WMA is loaded in the...

Instruction Manual
Page 31
... unit activates when the temperature inside the automatic disc changer exceeds 60°C (140°F), stopping all operation. ➪ Cool down . ➪ Load the CD correctly. LOAD: Discs are recorded on the disc. A MP3/WMA is played with the disc magazine. E-99: Something is reading the data on the MD, although it has a title. And then press the reset button on the MD. A copy-protected...
... unit activates when the temperature inside the automatic disc changer exceeds 60°C (140°F), stopping all operation. ➪ Cool down . ➪ Load the CD correctly. LOAD: Discs are recorded on the disc. A MP3/WMA is played with the disc magazine. E-99: Something is reading the data on the MD, although it has a title. And then press the reset button on the MD. A copy-protected...


