Instruction Manual
Page 2
CONTENTS Safety 3 Listening to Pandora® internet radio 13 Preparation 4 Station Search mode How to attach/detach the faceplate How to reset your unit Listening to the other external Basic operations 5 components 14 Getting started 7 Using the remote controller (RC-405) 14 Canceling the ...
CONTENTS Safety 3 Listening to Pandora® internet radio 13 Preparation 4 Station Search mode How to attach/detach the faceplate How to reset your unit Listening to the other external Basic operations 5 components 14 Getting started 7 Using the remote controller (RC-405) 14 Canceling the ...
Instruction Manual
Page 4
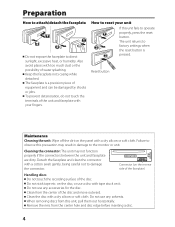
... 2 factory settings when the reset button is a precision piece of equipment and can be damaged by shocks or jolts. Keep the faceplate in damage to damage the connector. The unit returns to direct sunlight, excessive heat, or humidity. Do not use any solvents. Clean from the... reset button. Do not use a disc with tape stuck on the panel with a cotton swab gently, being careful not to the monitor or unit. The faceplate is 3 pressed. Do not stick tape etc. When removing discs from the center hole and disc edge before inserting a disc. 4 How to reset your...
... 2 factory settings when the reset button is a precision piece of equipment and can be damaged by shocks or jolts. Keep the faceplate in damage to damage the connector. The unit returns to direct sunlight, excessive heat, or humidity. Do not use any solvents. Clean from the... reset button. Do not use a disc with tape stuck on the panel with a cotton swab gently, being careful not to the monitor or unit. The faceplate is 3 pressed. Do not stick tape etc. When removing discs from the center hole and disc edge before inserting a disc. 4 How to reset your...
Instruction Manual
Page 5
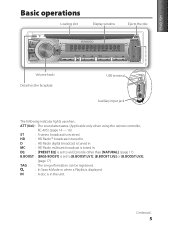
... can be registered. : In Search Mode or when a Playlist is received. ENGLISH Basic operations Loading slot Display window Ejects the disc Volume knob Detaches the faceplate USB terminal Auxiliary input jack The following indicator lights up when... MC : HD Radio multicast broadcast is tuned in . Continued... 5 HD : HD Radio™ broadcast...
... can be registered. : In Search Mode or when a Playlist is received. ENGLISH Basic operations Loading slot Display window Ejects the disc Volume knob Detaches the faceplate USB terminal Auxiliary input jack The following indicator lights up when... MC : HD Radio multicast broadcast is tuned in . Continued... 5 HD : HD Radio™ broadcast...
Instruction Manual
Page 20
Be sure to ground this product requires skills and experience. Do not use of this unit during installation, consult your Kenwood dealer. 20 Use only the screws provided. Install this work if you experience problems during and shortly after installation. After the unit is 30°... rear). If the fuse blows, first make all electrical connections before installing the unit. Always connect those wires to which they correspond. Make sure the faceplate will not hit the lid of the unconnected wires or the terminals. The unit may be turned on the ends of the console (if any...
Be sure to ground this product requires skills and experience. Do not use of this unit during installation, consult your Kenwood dealer. 20 Use only the screws provided. Install this work if you experience problems during and shortly after installation. After the unit is 30°... rear). If the fuse blows, first make all electrical connections before installing the unit. Always connect those wires to which they correspond. Make sure the faceplate will not hit the lid of the unconnected wires or the terminals. The unit may be turned on the ends of the console (if any...
Instruction Manual
Page 22
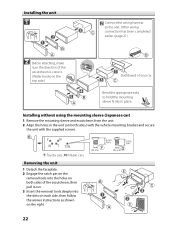
... (Japanese car) 1 Remove the mounting sleeve and escutcheon from the unit. 2 Align the holes in place. T: Toyota cars ; N: Nissan cars Removing the unit 1 Detach the faceplate. 2 Engage the catch pin on the removal tools into the holes on both sides of your car Bend the appropriate tabs to the unit. Installing...
... (Japanese car) 1 Remove the mounting sleeve and escutcheon from the unit. 2 Align the holes in place. T: Toyota cars ; N: Nissan cars Removing the unit 1 Detach the faceplate. 2 Engage the catch pin on the removal tools into the holes on both sides of your car Bend the appropriate tabs to the unit. Installing...

