Instruction Manual
Page 6
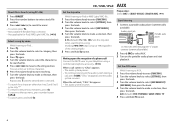
..." disappears and the audio system resumes. AUX Preparation: Select [ON] for a song. (Holding 4 / ¢ skips songs at 10% regardless of a phone call Connect the MUTE wire to your telephone using RC-406) 1 Press DIRECT. 2 Press the number buttons to enter a track/file number. 3 Press 4 / ¢ (+) to search for music. • To...
..." disappears and the audio system resumes. AUX Preparation: Select [ON] for a song. (Holding 4 / ¢ skips songs at 10% regardless of a phone call Connect the MUTE wire to your telephone using RC-406) 1 Press DIRECT. 2 Press the number buttons to enter a track/file number. 3 Press 4 / ¢ (+) to search for music. • To...
Instruction Manual
Page 11
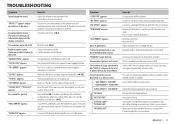
... source to drop the disc when it 's limit. Skip to forcibly eject the disc. TROUBLESHOOTING Symptom Sound cannot be sure the terminals of the speaker wires are insulated properly, then reset the unit. "TAG ERROR" appears. "NO DEVICE" appears. Make sure the device contains supported audio files. (➜ 10) Insert a playable...
... source to drop the disc when it 's limit. Skip to forcibly eject the disc. TROUBLESHOOTING Symptom Sound cannot be sure the terminals of the speaker wires are insulated properly, then reset the unit. "TAG ERROR" appears. "NO DEVICE" appears. Make sure the device contains supported audio files. (➜ 10) Insert a playable...
Instruction Manual
Page 12
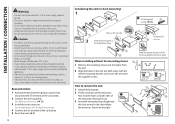
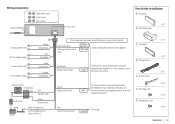
... vehicle mounting bracket and secure the unit with the supplied screws. Basic procedure 1 Remove the key from the unit. 2 Align the holes in place. See Wiring connection. (➜ 13) 3 Install the unit to hold the mounting sleeve firmly in the unit (on both sides of the trim plate, then pull it... has the same rating. Metal parts such as the heat sink and enclosure become hot. • Do not connect the · wires of speaker to the car chassis, Ground wire (black), or in -dash mounting) Hook on the top side Orientate the trim plate as shown on the right. See Installing the...
... vehicle mounting bracket and secure the unit with the supplied screws. Basic procedure 1 Remove the key from the unit. 2 Align the holes in place. See Wiring connection. (➜ 13) 3 Install the unit to hold the mounting sleeve firmly in the unit (on both sides of the trim plate, then pull it... has the same rating. Metal parts such as the heat sink and enclosure become hot. • Do not connect the · wires of speaker to the car chassis, Ground wire (black), or in -dash mounting) Hook on the top side Orientate the trim plate as shown on the right. See Installing the...
Instruction Manual
Page 13
... E Extraction key Brown (Mute control wire) Blue (Antenna control wire) To the terminal that is grounded when either the telephone rings or during conversation. (To F Flat head screw MUTE connect the Kenwood navigation system, refer your navigation manual.) G Round head screw (Not used) ANT CONT ( ×1 ) ( ...×1 ) ( ×1 ) ( ×2 ) ( ×4 ) ( ×4 ) ENGLISH | 13 Wiring connection SW FRONT REAR Subwoofer output ...
... E Extraction key Brown (Mute control wire) Blue (Antenna control wire) To the terminal that is grounded when either the telephone rings or during conversation. (To F Flat head screw MUTE connect the Kenwood navigation system, refer your navigation manual.) G Round head screw (Not used) ANT CONT ( ×1 ) ( ...×1 ) ( ×1 ) ( ×2 ) ( ×4 ) ( ×4 ) ENGLISH | 13 Wiring connection SW FRONT REAR Subwoofer output ...


