
Instruction Manual
Page 1
Model KDC-X497/ KDC-HD455U Serial number US Residents Only Register Online Register your records Record the serial number, found on the back of the unit, in the space provided below. KDC-X497 KDC-HD455U CD-RECEIVER INSTRUCTION MANUAL AMPLI-TUNER LECTEUR DE CD MODE D'EMPLOI REPRODUCTOR DE DISCOS COMPACTOS RECEPTOR DE FM/AM MANUAL DE INSTRUCCIONES Take the time to the model and serial numbers whenever you obtain the best...
Model KDC-X497/ KDC-HD455U Serial number US Residents Only Register Online Register your records Record the serial number, found on the back of the unit, in the space provided below. KDC-X497 KDC-HD455U CD-RECEIVER INSTRUCTION MANUAL AMPLI-TUNER LECTEUR DE CD MODE D'EMPLOI REPRODUCTOR DE DISCOS COMPACTOS RECEPTOR DE FM/AM MANUAL DE INSTRUCCIONES Take the time to the model and serial numbers whenever you obtain the best...

Instruction Manual
Page 2
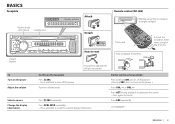
... BEFORE USE 2 BASICS 3 GETTING STARTED 4 CD / USB / iPod 5 AUX 6 HD RADIO™ 7 Pandora® 8 AUDIO SETTINGS 9 DISPLAY SETTINGS 10 MORE INFORMATION 10 TROUBLESHOOTING 11 INSTALLATION / CONNECTION 12 SPECIFICATIONS i and ii (at the end of the book) How to read this unit, pull them out horizontally. • Remove burrs from the center hole and disc edge before playing digital sources to avoid damaging the speakers by the sudden increase of the output level.
... BEFORE USE 2 BASICS 3 GETTING STARTED 4 CD / USB / iPod 5 AUX 6 HD RADIO™ 7 Pandora® 8 AUDIO SETTINGS 9 DISPLAY SETTINGS 10 MORE INFORMATION 10 TROUBLESHOOTING 11 INSTALLATION / CONNECTION 12 SPECIFICATIONS i and ii (at the end of the book) How to read this unit, pull them out horizontally. • Remove burrs from the center hole and disc edge before playing digital sources to avoid damaging the speakers by the sudden increase of the output level.
Instruction Manual
Page 3
... ATT during playback to attenuate the sound. • Press again to replace the battery Your preset adjustments will also be erased. Press SCRL DISP repeatedly. • Press and hold SRC to turn off the power. Press L SRC repeatedly. Pull out the insulation sheet when using for the first time. Detach button How to reset How to cancel. To Turn on the power Adjust the volume Select a source Change the display...
... ATT during playback to attenuate the sound. • Press again to replace the battery Your preset adjustments will also be erased. Press SCRL DISP repeatedly. • Press and hold SRC to turn off the power. Press L SRC repeatedly. Pull out the insulation sheet when using for the first time. Detach button How to reset How to cancel. To Turn on the power Adjust the volume Select a source Change the display...
Instruction Manual
Page 4
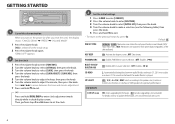
... source selection. ; SP SELECT OFF/ 5/4/ 6 × 9/6/ OEM: Selects according to update the firmware, see the following table), then press the knob. 5 Press and hold SCRL DISP to play as a music CD. Press 4 / ¢ to move between audio file disc and music CD. ; 2: Forces to enter clock adjustment mode directly while in each preset button regardless of the selected band. "DEMO OFF" appears. 2 Set the clock 1 Press the volume knob to enter [FUNCTION]. 2 Turn the volume...
... source selection. ; SP SELECT OFF/ 5/4/ 6 × 9/6/ OEM: Selects according to update the firmware, see the following table), then press the knob. 5 Press and hold SCRL DISP to play as a music CD. Press 4 / ¢ to move between audio file disc and music CD. ; 2: Forces to enter clock adjustment mode directly while in each preset button regardless of the selected band. "DEMO OFF" appears. 2 Set the clock 1 Press the volume knob to enter [FUNCTION]. 2 Turn the volume...

Instruction Manual
Page 5
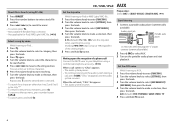
... registered in iPod source. MODE ON: From the iPod*1. Select a track/file Press 4 / ¢ (or 4 / ¢ (+) on RC-406). Press 5 iPod to iPod and playback starts. from a list 2 Turn the volume knob to make a selection, then press the knob. • AAC/MP3/WMA file: Select the desired folder, then a file. • iPod or KENWOOD Music Editor Light (KME Light)/ KENWOOD Music Control (KMC) file*4: Select the desired file from the unit. : Applicable...
... registered in iPod source. MODE ON: From the iPod*1. Select a track/file Press 4 / ¢ (or 4 / ¢ (+) on RC-406). Press 5 iPod to iPod and playback starts. from a list 2 Turn the volume knob to make a selection, then press the knob. • AAC/MP3/WMA file: Select the desired folder, then a file. • iPod or KENWOOD Music Editor Light (KME Light)/ KENWOOD Music Control (KMC) file*4: Select the desired file from the unit. : Applicable...
Instruction Manual
Page 6
... of a phone call Connect the MUTE wire to your telephone using RC-406) 1 Press DIRECT. 2 Press the number buttons to enter a track/file number. 3 Press 4 / ¢ (+) to search for music. • To cancel, press . • Not available if Random Play is selected. • Not applicable for iPod, KME Light/ KMC file. (➜ 10) Select a song by name While listening to iPod... 1 Press . 2 Turn the volume knob to select a category...
... of a phone call Connect the MUTE wire to your telephone using RC-406) 1 Press DIRECT. 2 Press the number buttons to enter a track/file number. 3 Press 4 / ¢ (+) to search for music. • To cancel, press . • Not available if Random Play is selected. • Not applicable for iPod, KME Light/ KMC file. (➜ 10) Select a song by name While listening to iPod... 1 Press . 2 Turn the volume knob to select a category...

Instruction Manual
Page 7
... MODE AUTO MEMORY RECEIVE MODE/ RCV MODE TAG MEMORY CLOCK AUTO: Increases the tuner selectivity to search for two songs are stored. MANUAL: Manually search for [PRESET TYPE].) (➜ 4) Sets the receive mode of iTunes Tagging, use the latest software versions with good reception. ; NO: Cancels. (Selectable only if [NORMAL] / [NORM] is automatically canceled. Displays the tag memory usage of the number buttons (1 to 6) on RC-406) to reduce interference noises from adjacent stations...
... MODE AUTO MEMORY RECEIVE MODE/ RCV MODE TAG MEMORY CLOCK AUTO: Increases the tuner selectivity to search for two songs are stored. MANUAL: Manually search for [PRESET TYPE].) (➜ 4) Sets the receive mode of iTunes Tagging, use the latest software versions with good reception. ; NO: Cancels. (Selectable only if [NORMAL] / [NORM] is automatically canceled. Displays the tag memory usage of the number buttons (1 to 6) on RC-406) to reduce interference noises from adjacent stations...
Instruction Manual
Page 8
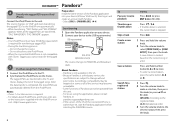
... is not compatible with iTunes Tagging you cannot transfer the tagged PSDs. 3 Purchase songs from iTunes Store 1 Connect the iPod/iPhone to the desired station, then press the knob. 8 USB input terminal KCA-iP102 (optional accessory) The source changes to store. • To select a stored station, press the same button (3, 4 or 5). Save a station Press and hold the volume knob. 2 Turn the volume knob to the unit. The...
... is not compatible with iTunes Tagging you cannot transfer the tagged PSDs. 3 Purchase songs from iTunes Store 1 Connect the iPod/iPhone to the desired station, then press the knob. 8 USB input terminal KCA-iP102 (optional accessory) The source changes to store. • To select a stored station, press the same button (3, 4 or 5). Save a station Press and hold the volume knob. 2 Turn the volume knob to the unit. The...
Instruction Manual
Page 9
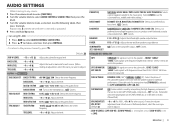
... source... 1 Press the volume knob to enter [FUNCTION]. 2 Turn the volume knob to select [AUDIO CONTROL]/ [AUDIO CTRL], then press the knob. 3 Turn the volume knob to use the customized bass, middle, and treble settings.) BASS BOOST B.BOOST LV1/ B.BOOST LV2/ B.BOOST LV3: Selects your preferred low and high frequencies boost to produce a well-balanced sound at a low volume level. ; PRESET EQ NATURAL/ USER/ ROCK/ POPS/ EASY/ TOP40/ JAZZ/ POWERFUL: Selects a preset equalizer suitable to the music genre. (Select [USER] to make a selection...
... source... 1 Press the volume knob to enter [FUNCTION]. 2 Turn the volume knob to select [AUDIO CONTROL]/ [AUDIO CTRL], then press the knob. 3 Turn the volume knob to use the customized bass, middle, and treble settings.) BASS BOOST B.BOOST LV1/ B.BOOST LV2/ B.BOOST LV3: Selects your preferred low and high frequencies boost to produce a well-balanced sound at a low volume level. ; PRESET EQ NATURAL/ USER/ ROCK/ POPS/ EASY/ TOP40/ JAZZ/ POWERFUL: Selects a preset equalizer suitable to the music genre. (Select [USER] to make a selection...
Instruction Manual
Page 10
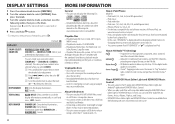
...; Technology • Program Service Data provides song name, artist, station ID, and other than 5 V and exceeds 1 A. COLOR 24/ USER: Selects your own color (when [COLOR 01] - [COLOR 24] or [USER] is longer than DIMMER LV1. ; OFF: Cancels. DISPLAY SETTINGS MORE INFORMATION 1 Press the volume knob to enter [FUNCTION]. 2 Turn the volume knob to select [SETTINGS], then press the knob. 3 Turn the volume knob to make a selection (see the following site: www.kenwood.com/cs...
...; Technology • Program Service Data provides song name, artist, station ID, and other than 5 V and exceeds 1 A. COLOR 24/ USER: Selects your own color (when [COLOR 01] - [COLOR 24] or [USER] is longer than DIMMER LV1. ; OFF: Cancels. DISPLAY SETTINGS MORE INFORMATION 1 Press the volume knob to enter [FUNCTION]. 2 Turn the volume knob to select [SETTINGS], then press the knob. 3 Turn the volume knob to make a selection (see the following site: www.kenwood.com/cs...
Instruction Manual
Page 11
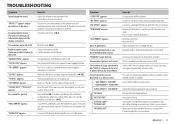
... USB device again. Clean the connectors. (➜ 2) Reset the unit. (➜ 3) • Connect the antenna firmly. • Pull the antenna out all . • Radio reception is full. Make sure the device contains supported audio files. (➜ 10) Insert a playable disc into the loading slot. Symptom Remedy "COPY PRO" appears. "READING" keeps flashing. The tag memory of this unit does not support the playback of the speaker wires are not displayed (e.g. The unit...
... USB device again. Clean the connectors. (➜ 2) Reset the unit. (➜ 3) • Connect the antenna firmly. • Pull the antenna out all . • Radio reception is full. Make sure the device contains supported audio files. (➜ 10) Insert a playable disc into the loading slot. Symptom Remedy "COPY PRO" appears. "READING" keeps flashing. The tag memory of this unit does not support the playback of the speaker wires are not displayed (e.g. The unit...
Instruction Manual
Page 12
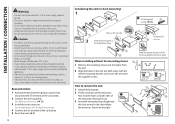
..., connect Ignition wire (red) to remove the unit 1 Detach the faceplate. 2 Fit the catch pin on the extraction keys into the slots on each side, then follow the arrows as shown on the car are working properly. • If the fuse blows, first make sure the wires are not touching car's chassis, then replace the old fuse with the angle of the car battery. 2 Connect the wires properly. INSTALLATION / CONNECTION...
..., connect Ignition wire (red) to remove the unit 1 Detach the faceplate. 2 Fit the catch pin on the extraction keys into the slots on each side, then follow the arrows as shown on the car are working properly. • If the fuse blows, first make sure the wires are not touching car's chassis, then replace the old fuse with the angle of the car battery. 2 Connect the wires properly. INSTALLATION / CONNECTION...
Instruction Manual
Page 13
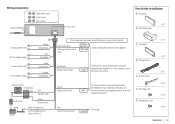
... manual.) G Round head screw (Not used) ANT CONT ( ×1 ) ( ×1 ) ( ×1 ) ( ×2 ) ( ×4 ) ( ×4 ) ENGLISH | 13 Wiring connection SW FRONT REAR Subwoofer output Front output R L Rear output Antenna terminal Fuse (10 A) Part list for installation A Faceplate B Mounting sleeve ( ×1 ) To front speaker (left) To front speaker (right) To rear speaker (left) To rear speaker (right) White White/Black Gray Gray/Black Green Green/Black Purple Purple/Black Ignition switch Car fuse box Red (Ignition wire) Car fuse box Yellow (Battery wire) Battery...
... manual.) G Round head screw (Not used) ANT CONT ( ×1 ) ( ×1 ) ( ×1 ) ( ×2 ) ( ×4 ) ( ×4 ) ENGLISH | 13 Wiring connection SW FRONT REAR Subwoofer output Front output R L Rear output Antenna terminal Fuse (10 A) Part list for installation A Faceplate B Mounting sleeve ( ×1 ) To front speaker (left) To front speaker (right) To rear speaker (left) To rear speaker (right) White White/Black Gray Gray/Black Green Green/Black Purple Purple/Black Ignition switch Car fuse box Red (Ignition wire) Car fuse box Yellow (Battery wire) Battery...
Instruction Manual
Page 40
... the dealer or an experienced radio/TV technician for countries that an electronic accessory has been designed to connect specifically to iPod, or iPhone, respectively, and has been certified by the developer to correct the interference by turning the equipment off and on, the user is trademark of Google Inc. Un tratamiento correcto del reciclaje y la eliminació...
... the dealer or an experienced radio/TV technician for countries that an electronic accessory has been designed to connect specifically to iPod, or iPhone, respectively, and has been certified by the developer to correct the interference by turning the equipment off and on, the user is trademark of Google Inc. Un tratamiento correcto del reciclaje y la eliminació...


