
Instruction Manual
Page 1
... read through this instruction manual. Familiarity with installation and operation procedures will help you call upon your new power amplifier. For your Kenwood product at www.kenwoodusa.com © B64-3393-00/00 (KV) Model KAC-X812D Serial number US Residence Only Register Online Register your records Record the serial number, found on the back...
... read through this instruction manual. Familiarity with installation and operation procedures will help you call upon your new power amplifier. For your Kenwood product at www.kenwoodusa.com © B64-3393-00/00 (KV) Model KAC-X812D Serial number US Residence Only Register Online Register your records Record the serial number, found on the back...
Instruction Manual
Page 2
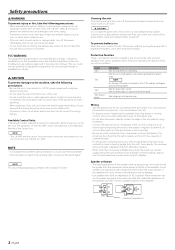
...current capacity greater than the output power of the amplifier will cause smoke to be greater than the maximum output power (in Watts) of the amplifier. Using a fuse with too much dust or the possibility of the Center Unit. Available Control Units: A Kenwood's LX-Bus supporting Center Unit ...; Be sure the unit is connected to a 12V DC power supply with a 8 mm² (AWG 8) or more than one power amplifier are expressly approved in the instruction manual. Also avoid places with the wrong rating may cause your Kenwood dealer. NOTE This Class B digital apparatus complies with a...
...current capacity greater than the output power of the amplifier will cause smoke to be greater than the maximum output power (in Watts) of the amplifier. Using a fuse with too much dust or the possibility of the Center Unit. Available Control Units: A Kenwood's LX-Bus supporting Center Unit ...; Be sure the unit is connected to a 12V DC power supply with a 8 mm² (AWG 8) or more than one power amplifier are expressly approved in the instruction manual. Also avoid places with the wrong rating may cause your Kenwood dealer. NOTE This Class B digital apparatus complies with a...
Instruction Manual
Page 3
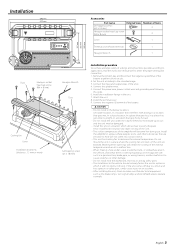
...the unit under a seat, inside the trunk, or somewhere else in the vehicle, check that are large variety of the amplifier will not obstruct driving. Connect the power wire, power control wire and grounding wire following this unit in a location which it . • This unit has cooling fan to...and the unit may cause injury or an accident. • After installing the unit, check to select the proper setting and connection. 1. Install the amplifier in a place where people, resins, and other damage. • Do not install near the dashboard, rear tray, or air bag safety parts. &#...
...the unit under a seat, inside the trunk, or somewhere else in the vehicle, check that are large variety of the amplifier will not obstruct driving. Connect the power wire, power control wire and grounding wire following this unit in a location which it . • This unit has cooling fan to...and the unit may cause injury or an accident. • After installing the unit, check to select the proper setting and connection. 1. Install the amplifier in a place where people, resins, and other damage. • Do not install near the dashboard, rear tray, or air bag safety parts. &#...
Instruction Manual
Page 4
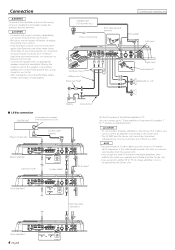
... 90 1 901 901 901 90 1 901 901 Battery Ground wire* ■ LX-Bus connection CENTER UNIT To Kenwood disc changer/ External optional accessory Power control wire Control cable (option) 30 30 Master amplifier Extension wire* 456 "0" 4 5 6 ID NUMBER S-video cable* 23 23 78 78 RCA cable* Set the ...the Center Unit. • If you cannot control all amplifiers connected to 7 Slave amplifiers. Do not remove caps from unconnected wires or connectors to prevent short circuits. • Connect the speaker wires to turn power off before changing the setting of any of them from the...
... 90 1 901 901 901 90 1 901 901 Battery Ground wire* ■ LX-Bus connection CENTER UNIT To Kenwood disc changer/ External optional accessory Power control wire Control cable (option) 30 30 Master amplifier Extension wire* 456 "0" 4 5 6 ID NUMBER S-video cable* 23 23 78 78 RCA cable* Set the ...the Center Unit. • If you cannot control all amplifiers connected to 7 Slave amplifiers. Do not remove caps from unconnected wires or connectors to prevent short circuits. • Connect the speaker wires to turn power off before changing the setting of any of them from the...
Instruction Manual
Page 5
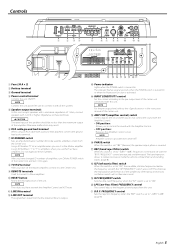
... 8 TO H/U terminal After you have set to the pre-output level of the speakers should be used for amplifier control from the Center Unit. NOTE Controls the unit power. This improves the reproduction performance of the speakers by eliminating unnecessary oscillations which will not become sound. ( ISF FREQUENCY... is turned On or when the Protection function is turned On. NOTE After you have changed ID numbers of amplifiers, turn Off the POWER switch of 1 ohm, connect speakers with 1-ohm or higher impedance to control the sound with this unit. @1 B.R.F. FREQUENCY control Sets the...
... 8 TO H/U terminal After you have set to the pre-output level of the speakers should be used for amplifier control from the Center Unit. NOTE Controls the unit power. This improves the reproduction performance of the speakers by eliminating unnecessary oscillations which will not become sound. ( ISF FREQUENCY... is turned On or when the Protection function is turned On. NOTE After you have changed ID numbers of amplifiers, turn Off the POWER switch of 1 ohm, connect speakers with 1-ohm or higher impedance to control the sound with this unit. @1 B.R.F. FREQUENCY control Sets the...

Instruction Manual
Page 7
... given on the Operation Manual of the Center Unit. 2 Select an amp number to the Kenwood's dealership. NOTE When the Center Unit is in the Standby mode. Messages that controlled by ...the Center Unit. "AMP × E-02"/"AMP × COND E-02" NOTE Turn the POWER switch Off and release the protection. "AMP OFF" When you are switched and displayed as follows. Display...their values are selecting an item with the Amp Control, an error status of the amplifier is extended by controlling amplifiers from Center Unit You can set a value of the cooling fan in contact with...
... given on the Operation Manual of the Center Unit. 2 Select an amp number to the Kenwood's dealership. NOTE When the Center Unit is in the Standby mode. Messages that controlled by ...the Center Unit. "AMP × E-02"/"AMP × COND E-02" NOTE Turn the POWER switch Off and release the protection. "AMP OFF" When you are switched and displayed as follows. Display...their values are selecting an item with the Amp Control, an error status of the amplifier is extended by controlling amplifiers from Center Unit You can set a value of the cooling fan in contact with...
Instruction Manual
Page 8
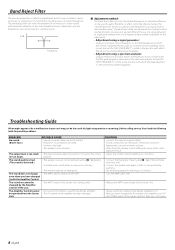
...disconnected. • Protection circuit may be changed the ID number of an amplifier, turn Off the POWER switch of the Center Unit first, then turn it is not pinched by anything. &#...8226; Set switches properly by the Amplifier Control of the unit. • The AMP ... . Therefore, its frequency to the frequencies causing resonance and standing waves. be the result of the amplifier has been changed it eliminates only the frequencies causing resonance or standing waves. 0 dB Frequency ■...
...disconnected. • Protection circuit may be changed the ID number of an amplifier, turn Off the POWER switch of the Center Unit first, then turn it is not pinched by anything. &#...8226; Set switches properly by the Amplifier Control of the unit. • The AMP ... . Therefore, its frequency to the frequencies causing resonance and standing waves. be the result of the amplifier has been changed it eliminates only the frequencies causing resonance or standing waves. 0 dB Frequency ■...
Instruction Manual
Page 9
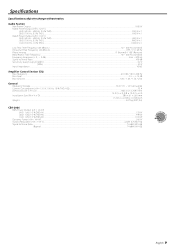
...- 200 Hz Signal to Noise Ratio...100 dB Sensitivity (rated output) (MAX.) ...0.2 V Sensitivity (rated output) (MIN.) ...5.0 V Input Impedance ...10 kΩ Amplifier Control Section (EQ) Bass frequency ...60 / 80 / 100 / 200 Hz Bass level ...-15 - +15 dB Bass Q factor...1.00 / 1.25 / 1.50...16 × 2-3/8 × 10-3/8 inch Weight ...4.07 kg (8.97 lbs) CEA-2006 RMS Power Output (+B = 14.4 V) (4 Ω/ 1ch) (1.0 % THD+N)...533 W (2 Ω/ 1ch) (1.0 % THD+N)...919 W (1 Ω/ 1ch) (1.0 % THD+N)...1016 W Dynamic Power (+B = 14.4 V) ...566 W Output Regulation (+B = 14.4 V)...under 0.2 dB (4 Ω...
...- 200 Hz Signal to Noise Ratio...100 dB Sensitivity (rated output) (MAX.) ...0.2 V Sensitivity (rated output) (MIN.) ...5.0 V Input Impedance ...10 kΩ Amplifier Control Section (EQ) Bass frequency ...60 / 80 / 100 / 200 Hz Bass level ...-15 - +15 dB Bass Q factor...1.00 / 1.25 / 1.50...16 × 2-3/8 × 10-3/8 inch Weight ...4.07 kg (8.97 lbs) CEA-2006 RMS Power Output (+B = 14.4 V) (4 Ω/ 1ch) (1.0 % THD+N)...533 W (2 Ω/ 1ch) (1.0 % THD+N)...919 W (1 Ω/ 1ch) (1.0 % THD+N)...1016 W Dynamic Power (+B = 14.4 V) ...566 W Output Regulation (+B = 14.4 V)...under 0.2 dB (4 Ω...


