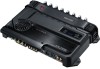
Instruction Manual
Page 2
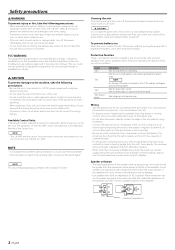
...the speakers that acts as an electrical ground passing electricity to the battery's negative - NOTE • The LX AMP and the sensor unit cannot be working right, consult your Kenwood dealer. They can scratch the surface of the amplifier. To prevent battery rise When the unit is used , ... the unit If the front panel gets dirty, turn off . Protection function There is shorted. If the "E-02" code does not disappear, contact your Kenwood dealer. • If the unit does not seem to malfunction. • To prevent a short circuit when replacing a fuse, first disconnect the wiring ...
...the speakers that acts as an electrical ground passing electricity to the battery's negative - NOTE • The LX AMP and the sensor unit cannot be working right, consult your Kenwood dealer. They can scratch the surface of the amplifier. To prevent battery rise When the unit is used , ... the unit If the front panel gets dirty, turn off . Protection function There is shorted. If the "E-02" code does not disappear, contact your Kenwood dealer. • If the unit does not seem to malfunction. • To prevent a short circuit when replacing a fuse, first disconnect the wiring ...
Instruction Manual
Page 3
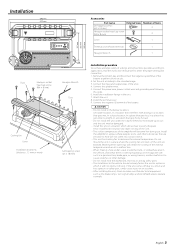
... mm FAN VOLT TEMP CURR 1 150 100 2 0.5 3 70 4 (MIN)5 0.2(MAX) 50 200 INPUT LPF SENSITIVITY(V) FREQUENCY(Hz) 40 200 B.R.F FREQUENCY(Hz) LPF OPERATION 0 200 Hz AMP CONT PHASE BRF ISF ISF FREQUENCY -4 150 Hz 100 Hz ON 180˃ -12dB ON 25Hz -8 70 Hz -12 50 Hz -6dB -16 -20 30...
... mm FAN VOLT TEMP CURR 1 150 100 2 0.5 3 70 4 (MIN)5 0.2(MAX) 50 200 INPUT LPF SENSITIVITY(V) FREQUENCY(Hz) 40 200 B.R.F FREQUENCY(Hz) LPF OPERATION 0 200 Hz AMP CONT PHASE BRF ISF ISF FREQUENCY -4 150 Hz 100 Hz ON 180˃ -12dB ON 25Hz -8 70 Hz -12 50 Hz -6dB -16 -20 30...
Instruction Manual
Page 4
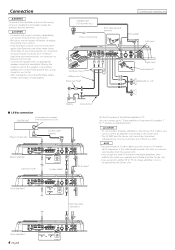
... Lead terminal* Subwoofer (L + R) 90 1 901 901 901 90 1 901 901 Battery Ground wire* ■ LX-Bus connection CENTER UNIT To Kenwood disc changer/ External optional accessory Power control wire Control cable (option) 30 30 Master amplifier Extension wire* 456 "0" 4 5 6 ID NUMBER S-video...After installation, check that no unconnected wires or connectors are touching the car body. You can cause this limit, you cannot control amps from unconnected wires or connectors to prevent short circuits. • Connect the speaker wires to a Slave amplifier, it is not recognized...
... Lead terminal* Subwoofer (L + R) 90 1 901 901 901 90 1 901 901 Battery Ground wire* ■ LX-Bus connection CENTER UNIT To Kenwood disc changer/ External optional accessory Power control wire Control cable (option) 30 30 Master amplifier Extension wire* 456 "0" 4 5 6 ID NUMBER S-video...After installation, check that no unconnected wires or connectors are touching the car body. You can cause this limit, you cannot control amps from unconnected wires or connectors to prevent short circuits. • Connect the speaker wires to a Slave amplifier, it is not recognized...
Instruction Manual
Page 5
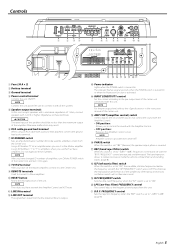
... For the pre-output level, refer to the in the band set to be no less than the maximum output of the center unit. % AMP CONT (amplifier control) switch Used to bypass the circuit when you have set with the Amplifier Control. • OFF position: Bypasses the Amplifier ...the line input terminal is output. 1 # Power indicator Lights when the POWER switch is set with this terminal. 7 ID NUMBER switch Sets an amp identification number (ID) to "-6dB"/"-12dB", frequencies in the instruction manual of the amplifier. The indicator flashes several seconds when the POWER switch is ...
... For the pre-output level, refer to the in the band set to be no less than the maximum output of the center unit. % AMP CONT (amplifier control) switch Used to bypass the circuit when you have set with the Amplifier Control. • OFF position: Bypasses the Amplifier ...the line input terminal is output. 1 # Power indicator Lights when the POWER switch is set with this terminal. 7 ID NUMBER switch Sets an amp identification number (ID) to "-6dB"/"-12dB", frequencies in the instruction manual of the amplifier. The indicator flashes several seconds when the POWER switch is ...
Instruction Manual
Page 6
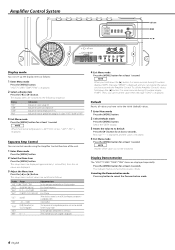
... 3 Adjust the Menu item Press the [2] or [3] button. NOTE When you hold down the [3] button 3 or more seconds during ID number display ("AMP"), message "MEMO" is displayed. Amplifier Control System FAN VOLT TEMP CURR Indicator MENU 2 / 3 Display mode You can set up the display items as ...follows. Indicates the internal temperature (°F/°C). Separate Amp Control You can control sounds using the Amplifier Control function of the cooling fan in 3 steps: "FAST", "SLOW" or "OFF". 3 Exit ...
... 3 Adjust the Menu item Press the [2] or [3] button. NOTE When you hold down the [3] button 3 or more seconds during ID number display ("AMP"), message "MEMO" is displayed. Amplifier Control System FAN VOLT TEMP CURR Indicator MENU 2 / 3 Display mode You can set up the display items as ...follows. Indicates the internal temperature (°F/°C). Separate Amp Control You can control sounds using the Amplifier Control function of the cooling fan in 3 steps: "FAST", "SLOW" or "OFF". 3 Exit ...

Instruction Manual
Page 7
...AMP × E-01"/"AMP × COND E-01" When the inside of the amplifier is in the Standby mode. "AMP OFF" When you use the Amp Control in contact with the Amp... an Amp from the Center Unit. 1 Enter AMP Control mode Select the AMP Control ...AMP NO"/ "AMP CONTROL NO" 0 - 7 Select an ID number of the amp you use . 6 Exit AMP Control mode Releases the Amp... to "7" of connected amps. 4 Select the AMP Control item for adjustment...Amp to operate Operate the desired...AMP NO"/"AMP ...AMP OFF" is in 3 steps: "FAST", "SLOW" or "OFF". "AMP × E-02"/"AMP... 5 Adjust the AMP Control item You can...
...AMP × E-01"/"AMP × COND E-01" When the inside of the amplifier is in the Standby mode. "AMP OFF" When you use the Amp Control in contact with the Amp... an Amp from the Center Unit. 1 Enter AMP Control mode Select the AMP Control ...AMP NO"/ "AMP CONTROL NO" 0 - 7 Select an ID number of the amp you use . 6 Exit AMP Control mode Releases the Amp... to "7" of connected amps. 4 Select the AMP Control item for adjustment...Amp to operate Operate the desired...AMP NO"/"AMP ...AMP OFF" is in 3 steps: "FAST", "SLOW" or "OFF". "AMP × E-02"/"AMP... 5 Adjust the AMP Control item You can...
Instruction Manual
Page 8
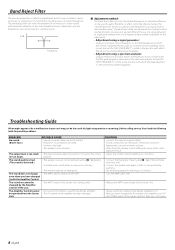
...changed . SOLUTION • Connect the input (or output) cables. • Check connections by the Amplifier Control of the unit. • The AMP Control of the amplifier has been changed it with which the vehicle compartment resonates or volume increases (standing waves occur), and set the "B.R.F. Band ...the POWER switch of resonance or unclear sound with minimum influence on the sound quality. The sound does not change • The AMP CONT has been turned "OFF". Troubleshooting Guide What might appear to be a malfunction in which all frequencies are connected with which the...
...changed . SOLUTION • Connect the input (or output) cables. • Check connections by the Amplifier Control of the unit. • The AMP Control of the amplifier has been changed it with which the vehicle compartment resonates or volume increases (standing waves occur), and set the "B.R.F. Band ...the POWER switch of resonance or unclear sound with minimum influence on the sound quality. The sound does not change • The AMP CONT has been turned "OFF". Troubleshooting Guide What might appear to be a malfunction in which all frequencies are connected with which the...

