
Instruction Manual
Page 2
... Setting B.M.S. (Bass Management System) B.M.S. Contents Warning 3 Safety precautions 4 WARNING CAUTION NOTE Notes 6 About SIRIUS Satellite radio tuner Category and Channel Search About CDs 7 Notes on playing MP3/WMA 8 General features 10 Power Selecting the Source Volume Attenuator Loudness Audio Control Audio Setup Speaker Setting Switching Display Station/Disc Naming (SNPS/DNPS) Auxiliary Input Display Setting Subwoofer Output TEL Mute Theft Deterrent Faceplate Tuner features 15 Tuning Mode Tuning Direct Access Tuning Station Preset Memory Auto Memory Entry Preset Tuning...
... Setting B.M.S. (Bass Management System) B.M.S. Contents Warning 3 Safety precautions 4 WARNING CAUTION NOTE Notes 6 About SIRIUS Satellite radio tuner Category and Channel Search About CDs 7 Notes on playing MP3/WMA 8 General features 10 Power Selecting the Source Volume Attenuator Loudness Audio Control Audio Setup Speaker Setting Switching Display Station/Disc Naming (SNPS/DNPS) Auxiliary Input Display Setting Subwoofer Output TEL Mute Theft Deterrent Faceplate Tuner features 15 Tuning Mode Tuning Direct Access Tuning Station Preset Memory Auto Memory Entry Preset Tuning...

Instruction Manual
Page 3
Location : Bottom Panel FCC WARNING This equipment may generate or use radio frequency energy. NOTE This equipment has been tested and found to comply with the limits for help. However, there is not installed and used in accordance with Federal Regulations, following measures: • Reorient or relocate the receiving antenna. • Increase the separation between the equipment and receiver. • Connect the equipment...
Location : Bottom Panel FCC WARNING This equipment may generate or use radio frequency energy. NOTE This equipment has been tested and found to comply with the limits for help. However, there is not installed and used in accordance with Federal Regulations, following measures: • Reorient or relocate the receiving antenna. • Increase the separation between the equipment and receiver. • Connect the equipment...

Instruction Manual
Page 5
... the disc auto changer fails to operate correctly. Reset button • Characters in the LCD may represent something impossible in actual operation. About CD players/disc changers connected to this unit KENWOOD disc changers/ CD players released in 1998 or later can be connected to this manual are examples used to explain more clearly how the controls are used and the information that any of them at a time. (The power supply does not turn on the car...
... the disc auto changer fails to operate correctly. Reset button • Characters in the LCD may represent something impossible in actual operation. About CD players/disc changers connected to this unit KENWOOD disc changers/ CD players released in 1998 or later can be connected to this manual are examples used to explain more clearly how the controls are used and the information that any of them at a time. (The power supply does not turn on the car...

Instruction Manual
Page 6
... and channel search mode Press the [38] button. 2 Select the item (category or channel) Press the [AUDIO] knob. SRC FM AUDIO/ 4/ ¢ OPEN c.s. Your CDs can get dirty, wipe them in a dusty CD slot. About SIRIUS Satellite radio tuner Refer to the instruction manual of SIRIUS Satellite radio tuner KTC-SR901/SR902/SR903 (optional accessory), when connected, for operations (without 'Category and Channel Search' function). Notes Cleaning the Unit If the faceplate of A models for the operation...
... and channel search mode Press the [38] button. 2 Select the item (category or channel) Press the [AUDIO] knob. SRC FM AUDIO/ 4/ ¢ OPEN c.s. Your CDs can get dirty, wipe them in a dusty CD slot. About SIRIUS Satellite radio tuner Refer to the instruction manual of SIRIUS Satellite radio tuner KTC-SR901/SR902/SR903 (optional accessory), when connected, for operations (without 'Category and Channel Search' function). Notes Cleaning the Unit If the faceplate of A models for the operation...

Instruction Manual
Page 11
... that can be adjusted switch as shown below. Audio Setup 1 Select the source for adjustment Press the [SRC] button. 2 Enter Audio Setup mode Press the [AUDIO] knob for adjustment Press the [AUDIO] knob. User memory: The values set to "SWPRE Sub-W". 5 Exit Audio Control mode Press the [AUDIO] knob for at least 1 second. 3 Select the setup item for at least 1 second. Audio Item [Sub Item] Display Sub woofer level* "SW Level" Bass [level] "Bass" [Center Frequency] "Bass F" [Extend] "Bass EXT" [Q Factor] "Bass Q" Middle [level] "Middle" [Center Frequency] "MID...
... that can be adjusted switch as shown below. Audio Setup 1 Select the source for adjustment Press the [SRC] button. 2 Enter Audio Setup mode Press the [AUDIO] knob for adjustment Press the [AUDIO] knob. User memory: The values set to "SWPRE Sub-W". 5 Exit Audio Control mode Press the [AUDIO] knob for at least 1 second. 3 Select the setup item for at least 1 second. Audio Item [Sub Item] Display Sub woofer level* "SW Level" Bass [level] "Bass" [Center Frequency] "Bass F" [Extend] "Bass EXT" [Q Factor] "Bass Q" Middle [level] "Middle" [Center Frequency] "MID...

Instruction Manual
Page 12
... File name Track number & Play time Display "TITLE" "ALBUM" "FOLDER NAME" "FILE NAME" "P-Time" In SIRIUS tuner source Information Channel Name Song Title Artist Name Composer name Category Name Band & Channel Number Display "Channel Name" "Song Title" "Artist Name" "Composer" "Category" "Channel No" In HD Radio source Information Station name Song title/ Artist name/ Album name/ Genre Frequency Display "Station Name" "Title" "Frequency" In Auxiliary input source Information Auxiliary input name • If the Disc title, Track...
... File name Track number & Play time Display "TITLE" "ALBUM" "FOLDER NAME" "FILE NAME" "P-Time" In SIRIUS tuner source Information Channel Name Song Title Artist Name Composer name Category Name Band & Channel Number Display "Channel Name" "Song Title" "Artist Name" "Composer" "Category" "Channel No" In HD Radio source Information Station name Song title/ Artist name/ Album name/ Genre Frequency Display "Station Name" "Title" "Frequency" In Auxiliary input source Information Auxiliary input name • If the Disc title, Track...

Instruction Manual
Page 13
... be changed by using a remote with a number buttons. Character "D" "A" "N" "C" "E" Button [3] [2] [6] [2] [3] Times pressed 1 1 2 3 2 6 Repeat steps 3 through the below . Internal CD player: 30 discs - English | 13 Each time the button is pressed the character type switches as shown below displays. • "AUX"/"AUX EXT" • "TV" • "VIDEO" • "GAME" • "PORTABLE" • "DVD" 4 Exit Auxiliary input display setting mode Press the [DISP] button. • When operation stops for at that time is selected, and Auxiliary input display setting mode closes...
... be changed by using a remote with a number buttons. Character "D" "A" "N" "C" "E" Button [3] [2] [6] [2] [3] Times pressed 1 1 2 3 2 6 Repeat steps 3 through the below . Internal CD player: 30 discs - English | 13 Each time the button is pressed the character type switches as shown below displays. • "AUX"/"AUX EXT" • "TV" • "VIDEO" • "GAME" • "PORTABLE" • "DVD" 4 Exit Auxiliary input display setting mode Press the [DISP] button. • When operation stops for at that time is selected, and Auxiliary input display setting mode closes...

Instruction Manual
Page 15
... indicator Preset station number ST TI DAB NEWS MP3 WMA ATT DIGITAL ANALOG RDS PTY M P S Band display Frequency display Tuning Mode Choose the tuning mode. Tuning mode Auto seek Preset station seek Display "Auto 1" "Auto 2" Manual "Manual" Operation Automatic search for a station. Each time the [FM] button is ON. Tuner features OPEN SRC AM FM 4/ ¢ c.s. Select the "TUNER" display. 2 Select the band Press the [FM] / [AM] button. Press the [AUTO] button. Search in order of stereo stations the "ST" indicator is pressed it switches between...
... indicator Preset station number ST TI DAB NEWS MP3 WMA ATT DIGITAL ANALOG RDS PTY M P S Band display Frequency display Tuning Mode Choose the tuning mode. Tuning mode Auto seek Preset station seek Display "Auto 1" "Auto 2" Manual "Manual" Operation Automatic search for a station. Each time the [FM] button is ON. Tuner features OPEN SRC AM FM 4/ ¢ c.s. Select the "TUNER" display. 2 Select the band Press the [FM] / [AM] button. Press the [AUTO] button. Search in order of stereo stations the "ST" indicator is pressed it switches between...
Instruction Manual
Page 17
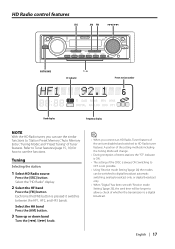
AUTO/AME 1 - 6 ST indicator Preset station number ST TI DAB NEWS MP3 WMA ATT DIGITAL ANALOG RDS PTY M P S Band display Frequency display NOTE With the HD Radio tuner, you connect an HD Radio, Tuner features of the unit are disabled and switched to 'Station Preset Memory', 'Auto Memory Entry', 'Tuning Mode', and 'Preset Tuning' of Tuner features. Select the HA band Press the [AM] button. 3 Tune up or down band Turn the [4] / [¢] knob. • When you can be longer...
AUTO/AME 1 - 6 ST indicator Preset station number ST TI DAB NEWS MP3 WMA ATT DIGITAL ANALOG RDS PTY M P S Band display Frequency display NOTE With the HD Radio tuner, you connect an HD Radio, Tuner features of the unit are disabled and switched to 'Station Preset Memory', 'Auto Memory Entry', 'Tuning Mode', and 'Preset Tuning' of Tuner features. Select the HA band Press the [AM] button. 3 Tune up or down band Turn the [4] / [¢] knob. • When you can be longer...
Instruction Manual
Page 18
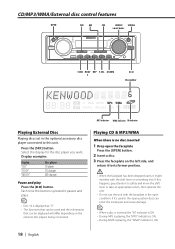
... can be used in the open condition. Select the display for the disc player you want. CD/MP3/WMA/External disc control features OPEN SRC AM FM AUDIO/ SCROLL 4/ ¢ OPEN c.s. SCAN RDM/ REP F.SEL M.RDM 3 38 Disc number ST TI DAB NEWS MP3 WMA ATT DIGITAL ANALOG RDS PTY M P S MP3 indicator WMA indicator IN indicator Playing External Disc Playing discs set in the optional accessory disc player connected to...
... can be used in the open condition. Select the display for the disc player you want. CD/MP3/WMA/External disc control features OPEN SRC AM FM AUDIO/ SCROLL 4/ ¢ OPEN c.s. SCAN RDM/ REP F.SEL M.RDM 3 38 Disc number ST TI DAB NEWS MP3 WMA ATT DIGITAL ANALOG RDS PTY M P S MP3 indicator WMA indicator IN indicator Playing External Disc Playing discs set in the optional accessory disc player connected to...

Instruction Manual
Page 23
...] button. 5 Select the Security Code numbers Turn the [4] / [¢] knob. 6 Repeat steps 4 and 5, and complete the Security Code. 7 Confirm the Security Code Press the [AUDIO] knob for at least 3 seconds. Manual Clock Adjustment 1 Select Clock Adjustment mode Press the [AUDIO] knob. In Standby mode Security Code Because authorization by using the Security Code is a help in steps 4 through 6, repeat from the battery power source 1 Turn the power ON. 2 Do the step 4 through 7 operation, and reenter the Security Code. Clock Display Setting...
...] button. 5 Select the Security Code numbers Turn the [4] / [¢] knob. 6 Repeat steps 4 and 5, and complete the Security Code. 7 Confirm the Security Code Press the [AUDIO] knob for at least 3 seconds. Manual Clock Adjustment 1 Select Clock Adjustment mode Press the [AUDIO] knob. In Standby mode Security Code Because authorization by using the Security Code is a help in steps 4 through 6, repeat from the battery power source 1 Turn the power ON. 2 Do the step 4 through 7 operation, and reenter the Security Code. Clock Display Setting...
Instruction Manual
Page 24
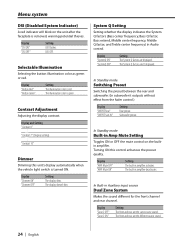
..., Bass extend, Middle center frequency, Middle Q factor, and Treble center frequency) in amplifier deactivates. The built-in Audio control. Display "Button Red" "Button Green" Setting The illumination color is green. Dimmer Dimming this control enhances the preout quality. In Standby mode Switching Preout Switching the preout between the rear and subwoofer. (In subwoofer it outputs without effect from the fader control.) Display "SWPRE Rear" "SWPRE Sub-W" Setting Rear preout. Display "AMP Mute OFF" "AMP Mute ON" Setting The built-in Auxiliary input source...
..., Bass extend, Middle center frequency, Middle Q factor, and Treble center frequency) in amplifier deactivates. The built-in Audio control. Display "Button Red" "Button Green" Setting The illumination color is green. Dimmer Dimming this control enhances the preout quality. In Standby mode Switching Preout Switching the preout between the rear and subwoofer. (In subwoofer it outputs without effect from the fader control.) Display "SWPRE Rear" "SWPRE Sub-W" Setting Rear preout. Display "AMP Mute OFF" "AMP Mute ON" Setting The built-in Auxiliary input source...

Instruction Manual
Page 25
... name/ Album name - Display "Zone 2 Rear" "Zone 2 Front" Setting The front is except the rear selected source, and the rear is connected to the unit, "AMP Bass +18" won't work correctly even if it OFF. Bass boost level is switched ON, the sound of the external amplifier using the main unit. • When the Dual Zone System is on, there is only sound effect including Audio control for except selected source. • When you...
... name/ Album name - Display "Zone 2 Rear" "Zone 2 Front" Setting The front is except the rear selected source, and the rear is connected to the unit, "AMP Bass +18" won't work correctly even if it OFF. Bass boost level is switched ON, the sound of the external amplifier using the main unit. • When the Dual Zone System is on, there is only sound effect including Audio control for except selected source. • When you...

Instruction Manual
Page 26
... When LX AMP unit connecting AMP Control You can control the LX AMP connected to the LX AMP. • This function can be played back even in Auxiliary Input function. Display "CD READ 1" "CD READ 2" Setting Play CD and MP3/WMA. Display Setting "AUX OFF" When selecting the source there's no Auxiliary Input. Digital broadcasts only. Some music CDs may not be used the [FM] / [AM] button. 4 Adjust the AMP Control item Turn the [4] / [¢] knob. 5 Exit AMP Control mode Press the [MENU] button. • You cannot use the LX AMP operation during...
... When LX AMP unit connecting AMP Control You can control the LX AMP connected to the LX AMP. • This function can be played back even in Auxiliary Input function. Display "CD READ 1" "CD READ 2" Setting Play CD and MP3/WMA. Display Setting "AUX OFF" When selecting the source there's no Auxiliary Input. Digital broadcasts only. Some music CDs may not be used the [FM] / [AM] button. 4 Adjust the AMP Control item Turn the [4] / [¢] knob. 5 Exit AMP Control mode Press the [MENU] button. • You cannot use the LX AMP operation during...
Instruction Manual
Page 27
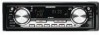
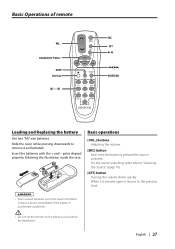
... TUV WXY QZ SRC ATT 38 4/¢ DIRECT/OK Loading and Replacing the battery Use two "AA"-size batteries. Basic operations [VOL.] buttons Adjusting the volume. [SRC] button Each time the button is accidentally swallowed. • Do not set the remote on hot places such as illustrated. poles aligned properly, following the illustration inside the case. For the source switching order refer to remove it returns to the...
... TUV WXY QZ SRC ATT 38 4/¢ DIRECT/OK Loading and Replacing the battery Use two "AA"-size batteries. Basic operations [VOL.] buttons Adjusting the volume. [SRC] button Each time the button is accidentally swallowed. • Do not set the remote on hot places such as illustrated. poles aligned properly, following the illustration inside the case. For the source switching order refer to remove it returns to the...

Instruction Manual
Page 29
... and rear). Make the proper input and output wire connections for each unit. 3. English | 29 To prevent a short circuit, remove the key from the ignition and disconnect the - Install the unit in the following order: ground, battery, ignition. 5. Always connect those wires to the car chassis (ground), you connect the + connector of the wiring harness. 4. battery. 2. Press the reset button. 2WARNING If you connect the ignition wire (red) and the battery wire (yellow) to the power source...
... and rear). Make the proper input and output wire connections for each unit. 3. English | 29 To prevent a short circuit, remove the key from the ignition and disconnect the - Install the unit in the following order: ground, battery, ignition. 5. Always connect those wires to the car chassis (ground), you connect the + connector of the wiring harness. 4. battery. 2. Press the reset button. 2WARNING If you connect the ignition wire (red) and the battery wire (yellow) to the power source...

Instruction Manual
Page 30
AUX Connecting Wires to Terminals Ez500 A Aux input A B Front output C Rear output/ Subwoofer output B Left output (White), Right output (Red) FRONT To KENWOOD disc changer/ Sirius satellite radio tuner/ HD Radio tuner/ External optional accessory To connect these leads, refer to the antenna control terminal in the vehicle. To car light control switch Wiring harness (Accessory1) P.CONT Power control/Motor antenna control wire (Blue/White) MUTE Mute wire (Brown) External amplifier control wire (Pink / Black) Dimmer control wire (Orange / White) Do not let the wire come ...
AUX Connecting Wires to Terminals Ez500 A Aux input A B Front output C Rear output/ Subwoofer output B Left output (White), Right output (Red) FRONT To KENWOOD disc changer/ Sirius satellite radio tuner/ HD Radio tuner/ External optional accessory To connect these leads, refer to the antenna control terminal in the vehicle. To car light control switch Wiring harness (Accessory1) P.CONT Power control/Motor antenna control wire (Blue/White) MUTE Mute wire (Brown) External amplifier control wire (Pink / Black) Dimmer control wire (Orange / White) Do not let the wire come ...

Instruction Manual
Page 34
... Tuning. ✔ A station that can't be received is selected. ☞ High-pitched tone isn't compensated for short circuits in Amp Mute Setting' (page 24) is ON. ☞ Turn it OFF. ? Even if Loudness is turned ON, high-pitched tone isn't compensated for. ✔ Tuner source is being entered. ☞ Enter a station that each source. ✔ The Disc changer isn't connected. ☞ Connect the Disc changer. The Dimmer function doesn't work . ✔ The mute wire...
... Tuning. ✔ A station that can't be received is selected. ☞ High-pitched tone isn't compensated for short circuits in Amp Mute Setting' (page 24) is ON. ☞ Turn it OFF. ? Even if Loudness is turned ON, high-pitched tone isn't compensated for. ✔ Tuner source is being entered. ☞ Enter a station that each source. ✔ The Disc changer isn't connected. ☞ Connect the Disc changer. The Dimmer function doesn't work . ✔ The mute wire...

Instruction Manual
Page 35
... vehicle ACC switch was set with "AUX EXT" showing in the 'About CD players/disc changers connected to the control unit. English | 35 Stereo is chosen when receiving condition is good, and it isn't displayed correctly according to the CD cleaning of the ACC switch being played. ✔ The media is being turned OFF. Disc source ? The disc won't insert. ✔ There's already another disc instead. ? Direct Search can 't be removed within 10...
... vehicle ACC switch was set with "AUX EXT" showing in the 'About CD players/disc changers connected to the control unit. English | 35 Stereo is chosen when receiving condition is good, and it isn't displayed correctly according to the CD cleaning of the ACC switch being played. ✔ The media is being turned OFF. Disc source ? The disc won't insert. ✔ There's already another disc instead. ? Direct Search can 't be removed within 10...

Instruction Manual
Page 36
... nearest service center. Hold Error: The protective circuit in the Disc changer. NO ACCESS: After setting it been played at least 1 time. TOC Error: No disc has been loaded in the Disc Changer, DNPP was done without having no disc names preset. "IN" indicator is blink (page18): The CD player section is played. ➪ ---- 36 | English Protected : A copy-protected file is not operating properly. ➪ Reinsert the CD. If the "Mecha Error" code...
... nearest service center. Hold Error: The protective circuit in the Disc changer. NO ACCESS: After setting it been played at least 1 time. TOC Error: No disc has been loaded in the Disc Changer, DNPP was done without having no disc names preset. "IN" indicator is blink (page18): The CD player section is played. ➪ ---- 36 | English Protected : A copy-protected file is not operating properly. ➪ Reinsert the CD. If the "Mecha Error" code...


