

Operation Manual
Page 3
Contents Before Use ...01 Dashboard Camera Function Guide 01 Precautions for Use 02 Accessories ...10 Key Features ...10 Parts Name and Functions 11 Installation and Connection 13 Initial Settings ...18 Basic Operation ...20 Settings...23 Connection with Computer 24 Using the Desktop Software 25 Using the Smartphone App 35 Troubleshooting ...44 Appendix ...45 Specifications ...48
Contents Before Use ...01 Dashboard Camera Function Guide 01 Precautions for Use 02 Accessories ...10 Key Features ...10 Parts Name and Functions 11 Installation and Connection 13 Initial Settings ...18 Basic Operation ...20 Settings...23 Connection with Computer 24 Using the Desktop Software 25 Using the Smartphone App 35 Troubleshooting ...44 Appendix ...45 Specifications ...48
Operation Manual
Page 4
... objects that JVCKENWOOD shall not be restricted even when doing so for the new video. Before Use • The screen images and operation examples in this document were created for everyday use. These files are not connected to get the perfect shot. Dashboard camera offers two modes: 1. The device lets users adjust camera settings to permanent power. Position the device in one shot. 01
... objects that JVCKENWOOD shall not be restricted even when doing so for the new video. Before Use • The screen images and operation examples in this document were created for everyday use. These files are not connected to get the perfect shot. Dashboard camera offers two modes: 1. The device lets users adjust camera settings to permanent power. Position the device in one shot. 01
Operation Manual
Page 5
... serviceable parts inside the unit, which could cause damage to your device and even bodily injury or property damage and will ensure trouble-free operation and reduce the risk of damage. • Keep your device away from excessive moisture and extreme temperatures. • Avoid exposing your device to direct sunlight or strong ultraviolet light for extended periods of time...
... serviceable parts inside the unit, which could cause damage to your device and even bodily injury or property damage and will ensure trouble-free operation and reduce the risk of damage. • Keep your device away from excessive moisture and extreme temperatures. • Avoid exposing your device to direct sunlight or strong ultraviolet light for extended periods of time...
Operation Manual
Page 6
.... • If the device is installed incorrectly, event recording or parked recording may not work correctly. • Refer to "Installation and Connection" for installation orientation, installation angle, and other information and then install the device correctly. • Do not install the device near it. • When LED traffic lights are recorded, video in all dirt and grease on the mounting surface. Failing to do so...
.... • If the device is installed incorrectly, event recording or parked recording may not work correctly. • Refer to "Installation and Connection" for installation orientation, installation angle, and other information and then install the device correctly. • Do not install the device near it. • When LED traffic lights are recorded, video in all dirt and grease on the mounting surface. Failing to do so...
Operation Manual
Page 11
... in conjunction with the limits for help. The user could lose the authority to operate this equipment does cause harmful interference to radio or television reception, which the receiver is no guarantee that to which can be co-located or operated in a particular installation. Reorient or relocate the receiving antenna. - 3-12 221-0022 DRV-A700W RU Д-JP.РА01...
... in conjunction with the limits for help. The user could lose the authority to operate this equipment does cause harmful interference to radio or television reception, which the receiver is no guarantee that to which can be co-located or operated in a particular installation. Reorient or relocate the receiving antenna. - 3-12 221-0022 DRV-A700W RU Д-JP.РА01...
Operation Manual
Page 12
...radio frequency (RF) Exposure rules. L'appareil doit accepter tout brouillage radioélectrique subi, même si le brouillage est susceptible d'en compromettre le fonctionnement. PHONE: 310 639-9000 THIS DEVICE COMPLIES WITH PART 15 OF THE FCC RULES. This device may cause undesired operation of Conformity Trade Name: KENWOOD Products: Dashboard Camera Model Name: DRV-A700W... RSS(s). Supplier's Declaration of the device. CAN ICES-3(B) / NMB-3(B) IC (Industry Canada) Notice This device contains licence-exempt transmitter(s)/receiver(s) that may not cause interference. 2.
...radio frequency (RF) Exposure rules. L'appareil doit accepter tout brouillage radioélectrique subi, même si le brouillage est susceptible d'en compromettre le fonctionnement. PHONE: 310 639-9000 THIS DEVICE COMPLIES WITH PART 15 OF THE FCC RULES. This device may cause undesired operation of Conformity Trade Name: KENWOOD Products: Dashboard Camera Model Name: DRV-A700W... RSS(s). Supplier's Declaration of the device. CAN ICES-3(B) / NMB-3(B) IC (Industry Canada) Notice This device contains licence-exempt transmitter(s)/receiver(s) that may not cause interference. 2.
Operation Manual
Page 14
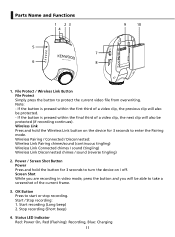
...protect the current video file from overwriting. Status LED Indicator Red: Power On, Red (Flashing): Recording, Blue: Charging 11 Wireless Pairing / Connected / Disconnected: Wireless Link Pairing chimes/sound (continuous tingling) Wireless Link Connected chimes / sound (tingling) Wireless Link Disconnected chimes / sound (reverse tingling) 2. Power / Screen Shot Button Power Press and hold the Wireless Link button on / off. Start recording (Long beep) 2. Parts Name and Functions 1 23 4 5 7 6 8 9 10 1. Wireless Link Press and hold the button for 3 seconds to turn the device on...
...protect the current video file from overwriting. Status LED Indicator Red: Power On, Red (Flashing): Recording, Blue: Charging 11 Wireless Pairing / Connected / Disconnected: Wireless Link Pairing chimes/sound (continuous tingling) Wireless Link Connected chimes / sound (tingling) Wireless Link Disconnected chimes / sound (reverse tingling) 2. Power / Screen Shot Button Power Press and hold the Wireless Link button on / off. Start recording (Long beep) 2. Parts Name and Functions 1 23 4 5 7 6 8 9 10 1. Wireless Link Press and hold the button for 3 seconds to turn the device on...
Operation Manual
Page 15
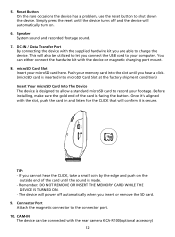
.... - CAM-IN The device can either connect the hardwire kit with the supplied hardwire kit you hear a click. (microSD card is inserted into the slot until the sound is secure. Simply press the reset until the device turns off automatically when you connect the USB cord to record your computer. Speaker System sound and recorded footage sound. 7. Connector Port Attach the magnetic connector to shut down the device. This...
.... - CAM-IN The device can either connect the hardwire kit with the supplied hardwire kit you hear a click. (microSD card is inserted into the slot until the sound is secure. Simply press the reset until the device turns off automatically when you connect the USB cord to record your computer. Speaker System sound and recorded footage sound. 7. Connector Port Attach the magnetic connector to shut down the device. This...
Operation Manual
Page 18
... you want to use the Parking Mode, connect hardwire kit to Permanent power supply. 3.5 Mount the dash cam behind the rearview mirror and connect the 5V Mini USB connector to the socket where the original fuse was removed from the three supplied types. Typically it . 3.4 Choose the correct fuse tap cable from the fuse box on Step 3.2. Please do not remove or change it locates under...
... you want to use the Parking Mode, connect hardwire kit to Permanent power supply. 3.5 Mount the dash cam behind the rearview mirror and connect the 5V Mini USB connector to the socket where the original fuse was removed from the three supplied types. Typically it . 3.4 Choose the correct fuse tap cable from the fuse box on Step 3.2. Please do not remove or change it locates under...
Operation Manual
Page 20
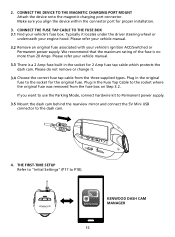
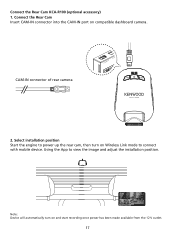
Using the App to power up the rear cam, then turn on and start recording once power has been made available from the 12 V outlet. 17 Note: Device will automatically turn on compatible dashboard camera. CAM-IN connector of rear camera 2. Select installation position Start the engine to view the image and adjust the installation position. Connect the Rear Cam KCA-R100 (optional accessory) 1. Connect the Rear Cam Insert CAM-IN connector into the CAM-IN port on Wireless Link mode to connect with mobile device.
Using the App to power up the rear cam, then turn on and start recording once power has been made available from the 12 V outlet. 17 Note: Device will automatically turn on compatible dashboard camera. CAM-IN connector of rear camera 2. Select installation position Start the engine to view the image and adjust the installation position. Connect the Rear Cam KCA-R100 (optional accessory) 1. Connect the Rear Cam Insert CAM-IN connector into the CAM-IN port on Wireless Link mode to connect with mobile device.
Operation Manual
Page 23
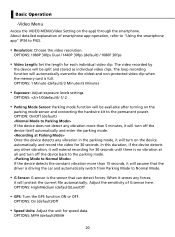
... parking mode. OPTIONS: On (default)/Off • Speed Units: Adjust the unit for each individual video clip. The video recorded by the device will extend recording for 30 seconds until there is full. OPTIONS: 1 Minute (default)/3 Minutes/5 Minutes • Exposure: Adjust exposure levels settings. OPTIONS: High/Medium (default)/Low/Off • GPS: Turn the GPS function ON or OFF. OPTIONS: MPH (default)/KMH 20 Basic Operation -Video Menu Access the VIDEO MENU(Video Setting...
... parking mode. OPTIONS: On (default)/Off • Speed Units: Adjust the unit for each individual video clip. The video recorded by the device will extend recording for 30 seconds until there is full. OPTIONS: 1 Minute (default)/3 Minutes/5 Minutes • Exposure: Adjust exposure levels settings. OPTIONS: High/Medium (default)/Low/Off • GPS: Turn the GPS function ON or OFF. OPTIONS: MPH (default)/KMH 20 Basic Operation -Video Menu Access the VIDEO MENU(Video Setting...
Operation Manual
Page 25
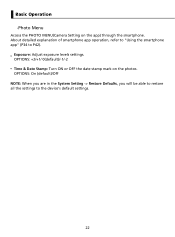
OPTIONS: On (default)/Off NOTE: When you are in the System Setting -> Restore Defaults, you will be able to restore all the settings to P42). Exposure: Adjust exposure levels settings. Basic Operation -Photo Menu Access the PHOTO MENU(Camera Setting on the photos. OPTIONS: +2/+1/ 0(default)/-1/-2 Time & Date Stamp: Turn ON or OFF the date stamp mark on the app) through the smartphone. About detailed explanation of smartphone app operation, refer to "Using the smartphone app" (P34 to the device's default settings. 22
OPTIONS: On (default)/Off NOTE: When you are in the System Setting -> Restore Defaults, you will be able to restore all the settings to P42). Exposure: Adjust exposure levels settings. Basic Operation -Photo Menu Access the PHOTO MENU(Camera Setting on the photos. OPTIONS: +2/+1/ 0(default)/-1/-2 Time & Date Stamp: Turn ON or OFF the date stamp mark on the app) through the smartphone. About detailed explanation of smartphone app operation, refer to "Using the smartphone app" (P34 to the device's default settings. 22
Operation Manual
Page 26
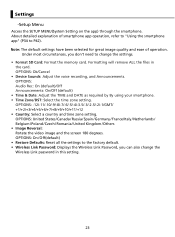
Settings -Setup Menu Access the SETUP MENU(System Setting on the app) through the smartphone. Under most circumstances, you don't need to the factory default. • Wireless Link Password: Displays the Wireless Link Password, you can also change the settings. • Format SD Card: Format the memory card. OPTIONS: -12/-11/-10/-9/-8/-7/-6/-5/-4/-3.5/-3/-2.5/-2/-1/GMT/ +1/+2/+3/+4/+5/+6/+7/+8/+9/+10/+11/+12 • Country: Select a country and time zone setting. OPTIONS: On /Off(default) • Restore Defaults: Reset all the settings to change the...
Settings -Setup Menu Access the SETUP MENU(System Setting on the app) through the smartphone. Under most circumstances, you don't need to the factory default. • Wireless Link Password: Displays the Wireless Link Password, you can also change the settings. • Format SD Card: Format the memory card. OPTIONS: -12/-11/-10/-9/-8/-7/-6/-5/-4/-3.5/-3/-2.5/-2/-1/GMT/ +1/+2/+3/+4/+5/+6/+7/+8/+9/+10/+11/+12 • Country: Select a country and time zone setting. OPTIONS: On /Off(default) • Restore Defaults: Reset all the settings to change the...
Operation Manual
Page 28
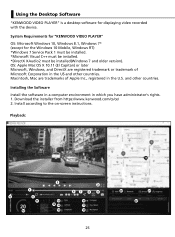
System Requirements for "KENWOOD VIDEO PLAYER" OS: Microsoft Windows 10, Windows 8.1, Windows 7* (except for displaying video recorded with the device. OS: Apple Mac OS X 10.11 (El Capitan) or later Microsoft, Windows, and DirectX are trademarks of Microsoft Corporation in the U.S. and other countries. Playback: JKVECNVWIDOEOODPVLIADYEEOR PLAYER File Edit Setup Share Help 00:27 INFORMATION 20 mph 0 200 G XY Z Sensor -2.0 0 +1.0 +3 0 -3 Time 2018 / 08 / 14 , -19 : 33 : 03...
System Requirements for "KENWOOD VIDEO PLAYER" OS: Microsoft Windows 10, Windows 8.1, Windows 7* (except for displaying video recorded with the device. OS: Apple Mac OS X 10.11 (El Capitan) or later Microsoft, Windows, and DirectX are trademarks of Microsoft Corporation in the U.S. and other countries. Playback: JKVECNVWIDOEOODPVLIADYEEOR PLAYER File Edit Setup Share Help 00:27 INFORMATION 20 mph 0 200 G XY Z Sensor -2.0 0 +1.0 +3 0 -3 Time 2018 / 08 / 14 , -19 : 33 : 03...
Operation Manual
Page 29
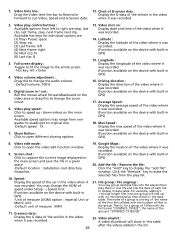
... may change the audio volume. - Video edit mode : Click to open the video edit function window. 9. Video playlist : A video thumbnail will end up / down videos on the device with built-in GPS) 15. Hot key: Alt + Enter 4. G-sensor data : Display the G-data of speed under Setup ÷ Speed Unit. (Function available on the device with built-in the group. Video time line : 12. Default volume: 100% 5. Chart of G-sensor data : Drag the Video time...
... may change the audio volume. - Video edit mode : Click to open the video edit function window. 9. Video playlist : A video thumbnail will end up / down videos on the device with built-in GPS) 15. Hot key: Alt + Enter 4. G-sensor data : Display the G-data of speed under Setup ÷ Speed Unit. (Function available on the device with built-in the group. Video time line : 12. Default volume: 100% 5. Chart of G-sensor data : Drag the Video time...
Operation Manual
Page 30
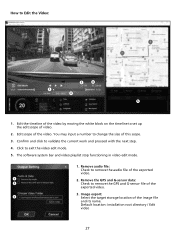
... this scope. 3. Default location: installation root directory / Edit video 27 How to validate the current work and proceed with the next step. 4. You may input a number to remove the audio file of video. 2. Edit scope of the exported video. 3. Confirm and click to Edit the Video: JKVECNWV I DOEOODPVLIADYEEOR PLAYER File Edit Setup Share Help INFORMATION Edit Mode 00:27 20 mph 0 200 Cut Time : 00:07...
... this scope. 3. Default location: installation root directory / Edit video 27 How to validate the current work and proceed with the next step. 4. You may input a number to remove the audio file of video. 2. Edit scope of the exported video. 3. Confirm and click to Edit the Video: JKVECNWV I DOEOODPVLIADYEEOR PLAYER File Edit Setup Share Help INFORMATION Edit Mode 00:27 20 mph 0 200 Cut Time : 00:07...
Operation Manual
Page 40
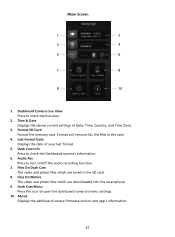
... audio recording function. 7. Audio Rec Press to check the Dashboard camera's Information. 6. Files On Dash Cam The video and photo files which are saved in the card. 4. Format will remove ALL the files in the SD card. 8. Dashboard Camera Live View Press to open the dashboard camera's menu settings. 10. Last Format Date Displays the date of Date, Time, Country, and Time Zone. 3. About Displays the dashboard camera firmware...
... audio recording function. 7. Audio Rec Press to check the Dashboard camera's Information. 6. Files On Dash Cam The video and photo files which are saved in the card. 4. Format will remove ALL the files in the SD card. 8. Dashboard Camera Live View Press to open the dashboard camera's menu settings. 10. Last Format Date Displays the date of Date, Time, Country, and Time Zone. 3. About Displays the dashboard camera firmware...
Operation Manual
Page 43
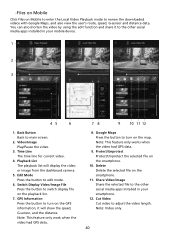
... for current video. 4. Note: This feature only work when the video had GPS data. 9. -Files on Mobile Click Files on the smartphone. 11. GPS Information Press the button to turn on the GPS information, it to the other social media apps installed in your mobile device. 1 2 3 45 6 1. Back Button Back to edit mode. 6. Cut Video Cut video to review the downloaded videos with Google Maps, and also view the user's route, speed...
... for current video. 4. Note: This feature only work when the video had GPS data. 9. -Files on Mobile Click Files on the smartphone. 11. GPS Information Press the button to turn on the GPS information, it to the other social media apps installed in your mobile device. 1 2 3 45 6 1. Back Button Back to edit mode. 6. Cut Video Cut video to review the downloaded videos with Google Maps, and also view the user's route, speed...
Operation Manual
Page 48
... does not charge in the setup menu and begin the process over again. I download files from the KENWOOD website a malicious software message appears Unresolved Issues If this function, go to Dash Cam Menu->Video Setting->Parking Mode Sensor on page 38 to turn off . Appendix Wireless Link Specification Standard Security Frequency Range Transfer Rate Output Power IEEE802.11n WPA2 2400-2483MHz ISM band 150Mbps (802.11n) 13dBm±...
... does not charge in the setup menu and begin the process over again. I download files from the KENWOOD website a malicious software message appears Unresolved Issues If this function, go to Dash Cam Menu->Video Setting->Parking Mode Sensor on page 38 to turn off . Appendix Wireless Link Specification Standard Security Frequency Range Transfer Rate Output Power IEEE802.11n WPA2 2400-2483MHz ISM band 150Mbps (802.11n) 13dBm±...
Operation Manual
Page 49
... when using a commercially available SD card, also check the instructions supplied with the SD card. • Be sure to format (initialize) an SD card with the device before use Wireless Link after setting security of saved files. 46 On Wireless Link Security The Wireless Link communicating with radio wave, there is supported. The stored data may be noted that JVCKENWOOD cannot compensate for using SD cards • When using this...
... when using a commercially available SD card, also check the instructions supplied with the SD card. • Be sure to format (initialize) an SD card with the device before use Wireless Link after setting security of saved files. 46 On Wireless Link Security The Wireless Link communicating with radio wave, there is supported. The stored data may be noted that JVCKENWOOD cannot compensate for using SD cards • When using this...


