

Operation Manual
Page 3
Contents Before Use ...01 Dashboard Camera Function Guide 01 Precautions for Use 02 Accessories ...10 Key Features ...10 Parts Name and Functions 11 Installation and Connection 14 Initial Settings ...20 Basic Operation ...22 Settings ...32 Connection with Computer 34 Using the Desktop Software 35 Using the Smartphone App 45 Troubleshooting ...53 Appendix ...55 Specifications ...58
Contents Before Use ...01 Dashboard Camera Function Guide 01 Precautions for Use 02 Accessories ...10 Key Features ...10 Parts Name and Functions 11 Installation and Connection 14 Initial Settings ...20 Basic Operation ...22 Settings ...32 Connection with Computer 34 Using the Desktop Software 35 Using the Smartphone App 45 Troubleshooting ...53 Appendix ...55 Specifications ...58

Operation Manual
Page 4
... be screen images that will let the device turn on the road and not the light from the road. 3. Photo Mode: The device setting takes still photographs. 3. Playback Mode: Users can view all distractions from the sky. 2. Reduce the amount of the SD card until it is removed, the device automatically deletes the oldest file to default when the device is active. 2. By adjusting the device...
... be screen images that will let the device turn on the road and not the light from the road. 3. Photo Mode: The device setting takes still photographs. 3. Playback Mode: Users can view all distractions from the sky. 2. Reduce the amount of the SD card until it is removed, the device automatically deletes the oldest file to default when the device is active. 2. By adjusting the device...

Operation Manual
Page 5
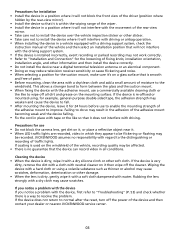
... while driving. • A window mount is placed near the lens. Nonadhesive generic screen protectors designed specifically for Use Precautions and notices Warning! Please keep the lens clean. • If the car's windscreen is damaged or exposed to excess moisture. Precautions for use on portable devices with LCD panels may impact the recording quality. • Connect the charger to a proper power source. The...
... while driving. • A window mount is placed near the lens. Nonadhesive generic screen protectors designed specifically for Use Precautions and notices Warning! Please keep the lens clean. • If the car's windscreen is damaged or exposed to excess moisture. Precautions for use on portable devices with LCD panels may impact the recording quality. • Connect the charger to a proper power source. The...
Operation Manual
Page 6
... driving or airbag operation. • When installing the device in a vehicle equipped with a driving support system, check the instruction manual of the vehicle and then select an installation position that will not interfere with the driving support system. • If the device is installed incorrectly, event recording or parked recording may not work correctly. • Refer to "Installation and Connection" for the loosening of fixing knob, installation orientation, installation...
... driving or airbag operation. • When installing the device in a vehicle equipped with a driving support system, check the instruction manual of the vehicle and then select an installation position that will not interfere with the driving support system. • If the device is installed incorrectly, event recording or parked recording may not work correctly. • Refer to "Installation and Connection" for the loosening of fixing knob, installation orientation, installation...
Operation Manual
Page 11
... limits for help. Reorient or relocate the receiving antenna. - The user could lose the authority to operate this equipment may generate or use radio frequency energy. However, there is no guarantee that to Part 15 of the following measures: - Consult the dealer or an experienced radio/TV technician for a Class B digital device, pursuant to which can be co-located or operated in conjunction...
... limits for help. Reorient or relocate the receiving antenna. - The user could lose the authority to operate this equipment may generate or use radio frequency energy. However, there is no guarantee that to Part 15 of the following measures: - Consult the dealer or an experienced radio/TV technician for a Class B digital device, pursuant to which can be co-located or operated in conjunction...
Operation Manual
Page 12
... radiateur et le corps humain. PHONE: 310 639-9000 THIS DEVICE COMPLIES WITH PART 15 OF THE FCC RULES. Complies with FCC/IC radiation exposure limits set forth for an uncontrolled environment and meets the FCC radio frequency (RF) Exposure Guidelines and RSS-102 of Conformity Trade Name: KENWOOD Products: Dashboard Camera Model Name: DRV-A501W Responsible Party: JVCKENWOOD USA...
... radiateur et le corps humain. PHONE: 310 639-9000 THIS DEVICE COMPLIES WITH PART 15 OF THE FCC RULES. Complies with FCC/IC radiation exposure limits set forth for an uncontrolled environment and meets the FCC radio frequency (RF) Exposure Guidelines and RSS-102 of Conformity Trade Name: KENWOOD Products: Dashboard Camera Model Name: DRV-A501W Responsible Party: JVCKENWOOD USA...
Operation Manual
Page 13
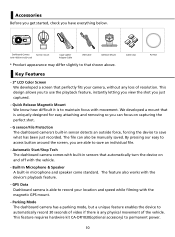
... microSD card) Suction mount Cigar Lighter Adapter Cable USB Cable Adhesive Mount * Product appearance may differ slightly to save what has been just recorded. Cable Clips PL Fliter Key Features - 3" LCD Color Screen We developed a screen that shown above. Parking Mode The dashboard camera has a parking mode, but a unique feature enables the device to use the playback feature, instantly letting you view the shot you...
... microSD card) Suction mount Cigar Lighter Adapter Cable USB Cable Adhesive Mount * Product appearance may differ slightly to save what has been just recorded. Cable Clips PL Fliter Key Features - 3" LCD Color Screen We developed a screen that shown above. Parking Mode The dashboard camera has a parking mode, but a unique feature enables the device to use the playback feature, instantly letting you view the shot you...
Operation Manual
Page 17
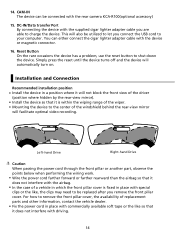
... may need to be replaced after you connect the USB cord to let you remove the front pillar cover. Simply press the reset until the device turns off and the device will facilitate optimal video recording. DC-IN/Data transfer Port By connecting the device with the rear camera KCA-R100(optional accessory) 15. 14. CAM-IN The device can either connect the cigar lighter adapter cable with...
... may need to be replaced after you connect the USB cord to let you remove the front pillar cover. Simply press the reset until the device turns off and the device will facilitate optimal video recording. DC-IN/Data transfer Port By connecting the device with the rear camera KCA-R100(optional accessory) 15. 14. CAM-IN The device can either connect the cigar lighter adapter cable with...

Operation Manual
Page 19
... solid support for proper installation. 2.2 REPLACE THE SUCTION MOUNT WITH THE ADHESIVE MOUNT: Suction Mount (a) Suction release tab Adhesive Mount (b) Locking lever (c) Locking ring (d) Power socket (e) Magnetic Connector There are two types of mounts included in the package. If you align the device within the connector port for the camera. The magnetic connector is an adhesive type. Make sure you prefer using the adhesive mount, please...
... solid support for proper installation. 2.2 REPLACE THE SUCTION MOUNT WITH THE ADHESIVE MOUNT: Suction Mount (a) Suction release tab Adhesive Mount (b) Locking lever (c) Locking ring (d) Power socket (e) Magnetic Connector There are two types of mounts included in the package. If you align the device within the connector port for the camera. The magnetic connector is an adhesive type. Make sure you prefer using the adhesive mount, please...
Operation Manual
Page 22
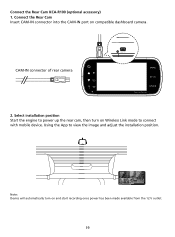
Connect the Rear Cam Insert CAM-IN connector into the CAM-IN port on Wireless Link mode to connect with mobile device. Connect the Rear Cam KCA-R100 (optional accessory) 1. Using the App to power up the rear cam, then turn on and start recording once power has been made available from the 12 V outlet. 19 Select installation position Start the engine to view the image and adjust the installation position. Note: Device will automatically turn on compatible dashboard camera. CAM-IN connector of rear camera 2.
Connect the Rear Cam Insert CAM-IN connector into the CAM-IN port on Wireless Link mode to connect with mobile device. Connect the Rear Cam KCA-R100 (optional accessory) 1. Using the App to power up the rear cam, then turn on and start recording once power has been made available from the 12 V outlet. 19 Select installation position Start the engine to view the image and adjust the installation position. Note: Device will automatically turn on compatible dashboard camera. CAM-IN connector of rear camera 2.
Operation Manual
Page 24
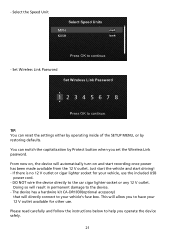
... use the included USB power cord. - This will directly connect to your vehicle's fuse box. Select the Speed Unit Select Speed Units MPH KMH Press OK to help you operate the device safely. 21 TIP: You can switch the capitalization by restoring defaults. Just start the vehicle and start recording once power has been made available from the 12 V outlet. Please read carefully and follow the instructions...
... use the included USB power cord. - This will directly connect to your vehicle's fuse box. Select the Speed Unit Select Speed Units MPH KMH Press OK to help you operate the device safely. 21 TIP: You can switch the capitalization by restoring defaults. Just start the vehicle and start recording once power has been made available from the 12 V outlet. Please read carefully and follow the instructions...
Operation Manual
Page 25
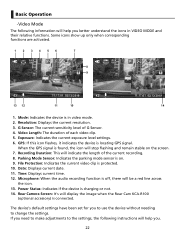
.... Power Status: Indicates if the device is locating GPS signal. Resolution: Displays the current resolution. 3. G Sensor: The current sensitivity level of each video clip. 5. GPS: If this icon flashes, it indicates the device is charging or not. 14. If you need to make adjustments to change the settings. Exposure: Indicates the current exposure level settings. 6. Time: Displays current time. 12. Some icons show up only when corresponding functions are activated...
.... Power Status: Indicates if the device is locating GPS signal. Resolution: Displays the current resolution. 3. G Sensor: The current sensitivity level of each video clip. 5. GPS: If this icon flashes, it indicates the device is charging or not. 14. If you need to make adjustments to change the settings. Exposure: Indicates the current exposure level settings. 6. Time: Displays current time. 12. Some icons show up only when corresponding functions are activated...
Operation Manual
Page 27
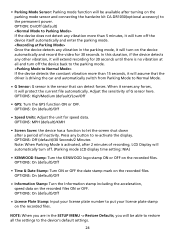
...: MPH (default)/KMH • Screen Saver: the device has a function to the device's default settings. 24 NOTE: When you will be available after 2 minutes of recording, LCD Display will automatically turn off. (Parking mode LCD display time setting: N/A) • KENWOOD Stamp: Turn the KENWOOD logo stamp ON or OFF on the recorded files. OPTIONS: On (default)/Off • Speed Units: Adjust the unit for 30 seconds. OPTIONS...
...: MPH (default)/KMH • Screen Saver: the device has a function to the device's default settings. 24 NOTE: When you will be available after 2 minutes of recording, LCD Display will automatically turn off. (Parking mode LCD display time setting: N/A) • KENWOOD Stamp: Turn the KENWOOD logo stamp ON or OFF on the recorded files. OPTIONS: On (default)/Off • Speed Units: Adjust the unit for 30 seconds. OPTIONS...

Operation Manual
Page 35
...: The Wireless Link function allows you access the sub-menu, highlight the desired setting and press the OK button to confirm your smartphone to the SETUP MENU. • Time Zone/DST: Select the time zone setting. Press the OK button to save the setting and press the MENU button to return to connect with the device. Settings Access the SETUP MENU by using use your selection and to return to set the value. Note...
...: The Wireless Link function allows you access the sub-menu, highlight the desired setting and press the OK button to confirm your smartphone to the SETUP MENU. • Time Zone/DST: Select the time zone setting. Press the OK button to save the setting and press the MENU button to return to connect with the device. Settings Access the SETUP MENU by using use your selection and to return to set the value. Note...
Operation Manual
Page 36
...:17:01 02/13/2019 Model: Firmware: Check updates: FCC ID: IC: OK Enter System Info DRV-A501W V3.3_AIZGAA_D www.kenwood.com/cs/ce IOMDRVA501W 282C-DRVA501W MENU Back System Info This device complies with part 15 of how many satellite signals the device is not recording. • Language: Select a preferred language. OPTIONS: System Info: Displays the firmware version and the FCC ID...
...:17:01 02/13/2019 Model: Firmware: Check updates: FCC ID: IC: OK Enter System Info DRV-A501W V3.3_AIZGAA_D www.kenwood.com/cs/ce IOMDRVA501W 282C-DRVA501W MENU Back System Info This device complies with part 15 of how many satellite signals the device is not recording. • Language: Select a preferred language. OPTIONS: System Info: Displays the firmware version and the FCC ID...
Operation Manual
Page 38
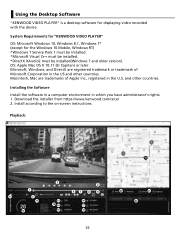
... in which you have administrator's rights. 1. Installing the Software Install the software in a computer environment in the U.S. Install according to the on-screen instructions. System Requirements for "KENWOOD VIDEO PLAYER" OS: Microsoft Windows 10, Windows 8.1, Windows 7* (except for displaying video recorded with the device. Download the installer from https://www.kenwood.com/cs/ce/ 2. Using the Desktop Software "KENWOOD VIDEO PLAYER" is a desktop software for the Windows 10...
... in which you have administrator's rights. 1. Installing the Software Install the software in a computer environment in the U.S. Install according to the on-screen instructions. System Requirements for "KENWOOD VIDEO PLAYER" OS: Microsoft Windows 10, Windows 8.1, Windows 7* (except for displaying video recorded with the device. Download the installer from https://www.kenwood.com/cs/ce/ 2. Using the Desktop Software "KENWOOD VIDEO PLAYER" is a desktop software for the Windows 10...

Operation Manual
Page 39
... recorded. Video shot on the device with a 5 minutes display time shown in GPS) 15. Video edit mode : 19. Add the file / Remove the file : -Default location : installation root directory Click the "Add" key to change the UOM of speed under Setup ÷ Speed Unit. (Function available on the device with built-in the data table. Share Button : Click to erase the selected files from the play , next...
... recorded. Video shot on the device with a 5 minutes display time shown in GPS) 15. Video edit mode : 19. Add the file / Remove the file : -Default location : installation root directory Click the "Add" key to change the UOM of speed under Setup ÷ Speed Unit. (Function available on the device with built-in the data table. Share Button : Click to erase the selected files from the play , next...

Operation Manual
Page 40
... video by moving the white block on the timeline to Edit the Video: JKVECNWV I DOEOODPVLIADYEEOR PLAYER File Edit Setup Share Help INFORMATION Edit Mode 00:27 20 mph 0 200 Cut Time : 00:07 ~ 00:37 G XY Z Sensor -2.0 0 +1.0 +3 0 -3 Time 2018...Select the target storage location of the video. Edit scope of the image file and its name. The software system bar and video playlist stop functioning in video edit mode. 1. How to set up the edit scope of video. 2. Confirm and click to validate the current work and proceed with the next step. 4. Default location: installation...
... video by moving the white block on the timeline to Edit the Video: JKVECNWV I DOEOODPVLIADYEEOR PLAYER File Edit Setup Share Help INFORMATION Edit Mode 00:27 20 mph 0 200 Cut Time : 00:07 ~ 00:37 G XY Z Sensor -2.0 0 +1.0 +3 0 -3 Time 2018...Select the target storage location of the video. Edit scope of the image file and its name. The software system bar and video playlist stop functioning in video edit mode. 1. How to set up the edit scope of video. 2. Confirm and click to validate the current work and proceed with the next step. 4. Default location: installation...
Operation Manual
Page 49
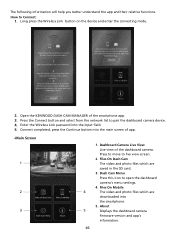
... device and enter the connecting mode. 2. Open the KENWOOD DASH CAM MANAGER of the dashboard camera. Press the Connect button and select from the network list to open the dashboard camera's menu settings. 4. Dash Cam Menu Press this icon to pair the dashboard camera device. 4. Enter the Wireless Link password into the smartphone. 5. Dashboard Camera Live View Live view of the smartphone app. 3. About 5 Displays the dashboard camera firmware...
... device and enter the connecting mode. 2. Open the KENWOOD DASH CAM MANAGER of the dashboard camera. Press the Connect button and select from the network list to open the dashboard camera's menu settings. 4. Dash Cam Menu Press this icon to pair the dashboard camera device. 4. Enter the Wireless Link password into the smartphone. 5. Dashboard Camera Live View Live view of the smartphone app. 3. About 5 Displays the dashboard camera firmware...

Operation Manual
Page 56
... unable to remove the SD card, use the edge of a small coin to my computer through the USB storage feature You may not be played on a non-smooth surface or an area with paint. 53 Also make sure the surface is placed. The functions have a suitable video player installed. The total video recording time is not taken unless you need , format the...
... unable to remove the SD card, use the edge of a small coin to my computer through the USB storage feature You may not be played on a non-smooth surface or an area with paint. 53 Also make sure the surface is placed. The functions have a suitable video player installed. The total video recording time is not taken unless you need , format the...


