

Operation Manual
Page 2
... structure 45 KENWOOD DRIVE REVIEWER operating environment 45 Recording time 46 Number of recordable files 46 Main Specifications 47 Important Notice Concerning the Software 48 z The screen images and operation examples in the Copyright Act. CCoonntetenntsts Drive Recorder Function Guide 4 About the setup function 4 About the recording functions 4 Setting the microphone sound during recording 6 Accessories 7 Precautions for Use 8 Precautions and notices 8 Caring for your device 8 Precautions for installation 10 Precautions...
... structure 45 KENWOOD DRIVE REVIEWER operating environment 45 Recording time 46 Number of recordable files 46 Main Specifications 47 Important Notice Concerning the Software 48 z The screen images and operation examples in the Copyright Act. CCoonntetenntsts Drive Recorder Function Guide 4 About the setup function 4 About the recording functions 4 Setting the microphone sound during recording 6 Accessories 7 Precautions for Use 8 Precautions and notices 8 Caring for your device 8 Precautions for installation 10 Precautions...
Operation Manual
Page 3
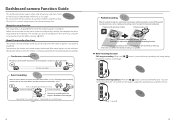
... the setup function The setup menu is displayed the first time the camera's power is turned on the menu screen to configure the settings and complete the basic setup related to insert the SD card into the vehicle), recording is not possible. „„ Other recording functions Still image recording: When the [ recorded is stored as "SD card"). Furthermore, the camera can be changed...
... the setup function The setup menu is displayed the first time the camera's power is turned on the menu screen to configure the settings and complete the basic setup related to insert the SD card into the vehicle), recording is not possible. „„ Other recording functions Still image recording: When the [ recorded is stored as "SD card"). Furthermore, the camera can be changed...
Operation Manual
Page 5
..., repair or make any attempt at a facility capable of handling these items and their waste by products. z Avoid exposing your device to direct sunlight or strong ultraviolet light for details in order to a proper power source. Contact your device, its parts or accessories. Use a soft, lint-free cloth to you place the recorder in a car. Proper recycling and waste disposal will help protect the screen...
..., repair or make any attempt at a facility capable of handling these items and their waste by products. z Avoid exposing your device to direct sunlight or strong ultraviolet light for details in order to a proper power source. Contact your device, its parts or accessories. Use a soft, lint-free cloth to you place the recorder in a car. Proper recycling and waste disposal will help protect the screen...

Operation Manual
Page 6
... other sticker. z Install the device in a vehicle equipped with a driving support system, check the instruction manual of the vehicle and then select an installation location that it then wipe off the power of the rear-view mirror. z Take care not to install the device where it will interfere with the movement of the device and then contact your dealer or nearest JVC KENWOOD service center. 10 11...
... other sticker. z Install the device in a vehicle equipped with a driving support system, check the instruction manual of the vehicle and then select an installation location that it then wipe off the power of the rear-view mirror. z Take care not to install the device where it will interfere with the movement of the device and then contact your dealer or nearest JVC KENWOOD service center. 10 11...

Operation Manual
Page 7
... distance of approximately 200 meters. Release paper 4. z In the case of a vehicle in place. HHoowwtotoInIsntasltlall Installation Procedure Check that the vehicle is a spirit level at [MENU] - [System settings] - [Mouting support tools] - [Level]. (➜ P. 34) Use it to help adjustment of the mount angle. z Wire the power cord farther forward or farther rearward than the airbag so that it to wipe off the release...
... distance of approximately 200 meters. Release paper 4. z In the case of a vehicle in place. HHoowwtotoInIsntasltlall Installation Procedure Check that the vehicle is a spirit level at [MENU] - [System settings] - [Mouting support tools] - [Level]. (➜ P. 34) Use it to help adjustment of the mount angle. z Wire the power cord farther forward or farther rearward than the airbag so that it to wipe off the release...
Operation Manual
Page 8
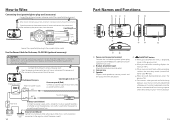
How to Wire Connecting the cigarette lighter plug cord (accessory) Connect the dashboard camera and power cord of the connector. After connecting the power cord, close the cover. Use the Power Cable for Dashcam (optional accessory). 2 Bracket attachment part Mount the included mount bracket. 3 Camera lens 4 Speaker Outputs audio guidance, warning sounds and the audio when files are played. 5 /SHORTCUT button z When pressed while the menu is always applied regardless of the power supply). z Fast-reverses when...
How to Wire Connecting the cigarette lighter plug cord (accessory) Connect the dashboard camera and power cord of the connector. After connecting the power cord, close the cover. Use the Power Cable for Dashcam (optional accessory). 2 Bracket attachment part Mount the included mount bracket. 3 Camera lens 4 Speaker Outputs audio guidance, warning sounds and the audio when files are played. 5 /SHORTCUT button z When pressed while the menu is always applied regardless of the power supply). z Fast-reverses when...

Operation Manual
Page 9
... [ ] buttons to select , then press the [MENU/OK] button. 1 1 2 2 1 3. How to Wire 6 MENU/OK button z Turns the camera's power on and off when pressed and held while playing, changes the volume. z When pressed while the monitor screen power-saving function is activated, cancels the power-saving function. (➜ P. 34) 7 button z When pressed while the menu is displayed. 4. z When pressed during recording. % SD card slot 1 z Insert an SD card for a large truck. 1 2. Adjust...
... [ ] buttons to select , then press the [MENU/OK] button. 1 1 2 2 1 3. How to Wire 6 MENU/OK button z Turns the camera's power on and off when pressed and held while playing, changes the volume. z When pressed while the monitor screen power-saving function is activated, cancels the power-saving function. (➜ P. 34) 7 button z When pressed while the menu is displayed. 4. z When pressed during recording. % SD card slot 1 z Insert an SD card for a large truck. 1 2. Adjust...

Operation Manual
Page 10
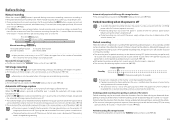
... select , then press the [MENU/OK] button. 1 2 1 4. Formatting SD cards To use an SD card, first format it out. Before Using the Driving Support Functions 7. z The driving support function is set to "OFF". 1 2 1 continued 19 Insert the SD card into SD card slot 1, pressing in until a click is set to "OFF" upon purchase. (➜ P. 34) 18 Before Using Inserting and ejecting SD cards Turn the camera's power...
... select , then press the [MENU/OK] button. 1 2 1 4. Formatting SD cards To use an SD card, first format it out. Before Using the Driving Support Functions 7. z The driving support function is set to "OFF". 1 2 1 continued 19 Insert the SD card into SD card slot 1, pressing in until a click is set to "OFF" upon purchase. (➜ P. 34) 18 Before Using Inserting and ejecting SD cards Turn the camera's power...

Operation Manual
Page 11
... camera's power turns on the resolution setting. c3ts cmaiAnnpbupet resosext.. (➜3 mP.Ai3np3up)tr eosx . 3 ・m i・n u ・t e s・・ Impact detection Continuous recording Continuous recording Event recording 10 seconds before event recording ends, event recording is no longer possible. When the upper limit of the recordable number of time. Before Using 5. Operate the [ ] and [ ] buttons to SD...
... camera's power turns on the resolution setting. c3ts cmaiAnnpbupet resosext.. (➜3 mP.Ai3np3up)tr eosx . 3 ・m i・n u ・t e s・・ Impact detection Continuous recording Continuous recording Event recording 10 seconds before event recording ends, event recording is no longer possible. When the upper limit of the recordable number of time. Before Using 5. Operate the [ ] and [ ] buttons to SD...
Operation Manual
Page 12
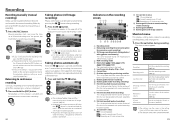
... power turns on , the automatic still image capture function turns off . im3 em. z The number of images can be selected from there for parked recording can be activated when the vibrations from the door closing are stored in and out of the vehicle. z The capture function also turns off if the menu or shortcut menu screen is displayed or if the recording mode is changed...
... power turns on , the automatic still image capture function turns off . im3 em. z The number of images can be selected from there for parked recording can be activated when the vibrations from the door closing are stored in and out of the vehicle. z The capture function also turns off if the menu or shortcut menu screen is displayed or if the recording mode is changed...
Operation Manual
Page 13
... on SD card not possible ^ Button guide (shortcut menu/recording mode switching) Button guide (MENU) & * Button guide (still image capture) Shortcut menu This displays setting items related to recording and frequently used setting items. 1. z Automatic still image capture also turns off when the menu is displayed or when the power is not possible while folders or files are playing or a menu is pressed and held for manual recording is the 10 seconds...
... on SD card not possible ^ Button guide (shortcut menu/recording mode switching) Button guide (MENU) & * Button guide (still image capture) Shortcut menu This displays setting items related to recording and frequently used setting items. 1. z Automatic still image capture also turns off when the menu is displayed or when the power is not possible while folders or files are playing or a menu is pressed and held for manual recording is the 10 seconds...

Operation Manual
Page 16
... file protection. 30 Configuring the Settings Operating using the menu Operations for playing files, configuring video recording settings, etc., can also turn off and continuous recording begins. Operate the [ ] and [ ] buttons to select the folder you can find setting items related to recording and frequently used setting items. (➜ P. 25) z You can be performed from the menu screen. 1. Playback 2. Parking recording settings Recording settings Driving support settings System settings SD card menu 31 Operate the [ ] and [ ] buttons...
... file protection. 30 Configuring the Settings Operating using the menu Operations for playing files, configuring video recording settings, etc., can also turn off and continuous recording begins. Operate the [ ] and [ ] buttons to select the folder you can find setting items related to recording and frequently used setting items. (➜ P. 25) z You can be performed from the menu screen. 1. Playback 2. Parking recording settings Recording settings Driving support settings System settings SD card menu 31 Operate the [ ] and [ ] buttons...

Operation Manual
Page 17
... rate 9 fps*/3 fps Set the image update frequency during file playback. (➜ P. 28) Manual REC Event REC Parking REC Still images Parking recording settings To use the parking recording function, the power must be captured with the automatic still image capture function. Configuring the Settings MENU * Factory default settings Playback Continuous REC (Slot 1) Continuous REC (Slot 2) Select the folder and play the desired file. (➜...
... rate 9 fps*/3 fps Set the image update frequency during file playback. (➜ P. 28) Manual REC Event REC Parking REC Still images Parking recording settings To use the parking recording function, the power must be captured with the automatic still image capture function. Configuring the Settings MENU * Factory default settings Playback Continuous REC (Slot 1) Continuous REC (Slot 2) Select the folder and play the desired file. (➜...

Operation Manual
Page 18
.... Configuring the Settings * Factory default settings Driving support settings Forward collision warning Lane departure warning Departure delay warning Detection range Mounting height ON/OFF* This function detects the distance between you and the vehicle in front, and sounds a warning if the distance is mounted. (➜ P. 17) System settings Date/time Daylight saving time Notification volume Playback volume Monitor Mounting support tool Select units Factory reset Setup Update system System version Automatic*/Manual Set whether to...
.... Configuring the Settings * Factory default settings Driving support settings Forward collision warning Lane departure warning Departure delay warning Detection range Mounting height ON/OFF* This function detects the distance between you and the vehicle in front, and sounds a warning if the distance is mounted. (➜ P. 17) System settings Date/time Daylight saving time Notification volume Playback volume Monitor Mounting support tool Select units Factory reset Setup Update system System version Automatic*/Manual Set whether to...
Operation Manual
Page 19
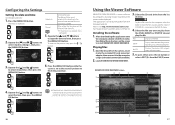
... time will not be set automatically according to be displayed. Operate the [ ] and [ ] button to install KENWOOD DRIVE REVIEWER. The application can be downloaded from the positioning satellite. After downloading the application onto the computer, double-click the installer, then follow the instructions on the computer, select the folder in which the file is set the date and time manually.. Launch KENWOOD DRIVE REVIEWER. 3. Please visit http://www.kenwood.com/cs/ce/. Operate...
... time will not be set automatically according to be displayed. Operate the [ ] and [ ] button to install KENWOOD DRIVE REVIEWER. The application can be downloaded from the positioning satellite. After downloading the application onto the computer, double-click the installer, then follow the instructions on the computer, select the folder in which the file is set the date and time manually.. Launch KENWOOD DRIVE REVIEWER. 3. Please visit http://www.kenwood.com/cs/ce/. Operate...

Operation Manual
Page 20
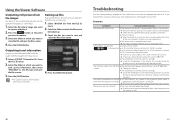
... , the icon is used to the normal screen. 7 Playback bar/playing time/total playing time/drive warning indicators Frontal collision warning icon Lane departure warning icon Departure delay warning icon 8 Operation buttons These are located in full screen, click it to return to determine your position on the capacity of the currently playing file. SELECT UNITS (S) DISPLAY DRIVINGWARNING (D) Switch to the normal screen. Turns the drive warning indicators on...
... , the icon is used to the normal screen. 7 Playback bar/playing time/total playing time/drive warning indicators Frontal collision warning icon Lane departure warning icon Departure delay warning icon 8 Operation buttons These are located in full screen, click it to return to determine your position on the capacity of the currently playing file. SELECT UNITS (S) DISPLAY DRIVINGWARNING (D) Switch to the normal screen. Turns the drive warning indicators on...
Operation Manual
Page 21
...'s power does not turn off . (➜ P. 34) a while. åå Change the setting. Using the Viewer Software Outputting still pictures from the images Any point in the currently playing video can be possible. Select the file whose image you cannot find a solution, contact your store of the same capacity. Select the folder in which the files are short-circuited, replace with...
...'s power does not turn off . (➜ P. 34) a while. åå Change the setting. Using the Viewer Software Outputting still pictures from the images Any point in the currently playing video can be possible. Select the file whose image you cannot find a solution, contact your store of the same capacity. Select the folder in which the files are short-circuited, replace with...
Operation Manual
Page 22
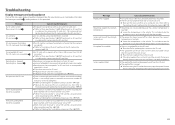
... card This SD card is not compatible Recording has stopped Recording has stopped No space on the SD card Event recording failed (file limit exceeded) Manual recording failed (file limit exceeded) Cause/Countermeasures z The power was turned on this camera into SD card slot 1. z When "Overwrite (manual)" is set to "Main specifications" (➜ P. 47) and insert an...
... card This SD card is not compatible Recording has stopped Recording has stopped No space on the SD card Event recording failed (file limit exceeded) Manual recording failed (file limit exceeded) Cause/Countermeasures z The power was turned on this camera into SD card slot 1. z When "Overwrite (manual)" is set to "Main specifications" (➜ P. 47) and insert an...

Operation Manual
Page 23
... time at which they may be completed. Changes due to strong shocks. z Do not let direct sunlight shine on the satellite positioning conditions, it could damage it is viewed, but this manual. This is a phenomenon typical of liquid crystal displays...KENWOOD DRIVE REVIEWER operating environment Windows version Supported OSs Windows 7 Service Pack 1 (32-bit/64-bit) Windows 8.1/8.1Pro (32-bit/64-bit) Windows 10 (32-bit/64-bit) Not included Windows 10 mobile CPU Intel Core i3 2 GHz or greater Memory 2 GB or greater Display 1280×800 or greater Sound PCM sound playback function...
... time at which they may be completed. Changes due to strong shocks. z Do not let direct sunlight shine on the satellite positioning conditions, it could damage it is viewed, but this manual. This is a phenomenon typical of liquid crystal displays...KENWOOD DRIVE REVIEWER operating environment Windows version Supported OSs Windows 7 Service Pack 1 (32-bit/64-bit) Windows 8.1/8.1Pro (32-bit/64-bit) Windows 10 (32-bit/64-bit) Not included Windows 10 mobile CPU Intel Core i3 2 GHz or greater Memory 2 GB or greater Display 1280×800 or greater Sound PCM sound playback function...

Operation Manual
Page 25
...operations for commercial and non-commercial use of conditions and the following conditions apply to highbyte; The X^32 term is free for all code found in this software must retain the copyright notice, this code cannot be unsigned (bring in accordance with the package. Notes The table can be removed. code...THE POSSIBILITY OF SUCH DAMAGE. Why do we 're using byte-swap instructions polynomial $edb88320 CRC32 code derived from the library being 1. This can be in the form of source code must display the following disclaimer. 2. Note that the following conditions ...
...operations for commercial and non-commercial use of conditions and the following conditions apply to highbyte; The X^32 term is free for all code found in this software must retain the copyright notice, this code cannot be unsigned (bring in accordance with the package. Notes The table can be removed. code...THE POSSIBILITY OF SUCH DAMAGE. Why do we 're using byte-swap instructions polynomial $edb88320 CRC32 code derived from the library being 1. This can be in the form of source code must display the following disclaimer. 2. Note that the following conditions ...


