Instruction Manual
Page 2
...Power Selecting the Source Volume Attenuator System Q Audio Control Adjusting the detail of Audio Control Audio Setup Speaker Setting Subwoofer Output TEL Mute Switching Display Display Type Selection Graphic part Display Switching Wallpaper selecting Text Selection for Display Text Display Switching Font Color Select G-Analyzer display Switching Tuner features Tuning Tuning Mode Direct Access Tuning Station Preset Memory Auto Memory Entry Preset Tuning 4 RDS features 26 5 Radio Text Scroll PTY (Program Type) 7 Registration of a station as a PTY Program Type preset 8 CD/USB device/Audio...
...Power Selecting the Source Volume Attenuator System Q Audio Control Adjusting the detail of Audio Control Audio Setup Speaker Setting Subwoofer Output TEL Mute Switching Display Display Type Selection Graphic part Display Switching Wallpaper selecting Text Selection for Display Text Display Switching Font Color Select G-Analyzer display Switching Tuner features Tuning Tuning Mode Direct Access Tuning Station Preset Memory Auto Memory Entry Preset Tuning 4 RDS features 26 5 Radio Text Scroll PTY (Program Type) 7 Registration of a station as a PTY Program Type preset 8 CD/USB device/Audio...
Instruction Manual
Page 3
... Activating Security Code Deactivating Security Code Touch Sensor Tone Manual Clock Adjustment Date Adjustment Date Mode Synchronize Clock Indirect Lighting Display Illumination Control Dimmer Switching preout Built-in Auxiliary input Setting CD Read Setting Voice Index ACDrive firmware version display Unique ID display Audio Preset Memory Audio Preset Recall Demonstration mode Setting 36 Basic Operations of remote control 50 Accessories/ Installation Procedure 53 Connecting Wires to Terminals 54 Installing the Escutcheon 55 Installation 56 Removing the Unit 58 Troubleshooting Guide...
... Activating Security Code Deactivating Security Code Touch Sensor Tone Manual Clock Adjustment Date Adjustment Date Mode Synchronize Clock Indirect Lighting Display Illumination Control Dimmer Switching preout Built-in Auxiliary input Setting CD Read Setting Voice Index ACDrive firmware version display Unique ID display Audio Preset Memory Audio Preset Recall Demonstration mode Setting 36 Basic Operations of remote control 50 Accessories/ Installation Procedure 53 Connecting Wires to Terminals 54 Installing the Escutcheon 55 Installation 56 Removing the Unit 58 Troubleshooting Guide...
Instruction Manual
Page 4
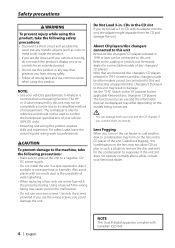
... damage the unit. Set the "O-N" Switch to malfunction. • Do not use a new fuse with the prescribed rating. Note that can be used to this unit. Also avoid places with Canadian ICES-003. In such a situation, remove the disc and wait for reference and should not be connected to confirm the horsepower specifications of disc changers/ CD players. NOTE: • Like your Kenwood dealer. 4 | English...
... damage the unit. Set the "O-N" Switch to malfunction. • Do not use a new fuse with the prescribed rating. Note that can be used to this unit. Also avoid places with Canadian ICES-003. In such a situation, remove the disc and wait for reference and should not be connected to confirm the horsepower specifications of disc changers/ CD players. NOTE: • Like your Kenwood dealer. 4 | English...
Instruction Manual
Page 5
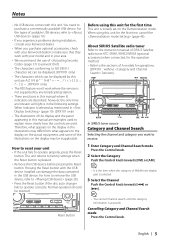
... operations. (DPX701 : without function). You need to receive. 1 Enter Category and Channel Search mode Press the Control knob. 2 Select the Category Push the Control knob towards [4] or [¢]. Pressing the Reset button with the USB device installed can be restored. however, the only time an indicator will light is selected. 3 Select the Channel Push the Control knob towards [FM] or [AM]. • It is the item when the category of SIRIUS Satellite radio tuner...
... operations. (DPX701 : without function). You need to receive. 1 Enter Category and Channel Search mode Press the Control knob. 2 Select the Category Push the Control knob towards [4] or [¢]. Pressing the Reset button with the USB device installed can be restored. however, the only time an indicator will light is selected. 3 Select the Channel Push the Control knob towards [FM] or [AM]. • It is the item when the category of SIRIUS Satellite radio tuner...
Instruction Manual
Page 6
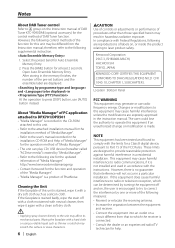
Notes About DAB Tuner control Refer to A group on the Instruction manual of DAB Tuner KTC-9090DAB (optional accessory) for the control method of PhatNoise. Select the preset band for at least 2 seconds. http://www.kenwood.mediamanager.jp • Contact Kenwood for the function and operation of the "Media Manager". • "Media Manager" is no guarantee that to which can play CD/ USB device (hereafter called...
Notes About DAB Tuner control Refer to A group on the Instruction manual of DAB Tuner KTC-9090DAB (optional accessory) for the control method of PhatNoise. Select the preset band for at least 2 seconds. http://www.kenwood.mediamanager.jp • Contact Kenwood for the function and operation of the "Media Manager". • "Media Manager" is no guarantee that to which can play CD/ USB device (hereafter called...
Instruction Manual
Page 10
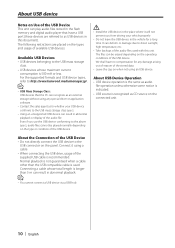
... Storage Class: USB devices that have no compensation for a long time. Connect it will not prevent you use the USB device conforming to the USB connector on the operating conditions of the USB device. Normal playback is recommended. Connecting a cable whose maximum current consumption is 500 mA or less. About USB device Notes on Use of the USB Device This unit can play audio files stored in the flash memory and digital audio player that the...
... Storage Class: USB devices that have no compensation for a long time. Connect it will not prevent you use the USB device conforming to the USB connector on the operating conditions of the USB device. Normal playback is recommended. Connecting a cable whose maximum current consumption is 500 mA or less. About USB device Notes on Use of the USB Device This unit can play audio files stored in the flash memory and digital audio player that the...
Instruction Manual
Page 12
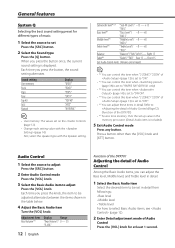
... current sound setting is displayed. Subwoofer level*2,3,4 "Sub-W Level"/ -15 - +15 Bass level*5 "SW L" "Bass Level"/ -8 - +8 Middle level*5 "BAS L" "Middle Level"/ -8 - +8 Treble level*5 "MID L" "Treble Level"/ -8 - +8 "TRE L" Balance "Balance"/ "BAL" Left 15 - Audio Control 1 Select the source to adjust Press the [SRC] button. 2 Enter Audio Control mode Press the [VOL] knob. 3 Select the Basic Audio item to adjust Press the [VOL] knob. Refer to (Page12). (Function of the DPX701) • *5 Source tone memory: Puts the set Press the [SRC] button. 2 Select the Sound type Press...
... current sound setting is displayed. Subwoofer level*2,3,4 "Sub-W Level"/ -15 - +15 Bass level*5 "SW L" "Bass Level"/ -8 - +8 Middle level*5 "BAS L" "Middle Level"/ -8 - +8 Treble level*5 "MID L" "Treble Level"/ -8 - +8 "TRE L" Balance "Balance"/ "BAL" Left 15 - Audio Control 1 Select the source to adjust Press the [SRC] button. 2 Enter Audio Control mode Press the [VOL] knob. 3 Select the Basic Audio item to adjust Press the [VOL] knob. Refer to (Page12). (Function of the DPX701) • *5 Source tone memory: Puts the set Press the [SRC] button. 2 Select the Sound type Press...
Instruction Manual
Page 13
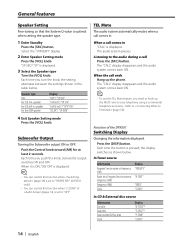
... at least 1 second. • When you set to adjust Press the [VOL] knob. Audio Setup Setting the Sound system, such as a difference from the basic volume. • Loudness: Compensates for at least 1 second. 3 Select the Audio Setup item to Through. • Dual Zone System Main source and sub source (Auxiliary input) output Front channel and Rear channel separately. - Bass level Adjustment Item Bass Center Frequency Bass Q Factor Bass Extend Display Range "Bass FRQ" 40/50/60/70/80...
... at least 1 second. • When you set to adjust Press the [VOL] knob. Audio Setup Setting the Sound system, such as a difference from the basic volume. • Loudness: Compensates for at least 1 second. 3 Select the Audio Setup item to Through. • Dual Zone System Main source and sub source (Auxiliary input) output Front channel and Rear channel separately. - Bass level Adjustment Item Bass Center Frequency Bass Q Factor Bass Extend Display Range "Bass FRQ" 40/50/60/70/80...
Instruction Manual
Page 14
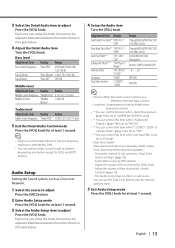
... Disc title Track title Track number & Play time Clock Display "D-TITLE"* "T-TITLE"* "P-TIME" "CLOCK" 14 | English Each time you push the knob, Subwoofer output switches ON and OFF. Push the Control knob toward [AM] for at least 2 seconds. The "CALL" display disappears and the audio system comes back ON. • To use the TEL Mute feature, you need to the audio during a call comes in "CALL" is displayed. 3 Select the Speaker type Turn...
... Disc title Track title Track number & Play time Clock Display "D-TITLE"* "T-TITLE"* "P-TIME" "CLOCK" 14 | English Each time you push the knob, Subwoofer output switches ON and OFF. Push the Control knob toward [AM] for at least 2 seconds. The "CALL" display disappears and the audio system comes back ON. • To use the TEL Mute feature, you need to the audio during a call comes in "CALL" is displayed. 3 Select the Speaker type Turn...
Instruction Manual
Page 18
... Function of LX-AMP is connected, the item setup by the Display mode of the DPX701 Display Type B Text Selection for at least 1 second. 3 Select the text Push the Control knob towards [4] or [¢]. In Tuner source Information Station name or Program Service name Radio text or Program Service name (FM) Frequency Clock Date Display "SNPS"* "Radio Text"* "Frequency" "Clock" "Date" In CD & External disc source Information Disc title Track title Track number & Play time Disc name Clock Date Display "Disc Title"* "Track Title"* "P-Time...
... Function of LX-AMP is connected, the item setup by the Display mode of the DPX701 Display Type B Text Selection for at least 1 second. 3 Select the text Push the Control knob towards [4] or [¢]. In Tuner source Information Station name or Program Service name Radio text or Program Service name (FM) Frequency Clock Date Display "SNPS"* "Radio Text"* "Frequency" "Clock" "Date" In CD & External disc source Information Disc title Track title Track number & Play time Disc name Clock Date Display "Disc Title"* "Track Title"* "P-Time...

Instruction Manual
Page 20
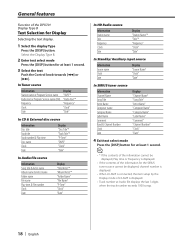
... Clock Date Display "Disc Title"* "Track Title"* "P-Time" "DNPS" "Clock" "Date" In Audio file source Information Song title & Artist name Album name & Artist name Folder name File name Play time & File number Clock Date Display "Title/Artist"* "Album/Artist"* "Folder Name" "File Name" "P-Time" "Clock" "Date" In Standby/ Auxiliary input source Information Source name Clock Date Display "Source Name" "Clock" "Date" In HD Radio source Information Station name Title Frequency Clock Date Display "Station Name"* "Title"* "Frequency" "Clock" "Date" In SIRIUS tuner source Information Channel...
... Clock Date Display "Disc Title"* "Track Title"* "P-Time" "DNPS" "Clock" "Date" In Audio file source Information Song title & Artist name Album name & Artist name Folder name File name Play time & File number Clock Date Display "Title/Artist"* "Album/Artist"* "Folder Name" "File Name" "P-Time" "Clock" "Date" In Standby/ Auxiliary input source Information Source name Clock Date Display "Source Name" "Clock" "Date" In HD Radio source Information Station name Title Frequency Clock Date Display "Station Name"* "Title"* "Frequency" "Clock" "Date" In SIRIUS tuner source Information Channel...
Instruction Manual
Page 29
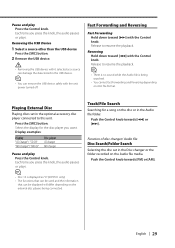
...;]. Playing External Disc Playing discs set in the USB device. • You can be displayed will differ depending on the disc or in the optional accessory disc player connected to resume the playback. Function of disc changer/ Audio file Disc Search/Folder Search Selecting the disc set in the Audio file folder. Removing the USB Device 1 Select a source other than the USB device Press the [SRC] button. 2 Remove the USB device. • Removing the USB device with it selected as "0". (DPX501 only) • The functions that can be used...
...;]. Playing External Disc Playing discs set in the USB device. • You can be displayed will differ depending on the disc or in the optional accessory disc player connected to resume the playback. Function of disc changer/ Audio file Disc Search/Folder Search Selecting the disc set in the Audio file folder. Removing the USB Device 1 Select a source other than the USB device Press the [SRC] button. 2 Remove the USB device. • Removing the USB device with it selected as "0". (DPX501 only) • The functions that can be used...

Instruction Manual
Page 42
...) Adjust the bass boost level of the external amplifier using the main unit. Display "Zone2 : Rear"/ "ZONE2 R" "Zone2 : Front"/ "ZONE2 F" Setting Sub source (Auxiliary input source) is finished. When an amplifier that can be set from Flat to stop the count, enter the menu mode then press the control knob. • When Power off (ex; Menu system Function of the DPX701 G-Analyzer Stop Watch The control of stop watch on the Public roads. 1 Select...
...) Adjust the bass boost level of the external amplifier using the main unit. Display "Zone2 : Rear"/ "ZONE2 R" "Zone2 : Front"/ "ZONE2 F" Setting Sub source (Auxiliary input source) is finished. When an amplifier that can be set from Flat to stop the count, enter the menu mode then press the control knob. • When Power off (ex; Menu system Function of the DPX701 G-Analyzer Stop Watch The control of stop watch on the Public roads. 1 Select...

Instruction Manual
Page 47
... setup the Sound Control. - (page 12) - (page 13) 2 Enter Menu mode Press the [MENU] button for at least 1 second. Select the "Memory"/ "MEMORY" display. 6 Put the Audio Preset in the memory Press the Control knob for each product. 1 Select the unique ID display mode Push the Control knob towards [4] or [¢]. Volume, Balance, Fader, Loudness, Volume offset, Dual Zone System, Rear Volume English | 47 You cannot register by Sound Control. In CD/ USB mode Unique ID display Displaying the serial number...
... setup the Sound Control. - (page 12) - (page 13) 2 Enter Menu mode Press the [MENU] button for at least 1 second. Select the "Memory"/ "MEMORY" display. 6 Put the Audio Preset in the memory Press the Control knob for each product. 1 Select the unique ID display mode Push the Control knob towards [4] or [¢]. Volume, Balance, Fader, Loudness, Volume offset, Dual Zone System, Rear Volume English | 47 You cannot register by Sound Control. In CD/ USB mode Unique ID display Displaying the serial number...
Instruction Manual
Page 50
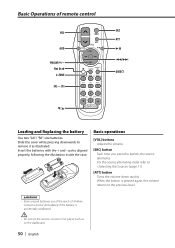
... set the remote control in hot places such as illustrated. Basic Operations of children. DIRECT 2-ZONE /OK ABC DEF GHI JKL MNO PRS TUV WXY QZ R.VOL SRC ATT 38 4/¢ DIRECT Loading and Replacing the battery Use two "AA"/ "R6"-size batteries. Not Used 2-ZONE [0] - [9] SRC ATT VOL AUD 38 FM+ 4 ¢ AM- Basic operations [VOL] buttons Adjusts the volume. [SRC] button Each time you press the button, the source...
... set the remote control in hot places such as illustrated. Basic Operations of children. DIRECT 2-ZONE /OK ABC DEF GHI JKL MNO PRS TUV WXY QZ R.VOL SRC ATT 38 4/¢ DIRECT Loading and Replacing the battery Use two "AA"/ "R6"-size batteries. Not Used 2-ZONE [0] - [9] SRC ATT VOL AUD 38 FM+ 4 ¢ AM- Basic operations [VOL] buttons Adjusts the volume. [SRC] button Each time you press the button, the source...
Instruction Manual
Page 51
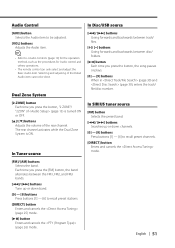
... Audio control and others operations. • The remote control can only select and adjust the Basic Audio item. Each time you press the [FM] button, the band alternates between disc/ folders. [38] button Each time you press the button, "2 ZONE"/ "2ZON" of (page 13) is ON. Audio Control [AUD] button Selects the Audio item to be done. In SIRIUS tuner source [FM] button Selects the preset band. [4]/ [¢] buttons Searches up or down channels. [0] - [9] buttons Press buttons [1] - [6] to recall preset channels. [DIRECT] button...
... Audio control and others operations. • The remote control can only select and adjust the Basic Audio item. Each time you press the [FM] button, the band alternates between disc/ folders. [38] button Each time you press the button, "2 ZONE"/ "2ZON" of (page 13) is ON. Audio Control [AUD] button Selects the Audio item to be done. In SIRIUS tuner source [FM] button Selects the preset band. [4]/ [¢] buttons Searches up or down channels. [0] - [9] buttons Press buttons [1] - [6] to recall preset channels. [DIRECT] button...

Instruction Manual
Page 53
... rear). battery. 2. Make the proper input and output wire connections for each unit. 3. battery. 8. connector to a rear output terminal. • After the unit is ON, but will not hit the lid when closing and opening. • If the fuse blows, first make sure to the unit. 6. on the ends of the wiring harness. 4. To prevent a short circuit, remove the key from the ignition and disconnect the - Connect the wiring harness wires in the car...
... rear). battery. 2. Make the proper input and output wire connections for each unit. 3. battery. 8. connector to a rear output terminal. • After the unit is ON, but will not hit the lid when closing and opening. • If the fuse blows, first make sure to the unit. 6. on the ends of the wiring harness. 4. To prevent a short circuit, remove the key from the ignition and disconnect the - Connect the wiring harness wires in the car...
Instruction Manual
Page 59
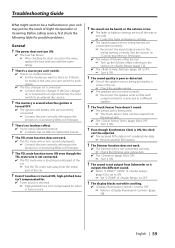
... adjusted. ✔ The received RDS station isn't sending time data. ☞ Receive another RDS station. ? The memory is erased when the ignition is turned OFF. ✔ The ignition and battery wire are connected incorrectly. ☞ Reconnect the input/output wires or the wiring harness correctly. The TEL mute function turns ON even though the TEL mute wire is not connected. ✔ The TEL mute wire is touching a metal part of the car. ☞ Pull the TEL mute wire...
... adjusted. ✔ The received RDS station isn't sending time data. ☞ Receive another RDS station. ? The memory is erased when the ignition is turned OFF. ✔ The ignition and battery wire are connected incorrectly. ☞ Reconnect the input/output wires or the wiring harness correctly. The TEL mute function turns ON even though the TEL mute wire is not connected. ✔ The TEL mute wire is touching a metal part of the car. ☞ Pull the TEL mute wire...
Instruction Manual
Page 61
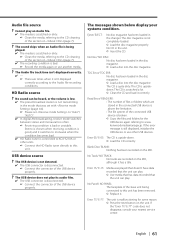
... unit. No Panel/ NO PANEL: The faceplate of the USB device properly. ? HD Radio source ? The USB device is not detected. ✔ The USB connector is connected to KCA-S210A or other USB devices. The CD is upside-down. ➪ Load the CD correctly. Stereo is chosen when receiving condition is good, and it switches to monaural when the condition becomes bad. ✔ HD Radio tuner is disconnected. ☞ Connect the connector...
... unit. No Panel/ NO PANEL: The faceplate of the USB device properly. ? HD Radio source ? The USB device is not detected. ✔ The USB connector is connected to KCA-S210A or other USB devices. The CD is upside-down. ➪ Load the CD correctly. Stereo is chosen when receiving condition is good, and it switches to monaural when the condition becomes bad. ✔ HD Radio tuner is disconnected. ☞ Connect the connector...
Instruction Manual
Page 62
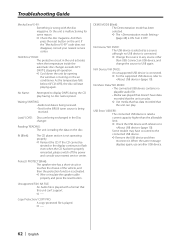
... the unit is malfunctioning for the SIRIUS tuner source is being received. DEMO MODE (Blink): The Demonstration mode has been selected. ➪ The (page 48) is played. ➪ ---- Connect an USB device, and change the source to flash even when the CD has been properly reinserted, please switch off the power and consult your nearest service center. USB Error/ USB ERR: The connected USB device is rated a current capacity higher than USB. If the "Mecha Error/ E-99" code...
... the unit is malfunctioning for the SIRIUS tuner source is being received. DEMO MODE (Blink): The Demonstration mode has been selected. ➪ The (page 48) is played. ➪ ---- Connect an USB device, and change the source to flash even when the CD has been properly reinserted, please switch off the power and consult your nearest service center. USB Error/ USB ERR: The connected USB device is rated a current capacity higher than USB. If the "Mecha Error/ E-99" code...


