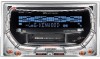

Instruction Manual
Page 2
...General features 10 Power Selecting the Source Volume Attenuator Audio Control Subwoofer Output TEL Mute SRS WOW Select SRS WOW Control Equalizer Control Adjustment of Equalizer type at EASY Adjustment of Equalizer type at PRO Memory preset of adjustment of Equalizer type Movie Select Switching Display Illumination Color Select User Illumination Color Setting Adjusting Clock Station/Disc Naming (SNPS/DNPS) Auxiliary Input Display Setting Tuner features 17 Tuning Direct Access Tuning Station Preset Memory Auto Memory Entry Preset Tuning Cassette player features 19 Playing Cassette Tapes...
...General features 10 Power Selecting the Source Volume Attenuator Audio Control Subwoofer Output TEL Mute SRS WOW Select SRS WOW Control Equalizer Control Adjustment of Equalizer type at EASY Adjustment of Equalizer type at PRO Memory preset of adjustment of Equalizer type Movie Select Switching Display Illumination Color Select User Illumination Color Setting Adjusting Clock Station/Disc Naming (SNPS/DNPS) Auxiliary Input Display Setting Tuner features 17 Tuning Direct Access Tuning Station Preset Memory Auto Memory Entry Preset Tuning Cassette player features 19 Playing Cassette Tapes...
Instruction Manual
Page 3
... unauthorized change or modification is connected. • Consult the dealer or an experienced radio/TV technician for a Class B digital device, pursuant to radio or television reception, which the receiver is made. KENWOOD CORPORATION 2967-3, ISHIKAWA-CHO, HACHIOJI-SHI TOKYO, JAPAN KENWOOD CORP. 2Warning 2CAUTION Use of controls or adjustments or performance of procedures other than those specified herein may generate or use radio frequency...
... unauthorized change or modification is connected. • Consult the dealer or an experienced radio/TV technician for a Class B digital device, pursuant to radio or television reception, which the receiver is made. KENWOOD CORPORATION 2967-3, ISHIKAWA-CHO, HACHIOJI-SHI TOKYO, JAPAN KENWOOD CORP. 2Warning 2CAUTION Use of controls or adjustments or performance of procedures other than those specified herein may generate or use radio frequency...
Instruction Manual
Page 5
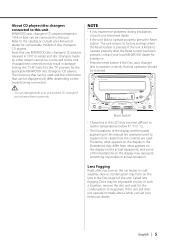
.... Normal operation should be connected to this unit. In such a situation, remove the disc and wait for assistance. • Press the reset button if the Disc auto changer fails to operate correctly. The functions that can be used . Lens Fogging Right after a while, consult your Kenwood dealer. • If the unit fails to factory settings when the Reset button is pressed. English | 5 About CD players/disc changers connected to this unit KENWOOD disc changers/ CD players released in...
.... Normal operation should be connected to this unit. In such a situation, remove the disc and wait for assistance. • Press the reset button if the Disc auto changer fails to operate correctly. The functions that can be used . Lens Fogging Right after a while, consult your Kenwood dealer. • If the unit fails to factory settings when the Reset button is pressed. English | 5 About CD players/disc changers connected to this unit KENWOOD disc changers/ CD players released in...
Instruction Manual
Page 8
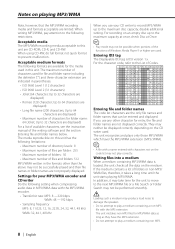
...code list may produce loud noise to damage the speakers. • Do no attempt to play correctly. In addition, it takes a long time until the unit starts playing MP3/WMA. Acceptable medium formats The following limitations: • Maximum number of directory levels: 8 • Maximum number ...instruction manual of folders or non-MP3/ WMA files, therefore, it may neither be entered and displayed. The media reproducible on this unit. Loading such a medium may not play a medium containing non MP3. 8 | English The unit mistakes non-MP3 files for the unit to move to the maximum disc...
...code list may produce loud noise to damage the speakers. • Do no attempt to play correctly. In addition, it takes a long time until the unit starts playing MP3/WMA. Acceptable medium formats The following limitations: • Maximum number of directory levels: 8 • Maximum number ...instruction manual of folders or non-MP3/ WMA files, therefore, it may neither be entered and displayed. The media reproducible on this unit. Loading such a medium may not play a medium containing non MP3. 8 | English The unit mistakes non-MP3 files for the unit to move to the maximum disc...
Instruction Manual
Page 11
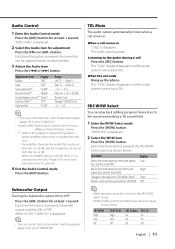
... and the audio system comes back ON. Subwoofer Output Turning the Subwoofer output ON or OFF. Each time the button is displayed. 2 Select the WOW item Press the [WOW] button. "WOW SEL" is pressed Subwoofer output switches ON or OFF. "AUD mode" is displayed. 2 Select the Audio item for power amplifiers that can be controlled from the basic volume. • *² - Moves the sound image up two notches and adjusts bass and the sound field. SRS...
... and the audio system comes back ON. Subwoofer Output Turning the Subwoofer output ON or OFF. Each time the button is displayed. 2 Select the WOW item Press the [WOW] button. "WOW SEL" is pressed Subwoofer output switches ON or OFF. "AUD mode" is displayed. 2 Select the Audio item for power amplifiers that can be controlled from the basic volume. • *² - Moves the sound image up two notches and adjusts bass and the sound field. SRS...
Instruction Manual
Page 12
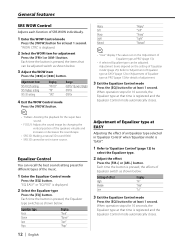
...: Setting of the music. 1 Enter the Equalizer Control mode Press the [EQ] button. When operation stops for 10 seconds, the Equalizer type at that can be adjusted switch as shown below . 3 Adjust the WOW item Press the [4] or [¢] button. Heavy Soft Sharp Light Natural "Heavy" "Soft" "Sharp" "Light" "Natural" • "User" display: The values set in 'Equalizer Control' when 'Equalizer mode' is displayed. 2 Select the Equalizer type Press the [EQ] button. Each time the button is...
...: Setting of the music. 1 Enter the Equalizer Control mode Press the [EQ] button. When operation stops for 10 seconds, the Equalizer type at that can be adjusted switch as shown below . 3 Adjust the WOW item Press the [4] or [¢] button. Heavy Soft Sharp Light Natural "Heavy" "Soft" "Sharp" "Light" "Natural" • "User" display: The values set in 'Equalizer Control' when 'Equalizer mode' is displayed. 2 Select the Equalizer type Press the [EQ] button. Each time the button is...

Instruction Manual
Page 13
... registered and the Equalizer Control mode automatically closes. Recalling a setting value 1 Enter the Equalizer Control mode Press the [EQ] button. When operation stops for 10 seconds, the Equalizer type at PRO Adjusting the effect of Equalizer type at PRO' (page 13) to 'Adjustment of an Equalizer type selected in Bass Center Frequency change as shown below . Adjustment Item Bass Center Frequency Bass level Bass Q Factor Bass Extend Middle Center Frequency Middle level Middle Q Factor Treble Center Frequency Treble level Display "BasF" "BasLV...
... registered and the Equalizer Control mode automatically closes. Recalling a setting value 1 Enter the Equalizer Control mode Press the [EQ] button. When operation stops for 10 seconds, the Equalizer type at PRO Adjusting the effect of Equalizer type at PRO' (page 13) to 'Adjustment of an Equalizer type selected in Bass Center Frequency change as shown below . Adjustment Item Bass Center Frequency Bass level Bass Q Factor Bass Extend Middle Center Frequency Middle level Middle Q Factor Treble Center Frequency Treble level Display "BasF" "BasLV...
Instruction Manual
Page 15
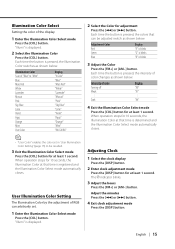
... Color Select mode automatically closes. Adjust the minutes Press the [4] or [¢] button. 4 Exit clock adjustment mode Press the [DISP] button. Each time the button is pressed, the Illumination Color switches as shown below : Illumination Color Scan of color Turning off Weak Display "X0" "X1" ... ... When operation stops for 10 seconds, the Illumination Color at that can arbitrarily set in 'User Illumination Color Setting' (page 15) to be adjusted switch as shown below: Adjustment Color Red Green Blue Display...
... Color Select mode automatically closes. Adjust the minutes Press the [4] or [¢] button. 4 Exit clock adjustment mode Press the [DISP] button. Each time the button is pressed, the Illumination Color switches as shown below : Illumination Color Scan of color Turning off Weak Display "X0" "X1" ... ... When operation stops for 10 seconds, the Illumination Color at that can arbitrarily set in 'User Illumination Color Setting' (page 15) to be adjusted switch as shown below: Adjustment Color Red Green Blue Display...
Instruction Manual
Page 16
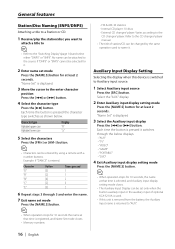
...; "PORTABLE" • "DVD" 4 Exit Auxiliary input display setting mode Press the [NAME.S] button. • When operation stops for 10 seconds, the name at that time is registered, and Name Set mode closes. • Memory numbers 16 | English FM & AM: 30 stations - Select the "AUX" display. 2 Enter Auxiliary input display setting mode Press the [NAME.S] button for 10 seconds the name at that time is selected, and Auxiliary input display setting mode closes. • The Auxiliary Input Display can be changed by using a remote with a number buttons. Character type...
...; "PORTABLE" • "DVD" 4 Exit Auxiliary input display setting mode Press the [NAME.S] button. • When operation stops for 10 seconds, the name at that time is registered, and Name Set mode closes. • Memory numbers 16 | English FM & AM: 30 stations - Select the "AUX" display. 2 Enter Auxiliary input display setting mode Press the [NAME.S] button for 10 seconds the name at that time is selected, and Auxiliary input display setting mode closes. • The Auxiliary Input Display can be changed by using a remote with a number buttons. Character type...
Instruction Manual
Page 17
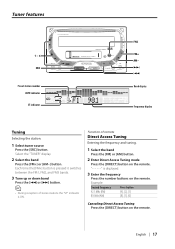
... the remote. Tuner features Preset station number AUTO indicator ST indicator Band display Frequency display Tuning Selecting the station. 1 Select tuner source Press the [SRC] button. Each time the [FM+] button is pressed it switches between the FM1, FM2, and FM3 bands. 3 Tune up or down band Press the [4] or [¢] button. • During reception of remote Direct Access Tuning Entering the frequency and tuning. 1 Select the band Press the [FM] or [AM] button. 2 Enter Direct Access Tuning mode Press the [DIRECT] button...
... the remote. Tuner features Preset station number AUTO indicator ST indicator Band display Frequency display Tuning Selecting the station. 1 Select tuner source Press the [SRC] button. Each time the [FM+] button is pressed it switches between the FM1, FM2, and FM3 bands. 3 Tune up or down band Press the [4] or [¢] button. • During reception of remote Direct Access Tuning Entering the frequency and tuning. 1 Select the band Press the [FM] or [AM] button. 2 Enter Direct Access Tuning mode Press the [DIRECT] button...

Instruction Manual
Page 22
... [¢] button. Canceling Direct Disc Search Press the [38] button. • Input "0" to select disc 10. Track/File Search Searching for the disc player you 're listening to. Press the [AM-] or [FM+] button. Press the [SRC] button. Track/File/Disc/Folder Repeat Replaying the song, disc in the optional accessory disc player connected to this unit. Press the [REP] button. CD/ MP3/ WMA/ External disc control features Playing External Disc Playing discs set in...
... [¢] button. Canceling Direct Disc Search Press the [38] button. • Input "0" to select disc 10. Track/File Search Searching for the disc player you 're listening to. Press the [AM-] or [FM+] button. Press the [SRC] button. Track/File/Disc/Folder Repeat Replaying the song, disc in the optional accessory disc player connected to this unit. Press the [REP] button. CD/ MP3/ WMA/ External disc control features Playing External Disc Playing discs set in...

Instruction Manual
Page 25
... color of Equalizer type can be adjusted among 3 levels. In Standby mode Contrast Adjustment Adjusting the display contrast. Equalizer types can be adjusted by Bass, Middle, and Treble. Fix the color set. Display and Setting "CONT 1" "CONT 6" (Original setting) "CONT 11" In Standby mode Opening Demonstration Setting the Demonstration when Power is turned ON. In Standby mode Switching preout Switching the preout between the rear and subwoofer. (In subwoofer it outputs without effect from one color to another during volume adjustment...
... color of Equalizer type can be adjusted among 3 levels. In Standby mode Contrast Adjustment Adjusting the display contrast. Equalizer types can be adjusted by Bass, Middle, and Treble. Fix the color set. Display and Setting "CONT 1" "CONT 6" (Original setting) "CONT 11" In Standby mode Opening Demonstration Setting the Demonstration when Power is turned ON. In Standby mode Switching preout Switching the preout between the rear and subwoofer. (In subwoofer it outputs without effect from one color to another during volume adjustment...
Instruction Manual
Page 28
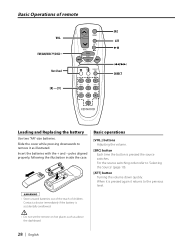
.... • Do not set the remote on hot places such as illustrated. Slide the cover while pressing downwards to remove it returns to 'Selecting the Source' (page 10). [ATT] button Turning the volume down quickly. Contact a doctor immediately if the battery is pressed again it as above the dashboard. 28 | English Basic operations [VOL.] buttons Adjusting the volume. [SRC] button Each time the button is pressed the source switches.
.... • Do not set the remote on hot places such as illustrated. Slide the cover while pressing downwards to remove it returns to 'Selecting the Source' (page 10). [ATT] button Turning the volume down quickly. Contact a doctor immediately if the battery is pressed again it as above the dashboard. 28 | English Basic operations [VOL.] buttons Adjusting the volume. [SRC] button Each time the button is pressed the source switches.
Instruction Manual
Page 29
... recall preset stations. [DIRECT] button Enters and cancels the 'Direct Access Tuning' (page 17) mode. In Cassette tape source [4]/ [¢] buttons Do 'DPSS (Direct Program Search System)' (page 20). [38] button Plays the reverse side of songs. When the [38] button is pressed the song pauses and plays. [0] - [9] buttons When in 'DPSS with the Remote' (page20) enter the number of the tape. [FM ] button Fast forwards the tape. In Tuner source...
... recall preset stations. [DIRECT] button Enters and cancels the 'Direct Access Tuning' (page 17) mode. In Cassette tape source [4]/ [¢] buttons Do 'DPSS (Direct Program Search System)' (page 20). [38] button Plays the reverse side of songs. When the [38] button is pressed the song pauses and plays. [0] - [9] buttons When in 'DPSS with the Remote' (page20) enter the number of the tape. [FM ] button Fast forwards the tape. In Tuner source...

Instruction Manual
Page 31
... two speakers are being connected to the system, connect the connectors either to both the front output terminals or to both the rear output terminals (do not remove the caps on the car are working properly. • Mount the unit so that the faceplate will not hit the lid when closing and opening. • If the fuse blows, first make sure to a power source that in turn may...
... two speakers are being connected to the system, connect the connectors either to both the front output terminals or to both the rear output terminals (do not remove the caps on the car are working properly. • Mount the unit so that the faceplate will not hit the lid when closing and opening. • If the fuse blows, first make sure to a power source that in turn may...

Instruction Manual
Page 35
... 2 1 Attach Accessory9 which was assembled in Assembly. Accessory3 (M5 × 7 mm) Accessory9 Accessory0 (M3 × 6 mm) Accessory9 2 Remove the factory-installed car stereo and install the unit. English | 35 Accessory9 is to be fixed either to Accessory9 which was assembled in Assembly. Accessory3 (M5 × 7 mm) Installation type 3 1 Attach Accessory@ to the center or bottom, depending on the car model.
... 2 1 Attach Accessory9 which was assembled in Assembly. Accessory3 (M5 × 7 mm) Accessory9 Accessory0 (M3 × 6 mm) Accessory9 2 Remove the factory-installed car stereo and install the unit. English | 35 Accessory9 is to be fixed either to Accessory9 which was assembled in Assembly. Accessory3 (M5 × 7 mm) Installation type 3 1 Attach Accessory@ to the center or bottom, depending on the car model.

Instruction Manual
Page 36
... fader or balance settings are low. Turn up the Volume offset, referring to the section on 'Connecting Wires to Terminals'. ? No sound can 't switch to an external disc source. ? Troubleshooting Guide What might seem to be a malfunction in your unit may just be the result of the car. ? Before calling service, first check the following table for short circuits in the wires, replace the fuse with the...
... fader or balance settings are low. Turn up the Volume offset, referring to the section on 'Connecting Wires to Terminals'. ? No sound can 't switch to an external disc source. ? Troubleshooting Guide What might seem to be a malfunction in your unit may just be the result of the car. ? Before calling service, first check the following table for short circuits in the wires, replace the fuse with the...
Instruction Manual
Page 37
... switch being entered. Enter a station that can be received. You're trying to enter a frequency with a 0.01 MHz unit. What can be designated in the FM band is being turned OFF. English | 37 Tuner source ? Radio reception is poor. The car antenna is not extended. Pull the antenna out all the way. The antenna control wire is not connected. Connect...
... switch being entered. Enter a station that can be received. You're trying to enter a frequency with a 0.01 MHz unit. What can be designated in the FM band is being turned OFF. English | 37 Tuner source ? Radio reception is poor. The car antenna is not extended. Pull the antenna out all the way. The antenna control wire is not connected. Connect...
Instruction Manual
Page 38
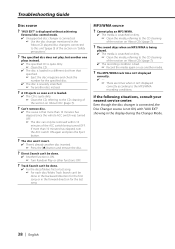
... this unit' (page 5) of the section on 'About CDs' (page 7). ? The sound skips when an MP3/WMA is being turned OFF. If more than 10 minutes has elapsed, turn the ACC switch ON again and press the Eject button. ? Troubleshooting Guide Disc source ? "AUX EXT" is displayed without achieving External disc control mode. Unsupported disc changer is not ON, with "AUX EXT" showing in the 'About CD players/disc changers connected to...
... this unit' (page 5) of the section on 'About CDs' (page 7). ? The sound skips when an MP3/WMA is being turned OFF. If more than 10 minutes has elapsed, turn the ACC switch ON again and press the Eject button. ? Troubleshooting Guide Disc source ? "AUX EXT" is displayed without achieving External disc control mode. Unsupported disc changer is not ON, with "AUX EXT" showing in the 'About CD players/disc changers connected to...
Instruction Manual
Page 39
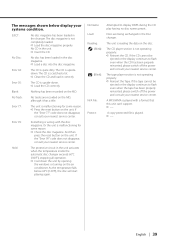
... display continues to flash even when the tape has been properly reinserted, please switch off the power and consult your nearest service center. A MP3/WMA is not completely loaded. Load the disc magazine properly. EJECT: No disc magazine has been loaded in the Disc changer. As the temperature falls below display your nearest service center. And then press the reset button on the unit. Discs...
... display continues to flash even when the tape has been properly reinserted, please switch off the power and consult your nearest service center. A MP3/WMA is not completely loaded. Load the disc magazine properly. EJECT: No disc magazine has been loaded in the Disc changer. As the temperature falls below display your nearest service center. And then press the reset button on the unit. Discs...


