

User Manual
Page 2
... rear panel and says that the component uses laser beams that are coloured in accordance with the following code: Blue : Neutral Brown : Live Do not connect those leads to reach a power point, then obtain an appropriate safety approved extension lead or adapter, or consult your home or the cable is cut off , remove the fuse and dispose of a three-pin plug. NO USER-SERVICEABLE PARTS...
... rear panel and says that the component uses laser beams that are coloured in accordance with the following code: Blue : Neutral Brown : Live Do not connect those leads to reach a power point, then obtain an appropriate safety approved extension lead or adapter, or consult your home or the cable is cut off , remove the fuse and dispose of a three-pin plug. NO USER-SERVICEABLE PARTS...
User Manual
Page 3
... uses both the changer's players to play all the accessories are present: If any accessories are missing, or if the changer is damaged or fails to you directly, notify your new Kenwood 200-Disc CD Changer. 3 CD-4900M is sold in USA. REPEAT RANDOM DISPLAY ! @ # $ % 1 2 3 4 5 TITLE INPUT ^ 6 USER +10 +100 FILE NAME & D 7 8 7 ( 9 64¢1 ¡ ) - + DELETE 0 = DISC SEL Q WE R T Y U I O P P.MODE CHECK CLEAR , A S D F G H J K L : ; ,, , ENTER SET SHIFT Z X C V B N M < , > . ? / SHIFT MODE ROOM B CONT PLAY SUB...
... uses both the changer's players to play all the accessories are present: If any accessories are missing, or if the changer is damaged or fails to you directly, notify your new Kenwood 200-Disc CD Changer. 3 CD-4900M is sold in USA. REPEAT RANDOM DISPLAY ! @ # $ % 1 2 3 4 5 TITLE INPUT ^ 6 USER +10 +100 FILE NAME & D 7 8 7 ( 9 64¢1 ¡ ) - + DELETE 0 = DISC SEL Q WE R T Y U I O P P.MODE CHECK CLEAR , A S D F G H J K L : ; ,, , ENTER SET SHIFT Z X C V B N M < , > . ? / SHIFT MODE ROOM B CONT PLAY SUB...
User Manual
Page 4
... music type or user file (MUSIC TYPE PLAY mode) (Player A only 35 Disc search (DISC SEARCH mode) (Player A only 36 Searching a disc by the disc title (CHARAC. Chapter 1 Chapter 2 4 Before applying power 2 Safety precautions 2 Your New Kenwood 200-Disc CD Changer 3 Chapter 1 : Setting Up Your New CD Changer 5 Connecting to a Receiver or Amplifier 6 System Control Chaining 8 Setting Up the 10-Key Remote and Keyboard 9 10-Key Remote 9 Keyboard 9 Chapter 2 : Getting to know Your New CD Changer...... 10 Front Panel 11 Front Panel Displays...
... music type or user file (MUSIC TYPE PLAY mode) (Player A only 35 Disc search (DISC SEARCH mode) (Player A only 36 Searching a disc by the disc title (CHARAC. Chapter 1 Chapter 2 4 Before applying power 2 Safety precautions 2 Your New Kenwood 200-Disc CD Changer 3 Chapter 1 : Setting Up Your New CD Changer 5 Connecting to a Receiver or Amplifier 6 System Control Chaining 8 Setting Up the 10-Key Remote and Keyboard 9 10-Key Remote 9 Keyboard 9 Chapter 2 : Getting to know Your New CD Changer...... 10 Front Panel 11 Front Panel Displays...
User Manual
Page 5
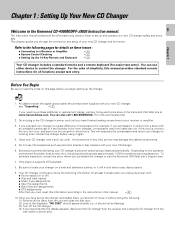
Chapter 1 : Setting Up Your New CD ChangerConnecting to a Receiver or Amplifier Chapter 1 Welcome to the Kenwood CD-4900M/DPF-J9030 Instruction manual. 5 The Instruction manual contains all the information you need to purchase additional or replacement cables, visit any kind, as protection sheets or disc cleaners with your new CD changer and its power cord: ÷ Power status (on a level and stationary surface, or it in winter from the wall outlet...
Chapter 1 : Setting Up Your New CD ChangerConnecting to a Receiver or Amplifier Chapter 1 Welcome to the Kenwood CD-4900M/DPF-J9030 Instruction manual. 5 The Instruction manual contains all the information you need to purchase additional or replacement cables, visit any kind, as protection sheets or disc cleaners with your new CD changer and its power cord: ÷ Power status (on a level and stationary surface, or it in winter from the wall outlet...
User Manual
Page 6
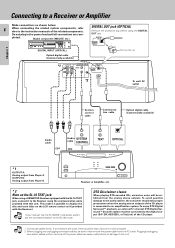
... analog stereo outputs of the related components. Plugging/unplugging connection cables without removal of the power cable can cause malfunctions or damage to the instruction manuals of the CD player is connected to the [SL16] mode. To enjoy DTS Digital Surround™ playback, an external 5.1 channel DTS Digital Surround™ decoder system must be loss of the CD player. Digital component (MD,DAT, etc.) DIGITAL OUT jack (OPTICAL) Remove the protective cap before using a KENWOOD Receiver equipped with the SL-16 TEXT jack, connect...
... analog stereo outputs of the related components. Plugging/unplugging connection cables without removal of the power cable can cause malfunctions or damage to the instruction manuals of the CD player is connected to the [SL16] mode. To enjoy DTS Digital Surround™ playback, an external 5.1 channel DTS Digital Surround™ decoder system must be loss of the CD player. Digital component (MD,DAT, etc.) DIGITAL OUT jack (OPTICAL) Remove the protective cap before using a KENWOOD Receiver equipped with the SL-16 TEXT jack, connect...
User Manual
Page 7
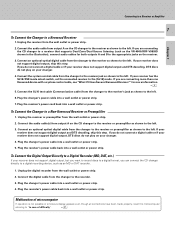
... receiver does not support digital output, DTS discs do not play on your receiver does not support digital output and DTS decoding, skip this step. If your changer. 4.Connect the system control cable from the changer to the receiver jack as shown to the left. Plug the changer's power cable into a wall outlet or power strip. To Connect the Digital Output Directly to a Digital Recorder (MD, DAT, etc.) If your receiver has the SL16/XS8 mode select switch, set the connected receiver to a Non-Kenwood Receiver...
... receiver does not support digital output, DTS discs do not play on your receiver does not support digital output and DTS decoding, skip this step. If your changer. 4.Connect the system control cable from the changer to the receiver jack as shown to the left. Plug the changer's power cable into a wall outlet or power strip. To Connect the Digital Output Directly to a Digital Recorder (MD, DAT, etc.) If your receiver has the SL16/XS8 mode select switch, set the connected receiver to a Non-Kenwood Receiver...
User Manual
Page 8
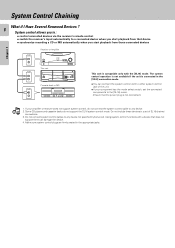
... unit is compatible only with a device that the power plug is connected in the [XS-8] connection mode. ÷ You can damage the device. 4. Make sure system control plugs are firmly seated in a set the connected components to the [SL16] mode. (Ensure that does not support them can connect the system control cord to either system control jack of SL16 chained connections. 3. Some CD players and cassette decks do not connect the system control cable to any device not specified by Kenwood. Using system control functions with...
... unit is compatible only with a device that the power plug is connected in the [XS-8] connection mode. ÷ You can damage the device. 4. Make sure system control plugs are firmly seated in a set the connected components to the [SL16] mode. (Ensure that does not support them can connect the system control cord to either system control jack of SL16 chained connections. 3. Some CD players and cassette decks do not connect the system control cable to any device not specified by Kenwood. Using system control functions with...
User Manual
Page 9
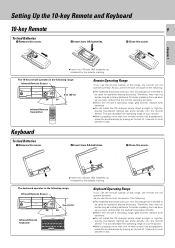
...247; When the remote's operating range gets shorter, replace both batteries. ÷ Do not install the CD changer where direct sunlight or high-frequency fluorescent lighting can shine directly into the remote sensor. REPEAT D E RANDOM F DISPLAY G 1 2 3 4 H I J K 5 6 7 8 L M N O 9 0 +10 +100 P Q R S - . / T U V DISC SELECTOR. ( ) X Y Z DELETE /CLEAR SPACE CHARAC. /CHECK /P.MODE ' W MODE SET DISC SKIP DOWN UP CURSOR LEFT RIGHT 1 ¡ ENTER 7 6 CHARACTER DOWN UP 4 ¢ REMOTE CONTROL UNIT RC-P0713 Remote Operating Range If you...
...247; When the remote's operating range gets shorter, replace both batteries. ÷ Do not install the CD changer where direct sunlight or high-frequency fluorescent lighting can shine directly into the remote sensor. REPEAT D E RANDOM F DISPLAY G 1 2 3 4 H I J K 5 6 7 8 L M N O 9 0 +10 +100 P Q R S - . / T U V DISC SELECTOR. ( ) X Y Z DELETE /CLEAR SPACE CHARAC. /CHECK /P.MODE ' W MODE SET DISC SKIP DOWN UP CURSOR LEFT RIGHT 1 ¡ ENTER 7 6 CHARACTER DOWN UP 4 ¢ REMOTE CONTROL UNIT RC-P0713 Remote Operating Range If you...

User Manual
Page 13
...At the time of character input, one character is lit or not. 1 POWER ( ) Chapter 1 Chapter 2 5 6 CONTINUOUS SUB OUT CONFIRM PLAY MONITOR A B C POWER BEST SELECTION D REPEAT E RANDOM F DISPLAY G 1 2 3 4 H I J K 5 6 7 8 L M N O 9 0 +10 +100 P Q R S - . / ' T U V W DISC SELECTOR ( X Y ) MODE Z DELETE SPACE CHARAC. /CLEAR /CHECK P.MODE SET DISC SKIP DOWN UP CURSOR LEFT RIGHT 1 ¡ ENTER 7 6 CHARACTER DOWN UP 4 ¢ REMOTE CONTROL UNIT RC-P0713 Model : RC-P0713 (Player A only) Infrared ray system 2 Buttons for modes...
...At the time of character input, one character is lit or not. 1 POWER ( ) Chapter 1 Chapter 2 5 6 CONTINUOUS SUB OUT CONFIRM PLAY MONITOR A B C POWER BEST SELECTION D REPEAT E RANDOM F DISPLAY G 1 2 3 4 H I J K 5 6 7 8 L M N O 9 0 +10 +100 P Q R S - . / ' T U V W DISC SELECTOR ( X Y ) MODE Z DELETE SPACE CHARAC. /CLEAR /CHECK P.MODE SET DISC SKIP DOWN UP CURSOR LEFT RIGHT 1 ¡ ENTER 7 6 CHARACTER DOWN UP 4 ¢ REMOTE CONTROL UNIT RC-P0713 Model : RC-P0713 (Player A only) Infrared ray system 2 Buttons for modes...
User Manual
Page 14
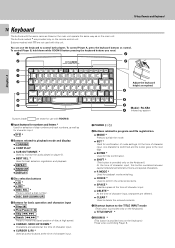
... input, characters are provided only on player B. ÷ BEST SEL. * Used for best selection registration and playback. ÷ REPEAT ÷ RANDOM ÷ DISPLAY 3 Disc selection buttons ÷ +10 * ÷ +100 * ÷ DISC SEL. * Press to select a disc number. ÷ DISC SKIP (DOWN/UP) 4 Buttons for character input. ÷ 0~9 * 2 Buttons related to playback mode and display ÷ CONFIRM ÷ CONT PLAY ÷ SUB OUT MONIT. * Used to monitor the audio played on the remote control...
... input, characters are provided only on player B. ÷ BEST SEL. * Used for best selection registration and playback. ÷ REPEAT ÷ RANDOM ÷ DISPLAY 3 Disc selection buttons ÷ +10 * ÷ +100 * ÷ DISC SEL. * Press to select a disc number. ÷ DISC SKIP (DOWN/UP) 4 Buttons for character input. ÷ 0~9 * 2 Buttons related to playback mode and display ÷ CONFIRM ÷ CONT PLAY ÷ SUB OUT MONIT. * Used to monitor the audio played on the remote control...
User Manual
Page 16
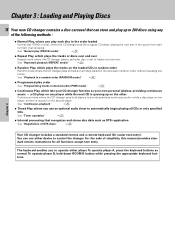
...; Programmed play (TRACK mode)" ( ÷ Repeat Play, which plays the tracks or discs over and over . To operate player B, hold down ROOM B button while pressing the appropriate keyboard buttons. a CD plays on all CDs or only specified CDs See "Timer operation" ¶ ÷ Internal processing that can use an optional audio timer to 200 discs using any tracks. Chapter 5 Chapter 6 Chapter 7 See "Playback in random order, without repeating any of simplicity, this manual...
...; Programmed play (TRACK mode)" ( ÷ Repeat Play, which plays the tracks or discs over and over . To operate player B, hold down ROOM B button while pressing the appropriate keyboard buttons. a CD plays on all CDs or only specified CDs See "Timer operation" ¶ ÷ Internal processing that can use an optional audio timer to 200 discs using any tracks. Chapter 5 Chapter 6 Chapter 7 See "Playback in random order, without repeating any of simplicity, this manual...
User Manual
Page 18
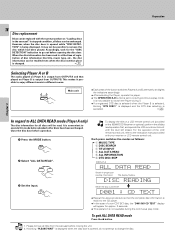
... so that played on a LCD remote control unit (provided with your receiver or LCD remote control unit. Notes 2. MODE 2 Select "ALL DATA READ". SET To display the title on Player B is output from the carousel before playback after discs have been exchanged. If blinking "PLEASE WAIT" is displayed when the disc door is convenient to the instruction manual provided with a KENWOOD Receiver or optional), perform the all discs will appear...
... so that played on a LCD remote control unit (provided with your receiver or LCD remote control unit. Notes 2. MODE 2 Select "ALL DATA READ". SET To display the title on Player B is output from the carousel before playback after discs have been exchanged. If blinking "PLEASE WAIT" is displayed when the disc door is convenient to the instruction manual provided with a KENWOOD Receiver or optional), perform the all discs will appear...
User Manual
Page 27
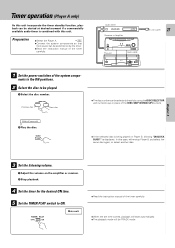
...; Select the Player A. * ÷ Connect the system components so that their power can be switched on the amplifier or receiver. 2 Stop playback. 4 Set the timer for the desired ON time. 5 Set the TIMER PLAY switch to be TRACK mode. is being played on Player B, blinking "DISCXXX BUSY!" Chapter 4 Chapter 5 Chapter 6 3 Set the listening volume. 1 Adjust the volume on by using the DISC SELECTOR and numeric keys in place of the DISC SKIP (DOWN/UP) buttons. Chapter 7 Timer operation (Player A only...
...; Select the Player A. * ÷ Connect the system components so that their power can be switched on the amplifier or receiver. 2 Stop playback. 4 Set the timer for the desired ON time. 5 Set the TIMER PLAY switch to be TRACK mode. is being played on Player B, blinking "DISCXXX BUSY!" Chapter 4 Chapter 5 Chapter 6 3 Set the listening volume. 1 Adjust the volume on by using the DISC SELECTOR and numeric keys in place of the DISC SKIP (DOWN/UP) buttons. Chapter 7 Timer operation (Player A only...

User Manual
Page 28
... OUTPUT A jacks. DISC SKIP DOWN UP SET Previous disc \ Next disc ÷ The disc number can be selected directly by using the numeric keys in the normal play TRACK mode. ) Chapter 1 Chapter 2 Chapter 3 Chapter 4 1 Activate the dts disc skip mode. 1 Press the MODE button. DISC SKIP DOWN UP Previous disc SET \ Next disc DISPLAY-A D001IDTSUCANC.? To quit DTS DISC SKIP mode Press the MODE button. Use the following procedure before playing the DTS disc. Each press switches the modes as follows: 1 MUSIC...
... OUTPUT A jacks. DISC SKIP DOWN UP SET Previous disc \ Next disc ÷ The disc number can be selected directly by using the numeric keys in the normal play TRACK mode. ) Chapter 1 Chapter 2 Chapter 3 Chapter 4 1 Activate the dts disc skip mode. 1 Press the MODE button. DISC SKIP DOWN UP Previous disc SET \ Next disc DISPLAY-A D001IDTSUCANC.? To quit DTS DISC SKIP mode Press the MODE button. Use the following procedure before playing the DTS disc. Each press switches the modes as follows: 1 MUSIC...
User Manual
Page 29
... sales area.) The remote control unit of these receiver models can also be used to input titles or display information such as normal. See "Listening to your favorite titles (BEST SELECTION mode)" ° Chapter 6 Chapter 7 Chapter 4 Chapter 5 You can use either device to control the changer. For the sake of simplicity, this internal processing to control various features, such as : ÷ Playing discs of a predefined or user-specified Music...
... sales area.) The remote control unit of these receiver models can also be used to input titles or display information such as normal. See "Listening to your favorite titles (BEST SELECTION mode)" ° Chapter 6 Chapter 7 Chapter 4 Chapter 5 You can use either device to control the changer. For the sake of simplicity, this internal processing to control various features, such as : ÷ Playing discs of a predefined or user-specified Music...

User Manual
Page 30
... not change the remote control unit in the normal play TRACK mode. ) Chapter 1 Chapter 2 Assigning Title (TITLE INPUT mode) 1 Switch to 20 tracks titles can be registered per disc. TITLEIINPUTNDOM D---CT-- Notes 1. CONTINUOUS SUB OUT CONFIRM PLAY MONITOR A B C BEST SELECTION D REPEAT E RANDOM F DISPLAY G 1 2 3 4 H I O P A S D F G H J K L : ; ,, , Z X C V B N M < , > . ? / 4 Store the disc title. Keyboard ÷ When the TITLE INPUT button is pressed during TITLE INPUT mode, the title input mode is cancelled. ZA B C Flashing cursor...
... not change the remote control unit in the normal play TRACK mode. ) Chapter 1 Chapter 2 Assigning Title (TITLE INPUT mode) 1 Switch to 20 tracks titles can be registered per disc. TITLEIINPUTNDOM D---CT-- Notes 1. CONTINUOUS SUB OUT CONFIRM PLAY MONITOR A B C BEST SELECTION D REPEAT E RANDOM F DISPLAY G 1 2 3 4 H I O P A S D F G H J K L : ; ,, , Z X C V B N M < , > . ? / 4 Store the disc title. Keyboard ÷ When the TITLE INPUT button is pressed during TITLE INPUT mode, the title input mode is cancelled. ZA B C Flashing cursor...
User Manual
Page 40
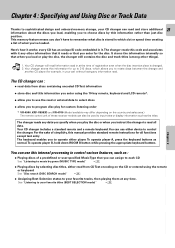
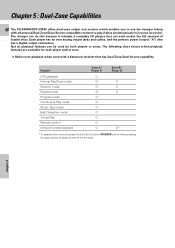
... 2 complete CD players that has Dual-Zone/Dual-Source capability. The changer can be used with a Kenwood Dual-Zone/Dual-Source compatible receiver) to use the changer (along with a Kenwood receiver that can each player and/or zone. ÷ Multi-room playback when used by both players or zones. Each player has its own analog output jacks and cables, and the primary player (output "A") also has a digital output connection. Chapter 5 : Dual-Zone Capabilities 40 The CD-4900M/DPF-J9030 offers dual-zone output and control, which playback...
... 2 complete CD players that has Dual-Zone/Dual-Source capability. The changer can be used with a Kenwood Dual-Zone/Dual-Source compatible receiver) to use the changer (along with a Kenwood receiver that can each player and/or zone. ÷ Multi-room playback when used by both players or zones. Each player has its own analog output jacks and cables, and the primary player (output "A") also has a digital output connection. Chapter 5 : Dual-Zone Capabilities 40 The CD-4900M/DPF-J9030 offers dual-zone output and control, which playback...

User Manual
Page 41
...; Power plug is removed. Unplug the power cord from the power socket, and while holding the 7 button depressed, plug the power cord into the socket again. 41 To reset the registered contents The registered contents for about 1 hour so that the condensation is loosely connected. ÷ With the power plug connected to "Disc handling precautions". Remedy ÷ Replace with new batteries. 9 ÷ Operate the remote control unit within the controllable range. 9 CD Player Symptom...
...; Power plug is removed. Unplug the power cord from the power socket, and while holding the 7 button depressed, plug the power cord into the socket again. 41 To reset the registered contents The registered contents for about 1 hour so that the condensation is loosely connected. ÷ With the power plug connected to "Disc handling precautions". Remedy ÷ Replace with new batteries. 9 ÷ Operate the remote control unit within the controllable range. 9 CD Player Symptom...

User Manual
Page 42
... cloth. DIGITAL AUDIO ÷ An 8 cm CD cannot be played with the power left ON, and restart the operation after power plug is not to use discs which can be played back. Be specially cautious against condensatin in its case. Note related to avoid danger, never use a cracked or deformed disc or a disc repaired with tape or adhesive agent. Discs which are marketed for improving the sound quality...
... cloth. DIGITAL AUDIO ÷ An 8 cm CD cannot be played with the power left ON, and restart the operation after power plug is not to use discs which can be played back. Be specially cautious against condensatin in its case. Note related to avoid danger, never use a cracked or deformed disc or a disc repaired with tape or adhesive agent. Discs which are marketed for improving the sound quality...

User Manual
Page 43
... found to comply with the limits for help. Increase the separation between the equipment and receiver. - - Chapter 3 CAUTION : Use of controls or adjustments or performance of the following are reproductions of labels on a circuit different from that interference will not occur in a residential installation. Location: Back Panel Chapter 4 Chapter 5 Specifications [Format] System Compact disc digital audio system Laser Semiconductor laser [D/A Convertors] D/A Conversion 1 Bit Oversampling...
... found to comply with the limits for help. Increase the separation between the equipment and receiver. - - Chapter 3 CAUTION : Use of controls or adjustments or performance of the following are reproductions of labels on a circuit different from that interference will not occur in a residential installation. Location: Back Panel Chapter 4 Chapter 5 Specifications [Format] System Compact disc digital audio system Laser Semiconductor laser [D/A Convertors] D/A Conversion 1 Bit Oversampling...


