
User Manual
Page 2
.... 2 U.S.A. DPF-J7020 (EN) Unpacking Unpack the unit carefully and make sure that you transport or ship the unit in accordance with the following code: Blue : Neutral Brown : Live Do not connect those leads to operate, notify your unit is no danger of a three-pin plug. Before applying power Units are designed for operation as Class 1. Accessories Audio cord 1) System control cord ........ (1) Communication cord ....... (1) Remote control unit ........ (1) Batteries (R6...
.... 2 U.S.A. DPF-J7020 (EN) Unpacking Unpack the unit carefully and make sure that you transport or ship the unit in accordance with the following code: Blue : Neutral Brown : Live Do not connect those leads to operate, notify your unit is no danger of a three-pin plug. Before applying power Units are designed for operation as Class 1. Accessories Audio cord 1) System control cord ........ (1) Communication cord ....... (1) Remote control unit ........ (1) Batteries (R6...
User Manual
Page 3
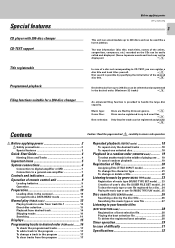
... change or delete a title 22 Listening to music by genre (MUSIC TYPE mode 23 Registration of music type (MUSIC TYPE SET mode) ..... 23 Creation of user's disc file (USER FILE SET mode) .. 24 To clear the music type or user file registered for a 200-disc changer Before applying power DPF-J7020 (EN) 3 This unit can accommodate up to 200 discs can be used like a home jukebox. Special features CD player with 200-disc changer CD-TEXT support Title registerable Programmed...
... change or delete a title 22 Listening to music by genre (MUSIC TYPE mode 23 Registration of music type (MUSIC TYPE SET mode) ..... 23 Creation of user's disc file (USER FILE SET mode) .. 24 To clear the music type or user file registered for a 200-disc changer Before applying power DPF-J7020 (EN) 3 This unit can accommodate up to 200 discs can be used like a home jukebox. Special features CD player with 200-disc changer CD-TEXT support Title registerable Programmed...
User Manual
Page 4
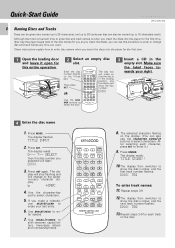
... open for each ). Press ENTER. CONFIRM A B POWER C BEST SELECTION D REPEAT E RANDOM F DISPLAY G 1 2 3 4 H I J K 5 6 7 8 L M N O 9 0 +10 +100 P Q R S - . / T U V DISC SELECTOR ( ) X Y Z DELETE /CLEAR SPACE CHARA. /CHECK /P.MODE ' W MODE SET DISC SKIP DOWN UP CURSOR LEFT RIGHT 1 ¡ ENTER 7 6 CHARACTER DOWN UP 4 ¢ REMOTE CONTROL UNIT RC-P0709 8. Make sure the label faces towards your last entry. 6. T-- Use CHARA./P.MODE to en- Enter the disc number directly on the disc. Although the most convenient time...
... open for each ). Press ENTER. CONFIRM A B POWER C BEST SELECTION D REPEAT E RANDOM F DISPLAY G 1 2 3 4 H I J K 5 6 7 8 L M N O 9 0 +10 +100 P Q R S - . / T U V DISC SELECTOR ( ) X Y Z DELETE /CLEAR SPACE CHARA. /CHECK /P.MODE ' W MODE SET DISC SKIP DOWN UP CURSOR LEFT RIGHT 1 ¡ ENTER 7 6 CHARACTER DOWN UP 4 ¢ REMOTE CONTROL UNIT RC-P0709 8. Make sure the label faces towards your last entry. 6. T-- Use CHARA./P.MODE to en- Enter the disc number directly on the disc. Although the most convenient time...

User Manual
Page 5
... operation: 1. Power status (ON or OFF), Title registration contents Music type registration contents User file registration contents Best selection registration contents In regard to steady lighting, and then switch off the power. Confirm that the flashing "NO DISC" display has changed to contact cleaner Do not use a cracked or deformed disc or a disc repaired with tape or adhesive agent. NO DISC 3. Never play a cracked or warped disc During playback, the disc...
... operation: 1. Power status (ON or OFF), Title registration contents Music type registration contents User file registration contents Best selection registration contents In regard to steady lighting, and then switch off the power. Confirm that the flashing "NO DISC" display has changed to contact cleaner Do not use a cracked or deformed disc or a disc repaired with tape or adhesive agent. NO DISC 3. Never play a cracked or warped disc During playback, the disc...
User Manual
Page 6
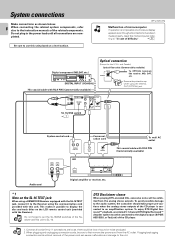
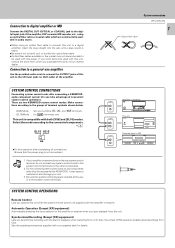
... analog stereo outputs. If connections are completed. System connections Make connections as shown below. 6 When connecting the related system components, refer also to the instruction manuals of the CD player is not possible or erroneous display appears even though all connections have been made properly, reset the microcomputer refer- System connections DPF-J7020 (EN) Malfunction of sound or noise produced. 2. Remove the protection cap when using the communication cord provided with the Receiver). OUTPUT L R SL16 XS 8 SYSTEM CONTROL TEXT * 1 DIGITAL...
... analog stereo outputs. If connections are completed. System connections Make connections as shown below. 6 When connecting the related system components, refer also to the instruction manuals of the CD player is not possible or erroneous display appears even though all connections have been made properly, reset the microcomputer refer- System connections DPF-J7020 (EN) Malfunction of sound or noise produced. 2. Remove the protection cap when using the communication cord provided with the Receiver). OUTPUT L R SL16 XS 8 SYSTEM CONTROL TEXT * 1 DIGITAL...
User Manual
Page 7
... digital input jack of the amplifier, DAT recorder, MD recorder, etc., using an optical fiber cable to connect this unit to a digital amplifier, insert the plug straight into the jack until a snap sound is compatible with this player. There are commercially available in to the system control terminals. Make connections according to the connected components. 6 SL16 XS 8 j ÷ Do this unit. Also, the simple CCRS operation enables great recordings from this operation after connecting a KENWOOD audio component system...
... digital input jack of the amplifier, DAT recorder, MD recorder, etc., using an optical fiber cable to connect this unit to a digital amplifier, insert the plug straight into the jack until a snap sound is compatible with this player. There are commercially available in to the system control terminals. Make connections according to the connected components. 6 SL16 XS 8 j ÷ Do this unit. Also, the simple CCRS operation enables great recordings from this operation after connecting a KENWOOD audio component system...
User Manual
Page 8
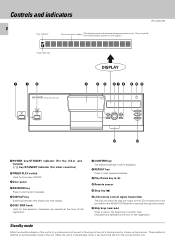
... standby mode of current is displayed. 8REPEAT key Press to start random playback. 5 DISPLAY key Switching between title display and time display. 6 DISC SKIP knob Used for timer play ON/OFF. 3 Door panel 4 RANDOM key Press to start repeated playback. 9 Play/Pause key (6) 0Remote sensor !Stop key (7) @LCD remote control signal transmitter The disc and track title data are output to the LCD remote control unit (provided with a KENWOOD Receiver or optional) through this manual...
... standby mode of current is displayed. 8REPEAT key Press to start random playback. 5 DISPLAY key Switching between title display and time display. 6 DISC SKIP knob Used for timer play ON/OFF. 3 Door panel 4 RANDOM key Press to start repeated playback. 9 Play/Pause key (6) 0Remote sensor !Stop key (7) @LCD remote control signal transmitter The disc and track title data are output to the LCD remote control unit (provided with a KENWOOD Receiver or optional) through this manual...
User Manual
Page 9
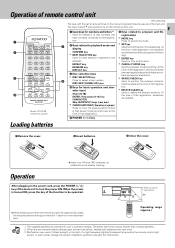
... speed. Operation of remote control unit 1 2 3 4 CONFIRM A B POWER C BEST SELECTION D REPEAT E RANDOM F DISPLAY G 1 2 3 4 H I J K 5 6 7 8 L M N O 9 0 +10 +100 P Q R S - . / T U V DISC SELECTOR ( ) X Y Z DELETE /CLEAR SPACE CHARA. /CHECK /P.MODE ' W MODE SET DISC SKIP DOWN UP CURSOR LEFT RIGHT 1 ¡ ENTER 7 6 CHARACTER DOWN UP 4 ¢ REMOTE CONTROL UNIT RC-P0709 Model: RC-P0709 Infrared ray system Loading batteries DPF-J7020 (EN) The keys with new ones. 3. At the time of title registration, one remote control key...
... speed. Operation of remote control unit 1 2 3 4 CONFIRM A B POWER C BEST SELECTION D REPEAT E RANDOM F DISPLAY G 1 2 3 4 H I J K 5 6 7 8 L M N O 9 0 +10 +100 P Q R S - . / T U V DISC SELECTOR ( ) X Y Z DELETE /CLEAR SPACE CHARA. /CHECK /P.MODE ' W MODE SET DISC SKIP DOWN UP CURSOR LEFT RIGHT 1 ¡ ENTER 7 6 CHARACTER DOWN UP 4 ¢ REMOTE CONTROL UNIT RC-P0709 Model: RC-P0709 Infrared ray system Loading batteries DPF-J7020 (EN) The keys with new ones. 3. At the time of title registration, one remote control key...
User Manual
Page 11
... to change the disc. The display flashes. DISC SKIP DOWN UP 3 Set the input. However, when the door panel is opened while "DISC DETEC- tration of the LCD remote control unit, refer to remove the disc which had been played. SET To display the title on a LCD remote control unit (provided with a KENWOOD Receiver or optional), perform the all CDs from the carousel before opening the door panel. Please remove all data read . If blinking "PLEASE...
... to change the disc. The display flashes. DISC SKIP DOWN UP 3 Set the input. However, when the door panel is opened while "DISC DETEC- tration of the LCD remote control unit, refer to remove the disc which had been played. SET To display the title on a LCD remote control unit (provided with a KENWOOD Receiver or optional), perform the all CDs from the carousel before opening the door panel. Please remove all data read . If blinking "PLEASE...
User Manual
Page 13
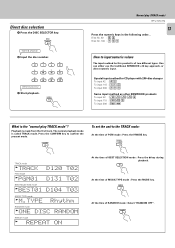
... input method for CD player with 200-disc changer To input 42 : 42 To input 115 : 115 To input 200 : 2)) Same input method as other KENWOOD products To input 42 : 00002 To input 115 : 05 To input 200 : What is of PGM mode : Press the P.MODE key. MODE At the time of MUSIC TYPE mode : Press the MODE key. RANDOM F DISC SELECTOR X Within 8 seconds! 2 Input the disc number. 1 2 3 4 H I J K 5 6 7 8 L M N O 9 0 +10 +100 P Q R S Within 8 seconds! 3 Start playback. CHARA. /P.MODE TRACK mode...
... input method for CD player with 200-disc changer To input 42 : 42 To input 115 : 115 To input 200 : 2)) Same input method as other KENWOOD products To input 42 : 00002 To input 115 : 05 To input 200 : What is of PGM mode : Press the P.MODE key. MODE At the time of MUSIC TYPE mode : Press the MODE key. RANDOM F DISC SELECTOR X Within 8 seconds! 2 Input the disc number. 1 2 3 4 H I J K 5 6 7 8 L M N O 9 0 +10 +100 P Q R S Within 8 seconds! 3 Start playback. CHARA. /P.MODE TRACK mode...
User Manual
Page 16
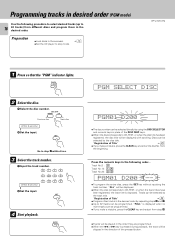
DPF-J7020 (EN) Preparation ÷ Load discs in the desired order by using the DISC SELECTOR and numeric keys in the direction of the pressed button. SET 4 Start playback. "ALL" will be played in the order they are programmed. ÷ When the 4 or ¢ key is displayed. CHARA. /P.MODE 2 Select the disc. 1 Select the disc number. Discs can be programmed. ÷ If you make a mistake, press the CLEAR key and...
DPF-J7020 (EN) Preparation ÷ Load discs in the desired order by using the DISC SELECTOR and numeric keys in the direction of the pressed button. SET 4 Start playback. "ALL" will be played in the order they are programmed. ÷ When the 4 or ¢ key is displayed. CHARA. /P.MODE 2 Select the disc. 1 Select the disc number. Discs can be programmed. ÷ If you make a mistake, press the CLEAR key and...

User Manual
Page 17
... programmed tracks SPACE /CHECK To add a track to the program Perform steps 2 and 3 of "Programming tracks in desired order". ^ PGM01EDD200DT03 ÷ Each time the key is displayed. To change a track in desired order". ^ Example ≠ ÷ Press it while the "PGM01" indicator blinks. ÷ The track being played. PGM01EDD200DT03 3 Perform steps 2 and 3 of "Programming tracks in the program 1 Set the CD player to stop mode...
... programmed tracks SPACE /CHECK To add a track to the program Perform steps 2 and 3 of "Programming tracks in desired order". ^ PGM01EDD200DT03 ÷ Each time the key is displayed. To change a track in desired order". ^ Example ≠ ÷ Press it while the "PGM01" indicator blinks. ÷ The track being played. PGM01EDD200DT03 3 Perform steps 2 and 3 of "Programming tracks in the program 1 Set the CD player to stop mode...
User Manual
Page 18
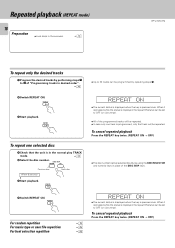
REPEAT E For random repetition For music type or user file repetition For best selection repetition ( ∞ • PGREPEAT2ONDT03 ÷ The current status is displayed when the key is pressed once. When it is pressed while the status is in the normal play TRACK mode. # 2 Select the disc number. REPEAT E 3 Start playback. DISC SKIP DOWN UP Previous disc Within 8 seconds! When it is...
REPEAT E For random repetition For music type or user file repetition For best selection repetition ( ∞ • PGREPEAT2ONDT03 ÷ The current status is displayed when the key is pressed once. When it is pressed while the status is in the normal play TRACK mode. # 2 Select the disc number. REPEAT E 3 Start playback. DISC SKIP DOWN UP Previous disc Within 8 seconds! When it is...

User Manual
Page 20
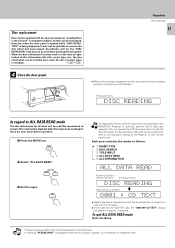
... unit. The display flashes. Then, press the SET key. To enter the disc title 1 Select the disc number. ENTER 6 ÷ When the MODE key is pressed during title input mode, the title input mode is open. TITLEIINPUTNDOM D---CT-- Operation is possible also when the door panel is cancelled. DISC SKIP DOWN UP SET \ 2 Enter the title. We recommend to register titles while discs are being played can be...
... unit. The display flashes. Then, press the SET key. To enter the disc title 1 Select the disc number. ENTER 6 ÷ When the MODE key is pressed during title input mode, the title input mode is open. TITLEIINPUTNDOM D---CT-- Operation is possible also when the door panel is cancelled. DISC SKIP DOWN UP SET \ 2 Enter the title. We recommend to register titles while discs are being played can be...

User Manual
Page 21
... the following timing. ÷ When the door panel is closed. ÷ With closed door panel, when title input mode is cancelled. key is pressed. Then, press the SET key. Select the disc number. In regard to disc information reading The entered title is read in to the disc with the DISC SKIP knob on the remote control keys, input the character as follows. The display flashes.
... the following timing. ÷ When the door panel is closed. ÷ With closed door panel, when title input mode is cancelled. key is pressed. Then, press the SET key. Select the disc number. In regard to disc information reading The entered title is read in to the disc with the DISC SKIP knob on the remote control keys, input the character as follows. The display flashes.

User Manual
Page 23
...; Sound Track → Spoken Word → World Music..... "Displaying all the text information" % ÷ The disc number can be selected directly by using the numeric keys in place of music type (MUSIC TYPE SET mode) 1 Activate the music type set mode. 1 Press the MODE key. Registration of the DISC SKIP keys. ÷ Repeat step 3 if it is required to the disc with the following timing. ÷ When that disc is played...
...; Sound Track → Spoken Word → World Music..... "Displaying all the text information" % ÷ The disc number can be selected directly by using the numeric keys in place of music type (MUSIC TYPE SET mode) 1 Activate the music type set mode. 1 Press the MODE key. Registration of the DISC SKIP keys. ÷ Repeat step 3 if it is required to the disc with the following timing. ÷ When that disc is played...

User Manual
Page 25
... MUSIC TYPE PLAY mode is in the carousel. ÷ Close the door panel. 0 ! ÷ Register music type or user file. £¢ ÷ Set the CD player to music by genre (MUSIC TYPE mode) DPF-J7020 (EN) 25 Playing the music type or user file (MUSIC TYPE PLAY mode) 1 Activate the music type play mode. 1 Press the MODE key. MUSICETYPERPLAY 2 Select the music type or user file. Random playback for the respective music type or user file. MUSICITYPETNDOM The display flashes...
... MUSIC TYPE PLAY mode is in the carousel. ÷ Close the door panel. 0 ! ÷ Register music type or user file. £¢ ÷ Set the CD player to music by genre (MUSIC TYPE mode) DPF-J7020 (EN) 25 Playing the music type or user file (MUSIC TYPE PLAY mode) 1 Activate the music type play mode. 1 Press the MODE key. MUSICETYPERPLAY 2 Select the music type or user file. Random playback for the respective music type or user file. MUSICITYPETNDOM The display flashes...

User Manual
Page 29
... mode will be selected directly by the timer. ÷ Read the instruction manual of the timer carefully. Timer operation As this unit. Preparation ÷ Load discs in place of the system components to the ON positions. 2 Select the disc to ON. Audio timer Amplifier or receiver 12:00 DPF-J7020 (EN) To AC outlet 29 This unit Audio cord 1 Set the power switches of the DISC SKIP keys. ENTER 6 3 Set the listening volume. 1 Adjust the volume on by using...
... mode will be selected directly by the timer. ÷ Read the instruction manual of the timer carefully. Timer operation As this unit. Preparation ÷ Load discs in place of the system components to the ON positions. 2 Select the disc to ON. Audio timer Amplifier or receiver 12:00 DPF-J7020 (EN) To AC outlet 29 This unit Audio cord 1 Set the power switches of the DISC SKIP keys. ENTER 6 3 Set the listening volume. 1 Adjust the volume on by using...

User Manual
Page 31
... 7 key depressed, plug the power cord into the socket again. No sound. Disc selection is not possible. ÷ MUSIC TYPE PLAY mode is selected. ÷Press the MODE key to quit MUSIC TYPE PLAY mode. ∞ Disc begins to play . Remedy ÷ Replace with new batteries. 9 ÷ Operate the remote control unit within the controllable range. 9 CD Player Symptom No power is loaded, player does not play when power is switched ÷ The TIMER PLAY switch is set to the wall...
... 7 key depressed, plug the power cord into the socket again. No sound. Disc selection is not possible. ÷ MUSIC TYPE PLAY mode is selected. ÷Press the MODE key to quit MUSIC TYPE PLAY mode. ∞ Disc begins to play . Remedy ÷ Replace with new batteries. 9 ÷ Operate the remote control unit within the controllable range. 9 CD Player Symptom No power is loaded, player does not play when power is switched ÷ The TIMER PLAY switch is set to the wall...
User Manual
Page 32
..., CHAPTER 1, SUBCHAPTER J. Location: Back Panel For your dealer for a Class B digital device, pursuant to radio communications, if it is not installed and used in the space provided below. Refer to the model and serial numbers whenever you call upon your records Record the serial number, found to operate this reason specifications may generate or use radio frequency energy. Notes 2. The user could lose the authority to...
..., CHAPTER 1, SUBCHAPTER J. Location: Back Panel For your dealer for a Class B digital device, pursuant to radio communications, if it is not installed and used in the space provided below. Refer to the model and serial numbers whenever you call upon your records Record the serial number, found to operate this reason specifications may generate or use radio frequency energy. Notes 2. The user could lose the authority to...


