

User Manual
Page 2
... OF IMPORTANT OPERATING AND MAINTENANCE (SERVICING) INSTRUCTIONS IN THE LITERATURE ACCOMPANYING THE APPLIANCE. For replacement, use only a 13Amp ASTA-approved (BS1362) fuse. 2.The fuse cover must be refitted when replacing the fuse in your home or the cable is cut off , remove the fuse and dispose of the plug immediately, to avoid a possible shock hazard by inadvertent connection to reach a power point...
... OF IMPORTANT OPERATING AND MAINTENANCE (SERVICING) INSTRUCTIONS IN THE LITERATURE ACCOMPANYING THE APPLIANCE. For replacement, use only a 13Amp ASTA-approved (BS1362) fuse. 2.The fuse cover must be refitted when replacing the fuse in your home or the cable is cut off , remove the fuse and dispose of the plug immediately, to avoid a possible shock hazard by inadvertent connection to reach a power point...
User Manual
Page 3
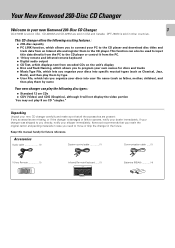
... Kenwood 200-Disc CD Changer. 3 CD-4700M is damaged or fails to operate, notify your dealer immediately. REPEAT RANDOM F DISPLAY G D E 1 2 3 4 H I OP P.MODE CHECK CLEAR , A S D F G H J K L : ; ,,, ENTER SET SHIFT Z X C V B N M < , > . ? / SHIFT MODE ROOM B CONT PLAY SUB OUT MONIT. If your discs into specific musical types (such as father, mother, children), and then play them by name Your new changer can also be used to input title data directly from the PC to the CD player or control...
... Kenwood 200-Disc CD Changer. 3 CD-4700M is damaged or fails to operate, notify your dealer immediately. REPEAT RANDOM F DISPLAY G D E 1 2 3 4 H I OP P.MODE CHECK CLEAR , A S D F G H J K L : ; ,,, ENTER SET SHIFT Z X C V B N M < , > . ? / SHIFT MODE ROOM B CONT PLAY SUB OUT MONIT. If your discs into specific musical types (such as father, mother, children), and then play them by name Your new changer can also be used to input title data directly from the PC to the CD player or control...
User Manual
Page 4
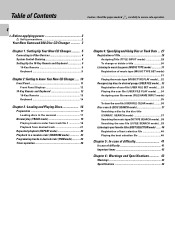
... 2 4 Before applying power 2 Safty precautions 2 Your New Kenwood 200-Disc CD Changer 3 Chapter 1 : Setting Up Your New CD Changer 5 Connecting to Other Devices 6 System Control Chaining 8 Setting Up the 10-Key Remote and Keyboard 9 10-Key Remote 9 Keyboard 9 Chapter 2 : Getting to know Your New CD Changer...... 10 Front Panel 11 Front Panel Displays 12 10-Key Remote and Keyboard 13 10-Key Remote 13 Keyboard 14 Chapter 3 : Loading and Playing Discs 16 Preparation 17...
... 2 4 Before applying power 2 Safty precautions 2 Your New Kenwood 200-Disc CD Changer 3 Chapter 1 : Setting Up Your New CD Changer 5 Connecting to Other Devices 6 System Control Chaining 8 Setting Up the 10-Key Remote and Keyboard 9 10-Key Remote 9 Keyboard 9 Chapter 2 : Getting to know Your New CD Changer...... 10 Front Panel 11 Front Panel Displays 12 10-Key Remote and Keyboard 13 10-Key Remote 13 Keyboard 14 Chapter 3 : Loading and Playing Discs 16 Preparation 17...

User Manual
Page 5
...; Connecting to a Other Devices ÷ System Control Chaining ÷ Setting Up the 10-Key Remote and Keyboard 6 8 9 Your CD changer includes a standard remote and a remote keyboard (for example, if you purchased it again. 4. Chapter 1 : Setting Up Your New CD Changer Connecting to Other Devices Welcome to the Kenwood CD-4700M/CD-4260M/CD-425M/DPF-J6030 Instruction manual. 5 The Instruction manual contains all functions except text entry. This chapter guides you through the connection and setup of any home...
...; Connecting to a Other Devices ÷ System Control Chaining ÷ Setting Up the 10-Key Remote and Keyboard 6 8 9 Your CD changer includes a standard remote and a remote keyboard (for example, if you purchased it again. 4. Chapter 1 : Setting Up Your New CD Changer Connecting to Other Devices Welcome to the Kenwood CD-4700M/CD-4260M/CD-425M/DPF-J6030 Instruction manual. 5 The Instruction manual contains all functions except text entry. This chapter guides you through the connection and setup of any home...

User Manual
Page 6
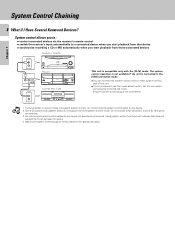
...the power cord from the analog stereo outputs. If connections are completed. When plugging and unplugging connection cables, be loss of the CD player is connected to use the PC LINK function. Chapter 1 Chapter 2 Connecting to Other Devices Connecting to Other Devices Make connections as shown below. 6 When connecting the related system components, refer also to the [SL16] mode. Digital component (MD,DAT, etc.) DIGITAL OUT OPTICAL TEXT Remove the cap DIGITAL INPUT (OPTICAL) Optical digital cable (Commercially-avaliable) OUTPUT R L *1 DIGITAL OUT OPTICAL TEXT SYSTEM CONTROL...
...the power cord from the analog stereo outputs. If connections are completed. When plugging and unplugging connection cables, be loss of the CD player is connected to use the PC LINK function. Chapter 1 Chapter 2 Connecting to Other Devices Connecting to Other Devices Make connections as shown below. 6 When connecting the related system components, refer also to the [SL16] mode. Digital component (MD,DAT, etc.) DIGITAL OUT OPTICAL TEXT Remove the cap DIGITAL INPUT (OPTICAL) Optical digital cable (Commercially-avaliable) OUTPUT R L *1 DIGITAL OUT OPTICAL TEXT SYSTEM CONTROL...
User Manual
Page 7
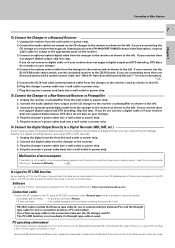
... CD player. Plug the changer's power cable into a wall outlet or power strip. The PC can connect the CD changer directly to the recorder. 3. D-sub 9-pin connector (Female) PC side connector - Use a cable equipped with a system control cable, see "What If I Have Several Kenwood Devices ?" RS-232C cables include the Reverse type cable for use in communications between PCs and the Straight type cable for more than one Kenwood device with a connector matching the computer in connection between the CD changer...
... CD player. Plug the changer's power cable into a wall outlet or power strip. The PC can connect the CD changer directly to the recorder. 3. D-sub 9-pin connector (Female) PC side connector - Use a cable equipped with a system control cable, see "What If I Have Several Kenwood Devices ?" RS-232C cables include the Reverse type cable for use in communications between PCs and the Straight type cable for more than one Kenwood device with a connector matching the computer in connection between the CD changer...
User Manual
Page 8
... appropriate jacks. Do not connect system control cables to Other Devices 8 What if I Have Several Kenwood Devices? Chapter 1 System Control Chaining Connecting to any device. 2. Chapter 4 Chapter 5 Chapter 6 Chapter 7 Using system control functions with the [SL16] mode. Make sure system control plugs are firmly seated in a set the connected components to any device not specified by Kenwood. Some CD players and cassette decks do not connect the system control cable to the [SL16] mode. (Ensure that the power plug is compatible only with a device that device ÷...
... appropriate jacks. Do not connect system control cables to Other Devices 8 What if I Have Several Kenwood Devices? Chapter 1 System Control Chaining Connecting to any device. 2. Chapter 4 Chapter 5 Chapter 6 Chapter 7 Using system control functions with the [SL16] mode. Make sure system control plugs are firmly seated in a set the connected components to any device not specified by Kenwood. Some CD players and cassette decks do not connect the system control cable to the [SL16] mode. (Ensure that the power plug is compatible only with a device that device ÷...
User Manual
Page 9
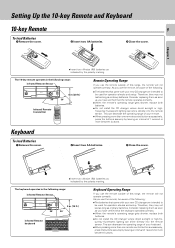
... remote's operating range gets shorter, replace both batteries. ÷ Do not install the CD changer where direct sunlight or high-frequency fluorescent lighting can decrease the operating range of your new CD changer are intended to be aware of 1 second or more than one remote control button successively, press the buttons securely by the polarity marking. Chapter 1 Chapter 2 Setting Up the 10-key Remote and Keyboard Connecting to Other Devices...
... remote's operating range gets shorter, replace both batteries. ÷ Do not install the CD changer where direct sunlight or high-frequency fluorescent lighting can decrease the operating range of your new CD changer are intended to be aware of 1 second or more than one remote control button successively, press the buttons securely by the polarity marking. Chapter 1 Chapter 2 Setting Up the 10-key Remote and Keyboard Connecting to Other Devices...

User Manual
Page 11
... CD-4700M/CD-4260M 0 DISPLAY o PUSH OPEN 0 Chapter 1 TIMER PLAY OFF ON STANDBY POWER ON/STANDBY DISPLAY DISC SKIP CONFIRM RANDOM REPEAT 6 7 4 ¢ Chapter 2 Chapter 3 Chapter 4 Chapter 5 11 2 # 3 4 5 67 8 9 0 ! @ MULTIPLE COMPACT DISC PLAYER 0 PUSH OPEN STANDBY ON/STANDBY TIMER PLAY OFF ON STANDBY POWER ON/STANDBY 200 DISC LOADING WITH TWIN PICK UP MECHANISM DISPLAY DISC SKIP CONFIRM RANDOM REPEAT 6 7 4 ¢ CD-425M/DPF-J6030 1 POWER button/Standby indicator (For U.S.A. They may differ from the remote control unit. Characters are selected at the time...
... CD-4700M/CD-4260M 0 DISPLAY o PUSH OPEN 0 Chapter 1 TIMER PLAY OFF ON STANDBY POWER ON/STANDBY DISPLAY DISC SKIP CONFIRM RANDOM REPEAT 6 7 4 ¢ Chapter 2 Chapter 3 Chapter 4 Chapter 5 11 2 # 3 4 5 67 8 9 0 ! @ MULTIPLE COMPACT DISC PLAYER 0 PUSH OPEN STANDBY ON/STANDBY TIMER PLAY OFF ON STANDBY POWER ON/STANDBY 200 DISC LOADING WITH TWIN PICK UP MECHANISM DISPLAY DISC SKIP CONFIRM RANDOM REPEAT 6 7 4 ¢ CD-425M/DPF-J6030 1 POWER button/Standby indicator (For U.S.A. They may differ from the remote control unit. Characters are selected at the time...
User Manual
Page 12
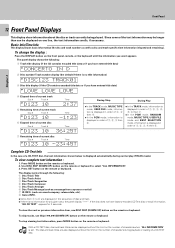
... you have factory-encoded CD Text disc or track information, "NO CD TEXT" appears for any given area, the panel display "-----". To stop viewing text information, press MODE button on the remote or keyboard. To skip tracks, use DISC SKIP (DOWN/UP) button on the number of remote cForonntrtoPlaunneitl 12 Front Panel Displays Chapter 1 Chapter 2 This display show information about the disc or track currently being played. Operation of characters...
... you have factory-encoded CD Text disc or track information, "NO CD TEXT" appears for any given area, the panel display "-----". To stop viewing text information, press MODE button on the remote or keyboard. To skip tracks, use DISC SKIP (DOWN/UP) button on the number of remote cForonntrtoPlaunneitl 12 Front Panel Displays Chapter 1 Chapter 2 This display show information about the disc or track currently being played. Operation of characters...
User Manual
Page 13
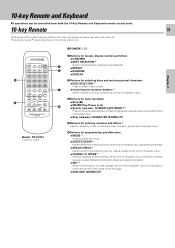
... 4 ¢ REMOTE CONTROL UNIT RC-P0714 Model : RC-P0714 Infrared ray system 1 POWER( ) 2 Buttons for modes, display control and letters ÷ CONFIRM ÷ BEST SELECTION * 1 Used for best selection registration and playback. ÷ REPEAT 2 ÷ RANDOM ÷ DISPLAY 3 Buttons for selecting discs and entering special characters ÷ DISC SELECTOR * Press to select a disc number. 3 ÷ Letter/special character buttons * Used for selection of disc numbers, as well as for character input. 4 Buttons for programming and...
... 4 ¢ REMOTE CONTROL UNIT RC-P0714 Model : RC-P0714 Infrared ray system 1 POWER( ) 2 Buttons for modes, display control and letters ÷ CONFIRM ÷ BEST SELECTION * 1 Used for best selection registration and playback. ÷ REPEAT 2 ÷ RANDOM ÷ DISPLAY 3 Buttons for selecting discs and entering special characters ÷ DISC SELECTOR * Press to select a disc number. 3 ÷ Letter/special character buttons * Used for selection of disc numbers, as well as for character input. 4 Buttons for programming and...
User Manual
Page 14
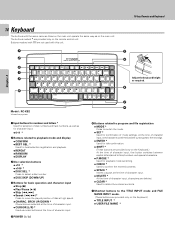
... INPUT * ÷ USER FILE NAME * Chapter 6 Chapter 7 SRCH DOWN DISC SKIP DOWN DISC SKIP UP ROOM B Chapter 2 Model : RC-KB2 Infrared ray system 3 4 Adjust the keyboard height as required. 6 3 4 Chapter 3 Chapter 4 Chapter 5 1 Input buttons for numbers and letters * Used for selection of disc numbers and track numbers, as well as cursor buttons at the time of character input. 5 POWER ( ) 6 Buttons related to program and file registration ÷ MODE * Press to switch the mode. ÷ SET * Used...
... INPUT * ÷ USER FILE NAME * Chapter 6 Chapter 7 SRCH DOWN DISC SKIP DOWN DISC SKIP UP ROOM B Chapter 2 Model : RC-KB2 Infrared ray system 3 4 Adjust the keyboard height as required. 6 3 4 Chapter 3 Chapter 4 Chapter 5 1 Input buttons for numbers and letters * Used for selection of disc numbers and track numbers, as well as cursor buttons at the time of character input. 5 POWER ( ) 6 Buttons related to program and file registration ÷ MODE * Press to switch the mode. ÷ SET * Used...

User Manual
Page 16
... specified CDs See "Timer operation" § Chapter 2 Chapter 3 Your CD changer includes a standard remote and a remote keyboard (for all discs loaded in the carousel in the queue from start to finish, then stopping. See "Repeated playback (REPEAT mode)" ™ ÷ Random Play, which plays the tracks or discs over and over Repeat mode where the CD changer plays a par-ticular disc or set of simplicity, this manual provides standard remote instructions for...
... specified CDs See "Timer operation" § Chapter 2 Chapter 3 Your CD changer includes a standard remote and a remote keyboard (for all discs loaded in the carousel in the queue from start to finish, then stopping. See "Repeated playback (REPEAT mode)" ™ ÷ Random Play, which plays the tracks or discs over and over Repeat mode where the CD changer plays a par-ticular disc or set of simplicity, this manual provides standard remote instructions for...

User Manual
Page 18
... to ALL DATA READ mode The disc information for the "DISC DETECTION" indication to change the disc. Chapter 2 The display flashes. Close the disc door before opening the disc door. MODE 2 Select "ALL DATA READ". DISC SKIP DOWN UP 3 Set the input. Each press switches the modes as "Loading discs in the carousel". In stopped condition, all data read operation first, and operate the LCD remote control unit with the door...
... to ALL DATA READ mode The disc information for the "DISC DETECTION" indication to change the disc. Chapter 2 The display flashes. Close the disc door before opening the disc door. MODE 2 Select "ALL DATA READ". DISC SKIP DOWN UP 3 Set the input. Each press switches the modes as "Loading discs in the carousel". In stopped condition, all data read operation first, and operate the LCD remote control unit with the door...
User Manual
Page 25
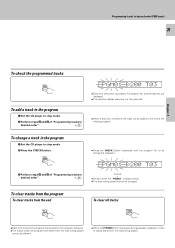
...; PGM01ED200 TD03 ÷ Each time the button is displayed. and the disc No. Chapter 5 Chapter 6 Chapter 7 Programming tracks in desired order (PGM mode) 25 Chapter 1 Chapter 2 Chapter 3 Chapter 4 To check the programmed tracks SPACE /CHECK To add a track to the program 1 Set the CD player to be changed . is entered, the track will be cleared. ÷ When the P.MODE button is cleared. ÷ The tracks...
...; PGM01ED200 TD03 ÷ Each time the button is displayed. and the disc No. Chapter 5 Chapter 6 Chapter 7 Programming tracks in desired order (PGM mode) 25 Chapter 1 Chapter 2 Chapter 3 Chapter 4 To check the programmed tracks SPACE /CHECK To add a track to the program 1 Set the CD player to be changed . is entered, the track will be cleared. ÷ When the P.MODE button is cleared. ÷ The tracks...
User Manual
Page 27
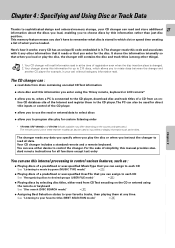
... or play for example, in at any time. You can also be used for direct title inputs or control of what disc is changed. Your CD changer will recall information read from an online CD database site of these receiver models can use the read and store additional information about the discs you load, enabling you 've loaded. Notes 2. Your changer stores this manual provides standard remote instructions for the disc...
... or play for example, in at any time. You can also be used for direct title inputs or control of what disc is changed. Your CD changer will recall information read from an online CD database site of these receiver models can use the read and store additional information about the discs you load, enabling you 've loaded. Notes 2. Your changer stores this manual provides standard remote instructions for the disc...
User Manual
Page 28
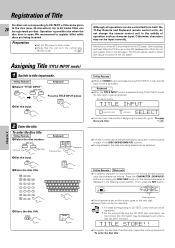
... the MODE button is pressed during TITLE INPUT mode, the title input mode is in the normal play TRACK mode. ) Registration of Title Although all operations can be controlled from an on the remote control buttons, input the character as character input. We recommend to the CD player, download disc and track titles of a CD from both the 10-Key Remote and Keyboard remote control units, do not change the remote control unit in the flashing cursor...
... the MODE button is pressed during TITLE INPUT mode, the title input mode is in the normal play TRACK mode. ) Registration of Title Although all operations can be controlled from an on the remote control buttons, input the character as character input. We recommend to the CD player, download disc and track titles of a CD from both the 10-Key Remote and Keyboard remote control units, do not change the remote control unit in the flashing cursor...
User Manual
Page 41
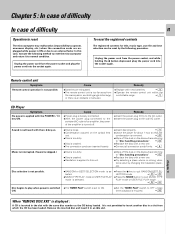
...; Press the 7 key to ON. LECTION mode. £, ÷ Press the MODE button to quit MUSIC TYPE PLAY mode or USER FILE PLAY mode. ¤› Disc begins to play when power is switched ÷ The TIMER PLAY switch is applied with new batteries. 9 ÷ Operate the remote control unit within the controllable range. 9 CD Player Symptom No power is set to quit RANDOM,BEST SE- Remedy ÷ Replace with the POWER( ) key ON. w ÷ Wipe off the...
...; Press the 7 key to ON. LECTION mode. £, ÷ Press the MODE button to quit MUSIC TYPE PLAY mode or USER FILE PLAY mode. ¤› Disc begins to play when power is switched ÷ The TIMER PLAY switch is applied with new batteries. 9 ÷ Operate the remote control unit within the controllable range. 9 CD Player Symptom No power is set to quit RANDOM,BEST SE- Remedy ÷ Replace with the POWER( ) key ON. w ÷ Wipe off the...
User Manual
Page 42
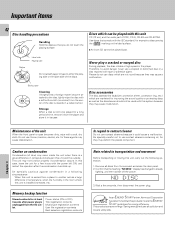
... product can be used with the IEC standard, for example a disc carrying COMPACT the marking on condensation Condensation (of time, remove it from the carousel and close the door panel. 2. Chapter 3 Chapter 4 Chapter 5 Maintenance of the unit When the front panel or case becomes dirty, wipe with this unit CD (12 cm), and the audio part of the disc outwards in the player...
... product can be used with the IEC standard, for example a disc carrying COMPACT the marking on condensation Condensation (of time, remove it from the carousel and close the door panel. 2. Chapter 3 Chapter 4 Chapter 5 Maintenance of the unit When the front panel or case becomes dirty, wipe with this unit CD (12 cm), and the audio part of the disc outwards in the player...
User Manual
Page 43
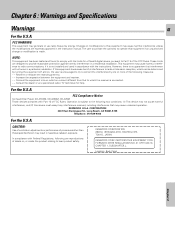
... not installed and used in accordance with Part 15 of labels on a circuit different from that interference will not occur in a residential installation. Consult the dealer or an experienced radio / TV technician for a Class B digital device, pursuant to laser product safety. In compliance with the limits for help. KENWOOD CORPORATION 2967-3, ISHIKAWA-CHO, HACHIOJI-SHI, TOKYO, JAPAN KENWOOD CORP. Location: Back Panel...
... not installed and used in accordance with Part 15 of labels on a circuit different from that interference will not occur in a residential installation. Consult the dealer or an experienced radio / TV technician for a Class B digital device, pursuant to laser product safety. In compliance with the limits for help. KENWOOD CORPORATION 2967-3, ISHIKAWA-CHO, HACHIOJI-SHI, TOKYO, JAPAN KENWOOD CORP. Location: Back Panel...


