
User Manual
Page 2
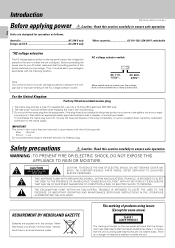
DPF-3010/2010/1010 (En) Caution : Read this section carefully to ensure safe operation. Before connecting the power cord to improper setting of this equipment. For replacement, use only a 13-Amp ASTA-approved (BS1362) fuse. 2. Do not cut off the mains plug from this switch matches your dealer. WARNING : TO PREVENT FIRE OR ELECTRIC SHOCK, DO NOT EXPOSE THIS APPLIANCE TO RAIN OR...
DPF-3010/2010/1010 (En) Caution : Read this section carefully to ensure safe operation. Before connecting the power cord to improper setting of this equipment. For replacement, use only a 13-Amp ASTA-approved (BS1362) fuse. 2. Do not cut off the mains plug from this switch matches your dealer. WARNING : TO PREVENT FIRE OR ELECTRIC SHOCK, DO NOT EXPOSE THIS APPLIANCE TO RAIN OR...
User Manual
Page 3
... power 2 Safety precautions 2 Special features 3 IMPORTANT SAFEGUARDS 4 System connections 6 To use the headphone 7 Maintenance 9 Controls and indicators 10 Operation of remote control unit 11 Normal play (TRACK mode 12 Playing tracks in order from track No.1 12 Playback from desired track 13 Skipping tracks 13 Searching 13 Time display on CD player (TIME DISPLAY 13 Programmed play (PGM mode 14 To check or change the programmed tracks 15 To add a track to the program...
... power 2 Safety precautions 2 Special features 3 IMPORTANT SAFEGUARDS 4 System connections 6 To use the headphone 7 Maintenance 9 Controls and indicators 10 Operation of remote control unit 11 Normal play (TRACK mode 12 Playing tracks in order from track No.1 12 Playback from desired track 13 Skipping tracks 13 Searching 13 Time display on CD player (TIME DISPLAY 13 Programmed play (PGM mode 14 To check or change the programmed tracks 15 To add a track to the program...
User Manual
Page 4
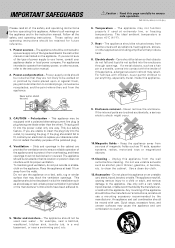
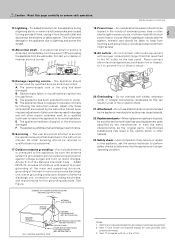
... sets, speaker systems, radios, motorized toys or magnetized objects. 11.Cleaning - This plug will fit into contact with its proper ventilation. for ventilation and to ensure reliable operation of magnetic fields such as alcohol, paint thinner, gasoline, or benzine, etc. Unplug this appliance from sources of the appliance and to insert the plug fully into the enclosure through openings. Power sources...
... sets, speaker systems, radios, motorized toys or magnetized objects. 11.Cleaning - This plug will fit into contact with its proper ventilation. for ventilation and to ensure reliable operation of magnetic fields such as alcohol, paint thinner, gasoline, or benzine, etc. Unplug this appliance from sources of the appliance and to insert the plug fully into the enclosure through openings. Power sources...
User Manual
Page 5
... antenna is connected to this can fall into the appliance. Replacement parts - When replacement parts are not required except for this page carefully to qualified service personnel. 17.Outdoor antenna grounding - Item 17 and 18 are required, be referred to ensure safe operation. Never connect other audio equipment with UL in proper operating condition. The power-supply cord or the plug has been damaged. Do not use...
... antenna is connected to this can fall into the appliance. Replacement parts - When replacement parts are not required except for this page carefully to qualified service personnel. 17.Outdoor antenna grounding - Item 17 and 18 are required, be referred to ensure safe operation. Never connect other audio equipment with UL in proper operating condition. The power-supply cord or the plug has been damaged. Do not use...

User Manual
Page 6
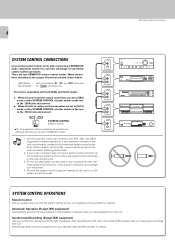
System control cord SYSTEM CONTROL Audio cord Commercially-available optical fiber cable CD L R DIGITAL INPUT OPTICAL Amplifier MD recorder To AC outlet To wall AC outlet To AC outlet Notes 1. When plugging and unplugging connection cords, be sure to , or greater than, shown below . Left and right panels: 10 cm Rear panel: 10 cm DIGITAL OUTPUT jack (DPF-3010/DPF-2010 only) SL 16/XS8 switch 8 OUTPUT L R DIGITAL OUTPUT OPTICAL SYSTEM CONTROL ƒ SL 16 XS-8 Remove the protection cap when using the DIGITAL OUTPUT (OPTICAL) jack. DPF-3010/2010...
System control cord SYSTEM CONTROL Audio cord Commercially-available optical fiber cable CD L R DIGITAL INPUT OPTICAL Amplifier MD recorder To AC outlet To wall AC outlet To AC outlet Notes 1. When plugging and unplugging connection cords, be sure to , or greater than, shown below . Left and right panels: 10 cm Rear panel: 10 cm DIGITAL OUTPUT jack (DPF-3010/DPF-2010 only) SL 16/XS8 switch 8 OUTPUT L R DIGITAL OUTPUT OPTICAL SYSTEM CONTROL ƒ SL 16 XS-8 Remove the protection cap when using the DIGITAL OUTPUT (OPTICAL) jack. DPF-3010/2010...

User Manual
Page 7
... DPF-3010) Connect a stereo headphone to the PHONES jack of the CD player. Use these keys for DPF-3010/2010) Connect the DIGITAL OUTPUT (OPTICAL) jack to the CD input jacks (or AUX jacks) of the amplifier. REMOTE CONTROL UNIT RC-P0305 OUTPUT DOWN UP To use amplifier Use the provided audio cords to connect the OUTPUT jacks of this unit too much. Adjust the sound volume using an optical fiber cable which you purchased the cord or your nearest dealer. SINGLE TIME _12 db Output level ÷ It is turned...
... DPF-3010) Connect a stereo headphone to the PHONES jack of the CD player. Use these keys for DPF-3010/2010) Connect the DIGITAL OUTPUT (OPTICAL) jack to the CD input jacks (or AUX jacks) of the amplifier. REMOTE CONTROL UNIT RC-P0305 OUTPUT DOWN UP To use amplifier Use the provided audio cords to connect the OUTPUT jacks of this unit too much. Adjust the sound volume using an optical fiber cable which you purchased the cord or your nearest dealer. SINGLE TIME _12 db Output level ÷ It is turned...
User Manual
Page 8
... CONTROL OPERATIONS Remote Control Lets you operate this operation after connecting a KENWOOD audio component system lets you take advantage of playback when recording from CD. If your cassette deck and MD recorder for details. Be sure the system control plugs are inserted all the way in system control connection are two KENWOOD system control modes. Automatic Operation (Except [XR] equipment) Automatically switches the input selector on the other than those specified by Kenwood. DPF-3010/2010/1010 (En) 8 SYSTEM CONTROL CONNECTIONS SYSTEM CONTROL Connecting system control cords...
... CONTROL OPERATIONS Remote Control Lets you operate this operation after connecting a KENWOOD audio component system lets you take advantage of playback when recording from CD. If your cassette deck and MD recorder for details. Be sure the system control plugs are inserted all the way in system control connection are two KENWOOD system control modes. Automatic Operation (Except [XR] equipment) Automatically switches the input selector on the other than those specified by Kenwood. DPF-3010/2010/1010 (En) 8 SYSTEM CONTROL CONNECTIONS SYSTEM CONTROL Connecting system control cords...
User Manual
Page 9
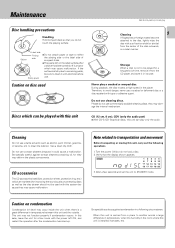
... tape to either the playing side or the label side of time, remove it from a place to remaining paste, be played for improving the sound quality or protecting discs as well as alcohol, paint thinner, gasoline, or benzine, etc. Never play only the audio. Be specially careful against condensation in a following operations. 1. CD (12 cm, 8 cm), CDV (only the audio part) ÷ With CD-G (CD...
... tape to either the playing side or the label side of time, remove it from a place to remaining paste, be played for improving the sound quality or protecting discs as well as alcohol, paint thinner, gasoline, or benzine, etc. Never play only the audio. Be specially careful against condensation in a following operations. 1. CD (12 cm, 8 cm), CDV (only the audio part) ÷ With CD-G (CD...
User Manual
Page 10
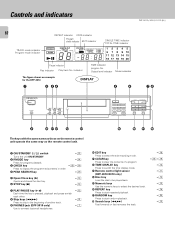
.... 4 PEAK SEARCH key ( 5 Open/Close key (0) Opens and closes the disc tray. 6 STOP key (7) @ @ 7 PLAY/PAUSE key (6) Each time the key is pressed, playback and pause switch each other. 8 Skip keys (4,¢) Press to skip to the beginning of a program. @ TIME DISPLAY key Press to switch the time display mode. # Remote control light sensor (DPF-3010/2010 only) $ Disc tray Load the disc to be played back. % Numeric keys Use the numeric keys...
.... 4 PEAK SEARCH key ( 5 Open/Close key (0) Opens and closes the disc tray. 6 STOP key (7) @ @ 7 PLAY/PAUSE key (6) Each time the key is pressed, playback and pause switch each other. 8 Skip keys (4,¢) Press to skip to the beginning of a program. @ TIME DISPLAY key Press to switch the time display mode. # Remote control light sensor (DPF-3010/2010 only) $ Disc tray Load the disc to be played back. % Numeric keys Use the numeric keys...

User Manual
Page 11
..., change the system installation position to turn the unit ON. Therefore, their lives may occur if direct sunlight or the light of a high-frequency lighting fluorescent lamp enters the remote control light sensor. The keys marked * are intended for use in the power cord, press the ON/STANDBY ( ) switch of the main unit to prevent the malfunction. Operation of remote control unit (DPF-3010/DPF-2010 only) DPF-3010/2010/1010 (En...
..., change the system installation position to turn the unit ON. Therefore, their lives may occur if direct sunlight or the light of a high-frequency lighting fluorescent lamp enters the remote control light sensor. The keys marked * are intended for use in the power cord, press the ON/STANDBY ( ) switch of the main unit to prevent the malfunction. Operation of remote control unit (DPF-3010/DPF-2010 only) DPF-3010/2010/1010 (En...

User Manual
Page 12
Normal play (TRACK mode) Use the following procedure to play starts from track No. 1 1 Press the ON/STANDBY switch to ON. Label side 7 6 4 Disc tray ¢ 1 ¡ 3 Close the tray. 0 3 Start playback. recorded on the tray. (If the disc is not placed horizontally, malfunction will cause malfunctioning. ÷ Place the disc properly along the groove on the CD are displayed. ÷ After a few seconds, play a CD in the operations described...
Normal play (TRACK mode) Use the following procedure to play starts from track No. 1 1 Press the ON/STANDBY switch to ON. Label side 7 6 4 Disc tray ¢ 1 ¡ 3 Close the tray. 0 3 Start playback. recorded on the tray. (If the disc is not placed horizontally, malfunction will cause malfunctioning. ÷ Place the disc properly along the groove on the CD are displayed. ÷ After a few seconds, play a CD in the operations described...
User Manual
Page 14
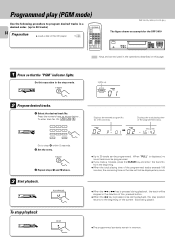
...; Load a disc in the CD player. @ DPF-3010/2010/1010 (En) The figure shows an example for a few seconds. for the DPF-3010 7 6 4 ¢ 1 ¡ : Keys and control used in the operations described on the disc will not be skipped in the direction of the programmed tracks. Do this page. 1 Press so that the "PGM" indicator lights. Displays the total playing time of the pressed button. ÷...
...; Load a disc in the CD player. @ DPF-3010/2010/1010 (En) The figure shows an example for a few seconds. for the DPF-3010 7 6 4 ¢ 1 ¡ : Keys and control used in the operations described on the disc will not be skipped in the direction of the programmed tracks. Do this page. 1 Press so that the "PGM" indicator lights. Displays the total playing time of the pressed button. ÷...

User Manual
Page 15
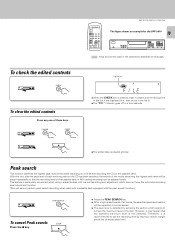
... change the programmed tracks 1 Press the CHECK key. To clear tracks from the end. CHECK Press until the track No. P.MODE ÷ Press it while the "P.C." on tape, the search and repeat play operations of tape using the DPSS function (which occurs with classical or live recording music), the spaces will be added to be automatically created between tracks. Lights...
... change the programmed tracks 1 Press the CHECK key. To clear tracks from the end. CHECK Press until the track No. P.MODE ÷ Press it while the "P.C." on tape, the search and repeat play operations of tape using the DPSS function (which occurs with classical or live recording music), the spaces will be added to be automatically created between tracks. Lights...
User Manual
Page 16
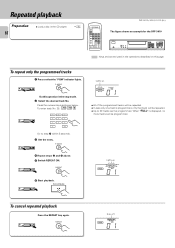
.... 01 PLAY/PAUSE 6 Lights up . PGM REPEAT TRACK NO. 01 To cancel repeated playback Press the REPEAT key again. Repeated playback Preparation 16 ™ ÷ Load a disc in the CD player. @ DPF-3010/2010/1010 (En) The figure shows an example for the DPF-3010 7 6 4 ¢ 1 ¡ : Keys and control used in the operations described on this operation in the stop mode. 2 Select...
.... 01 PLAY/PAUSE 6 Lights up . PGM REPEAT TRACK NO. 01 To cancel repeated playback Press the REPEAT key again. Repeated playback Preparation 16 ™ ÷ Load a disc in the CD player. @ DPF-3010/2010/1010 (En) The figure shows an example for the DPF-3010 7 6 4 ¢ 1 ¡ : Keys and control used in the operations described on this operation in the stop mode. 2 Select...
User Manual
Page 18
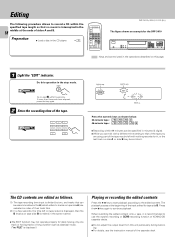
... KENWOOD cassette decks. ÷ Do not adjust the output level from this unit particularly during recording. ÷ For details, see the instruction manual of the track edited for tape side B. PGM Lights up . The CD contents are edited as follows. (1) The tape recording time input is divided by two, and tracks that can edit with a different time setting to that no FILE" is displayed.) Playing...
... KENWOOD cassette decks. ÷ Do not adjust the output level from this unit particularly during recording. ÷ For details, see the instruction manual of the track edited for tape side B. PGM Lights up . The CD contents are edited as follows. (1) The tape recording time input is divided by two, and tracks that can edit with a different time setting to that no FILE" is displayed.) Playing...
User Manual
Page 19
... using a cassette deck with manual recording level adjustment which does not have the automatic recording level adjustment function. (This unit cannot perform peak search recording when used in the operations ...numbers and remaining time in the file A are displayed first, then those in the disc. This feature is detected by leaving a certain margin above the detected peak level. A EDIT 5 P.C. Lights up. However, it is not detected. P.MODE CLEAR DPF-3010/2010/1010 (En) The figure shows an example for the DPF-3010 19 7 6 4 ¢ 1 ¡ : Keys and control used...
... using a cassette deck with manual recording level adjustment which does not have the automatic recording level adjustment function. (This unit cannot perform peak search recording when used in the operations ...numbers and remaining time in the file A are displayed first, then those in the disc. This feature is detected by leaving a certain margin above the detected peak level. A EDIT 5 P.C. Lights up. However, it is not detected. P.MODE CLEAR DPF-3010/2010/1010 (En) The figure shows an example for the DPF-3010 19 7 6 4 ¢ 1 ¡ : Keys and control used...
User Manual
Page 20
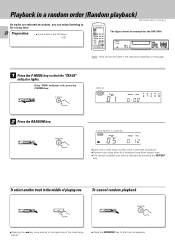
...random playback can enjoy listening to for a long time. 20 Preparation ™ ÷ Load a disc in the CD player. @ DPF-3010/2010/1010 (En) The figure shows an example for the DPF-3010 7 6 4 ¢ 1 ¡ : Keys and control used in the middle of playing one To cancel random playback RANDOM ¢ ÷...REPEAT key. P.MODE Lights up. RANDOM In case track No. 5 is selected TRACK TRACK NO. 05 SINGLE TIME 0 :12 ÷ Each time a track ends, another track in the operations described on this page. 1 Press the P.MODE key so that the "TRACK" indicator lights. To select another...
...random playback can enjoy listening to for a long time. 20 Preparation ™ ÷ Load a disc in the CD player. @ DPF-3010/2010/1010 (En) The figure shows an example for the DPF-3010 7 6 4 ¢ 1 ¡ : Keys and control used in the middle of playing one To cancel random playback RANDOM ¢ ÷...REPEAT key. P.MODE Lights up. RANDOM In case track No. 5 is selected TRACK TRACK NO. 05 SINGLE TIME 0 :12 ÷ Each time a track ends, another track in the operations described on this page. 1 Press the P.MODE key so that the "TRACK" indicator lights. To select another...
User Manual
Page 21
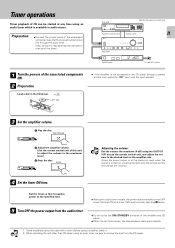
... connected to the CD player through the audio timer. (Also, be sure to read carefully the instruction manual of the timer.) This unit System control cord DPF-3010/2010/1010 (En) 7 6 4 ¢ 1 ¡ Audio cord 21 Amplifier Audio timer 12 F00 To wall AC outlet 1 Turn the powers of the associated components ON. 2 Preparation Load a disc in the CD player. @ Label side 7 6 4 ¢ 1 ¡ ÷ If the amplifier is available in audio stores. PLAY/PAUSE 6 2 Adjust the amplifier volume. (Use the remote control...
... connected to the CD player through the audio timer. (Also, be sure to read carefully the instruction manual of the timer.) This unit System control cord DPF-3010/2010/1010 (En) 7 6 4 ¢ 1 ¡ Audio cord 21 Amplifier Audio timer 12 F00 To wall AC outlet 1 Turn the powers of the associated components ON. 2 Preparation Load a disc in the CD player. @ Label side 7 6 4 ¢ 1 ¡ ÷ If the amplifier is available in audio stores. PLAY/PAUSE 6 2 Adjust the amplifier volume. (Use the remote control...
User Manual
Page 22
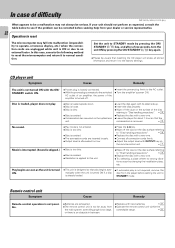
... outlet. ÷ Turn the amplifier's power ON. Set the unit to STANDBY mode by pressing the ON/ STANDBY ( ) key, and after a few seconds, turn the unit ON by changing the installation place, etc. Disc is loaded, player does not play is an obstacle in between. ÷ Replace with new batteries. ! ÷ Operate the remote control unit within the controllable range. ! In case of difficulty DPF-3010/2010/1010 (En) What appears...
... outlet. ÷ Turn the amplifier's power ON. Set the unit to STANDBY mode by pressing the ON/ STANDBY ( ) key, and after a few seconds, turn the unit ON by changing the installation place, etc. Disc is loaded, player does not play is an obstacle in between. ÷ Replace with new batteries. ! ÷ Operate the remote control unit within the controllable range. ! In case of difficulty DPF-3010/2010/1010 (En) What appears...
User Manual
Page 23
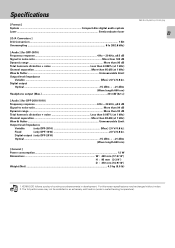
The full performance may be exhibited in development. Notes 2. KENWOOD follows a policy of continuous advancements in an extremely cold location (under a water-freezing temperature). For this reason specifications may not be changed without notice. Specifications [ Format ] System Compact disc digital audio system Laser ...Semiconductor laser [ D/A Convertors ] D/A Conversion ...1 Bit Oversampling ...8 fs (352.8 kHz) [ Audio ] (for DPF-3010) Frequency response 4 Hz ~ 20 kHz, ±0.5 dB...
The full performance may be exhibited in development. Notes 2. KENWOOD follows a policy of continuous advancements in an extremely cold location (under a water-freezing temperature). For this reason specifications may not be changed without notice. Specifications [ Format ] System Compact disc digital audio system Laser ...Semiconductor laser [ D/A Convertors ] D/A Conversion ...1 Bit Oversampling ...8 fs (352.8 kHz) [ Audio ] (for DPF-3010) Frequency response 4 Hz ~ 20 kHz, ±0.5 dB...


