User Manual
Page 123
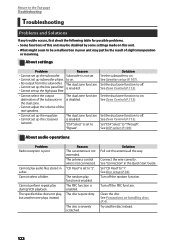
... but another disc instead. 122 Turn off . Set the dual zone function to off the PBC function. See DSP select (P.109). Connect the wire correctly. The dual zone function • Cannot set to "Bypass". The dual zone function is poor. See Zone Control (P.112). About audio ...extended. Set the dual zone function to off the random function. The specified disc does not play function is severely scratched. The antenna control wire is not set • Cannot set up the subwoofer. Subwoofer is not connected. is enabled. • Cannot set up subwoofer phase....
... but another disc instead. 122 Turn off . Set the dual zone function to off the PBC function. See DSP select (P.109). Connect the wire correctly. The dual zone function • Cannot set to "Bypass". The dual zone function is poor. See Zone Control (P.112). About audio ...extended. Set the dual zone function to off the random function. The specified disc does not play function is severely scratched. The antenna control wire is not set • Cannot set up the subwoofer. Subwoofer is not connected. is enabled. • Cannot set up subwoofer phase....

User Manual
Page 124
...cause of the unit. Other Problem The Touch Sensor Tone doesn't sound. Error Message Cause Solution Protect Protective circuit has been activated Wire or insulate the speaker cord as a source although no USB device is not operating correctly due to some reason or other than the... disc. Parental Level Error The disc you wanted to play has a Set the parental level. See Precautions on handling discs (P.4). Contact the Kenwood dealer if this unit. Connect a USB device, and change the source to play has a See Region Codes in contact with the labeled ...
...cause of the unit. Other Problem The Touch Sensor Tone doesn't sound. Error Message Cause Solution Protect Protective circuit has been activated Wire or insulate the speaker cord as a source although no USB device is not operating correctly due to some reason or other than the... disc. Parental Level Error The disc you wanted to play has a Set the parental level. See Precautions on handling discs (P.4). Contact the Kenwood dealer if this unit. Connect a USB device, and change the source to play has a See Region Codes in contact with the labeled ...

User Manual 3
Page 17
... result in malfunction. Blocking these openings will not hit the lid when closing and opening. • If the fuse blows, first make sure the wires aren't touching to a power source with vinyl tape or other similar material. Installation ÑÑBefore Installation Before installation of this unit in the... console of your vehicle. The unit may start a fire. Always connect those wires to both the front output terminals or to the power source running through the fuse box. • Do not cut out the fuse from the...
... result in malfunction. Blocking these openings will not hit the lid when closing and opening. • If the fuse blows, first make sure the wires aren't touching to a power source with vinyl tape or other similar material. Installation ÑÑBefore Installation Before installation of this unit in the... console of your vehicle. The unit may start a fire. Always connect those wires to both the front output terminals or to the power source running through the fuse box. • Do not cut out the fuse from the...
User Manual 3
Page 18
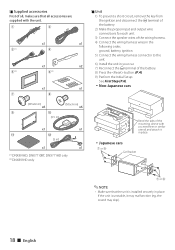
ground, battery, ignition. 5) Connect the wiring harness connector to the unit. 6) Install the unit in the following order; ÑÑSupplied accessories First of the battery. 8) Press the button. (P.4) 9) Perform the ... the key from the ignition and disconnect the ¤ terminal of the battery. 2) Make the proper input and output wire connections for each unit. 3) Connect the speaker wires of the wiring harness. 4) Connect the wiring harness wires in your car. 7) Reconnect the ¤ terminal of all, make sure that the unit is installed securely in...
ground, battery, ignition. 5) Connect the wiring harness connector to the unit. 6) Install the unit in the following order; ÑÑSupplied accessories First of the battery. 8) Press the button. (P.4) 9) Perform the ... the key from the ignition and disconnect the ¤ terminal of the battery. 2) Make the proper input and output wire connections for each unit. 3) Connect the speaker wires of the wiring harness. 4) Connect the wiring harness wires in your car. 7) Reconnect the ¤ terminal of all, make sure that the unit is installed securely in...

User Manual 3
Page 20
... position of the microphone (accessory =). 2) Clean the installation surface. 3) Remove the separator of the microphone (accessory =), and stick the microphone to the place shown below. 4) Wire the microphone cable up to the unit with it secured at least 12 inch (30 cm) from cellular phone or other mounting surface. Fix a cable...
... position of the microphone (accessory =). 2) Clean the installation surface. 3) Remove the separator of the microphone (accessory =), and stick the microphone to the place shown below. 4) Wire the microphone cable up to the unit with it secured at least 12 inch (30 cm) from cellular phone or other mounting surface. Fix a cable...

User Manual 3
Page 22
... Preout Front Audio Preout Subwoofer Preout 22 ñ English Accessory =: Bluetooth Microphone Blue/Red (DNX891HD, DNX7710BT only) RELAY To Relay Box. Purple/White (Reverse sensor wire) Connect to the vehicle's parking brake detection switch harness. Light Green (Parking sensor wire) PRK SW For best safety, be sure to connect the parking sensor.
... Preout Front Audio Preout Subwoofer Preout 22 ñ English Accessory =: Bluetooth Microphone Blue/Red (DNX891HD, DNX7710BT only) RELAY To Relay Box. Purple/White (Reverse sensor wire) Connect to the vehicle's parking brake detection switch harness. Light Green (Parking sensor wire) PRK SW For best safety, be sure to connect the parking sensor.

User Manual 3
Page 23
... car light control switch Light Blue/Yellow (Steering remote control wire) REMOTE CONT STEERING WHEEL REMOTE INPUT Orange/White (Dimmer control wire) ILLUMI Connect to its power control terminal. Brown (Mute control wire) MUTE White/Black + White Gray/Black Gray + Green/Black + Green To front ..., you need to hook up this wire to your car. ÑÑConnecting wires to terminals Fuse (10A) Fuse (10A) Ignition key switch ACC Accessory 1 Red (Ignition wire) Car fuse box (Main fuse) Car fuse box AA Yellow (Battery wire) Black (Ground wire) ¤ (To car chassis) ...
... car light control switch Light Blue/Yellow (Steering remote control wire) REMOTE CONT STEERING WHEEL REMOTE INPUT Orange/White (Dimmer control wire) ILLUMI Connect to its power control terminal. Brown (Mute control wire) MUTE White/Black + White Gray/Black Gray + Green/Black + Green To front ..., you need to hook up this wire to your car. ÑÑConnecting wires to terminals Fuse (10A) Fuse (10A) Ignition key switch ACC Accessory 1 Red (Ignition wire) Car fuse box (Main fuse) Car fuse box AA Yellow (Battery wire) Black (Ground wire) ¤ (To car chassis) ...


