Instruction Manual
Page 2
...radio 23 Using other external components 26 AV-IN 26 Using the external navigation unit 27 Sound adjustment 28 Using the sound equalization 28 Adjusting the cross over frequency 29 2 DDX418/DDX4048BT/DDX318/DDX3048 Changing the display design......30 Setting for video playback .........32...menu items 35 Memorizing/recalling the settings 38 Locking the settings 38 Adjusting the touch position 38 BLUETOOTH OPERATIONS (Only for DDX418/DDX4048BT) Information for using Bluetooth® devices 39 Bluetooth operations 39 Connecting Bluetooth devices 40 Using the Bluetooth mobile phone ...
...radio 23 Using other external components 26 AV-IN 26 Using the external navigation unit 27 Sound adjustment 28 Using the sound equalization 28 Adjusting the cross over frequency 29 2 DDX418/DDX4048BT/DDX318/DDX3048 Changing the display design......30 Setting for video playback .........32...menu items 35 Memorizing/recalling the settings 38 Locking the settings 38 Adjusting the touch position 38 BLUETOOTH OPERATIONS (Only for DDX418/DDX4048BT) Information for using Bluetooth® devices 39 Bluetooth operations 39 Connecting Bluetooth devices 40 Using the Bluetooth mobile phone ...

Instruction Manual
Page 7
time with the connected navigation unit. English 7 Example: 3:00 - 3:29 = 3:00 3:30 - 3:59 = 4:00 5 Finish the procedure. * Appears only when the navigation unit is connected. Setting the clock 1 Display screen. 4 Set the clock time. 2 Display screen. 3 * Synchronizes the clock time with Radio Data System. Sets the clock manually. (☞ below) 1 Adjust the hour 2 Adjust the minute [Reset]: Sets the minute to "00."
time with the connected navigation unit. English 7 Example: 3:00 - 3:29 = 3:00 3:30 - 3:59 = 4:00 5 Finish the procedure. * Appears only when the navigation unit is connected. Setting the clock 1 Display screen. 4 Set the clock time. 2 Display screen. 3 * Synchronizes the clock time with Radio Data System. Sets the clock manually. (☞ below) 1 Adjust the hour 2 Adjust the minute [Reset]: Sets the minute to "00."
Instruction Manual
Page 9
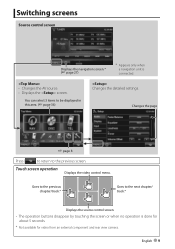
... in this area. (☞ page 36) Changes the detailed settings. Touch screen operation Displays the video control menu. Switching screens Source control screen Displays the navigation screen.* (☞ page 27) * Appears only when a navigation unit is done for about 5 seconds. * Not available for video from an external component and rear view camera.
... in this area. (☞ page 36) Changes the detailed settings. Touch screen operation Displays the video control menu. Switching screens Source control screen Displays the navigation screen.* (☞ page 27) * Appears only when a navigation unit is done for about 5 seconds. * Not available for video from an external component and rear view camera.

Instruction Manual
Page 10
...player. *1 You can select 3 items to be displayed in this area. (☞ page 36) *2 When no navigation unit is connected. *2 Plays a disc. AV SOURCE OPERATIONS Selecting the playback source DDX418/DDX4048BT DDX318/DDX3048 *1 NAV (☞ page 27) DISC (☞ page 11) TEL*3 (☞ page 43) ...) iPod*4 (☞ page 20) TUNER (☞ page 23) VIDEO*4 (☞ page 26) Bluetooth*3 (☞ page 46) Displays the navigation screen when a navigation unit is connected, "No Navigation" appears. *3 Only for DDX418/DDX4048BT. *4 Select an appropriate input setting on . (☞ page 37) 10...
...player. *1 You can select 3 items to be displayed in this area. (☞ page 36) *2 When no navigation unit is connected. *2 Plays a disc. AV SOURCE OPERATIONS Selecting the playback source DDX418/DDX4048BT DDX318/DDX3048 *1 NAV (☞ page 27) DISC (☞ page 11) TEL*3 (☞ page 43) ...) iPod*4 (☞ page 20) TUNER (☞ page 23) VIDEO*4 (☞ page 26) Bluetooth*3 (☞ page 46) Displays the navigation screen when a navigation unit is connected, "No Navigation" appears. *3 Only for DDX418/DDX4048BT. *4 Select an appropriate input setting on . (☞ page 37) 10...
Instruction Manual
Page 27
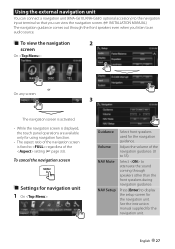
Press [Enter] to regardless of the setting (☞ page 33). Using the external navigation unit You can connect a navigation unit (KNA-G610, KNA-G630: optional accessory) to the navigation input terminal so that you can view the navigation screen. (☞ INSTALLATION MANUAL) The navigation guidance comes out through the front speakers even when you listen to...
Press [Enter] to regardless of the setting (☞ page 33). Using the external navigation unit You can connect a navigation unit (KNA-G610, KNA-G630: optional accessory) to the navigation input terminal so that you can view the navigation screen. (☞ INSTALLATION MANUAL) The navigation guidance comes out through the front speakers even when you listen to...
Instruction Manual
Page 36
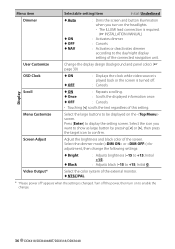
... or the screen is required. (☞ INSTALLATION MANUAL) : Activates dimmer. : Cancels. : Activates or deactivates dimmer according to the day/night display setting of the connected navigation unit. Display Scroll ♦ ON ♦ Once : Repeats scrolling. : Scrolls the displayed information once. ♦ OFF : Cancels. • Touching [ Menu item Selectable setting/item Initial...
... or the screen is required. (☞ INSTALLATION MANUAL) : Activates dimmer. : Cancels. : Activates or deactivates dimmer according to the day/night display setting of the connected navigation unit. Display Scroll ♦ ON ♦ Once : Repeats scrolling. : Scrolls the displayed information once. ♦ OFF : Cancels. • Touching [ Menu item Selectable setting/item Initial...

Instruction Manual
Page 37
...the USB Audio and Video cable for iPod/iPhone. (☞ page 20) • Initial for DDX4048BT/DDX3048: AV-IN, for DDX418/DDX318: iPod Input R-CAM Interrupt Navigation ♦ ON ♦ OFF : Displays the picture from rear view camera when you shift the gear to the previous screen,... clear, or lock the settings you have played back a file with which the Registration Code recorded, this unit's Registration Code is changed. Change the navigation settings. (☞ page 27) Language * Clock Select the text language used for on screen. (☞ page 38) * "Please power off the...
...the USB Audio and Video cable for iPod/iPhone. (☞ page 20) • Initial for DDX4048BT/DDX3048: AV-IN, for DDX418/DDX318: iPod Input R-CAM Interrupt Navigation ♦ ON ♦ OFF : Displays the picture from rear view camera when you shift the gear to the previous screen,... clear, or lock the settings you have played back a file with which the Registration Code recorded, this unit's Registration Code is changed. Change the navigation settings. (☞ page 27) Language * Clock Select the text language used for on screen. (☞ page 38) * "Please power off the...

Instruction Manual
Page 49
... in, it answers the call. NAV/V.SEL Switches to lower the volume. MODE Switches the screen mode. Volume attenuator Press the key once to the navigation screen. Cursor key Moves the cursor when displaying menu. Press again to be played. Screen mode changes each time you press this key. Operations from...
... in, it answers the call. NAV/V.SEL Switches to lower the volume. MODE Switches the screen mode. Volume attenuator Press the key once to the navigation screen. Cursor key Moves the cursor when displaying menu. Press again to be played. Screen mode changes each time you press this key. Operations from...


