Instruction Manual
Page 2
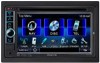
... 5 Activating the security function 5 Component names and functions 6 Setting the clock 7 Common operations 8 Turning on the power 8 Turning off the power 8 Adjusting the volume 8 Putting the unit in standby 8 Turning off/on the screen 8 Switching screens 9 AV SOURCE OPERATIONS Selecting the playback source....10 Disc operations 11 Playing a disc 11 Playable disc type 12 Playback operations 13 Settings for disc playback 17 USB operations 18 Playing a USB device 18 Listening to the iPod/iPhone device 20 iPod/iPhone playback operations 21 Selecting a track/video from menu on...
... 5 Activating the security function 5 Component names and functions 6 Setting the clock 7 Common operations 8 Turning on the power 8 Turning off the power 8 Adjusting the volume 8 Putting the unit in standby 8 Turning off/on the screen 8 Switching screens 9 AV SOURCE OPERATIONS Selecting the playback source....10 Disc operations 11 Playing a disc 11 Playable disc type 12 Playback operations 13 Settings for disc playback 17 USB operations 18 Playing a USB device 18 Listening to the iPod/iPhone device 20 iPod/iPhone playback operations 21 Selecting a track/video from menu on...
Instruction Manual
Page 3
... operations. - The unit returns to operate properly, press the Reset button. You can select the indication language from the menu. (☞ page 37) English 3 Chemical changes occur inside the car... For safety... • Do not raise the volume level too much, as air bags. - For operations using the remote controller (RC-DV340: supplied only for DDX4048BT/DDX3048), ☞ page 48. • < > indicates the variable screens/ menus/operations/settings...
... operations. - The unit returns to operate properly, press the Reset button. You can select the indication language from the menu. (☞ page 37) English 3 Chemical changes occur inside the car... For safety... • Do not raise the volume level too much, as air bags. - For operations using the remote controller (RC-DV340: supplied only for DDX4048BT/DDX3048), ☞ page 48. • < > indicates the variable screens/ menus/operations/settings...
Instruction Manual
Page 4
... a particular installation. The user could lose the authority to operate this equipment may cause harmful interference to comply with the limits for help. Location : Top Panel DDX4048BT/DDX3048: The marking of procedures other than those specified herein may generate or use radio frequency energy. Kenwood Corporation 2967-3, ISHIKAWA-MACHI, HACHIOJI-SHI TOKYO, JAPAN KENWOOD CORP. DDX418/DDX318: CAUTION Use of controls or adjustments or performance...
... a particular installation. The user could lose the authority to operate this equipment may cause harmful interference to comply with the limits for help. Location : Top Panel DDX4048BT/DDX3048: The marking of procedures other than those specified herein may generate or use radio frequency energy. Kenwood Corporation 2967-3, ISHIKAWA-MACHI, HACHIOJI-SHI TOKYO, JAPAN KENWOOD CORP. DDX418/DDX318: CAUTION Use of controls or adjustments or performance...
Instruction Manual
Page 5
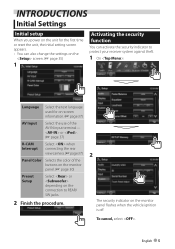
... 37) R-CAM Interrupt Select when connecting the rear view camera. (☞ page 37) Panel Color Selects the color of the AV-IN input terminal- English 5 To cancel, select . INTRODUCTIONS Initial Settings Initial setup When you power on the unit for the first time or reset the unit, the initial setting screen appears. • You can also change the settings on the screen. (☞ page 35) 1 Activating the security function You can activate the security indicator...
... 37) R-CAM Interrupt Select when connecting the rear view camera. (☞ page 37) Panel Color Selects the color of the AV-IN input terminal- English 5 To cancel, select . INTRODUCTIONS Initial Settings Initial setup When you power on the unit for the first time or reset the unit, the initial setting screen appears. • You can also change the settings on the screen. (☞ page 35) 1 Activating the security function You can activate the security indicator...
Instruction Manual
Page 6
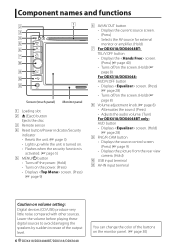
... output level. 6 DDX418/DDX4048BT/DDX318/DDX3048 You can change the color of the buttons on volume setting: Digital devices (CD/USB) produce very little noise compared with other sources. Component names and functions Screen (touch panel) Monitor panel 1 Loading slot 2 0 (Eject) button Ejects the disc. 3 Remote sensor 4 Reset button/Power indicator/Security indicator • Resets the unit. (☞ page 3) • Lights up while the unit is turned on. • Flashes when the security function is activated. (☞ page 5) 5 MENU/ button • Turns off the power...
... output level. 6 DDX418/DDX4048BT/DDX318/DDX3048 You can change the color of the buttons on volume setting: Digital devices (CD/USB) produce very little noise compared with other sources. Component names and functions Screen (touch panel) Monitor panel 1 Loading slot 2 0 (Eject) button Ejects the disc. 3 Remote sensor 4 Reset button/Power indicator/Security indicator • Resets the unit. (☞ page 3) • Lights up while the unit is turned on. • Flashes when the security function is activated. (☞ page 5) 5 MENU/ button • Turns off the power...
Instruction Manual
Page 9
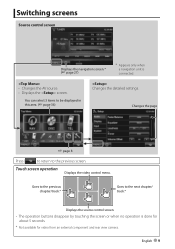
... video control menu. You can select 3 items to the next chapter/ track.* Displays the source control screen. • The operation buttons disappear by touching the screen or when no operation is connected. • Changes the AV source. • Displays the screen. Goes to the previous chapter/track.* Goes to be displayed in this area. (☞ page 36) Changes the detailed settings. Switching screens Source control screen Displays the navigation screen.* (☞ page 27) * Appears only when a navigation unit...
... video control menu. You can select 3 items to the next chapter/ track.* Displays the source control screen. • The operation buttons disappear by touching the screen or when no operation is connected. • Changes the AV source. • Displays the screen. Goes to the previous chapter/track.* Goes to be displayed in this area. (☞ page 36) Changes the detailed settings. Switching screens Source control screen Displays the navigation screen.* (☞ page 27) * Appears only when a navigation unit...

Instruction Manual
Page 10
Displays the Bluetooth mobile phone setting screen. Switches to an external component connected to AV-IN input terminal on a USB device. AV SOURCE OPERATIONS Selecting the playback source DDX418/DDX4048BT DDX318/DDX3048 *1 NAV (☞ page 27) DISC (☞ page 11) TEL*3 (☞ page 43) USB (☞ page 18) iPod*4 (☞ page 20) TUNER (☞ page 23) VIDEO*4 (☞ page 26) Bluetooth*3 (☞ page 46) Displays the navigation screen when a navigation unit is connected, "No Navigation" appears...
Displays the Bluetooth mobile phone setting screen. Switches to an external component connected to AV-IN input terminal on a USB device. AV SOURCE OPERATIONS Selecting the playback source DDX418/DDX4048BT DDX318/DDX3048 *1 NAV (☞ page 27) DISC (☞ page 11) TEL*3 (☞ page 43) USB (☞ page 18) iPod*4 (☞ page 20) TUNER (☞ page 23) VIDEO*4 (☞ page 26) Bluetooth*3 (☞ page 46) Displays the navigation screen when a navigation unit is connected, "No Navigation" appears...

Instruction Manual
Page 17
... Select the initial disc menu language; Screen Ratio Select the monitor type to reduce the dynamic range a little. ♦ Dialog : Select this . Initial English (☞ page 55). Settings for DDX418/DDX318: OFF Select the initial audio language; Initial English (☞ page 55). Dynamic Range Control You can change the dynamic range while playing Dolby Digital software. ♦ Wide : Select this to enjoy a powerful sound at a low volume level...
... Select the initial disc menu language; Screen Ratio Select the monitor type to reduce the dynamic range a little. ♦ Dialog : Select this . Initial English (☞ page 55). Settings for DDX418/DDX318: OFF Select the initial audio language; Initial English (☞ page 55). Dynamic Range Control You can change the dynamic range while playing Dolby Digital software. ♦ Wide : Select this to enjoy a powerful sound at a low volume level...

Instruction Manual
Page 18
... connection ports, some USB devices. • Do not leave a USB device in the car, expose to direct sunlight, or high temperature to avoid deformation or cause damaging to the device. 18 DDX418/DDX4048BT/DDX318/DDX3048 CA-U1EX (500 mA Max: optional accessory) The source changes to avoid losing the data. In this case, disconnect the USB device then reset this unit and the USB device. • Operation and power...
... connection ports, some USB devices. • Do not leave a USB device in the car, expose to direct sunlight, or high temperature to avoid deformation or cause damaging to the device. 18 DDX418/DDX4048BT/DDX318/DDX3048 CA-U1EX (500 mA Max: optional accessory) The source changes to avoid losing the data. In this case, disconnect the USB device then reset this unit and the USB device. • Operation and power...

Instruction Manual
Page 23
... seek mode. • AUTO1: Auto Search • AUTO2: Tunes in stations in memory one after another. • MANU: Manual Search Searches for better FM reception. (Stereo effect will be lost.) • The MONO indicator lights up when receiving an FM stereo broadcast with sufficient signal strength. [P1] - [P6] • Turns in the preset station. (Press) • Presets the currently tuned station. (Hold) [Mode] Displays tuner setting screen. (☞ page 24) [TI] Activates...
... seek mode. • AUTO1: Auto Search • AUTO2: Tunes in stations in memory one after another. • MANU: Manual Search Searches for better FM reception. (Stereo effect will be lost.) • The MONO indicator lights up when receiving an FM stereo broadcast with sufficient signal strength. [P1] - [P6] • Turns in the preset station. (Press) • Presets the currently tuned station. (Hold) [Mode] Displays tuner setting screen. (☞ page 24) [TI] Activates...
Instruction Manual
Page 27
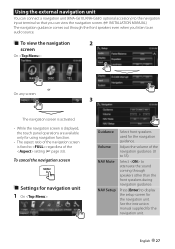
... the sound coming through the front speakers even when you can view the navigation screen. (☞ INSTALLATION MANUAL) The navigation guidance comes out through speakers other than the front speakers during navigation guidance. To view the navigation 2 screen On : or On any screen: 3 The navigation screen is activated. • While the navigation screen is fixed to an audio source. Adjust the volume of the navigation screen is displayed, the touch panel operations...
... the sound coming through the front speakers even when you can view the navigation screen. (☞ INSTALLATION MANUAL) The navigation guidance comes out through speakers other than the front speakers during navigation guidance. To view the navigation 2 screen On : or On any screen: 3 The navigation screen is activated. • While the navigation screen is fixed to an audio source. Adjust the volume of the navigation screen is displayed, the touch panel operations...

Instruction Manual
Page 29
... the subwoofer is set to . Adjusting the cross over frequency 1 On : 2 2 3 Adjust the sound of Bass/ Middle/Treble to adjust, then make adjustment. Adjusts the width of "Selecting a preset sound mode," then... Adjusting the sound precisely 1 Perform steps 1 and 2 of the frequency. Adjusts level. Flat Freq Level Q Factor Bass EXT SW Level Changes level of each band. 3 Select the item to 0. English 29 Activates/deactivates bass. Adjusts the cross over for subwoofer (low pass filter).*1 Adjusts the cross over for front or rear speakers...
... the subwoofer is set to . Adjusting the cross over frequency 1 On : 2 2 3 Adjust the sound of Bass/ Middle/Treble to adjust, then make adjustment. Adjusts the width of "Selecting a preset sound mode," then... Adjusting the sound precisely 1 Perform steps 1 and 2 of the frequency. Adjusts level. Flat Freq Level Q Factor Bass EXT SW Level Changes level of each band. 3 Select the item to 0. English 29 Activates/deactivates bass. Adjusts the cross over for subwoofer (low pass filter).*1 Adjusts the cross over for front or rear speakers...

Instruction Manual
Page 35
... connected to REAR/SW jacks through an amplifier. : Select this when subwoofer is connected to R6; Speaker Select Select the size of the following categories: DVD/DVD-VR, VCD/CD, and DivX/ MPEG1/MPEG2/MP3/WMA/WAV/AAC.) The volume level will automatically increase or decrease when you change the source. ♦ -15 to +6; Initial 0 Press [5/∞/2/3] or drag [ ] to produce a well-balanced sound at a low volume level. Audio X'over Adjust...
... connected to REAR/SW jacks through an amplifier. : Select this when subwoofer is connected to R6; Speaker Select Select the size of the following categories: DVD/DVD-VR, VCD/CD, and DivX/ MPEG1/MPEG2/MP3/WMA/WAV/AAC.) The volume level will automatically increase or decrease when you change the source. ♦ -15 to +6; Initial 0 Press [5/∞/2/3] or drag [ ] to produce a well-balanced sound at a low volume level. Audio X'over Adjust...
Instruction Manual
Page 36
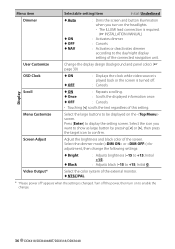
... [ Menu item Selectable setting/item Initial: Underlined Dimmer ♦ Auto ♦ ON ♦ OFF ♦ NAV : Dims the screen and button illumination when you turn on the headlights. • The ILLUMI lead connection is turned off. : Cancels. User Customize Change the display design (background and panel color). (☞ page 30) OSD Clock ♦ ON ♦ OFF : Displays the clock while video source is played back or the screen is required. (☞ INSTALLATION MANUAL) : Activates dimmer. : Cancels. : Activates...
... [ Menu item Selectable setting/item Initial: Underlined Dimmer ♦ Auto ♦ ON ♦ OFF ♦ NAV : Dims the screen and button illumination when you turn on the headlights. • The ILLUMI lead connection is turned off. : Cancels. User Customize Change the display design (background and panel color). (☞ page 30) OSD Clock ♦ ON ♦ OFF : Displays the clock while video source is played back or the screen is required. (☞ INSTALLATION MANUAL) : Activates dimmer. : Cancels. : Activates...

Instruction Manual
Page 37
... operation buttons and menu items. Adjust the clock time. (☞ page 7) System Beep ♦ ON ♦ OFF : Activates the key-touch tone. : Cancels. Activate or deactivate the security function. (☞ page 5) Serial Number Displays the serial number. Touch Panel Adjust Adjust the touch position of AV-IN input terminal. ♦ AV-IN : Select to play an AV component connected to the AV-IN input terminal. ♦ iPod : Select when connecting the iPod/iPhone using the USB Audio and Video cable...
... operation buttons and menu items. Adjust the clock time. (☞ page 7) System Beep ♦ ON ♦ OFF : Activates the key-touch tone. : Cancels. Activate or deactivate the security function. (☞ page 5) Serial Number Displays the serial number. Touch Panel Adjust Adjust the touch position of AV-IN input terminal. ♦ AV-IN : Select to play an AV component connected to the AV-IN input terminal. ♦ iPod : Select when connecting the iPod/iPhone using the USB Audio and Video cable...

Instruction Manual
Page 39
... these operations, stop your car in a safe place. • Some Bluetooth devices may not be connected without cables and communicate with each other devices. Bluetooth operations Bluetooth is disconnected. BLUETOOTH OPERATIONS (Only for DDX418/DDX4048BT) Information for using phone book, etc. When you . • When the unit is turned off, the device is a short-range wireless radio communication technology for the mobile device such as dialing the numbers, using Bluetooth® devices • While driving, do...
... these operations, stop your car in a safe place. • Some Bluetooth devices may not be connected without cables and communicate with each other devices. Bluetooth operations Bluetooth is disconnected. BLUETOOTH OPERATIONS (Only for DDX418/DDX4048BT) Information for using phone book, etc. When you . • When the unit is turned off, the device is a short-range wireless radio communication technology for the mobile device such as dialing the numbers, using Bluetooth® devices • While driving, do...

Instruction Manual
Page 47
... Tone Change*1 When is turned on the Bluetooth device - Bluetooth HF/Audio Select the speakers used for Bluetooth (both phone use and audio player). ♦ Front Only : From front speakers only. ♦ All : From all settings you of the arrival of a message. : The unit informs you have made for . Menu items Selectable setting/item Initial: Underlined Connection ♦ Connect : ☞ page 41 ♦ Disconnect : ☞ page 41 PIN Code Changes the PIN code of the unit. Audio Device*2 Shows the audio device...
... Tone Change*1 When is turned on the Bluetooth device - Bluetooth HF/Audio Select the speakers used for Bluetooth (both phone use and audio player). ♦ Front Only : From front speakers only. ♦ All : From all settings you of the arrival of a message. : The unit informs you have made for . Menu items Selectable setting/item Initial: Underlined Connection ♦ Connect : ☞ page 41 ♦ Disconnect : ☞ page 41 PIN Code Changes the PIN code of the unit. Audio Device*2 Shows the audio device...
Instruction Manual
Page 56
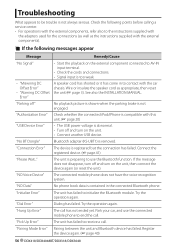
... points before calling a service center. • For operations with the external components, refer also to initialize the Bluetooth module. The unit has failed to contact with the adapters used for the connections (as well as appropriate, then reset the unit (☞ page 3). Wire or insulate the speaker cord as the instructions supplied with this unit. (☞ page 20) "USB Device Error" • The USB power voltage is registered but...
... points before calling a service center. • For operations with the external components, refer also to initialize the Bluetooth module. The unit has failed to contact with the adapters used for the connections (as well as appropriate, then reset the unit (☞ page 3). Wire or insulate the speaker cord as the instructions supplied with this unit. (☞ page 20) "USB Device Error" • The USB power voltage is registered but...
Instruction Manual
Page 57
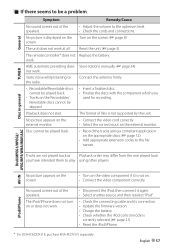
... screen. (☞ page 8) Reset the unit. (☞ page 3) The remote controller* does not work . • Disconnect the iPod, then connect it again. • Select another source and then reselect "iPod". • Check the connecting cable and its connection. • Update the firmware version. • Charge the battery. • Check whether the iPod control mode is correctly selected. (☞ page 21) • Reset the iPod/iPhone. * For DDX418/DDX318, purchase KNA-RCDV331 separately. Turn on the screen. Connect the antenna...
... screen. (☞ page 8) Reset the unit. (☞ page 3) The remote controller* does not work . • Disconnect the iPod, then connect it again. • Select another source and then reselect "iPod". • Check the connecting cable and its connection. • Update the firmware version. • Charge the battery. • Check whether the iPod control mode is correctly selected. (☞ page 21) • Reset the iPod/iPhone. * For DDX418/DDX318, purchase KNA-RCDV331 separately. Turn on the screen. Connect the antenna...
Instruction Manual
Page 58
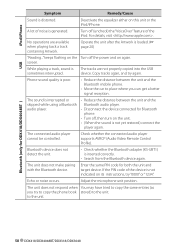
... device connected for Bluetooth phone. • Turn off, then turn on the unit. • (When the sound is not indicated on again. Adjust the microphone unit position. Turn off the power and on its instructions, try again. While playing a track, sound is loaded. (☞ page 20) "Reading..." If the PIN code of the device is not yet restored) connect the player again. keeps flashing on this unit or the iPod/iPhone. The unit does not make pairing...
... device connected for Bluetooth phone. • Turn off, then turn on the unit. • (When the sound is not indicated on again. Adjust the microphone unit position. Turn off the power and on its instructions, try again. While playing a track, sound is loaded. (☞ page 20) "Reading..." If the PIN code of the device is not yet restored) connect the player again. keeps flashing on this unit or the iPod/iPhone. The unit does not make pairing...


