Instruction Manual
Page 6
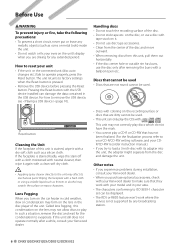
.... • The RDS or RBDS feature won't work with your model and in the disc player of this unit is stained, wipe it with a clean soft dry cloth. ¤ •... neutral cleaner, then wipe it . • Do not use the disc only after a while, consult your Kenwood dealer. • Discs with a hard cloth or using a volatile liquid such as coins or metal tools)...DNX5120/DNX512EX/DDX512/DDX5032 Wiping the faceplate with coloring on the unit's display when you purchase optional accessories, check with tape stuck on the lens in your area. • The characters conforming to load...
.... • The RDS or RBDS feature won't work with your model and in the disc player of this unit is stained, wipe it with a clean soft dry cloth. ¤ •... neutral cleaner, then wipe it . • Do not use the disc only after a while, consult your Kenwood dealer. • Discs with a hard cloth or using a volatile liquid such as coins or metal tools)...DNX5120/DNX512EX/DDX512/DDX5032 Wiping the faceplate with coloring on the unit's display when you purchase optional accessories, check with tape stuck on the lens in your area. • The characters conforming to load...
Instruction Manual
Page 7
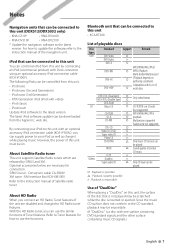
... Fifth Generation iPod (iPod with Dock connector using an optional accessory iPod connection cable (KCA-iP300V ). Use of playable discs Disc Standard Support types DVD DVD Video ‡ DVD Audio × DVD-R ‡ Remark DVD-RW DVD+R DVD+RW MP3/WMA/AAC/JPEG/ ‡ MPEG Playback Multi-.../ ‡ (Playback depends on authoring conditions) Compatible with one surface containing DVD standard signals and the other surface containing music CD signals.) English 7 Optional accessories below are necessary for how to the latest version. About HD Radio When ...
... Fifth Generation iPod (iPod with Dock connector using an optional accessory iPod connection cable (KCA-iP300V ). Use of playable discs Disc Standard Support types DVD DVD Video ‡ DVD Audio × DVD-R ‡ Remark DVD-RW DVD+R DVD+RW MP3/WMA/AAC/JPEG/ ‡ MPEG Playback Multi-.../ ‡ (Playback depends on authoring conditions) Compatible with one surface containing DVD standard signals and the other surface containing music CD signals.) English 7 Optional accessories below are necessary for how to the latest version. About HD Radio When ...
Instruction Manual
Page 8
... systems are recorded in the same disc, only the playback system recorded at the first setout is played. • Playable disc media CD-R/RW/ROM, DVD±R/RW • Playable disc file format ISO 9660 Level 1/2, Joliet, Romeo, Long file name. • Playable USB device USB mass storage class, iPod with...
... systems are recorded in the same disc, only the playback system recorded at the first setout is played. • Playable disc media CD-R/RW/ROM, DVD±R/RW • Playable disc file format ISO 9660 Level 1/2, Joliet, Romeo, Long file name. • Playable USB device USB mass storage class, iPod with...
Instruction Manual
Page 31
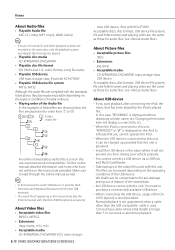
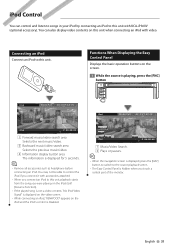
... iPod Video Signal" is displayed on the video screen. • While connecting an iPod, "KENWOOD" appears on the screen. 1 While the source is displayed, press the [NAV] button to switch to this unit with KCA-iP300V (optional accessory). I N SCRN TI 1 1 iPod 2 P 00:00:05 IN . 1 Music/Video Search. 2 ... Panel Displays the basic operation buttons on the iPod and the iPod's control is displayed for 5 seconds. ⁄ • Remove all accessories such as headphone before connecting an iPod. iPod Mode:Full AV - You may not be able to control the iPod if you connect it...
... iPod Video Signal" is displayed on the video screen. • While connecting an iPod, "KENWOOD" appears on the screen. 1 While the source is displayed, press the [NAV] button to switch to this unit with KCA-iP300V (optional accessory). I N SCRN TI 1 1 iPod 2 P 00:00:05 IN . 1 Music/Video Search. 2 ... Panel Displays the basic operation buttons on the iPod and the iPod's control is displayed for 5 seconds. ⁄ • Remove all accessories such as headphone before connecting an iPod. iPod Mode:Full AV - You may not be able to control the iPod if you connect it...
Instruction Manual
Page 37
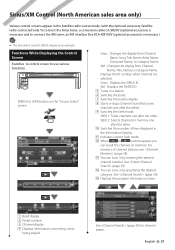
... [SIRIUS] or [XM] button on memory. For memory of lines displayed in the Satellite radio source mode. (with the optional accessory Satellite radio connected only. English 37 q Indicates current Seek mode w When to connect the XM tuner, an XM interface Box KCA-XM100V (optional... number when Channel 0 is necessary.) • This document uses the SIRIUS display as an example. To connect the Sirius tuner, a conversion cable CA-SR20V (optional accessory) is necessary and to buttons appear, you can recall the channel on the "Source Select" screen 1 2 5 78 6 9 10 11 3 4 5 12 ...
... [SIRIUS] or [XM] button on memory. For memory of lines displayed in the Satellite radio source mode. (with the optional accessory Satellite radio connected only. English 37 q Indicates current Seek mode w When to connect the XM tuner, an XM interface Box KCA-XM100V (optional... number when Channel 0 is necessary.) • This document uses the SIRIUS display as an example. To connect the Sirius tuner, a conversion cable CA-SR20V (optional accessory) is necessary and to buttons appear, you can recall the channel on the "Source Select" screen 1 2 5 78 6 9 10 11 3 4 5 12 ...

Instruction Manual
Page 40
...-phone to read the instruction manual of the Bluetooth Unit as well. Bluetooth Audio Control When KCA-BT200 (optional accessory) is connected, you can listen to audio files stored in Bluetooth audio player and cell-phone. • You need to register your Bluetooth Unit beforehand. Functions While Displaying the Control Screen ... screen to use various functions. [Bluetooth] button on the "Source Select" screen 3 1 2 4 4 1 Plays. 2 Pauses. 3 Stops playing. 4 Selects a file. ⁄ • If the Bluetooth Audio player does not support AVRCP profile, buttons 1 to 4 are not displayed.
...-phone to read the instruction manual of the Bluetooth Unit as well. Bluetooth Audio Control When KCA-BT200 (optional accessory) is connected, you can listen to audio files stored in Bluetooth audio player and cell-phone. • You need to register your Bluetooth Unit beforehand. Functions While Displaying the Control Screen ... screen to use various functions. [Bluetooth] button on the "Source Select" screen 3 1 2 4 4 1 Plays. 2 Pauses. 3 Stops playing. 4 Selects a file. ⁄ • If the Bluetooth Audio player does not support AVRCP profile, buttons 1 to 4 are not displayed.

Instruction Manual
Page 41
The Phone Call ("CALL") screen appears, and system is paused automatically. Hang up the MUTE wire to your telephone using a commercial telephone accessory. The system resumes playing automatically. ⁄ • To use the TEL Mute feature, you need to . Phone Call ("CALL") screen When the call When the telephone is called ... English 41 Muting Audio Volume upon Reception of Phone Call When the telephone is called , the system is paused. Refer to hook up the phone. Muting Audio Volume upon Reception of Phone call ends...
The Phone Call ("CALL") screen appears, and system is paused automatically. Hang up the MUTE wire to your telephone using a commercial telephone accessory. The system resumes playing automatically. ⁄ • To use the TEL Mute feature, you need to . Phone Call ("CALL") screen When the call When the telephone is called ... English 41 Muting Audio Volume upon Reception of Phone Call When the telephone is called , the system is paused. Refer to hook up the phone. Muting Audio Volume upon Reception of Phone call ends...

Instruction Manual
Page 44
... the Bluetooth Unit as well • To use the Phonebook, it must have registered a phone number in the Hands Free control mode. (with the optional accessory Bluetooth unit connected only) • You need to register your cell-phone to preset a phone number, see the instruction manual of bar segments, the higher...
... the Bluetooth Unit as well • To use the Phonebook, it must have registered a phone number in the Hands Free control mode. (with the optional accessory Bluetooth unit connected only) • You need to register your cell-phone to preset a phone number, see the instruction manual of bar segments, the higher...
Installation Guide
Page 5
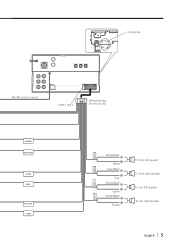
CONT P CONT REAR R REAR L FRONT R FRONT L White/Black + White Gray/Black + Gray Green/Black + Green Purple/Black + Purple To front left speaker To front right speaker To rear left speaker To rear right speaker English | 5 Cooling fan FM/AM antenna input FUSE ( 15A ) Wiring harness (Accessory 1) REVERSE REMO.CONT ILLUMI MUTE ANT.
CONT P CONT REAR R REAR L FRONT R FRONT L White/Black + White Gray/Black + Gray Green/Black + Green Purple/Black + Purple To front left speaker To front right speaker To rear left speaker To rear right speaker English | 5 Cooling fan FM/AM antenna input FUSE ( 15A ) Wiring harness (Accessory 1) REVERSE REMO.CONT ILLUMI MUTE ANT.
Installation Guide
Page 7
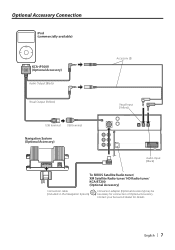
Optional Accessory Connection iPod (commercially available) KCA-iP300V (Optional Accessory) Audio Output (Black) Accessory 2 Visual Output (Yellow) Visual Input (Yellow) USB terminal USB terminal Navigation System (Optional Accessory) Audio Input (Black) To SIRIUS Satellite Radio tuner/ XM Satellite Radio tuner/ HD Radio tuner/ KCA-BT200 (Optional Accessory) Connection cable (Included in the Navigation System) Conversion adapter (Optional Accessory) may be necessary for details. English | 7 Contact your Kenwood dealer for connection of Optional Accessory.
Optional Accessory Connection iPod (commercially available) KCA-iP300V (Optional Accessory) Audio Output (Black) Accessory 2 Visual Output (Yellow) Visual Input (Yellow) USB terminal USB terminal Navigation System (Optional Accessory) Audio Input (Black) To SIRIUS Satellite Radio tuner/ XM Satellite Radio tuner/ HD Radio tuner/ KCA-BT200 (Optional Accessory) Connection cable (Included in the Navigation System) Conversion adapter (Optional Accessory) may be necessary for details. English | 7 Contact your Kenwood dealer for connection of Optional Accessory.
Installation Guide
Page 8
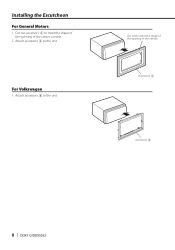
Cut out to meet the shape of the opening of the opening in the vehicle. Cut out accessory 4 to meet the shape of the center console. 2. Attach accessory 8 to the unit. Accessory 4 Accessory 8 8 | DDX512/DDX5032 Attach accessory 4 to the unit. Installing the Escutcheon For General Motors 1. For Volkswagen 1.
Cut out to meet the shape of the opening of the opening in the vehicle. Cut out accessory 4 to meet the shape of the center console. 2. Attach accessory 8 to the unit. Accessory 4 Accessory 8 8 | DDX512/DDX5032 Attach accessory 4 to the unit. Installing the Escutcheon For General Motors 1. For Volkswagen 1.

Installation Guide
Page 9
For Toyota/Scion 1. Cut out accessory 4 as illustrated. Use 2 pieces of accessory 5 for 1 accessory 4 cutout. 3. Attach accessory 4 cut -out against the center rib as illustrated. Accessory 5 Accessory 4 English | 9 Fold double-sided adhesive (accessory 5) along the slit and attach it to accessory 4 cut -out to the unit. Cutting line 2.
For Toyota/Scion 1. Cut out accessory 4 as illustrated. Use 2 pieces of accessory 5 for 1 accessory 4 cutout. 3. Attach accessory 4 cut -out against the center rib as illustrated. Accessory 5 Accessory 4 English | 9 Fold double-sided adhesive (accessory 5) along the slit and attach it to accessory 4 cut -out to the unit. Cutting line 2.
Installation Guide
Page 10
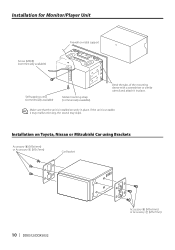
... unit is unstable, it in place. Installation on Toyota, Nissan or Mitsubishi Car using Brackets Accessory 6 (M5x6mm) or Accessory 7 (M5x7mm) Car Bracket 10 | DDX512/DDX5032 Accessory 6 (M5x6mm) or Accessory 7 (M5x7mm) If the unit is installed securely in place. Installation for Monitor/Player Unit Screw (M4X8) (commercially available) Firewall or metal support Self-tapping screw (commercially available...
... unit is unstable, it in place. Installation on Toyota, Nissan or Mitsubishi Car using Brackets Accessory 6 (M5x6mm) or Accessory 7 (M5x7mm) Car Bracket 10 | DDX512/DDX5032 Accessory 6 (M5x6mm) or Accessory 7 (M5x7mm) If the unit is installed securely in place. Installation for Monitor/Player Unit Screw (M4X8) (commercially available) Firewall or metal support Self-tapping screw (commercially available...
Installation Guide
Page 11
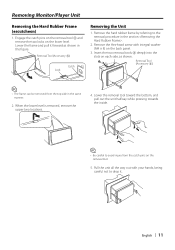
... in the section . 2. Remove the hard rubber frame by referring to the removal procedure in the same manner. 2. Removal Tool (Accessory 3) ⁄ • The frame can be removed from the catch pins on the lower level. Removal Tool (Accessory 3) Catch Lock Removing the Unit 1. Removing Monitor/Player Unit Removing the Hard Rubber Frame (escutcheon) 1.
... in the section . 2. Remove the hard rubber frame by referring to the removal procedure in the same manner. 2. Removal Tool (Accessory 3) ⁄ • The frame can be removed from the catch pins on the lower level. Removal Tool (Accessory 3) Catch Lock Removing the Unit 1. Removing Monitor/Player Unit Removing the Hard Rubber Frame (escutcheon) 1.