Kenwood CMOS-220 Support and Manuals
Get Help and Manuals for this Kenwood item

View All Support Options Below
Free Kenwood CMOS-220 manuals!
Problems with Kenwood CMOS-220?
Ask a Question
Free Kenwood CMOS-220 manuals!
Problems with Kenwood CMOS-220?
Ask a Question
Popular Kenwood CMOS-220 Manual Pages
Operation Manual - Page 1

... or service on the warranty card, and in the spaces designated on the product. Refer to read through this instruction manual. Model CMOS-320/CMOS-220 Serial number
US Residence Only
Register Online
Register your Kenwood product at www.Kenwoodusa.com
© 2014 JVC KENWOOD Corporation
LYT2720-001A (W)
CMOS-320 CMOS-220
UNIVERSAL MULTI-VIEW CAMERA/ UNIVERSAL REAR VIEW CAMERA
INSTRUCTION...
Operation Manual - Page 2

... the car is designed to supplement the driver's rear view, but confirm whether the TV you when reversing to drill the holes. If you when reversing to confirm the view.
• Do not wash your eyes. Be sure to look behind you use your unit to install the camera, check the location of distance. Be sure...
Operation Manual - Page 3

... the vehicle, the coating may melt and cause short-circuiting, which may cause a short circuit, that in the rear view camera falling off . • Do not attach the camera bracket to cause a short circuit, then replace the old fuse with one with the same rating.
• Insulate unconnected wires with cable clamps or adhesive tape...
Operation Manual - Page 4

... should be attached.
Mount so that the "KENWOOD" logo appears at the center of the required connections.
Installation
CAUTION
• The adjustments during camera setting may be hindered depending on which the camera bracket is to be installed at a height of 30cm to 80cm (0.98feet to 2.62feet).
4 | CMOS-320/CMOS-220
Install the camera at the top. Be careful not to...
Operation Manual - Page 5
... "Camera ID Setting" (page 13) and "Camera Setting Procedure" (page 10).
Vehicle rear part or bumper
When installing CMOS-320 as a front camera: When you have connected this camera to the instruction manual of the unit that the guideline and the parking lines become vertical. When installing CMOS-320 as a rearview camera: Refer to page 9 to [Overhead View].
When using CMOS-320...
Operation Manual - Page 6

... the driver seat side.
ɹɹɹ
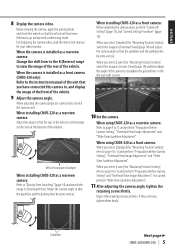
When using the camera bracket clamping screw. If required, secure the bracket on the camera bracket and attach it in position. Select one of them to fit the position of the switch unit and then attach it . For the ID setting, see "Camera ID Setting"(page 13)
6 | CMOS-320/CMOS-220 Do...
Operation Manual - Page 7
...
GND cord (Black)
Connect to a metallic part of vehicle (a part of chassis connected to prevent the short-circuiting incident. CMOS-320/CMOS-220 | 7
GND
CAUTION • If the ...terminal of the battery to the negative side of the video monitor. Camera's cord length: 1.5 m (4.92 feet), Power cord: 7.5 m (24.6 feet)
Power cord
Switch unit (CMOS-320 only): 1 m (3.28 feet) CAM+ (Green/red)
...
Operation Manual - Page 8

...
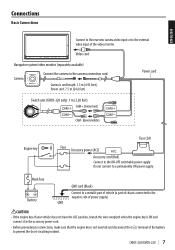
To power supply
8 | CMOS-320/CMOS-220 For details, see "Camera ID Setting" (page 13). • Connect the power supply in the same way as rearview camera)
Connect to set an ID for the front camera. System Connection (CMOS-320 only)
• When connecting the camera to the dedicated rearview camera video input. Video cord
Power cord
Camera 1 (Used as "Basic Connections...
Operation Manual - Page 9

... parking brake and push the brake pedal so that the vehicle is completely stationary.
CMOS-320/CMOS-220 | 9
When installing the front camera at the center of the vehicle
(page 4).
• If not, the image may not be symmetric in the "Corner View".
2 Move the vehicle on the center of the parking
line.
• You can...
Operation Manual - Page 10

... then go to the left and right. Select [Lower] when installing the camera at a height of 50cm to 80cm (1.64feet to 2.62feet).
10 | CMOS-320/CMOS-220
Adjustment is possible by two steps to step 5. • Selecting [Reset All] resets all of the camera installation position.
1 Select "OVERHEAD VIEW IMAGE ADJUSTMENT
(CENTERING)".
2 Press the + or -
The following items...
Operation Manual - Page 11

... Adjustment (Up-and-Down Angle)
This item adjusts the vertical angle (inclination) of the camera installation position.
1 Select "OVERHEAD VIEW IMAGE ADJUSTMENT
(Right-and-Left ANGLE)".
2 Press the + or - CMOS-320/CMOS-220 | 11 button of the switch unit so
that the center of the switch unit
so that the lines indicating the vehicle width are...
Operation Manual - Page 12

... default, guidelines shown below are displayed assuming that the camera installation height is 80 cm (2.62 feet) and that the distance between the left and right lines of the guidelines displayed in the wide view.
1 Select "GUIDELINE ADJUSTMENT (Size)". 2 Press the + or - Camera Setting (CMOS-320 only)
For Guideline Adjustment
• The subsequent adjustments adjust the...
Operation Manual - Page 13

... the image, refer to set the reference line for more than 2 seconds, and then press and hold the -
CMOS-320/CMOS-220 | 13 The red line can be seen in the wide view.
button of your vehicle's bumper. If the edge of your vehicle's bumper cannot be used independently to the instruction manual of it is required...
Operation Manual - Page 14

...
Depending on the camera installation position, the Overhead View image may not be displayed correctly. • Overhead View may appear twice, depending on touch the control unit screen (page 8). When connecting the camera to switch the display view as well on the connected navigation system.
14 | CMOS-320/CMOS-220 This allows the control unit to a Kenwood navigation system etc...
Operation Manual - Page 15

... F value 2.0 Angles of view
: Horizontal: Approx. 195° : Vertical: Approx. 145° Video output: 1.0 Vp-p/ 75Ω Illumination range: Approx. 0.9 to 100,000 lux Iris system: Electronic iris Scanning system: Interlace Synchronizing system: Internal synchronization Dimensions (WxHxD): 23.4 x 23.4 x 26.1 mm Weight: Approx. 23 g (without cable)
Camera Unit (CMOS-220)
Output video : Wide-angle...
Kenwood CMOS-220 Reviews
We have not received any reviews for Kenwood yet.