Kenwood CMOS-210 Support and Manuals
Get Help and Manuals for this Kenwood item

View All Support Options Below
Free Kenwood CMOS-210 manuals!
Problems with Kenwood CMOS-210?
Ask a Question
Free Kenwood CMOS-210 manuals!
Problems with Kenwood CMOS-210?
Ask a Question
Kenwood CMOS-210 Videos

Kenwood DNX5190 and the CMOS-210 Camera
Duration: :36
Total Views: 12,265
Duration: :36
Total Views: 12,265
102 - ????????+??????? KENWOOD CMOS-210
Duration: 1:11
Total Views: 26,153
Duration: 1:11
Total Views: 26,153
Kenwood DNX5190 and the CMOS-210 Camera at Night
Duration: :30
Total Views: 1,983
Duration: :30
Total Views: 1,983
Popular Kenwood CMOS-210 Manual Pages
User Manual - Page 1

.... Familiarity with installation and operation procedures will help you call upon your Kenwood dealer for information or service on the warranty card, and in the space provided below. For your Kenwood product at www.Kenwoodusa.com
© 2011 JVC KENWOOD Corporation
B64-4963-08/00 (W) CMOS-310 CMOS-210
UNIVERSAL MULTI-VIEW CAMERA/ UNIVERSAL REAR VIEW CAMERA
INSTRUCTION MANUAL
CAMÉ...
User Manual - Page 2

... input and output wire connections
for checking the view at the rear of a car.
• A rear view camera is installed under a front seat, make sure none of this unit is a camera that in water entering the camera or the camera falling off.
• Check camera bracket installation before driving. NOTE
• This product is a rear view camera for each unit.
3 Connect the wiring harness...
User Manual - Page 3
...in the rear view camera falling off. - on the car are working properly.
• Install so that it does not obstruct the rear field of view. • Install so that it cannot touch any moving parts, such as with battery wires, the battery may lead to the unit coming off with camera bracket) ..........1
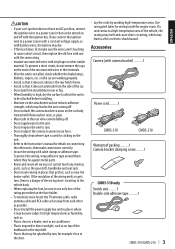
Power cord ..........1
CMOS-310
CMOS-210
Waterproof packing ..........1 Camera bracket...
User Manual - Page 4

... until the camera setting has completed.
For details, read the instruction manual for your video monitor.
9 Change the shift lever to the R (Reverse) range
to the surface on the camera installation position. Using a commercially available cleaner, wipe dirt, moisture and oil away from
the camera and adjust the shape according to view the image of the rear of the...
User Manual - Page 5

... them firmly.
12 Perform the operations in "Camera Setting"
(page 8). (CMOS-310 only)
If an adjustment is to be attached.
2 Attach double-side adhesive tape on the
bottom of the monitor screen. Vehicle rear part or bumper
Installing the Switch Unit (CMOS-310 only)
1 Clean the switch unit installation surface. Inspect the retaining screws at the bottom...
User Manual - Page 6

... to a metallic part of vehicle (a part of power supply). Camera's cord length 1.5 m (4.92 feet), Power cord 7.5 m (24.6 feet)
Power cord
Switch unit (CMOS-310 only): 1...CMOS-310/CMOS-210 Connections
Basic Connections
Connect to the rearview camera video input or to the camera connection cord. Video cord
Navigation system/video monitor (separately available)
Camera
Connect the camera...
User Manual - Page 7

... input. CAM+ (Green/red) CAM- (Green/white)
Camera 2 (Used as front view camera)(Change ID to ID2.)
Power cord
Connect to the camera control terminals of 2 Cameras
Connect to check the camera image. ENGLISH
System Connection (CMOS-310 only)
• When connecting the camera to set an ID for the front and rear), it is not used in the same...
User Manual - Page 8

.... To adjust the item: After selecting the item, press the + or - Camera Setting Procedure
1 Complete all of the camera. Overhead view image adjustments
(Centering, Right-and-Left angle, Up-and-Down Angle) 2. Some video monitors may switch automatically to other people.
8 | CMOS-310/CMOS-210
Use the + or - In a parking space with white lines and tire stoppers...
User Manual - Page 9

... the horizontal angle (in the currently available range, change the camera position before retrying.
3 After completing the adjustment, press the
view button. button of the switch unit
so that the two white lines appear on the position corresponding to invert the icon upside down.
3 After completing the adjustment, press the
view button. CMOS-310/CMOS-210 | 9
User Manual - Page 10

... orange line displayed in it independently from other guide lines.
2.2 m (7.22 feet)
Green
0.5 m (1.64 feet)
Orange Yellow
Red
2.7 m (8.86 feet)
10 | CMOS-310/CMOS-210 As the interval between the left and right lines of the following adjustments are shown vertical.
button of the camera installation position.
1 Select "OVERHEAD VIEW IMAGE ADJUSTMENT
(Up-and-Down ANGLE)".
2 Press...
User Manual - Page 11

... ADJUSTMENT (Horizontal direction)".
3 After completing the adjustment, press the
view button. CMOS-310/CMOS-210 | 11 ENGLISH
Wide View Guideline Adjustment (Size)
This item adjusts the overall size of guidelines displayed in the wide view.
1 Select "WIDE VIEW GUIDELINE ADJUSTMENT
(Horizontal direction)".
2 Press the + or -
button of the switch unit to
adjust the left -right positioning...
User Manual - Page 12

... your vehicle's bumper.
3 After completing the adjustment, press the
view button. Advances to set the reference line for the vehicle parking position.
1 Select "WIDE VIEW GUIDELINE ADJUSTMENT
(Red Line Position Setting)".
2 Press the + or - The red line can be used independently to "SETTING COMPLETE".
12 | CMOS-310/CMOS-210
Move the red line until the edge of the...
User Manual - Page 13

....
2 Press the + or - CMOS-310/CMOS-210 | 13 button of the switch unit to ID1 at the factory.
1 Press and hold the - The camera IDs of the
switch unit to select [Finish] and press the view button. button of both cameras have been set to
select [Finish] and press the view button.
ENGLISH
Finishing the Camera Setting
1 Press the + or -
User Manual - Page 14

Display View Switching (CMOS-310 only)
Display View Switching
The CMOS-310 camera system can display 5 kinds of camera images.
1 With an image displayed on the monitor, press
the view button of about 135°. Super Wide View Wide-angle image covering a horizontal angle of the switch unit.
This allows the control unit to a Kenwood navigation system etc, (Control unit...
User Manual - Page 15

... (WxHxD): 24 x 24 x 24.9 mm Weight: Approx. 36 g (without cable)
Camera Unit (CMOS-210)
Output video : Wide-angle mirror image (for rearview)
Sensor: 1/4-inch color CMOS sensor Number of pixels: Approx. 310,000 pixels Lens
: Wide angle, Focal length f=1.41 mm, F value 2.3 Angles of view
: Horizontal: Approx. 130° : Vertical: Approx. 101° Video output...
Kenwood CMOS-210 Reviews
We have not received any reviews for Kenwood yet.