
Installation Manual
Page 1
KVT-819DVD KVT-839DVD MONITOR WITH DVD RECEIVER INSTALLATION MANUAL MONITOR CON RECEPTOR DVD MANUAL DE INSTALACIÓN © B54-4552-00/00 (KV/RV)
KVT-819DVD KVT-839DVD MONITOR WITH DVD RECEIVER INSTALLATION MANUAL MONITOR CON RECEPTOR DVD MANUAL DE INSTALACIÓN © B54-4552-00/00 (KV/RV)
Installation Manual
Page 4
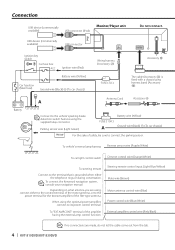
To connect the Kenwood navigation system, consult your navigation manual. Steering remote ...Depending on what antenna you are made, do not let the cable come out from the tab. 4 | KVT-819DVD/KVT-839DVD When using the optional power amplifier, connect to the vehicle's parking brake detection switch harness using harness ... 4 A Connect to its power control terminal. Connection USB device (commercially available) USB connector (iPod) Monitor/Player unit iPod USB device (commercially available) USB connector Do not connect. Ignition key switch Car fuse box ACC Ignition...
To connect the Kenwood navigation system, consult your navigation manual. Steering remote ...Depending on what antenna you are made, do not let the cable come out from the tab. 4 | KVT-819DVD/KVT-839DVD When using the optional power amplifier, connect to the vehicle's parking brake detection switch harness using harness ... 4 A Connect to its power control terminal. Connection USB device (commercially available) USB connector (iPod) Monitor/Player unit iPod USB device (commercially available) USB connector Do not connect. Ignition key switch Car fuse box ACC Ignition...
Installation Manual
Page 6
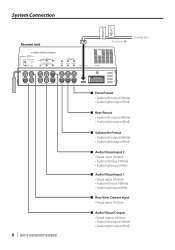
System Connection Receiver unit RELAY 2 RELAY 1 Accessory # To Relay Box 6 | KVT-819DVD/KVT-839DVD ■ Front Preout • Audio left output (White) • Audio right output (Red) ■ Rear Preout • Audio left output (White) • Audio right ...
System Connection Receiver unit RELAY 2 RELAY 1 Accessory # To Relay Box 6 | KVT-819DVD/KVT-839DVD ■ Front Preout • Audio left output (White) • Audio right output (Red) ■ Rear Preout • Audio left output (White) • Audio right ...
Installation Manual
Page 8
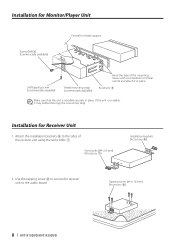
Installation for Receiver Unit 1. Installation for Monitor/Player Unit Screw (M4X8) (commercially available) Firewall or metal support Self-tapping screw (commercially available) Metal mounting strap (commercially available) Bend the tabs of... bolts (M4 × 8 mm) (Accessory 7) Installation brackets (Accessory 9) 2. If the unit is installed securely in place. Tapping screw (ø4 × 16 mm) (Accessory 8) 8 | KVT-819DVD/KVT-839DVD Accessory 5 Make sure that the unit is unstable, it in place. Use the tapping screw 8 to secure the receiver unit to the sides of...
Installation for Receiver Unit 1. Installation for Monitor/Player Unit Screw (M4X8) (commercially available) Firewall or metal support Self-tapping screw (commercially available) Metal mounting strap (commercially available) Bend the tabs of... bolts (M4 × 8 mm) (Accessory 7) Installation brackets (Accessory 9) 2. If the unit is installed securely in place. Tapping screw (ø4 × 16 mm) (Accessory 8) 8 | KVT-819DVD/KVT-839DVD Accessory 5 Make sure that the unit is unstable, it in place. Use the tapping screw 8 to secure the receiver unit to the sides of...
Installation Manual
Page 10
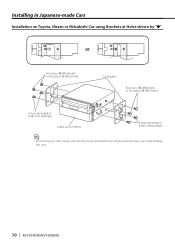
Use only the screws provided. Installing in Japanese-made Cars Installation on Toyota, Nissan or Mitsubishi Car using Brackets at Holes shown by "●" or Accessory 0 (M5x6mm) or Accessory ! (M5x7mm) Car Bracket Accessory 0 (M5x6mm) or Accessory ! (M5x7mm) Screws (included in audio unit package) Audio unit or others Screws (included in audio unit package) ⁄ • Do not use the wrong screws, you could damage the unit. 10 | KVT-819DVD/KVT-839DVD If you use your own screws.
Use only the screws provided. Installing in Japanese-made Cars Installation on Toyota, Nissan or Mitsubishi Car using Brackets at Holes shown by "●" or Accessory 0 (M5x6mm) or Accessory ! (M5x7mm) Car Bracket Accessory 0 (M5x6mm) or Accessory ! (M5x7mm) Screws (included in audio unit package) Audio unit or others Screws (included in audio unit package) ⁄ • Do not use the wrong screws, you could damage the unit. 10 | KVT-819DVD/KVT-839DVD If you use your own screws.


