
Installation Manual
Page 1
KVT-819DVD KVT-839DVD MONITOR WITH DVD RECEIVER INSTALLATION MANUAL MONITOR CON RECEPTOR DVD MANUAL DE INSTALACIÓN © B54-4552-00/00 (KV/RV)
KVT-819DVD KVT-839DVD MONITOR WITH DVD RECEIVER INSTALLATION MANUAL MONITOR CON RECEPTOR DVD MANUAL DE INSTALACIÓN © B54-4552-00/00 (KV/RV)
Installation Manual
Page 4
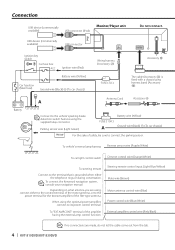
... a chassis using harness band (Accessory @). -+ Battery Antenna Cord Accessory 4 A Connect to its power control terminal. To connect the Kenwood navigation system, consult your navigation manual. Steering remote control input (Light Blue/Yellow) Mute wire (Brown) Motor antenna control wire (Blue...When using , connect either the telephone rings or during conversation. Connection USB device (commercially available) USB connector (iPod) Monitor/Player unit iPod USB device (commercially available) USB connector Do not connect. Depending on what antenna you are made, do not let...
... a chassis using harness band (Accessory @). -+ Battery Antenna Cord Accessory 4 A Connect to its power control terminal. To connect the Kenwood navigation system, consult your navigation manual. Steering remote control input (Light Blue/Yellow) Mute wire (Brown) Motor antenna control wire (Blue...When using , connect either the telephone rings or during conversation. Connection USB device (commercially available) USB connector (iPod) Monitor/Player unit iPod USB device (commercially available) USB connector Do not connect. Depending on what antenna you are made, do not let...
Installation Manual
Page 6
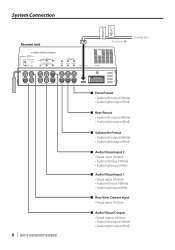
System Connection Receiver unit RELAY 2 RELAY 1 Accessory # To Relay Box 6 | KVT-819DVD/KVT-839DVD ■ Front Preout • Audio left output (White) • Audio right output (Red) ■ Rear Preout • Audio left output (White) • Audio right ...
System Connection Receiver unit RELAY 2 RELAY 1 Accessory # To Relay Box 6 | KVT-819DVD/KVT-839DVD ■ Front Preout • Audio left output (White) • Audio right output (Red) ■ Rear Preout • Audio left output (White) • Audio right ...
Installation Manual
Page 8
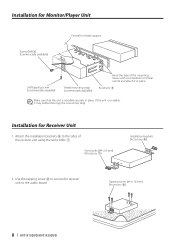
...board. Installation for Receiver Unit 1. If the unit is installed securely in place. Sems bolts (M4 × 8 mm) (Accessory 7) Installation brackets (Accessory 9) 2. Installation for Monitor/Player Unit Screw (M4X8) (commercially available) Firewall or metal support Self-tapping screw (commercially available) Metal mounting strap (commercially available) Bend the tabs of the receiver... the mounting sleeve with a screwdriver or similar utensil and attach it may malfunction (eg, the sound may skip). Tapping screw (ø4 × 16 mm) (Accessory 8) 8 | KVT-819DVD/KVT-839DVD
...board. Installation for Receiver Unit 1. If the unit is installed securely in place. Sems bolts (M4 × 8 mm) (Accessory 7) Installation brackets (Accessory 9) 2. Installation for Monitor/Player Unit Screw (M4X8) (commercially available) Firewall or metal support Self-tapping screw (commercially available) Metal mounting strap (commercially available) Bend the tabs of the receiver... the mounting sleeve with a screwdriver or similar utensil and attach it may malfunction (eg, the sound may skip). Tapping screw (ø4 × 16 mm) (Accessory 8) 8 | KVT-819DVD/KVT-839DVD
Installation Manual
Page 10
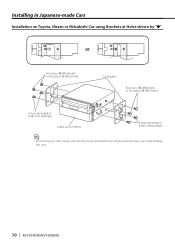
If you could damage the unit. 10 | KVT-819DVD/KVT-839DVD Installing in Japanese-made Cars Installation on Toyota, Nissan or Mitsubishi Car using Brackets at Holes shown by "●" or Accessory 0 (M5x6mm) or Accessory ! (M5x7mm) Car Bracket Accessory 0 (M5x6mm) or Accessory ! (M5x7mm) Screws (included in audio unit package) Audio unit or others Screws (included in audio unit package) ⁄ • Do not use the wrong screws, you use your own screws. Use only the screws provided.
If you could damage the unit. 10 | KVT-819DVD/KVT-839DVD Installing in Japanese-made Cars Installation on Toyota, Nissan or Mitsubishi Car using Brackets at Holes shown by "●" or Accessory 0 (M5x6mm) or Accessory ! (M5x7mm) Car Bracket Accessory 0 (M5x6mm) or Accessory ! (M5x7mm) Screws (included in audio unit package) Audio unit or others Screws (included in audio unit package) ⁄ • Do not use the wrong screws, you use your own screws. Use only the screws provided.


