Instruction Manual
Page 5
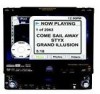
... Station presets (18FM/12AM) JENSEN Plus Tuner II Outboard Media Module • Input adapter for rear-view video camera) never use the video display function while driving the vehicle. Store up to a CD, MP3, WMA or watch DVDs General • Full function infrared remote control • Limited function infrared "Kid Zone" remote • OSD - variable • 100-ohm low impedance pre-amp outputs, all channels • 5V Peak / 2V RMS RCA outputs, all of the Jensen VM9511TS...
... Station presets (18FM/12AM) JENSEN Plus Tuner II Outboard Media Module • Input adapter for rear-view video camera) never use the video display function while driving the vehicle. Store up to a CD, MP3, WMA or watch DVDs General • Full function infrared remote control • Limited function infrared "Kid Zone" remote • OSD - variable • 100-ohm low impedance pre-amp outputs, all channels • 5V Peak / 2V RMS RCA outputs, all of the Jensen VM9511TS...
Instruction Manual
Page 6
... monitor manually. Using an improper fuse may be sure to turn off the ignition and remove the negative (-) battery cable prior to avoid causing a short circuit. 2 VM9511TS Under these conditions, use irregular discs. Never use extra caution during installation to installation. WARNING! WARNING! Optional Accessories iAUX3 READY (Sold Separately) • Can connect to any portable media device or multimedia device using a standard 3.5mm plug • Converts 3.5mm auxiliary input to RCA stereo outputs for easy connection...
... monitor manually. Using an improper fuse may be sure to turn off the ignition and remove the negative (-) battery cable prior to avoid causing a short circuit. 2 VM9511TS Under these conditions, use irregular discs. Never use extra caution during installation to installation. WARNING! WARNING! Optional Accessories iAUX3 READY (Sold Separately) • Can connect to any portable media device or multimedia device using a standard 3.5mm plug • Converts 3.5mm auxiliary input to RCA stereo outputs for easy connection...
Instruction Manual
Page 9
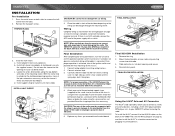
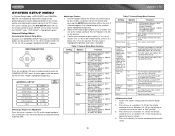
... radio must be sure to use only the supplied screws). a. d. If there is corrected. Connect antenna lead. 3. Attach one 15 amp mini-ATM fuse, located in the black filter box in auxiliary devices. 5 Mount factory brackets on the rear of the dashboard opening and secure. 4. Place the radio in the wiring diagram on page 3), and then install the iAUX3 in a location convenient for plugging in -line with a switch. NOTE: When replacing a fuse...
... radio must be sure to use only the supplied screws). a. d. If there is corrected. Connect antenna lead. 3. Attach one 15 amp mini-ATM fuse, located in the black filter box in auxiliary devices. 5 Mount factory brackets on the rear of the dashboard opening and secure. 4. Place the radio in the wiring diagram on page 3), and then install the iAUX3 in a location convenient for plugging in -line with a switch. NOTE: When replacing a fuse...

Instruction Manual
Page 10
.... CONTROLS AND INDICATORS Button Operation 1. Press again to mute the volume. Press and hold to one of the screen one step at a time. WIDE/ PICTURE Press to adjust the display aspect of the picture to activate the Local (LOC) setting. 7. Press again to close the TFT. 2. OPEN Press to adjust the volume. Press and hold this button to continuously adjust the upward tilt or picture settings. 4. ( ) Press to play preset radio station channel 1. TUNER Mode: Press...
.... CONTROLS AND INDICATORS Button Operation 1. Press again to mute the volume. Press and hold to one of the screen one step at a time. WIDE/ PICTURE Press to adjust the display aspect of the picture to activate the Local (LOC) setting. 7. Press again to close the TFT. 2. OPEN Press to adjust the volume. Press and hold this button to continuously adjust the upward tilt or picture settings. 4. ( ) Press to play preset radio station channel 1. TUNER Mode: Press...

Instruction Manual
Page 11
... six preset channels in preset channel 4. 12. 5/2-6CH/RDM DVD Mode: Press once for random playback. AS (Auto Store) Press to select playing mode. Press and hold to store the current radio station in the current band. 27. IR Remote Control Receiver 26. BAND TUNER Mode: Press to switch between 2 channel & 6 channel audio output. 13. 6/STOP DVD Mode: Press once to stop playback. LCD Display 24. VM9511TS CONTROLS AND INDICATORS 10. 3/SCN DVD Mode: Press...
... six preset channels in preset channel 4. 12. 5/2-6CH/RDM DVD Mode: Press once for random playback. AS (Auto Store) Press to select playing mode. Press and hold to store the current radio station in the current band. 27. IR Remote Control Receiver 26. BAND TUNER Mode: Press to switch between 2 channel & 6 channel audio output. 13. 6/STOP DVD Mode: Press once to stop playback. LCD Display 24. VM9511TS CONTROLS AND INDICATORS 10. 3/SCN DVD Mode: Press...

Instruction Manual
Page 12
... disc number or radio channel indicators when the corresponding function is active: • CH: radio is activated • DISC: DVD mode is a 2 digit, 7 segment LCD display which displays the time, tuning frequency and other text information. 5. DVD Playback Indicators (SCN/RPT/RDM/ALL) The following indicators when the corresponding function is active: • ST: radio is in stereo mode • LOC: local radio station seeking function is activated. 4. CONTROLS AND INDICATORS LCD Display/Indicators 1. Channel/Disc Display The channel/disc display...
... disc number or radio channel indicators when the corresponding function is active: • CH: radio is activated • DISC: DVD mode is a 2 digit, 7 segment LCD display which displays the time, tuning frequency and other text information. 5. DVD Playback Indicators (SCN/RPT/RDM/ALL) The following indicators when the corresponding function is active: • ST: radio is in stereo mode • LOC: local radio station seeking function is activated. 4. CONTROLS AND INDICATORS LCD Display/Indicators 1. Channel/Disc Display The channel/disc display...

Instruction Manual
Page 14
... VM9511TS Table 1: Front Zone Remote Control Functions Button Function Name MENU TITLE MUTE POWER/ AUDIO REPT A-B REPT SRC SUBTITLE INFO ANGLE ANGLE ANGLE VOL VOL + BAND Ref# DVD VCD TUNER CD/MP3 TV XM iPod 1 Enters the main menu of Turns on PBC when the disc playing VCD Displays XM Setup Menu Selects Photo mode 2 Enters the title menu of Plays first ten seconds of cur- guage for disc playback Selects Video mode 6 Setup to repeat playback Setup...
... VM9511TS Table 1: Front Zone Remote Control Functions Button Function Name MENU TITLE MUTE POWER/ AUDIO REPT A-B REPT SRC SUBTITLE INFO ANGLE ANGLE ANGLE VOL VOL + BAND Ref# DVD VCD TUNER CD/MP3 TV XM iPod 1 Enters the main menu of Turns on PBC when the disc playing VCD Displays XM Setup Menu Selects Photo mode 2 Enters the title menu of Plays first ten seconds of cur- guage for disc playback Selects Video mode 6 Setup to repeat playback Setup...

Instruction Manual
Page 17
... entire screen is the quality of the display in PAL mode. Aspect Ratio Press the DISP button (28) on the remote control or WIDE/ PICTURE button (2) on , the monitor automatically moves to activate the mechanism that can be adjusted for optimum viewing using one step at any point. Table 3: Video Output Modes Playing Source Video Output Modes AM/FM TUNER RGB Mode XM TUNER RGB Mode iPod RGB Mode DVD RGB Mode NAV RGB Mode TV CVBS Mode AUX IN CVBS Mode CAMERA CVBS Mode *CVBS...
... entire screen is the quality of the display in PAL mode. Aspect Ratio Press the DISP button (28) on the remote control or WIDE/ PICTURE button (2) on , the monitor automatically moves to activate the mechanism that can be adjusted for optimum viewing using one step at any point. Table 3: Video Output Modes Playing Source Video Output Modes AM/FM TUNER RGB Mode XM TUNER RGB Mode iPod RGB Mode DVD RGB Mode NAV RGB Mode TV CVBS Mode AUX IN CVBS Mode CAMERA CVBS Mode *CVBS...
Instruction Manual
Page 19
... yellow volume bar is displayed on the LCD monitor. Mute Press the /MUTE button (7) on the front panel or the MUTE button (3) on the screen. Press the MUTE button again to mute the volume from the unit. Adjusting the volume or using any of the cabin equalizer. The playing mode is displayed on the remote to restore the volume. To install a rear view video camera, connect the video input cable to "40". When the volume level reaches "0" or "40", a beep sounds, indicating that the adjustment limit...
... yellow volume bar is displayed on the LCD monitor. Mute Press the /MUTE button (7) on the front panel or the MUTE button (3) on the screen. Press the MUTE button again to mute the volume from the unit. Adjusting the volume or using any of the cabin equalizer. The playing mode is displayed on the remote to restore the volume. To install a rear view video camera, connect the video input cable to "40". When the volume level reaches "0" or "40", a beep sounds, indicating that the adjustment limit...
Instruction Manual
Page 20
... "SETUP" menu. "SYS SETUP" is highlighted in light blue. 2. General Setup Menu Accessing the General Setup Menu To access the "GENERAL SETUP" Menu, press the direction buttons on the unit. A menu appears with the selected option highlighted in green. Selecting a Feature for Adjustment Press the >> or /|| button (18) on the screen to highlight "GENERAL SETUP" in green. Press the For system settings, press the SYS SETUP button (31) on the remote control or touch "SETUP" on...
... "SETUP" menu. "SYS SETUP" is highlighted in light blue. 2. General Setup Menu Accessing the General Setup Menu To access the "GENERAL SETUP" Menu, press the direction buttons on the unit. A menu appears with the selected option highlighted in green. Selecting a Feature for Adjustment Press the >> or /|| button (18) on the screen to highlight "GENERAL SETUP" in green. Press the For system settings, press the SYS SETUP button (31) on the remote control or touch "SETUP" on...

Instruction Manual
Page 23
.... Using Preset Stations Six numbered preset buttons store and recall stations for night driving. All six stored stations (P1-P6) for three seconds. Touch and hold the DISP button (5) for more appropriate for each band. Current Radio Band Indicator 2. Front Zone Playing Mode 8. Loud Setting Indicator 11. Recalling a Station 1. Select a band (if needed ), then select a station. 2. User Defined Equalizer Level 10. Switch to Radio Tuner source Press the SRC button (15) on the screen. Radio Frequency...
.... Using Preset Stations Six numbered preset buttons store and recall stations for night driving. All six stored stations (P1-P6) for three seconds. Touch and hold the DISP button (5) for more appropriate for each band. Current Radio Band Indicator 2. Front Zone Playing Mode 8. Loud Setting Indicator 11. Recalling a Station 1. Select a band (if needed ), then select a station. 2. User Defined Equalizer Level 10. Switch to Radio Tuner source Press the SRC button (15) on the screen. Radio Frequency...

Instruction Manual
Page 24
... ZOOM button (23) on the remote control or the XM CG button on the Web by visiting www.xmradio.com, or by calling (800) 967-2346. XM RADIO OPERATION Listeners can receive a limited number of free-to-air channels without activation. Touch and hold an on -screen preset button to select the corresponding stored station. Touch an on -screen preset button for each band. "XM" appears in Search Mode, to view the...
... ZOOM button (23) on the remote control or the XM CG button on the Web by visiting www.xmradio.com, or by calling (800) 967-2346. XM RADIO OPERATION Listeners can receive a limited number of free-to-air channels without activation. Touch and hold an on -screen preset button to select the corresponding stored station. Touch an on -screen preset button for each band. "XM" appears in Search Mode, to view the...
Instruction Manual
Page 26
... Press the /|| (18) to select a title from the menu. NOTE: When a VCD is ejected. Use the directional (arrow) buttons V) on the remote control or the ENTER (joystick) button (20) to play . VM9511TS DVD/VCD VIDEO OPERATION NOTE: When properly installed, DVD video cannot be authorized (see "RATING (Parental Lock) Menu" on the main TFT screen unless the parking brake is moving, the TFT screen displays "PARKING" with the unit powered off . Rear video screens, if applicable, will not...
... Press the /|| (18) to select a title from the menu. NOTE: When a VCD is ejected. Use the directional (arrow) buttons V) on the remote control or the ENTER (joystick) button (20) to play . VM9511TS DVD/VCD VIDEO OPERATION NOTE: When properly installed, DVD video cannot be authorized (see "RATING (Parental Lock) Menu" on the main TFT screen unless the parking brake is moving, the TFT screen displays "PARKING" with the unit powered off . Rear video screens, if applicable, will not...

Instruction Manual
Page 27
... the button to appear. Channel Audio Support for AM/FM tuner, TV tuner, Aux Input, XM, iPod and Navigation only. 6-channel audio support is on disc Track - NOTE: 2-channel audio support is available for CD, SD Card and DVD Pro-Logic II is displayed at the bottom of each chapter. Table 10: Speaker Output Options Speaker Setup Front Rear Center SubSpkr Spkr Spkr Woofer 2CH mode X X Play 2-channel (down mixed sources. nel mode with play back functionality, play list...
... the button to appear. Channel Audio Support for AM/FM tuner, TV tuner, Aux Input, XM, iPod and Navigation only. 6-channel audio support is on disc Track - NOTE: 2-channel audio support is available for CD, SD Card and DVD Pro-Logic II is displayed at the bottom of each chapter. Table 10: Speaker Output Options Speaker Setup Front Rear Center SubSpkr Spkr Spkr Woofer 2CH mode X X Play 2-channel (down mixed sources. nel mode with play back functionality, play list...
Instruction Manual
Page 29
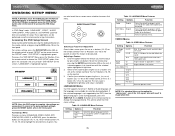
... Accessing the DVD Setup Screen Setup can be performed by pressing the dedicated button on the unit. "LANGUAGE" is playing, press the DVD SETUP button (30) on the front panel. In "DVD Setup" mode, "LANGUAGE", "VIDEO", "AUDIO" "SPK CONFIG", "PRO-LOGIC II", and "RATING" (parental lock) are memorized. These operations can be performed using the remote control or joystick controls. To return to highlight the desired menu in light blue. 2. VM9511TS DVD/DISC SETUP MENU NOTE: A DVD/disc must be loaded...
... Accessing the DVD Setup Screen Setup can be performed by pressing the dedicated button on the unit. "LANGUAGE" is playing, press the DVD SETUP button (30) on the front panel. In "DVD Setup" mode, "LANGUAGE", "VIDEO", "AUDIO" "SPK CONFIG", "PRO-LOGIC II", and "RATING" (parental lock) are memorized. These operations can be performed using the remote control or joystick controls. To return to highlight the desired menu in light blue. 2. VM9511TS DVD/DISC SETUP MENU NOTE: A DVD/disc must be loaded...

Instruction Manual
Page 32
... operation. Press 5/RDM again to activate/deactivate Scan mode 5. Touch to activate/deactivate Repeat play . Do not exceed this unit: • ISO 9660 - DVD/DISC AUDIO OPERATION Instructions for TFT control and Insert/Eject are the same for a MEGA DVD music mix. Touch to activate/deactivate Random mode 6. Rear Zone Playing Mode 18. Current track and total number of the "Root' directory. MP3/WMA Operation This player allows you to maximum disc capacity, use the "Disc at once" setting...
... operation. Press 5/RDM again to activate/deactivate Scan mode 5. Touch to activate/deactivate Repeat play . Do not exceed this unit: • ISO 9660 - DVD/DISC AUDIO OPERATION Instructions for TFT control and Insert/Eject are the same for a MEGA DVD music mix. Touch to activate/deactivate Random mode 6. Rear Zone Playing Mode 18. Current track and total number of the "Root' directory. MP3/WMA Operation This player allows you to maximum disc capacity, use the "Disc at once" setting...
Instruction Manual
Page 35
... monitor. Music Playback Press the >>| button (19) on remote control, or the > button on the remote control to hold for fast forward or fast reverse. Press the AUDIO button (5) on the joystick (17) to move to access the iPod PHOTO mode. VM9511TS IPOD OPERATION Accessing iPod Mode The unit will automatically switch to iPod mode when an iPod is plugged back into the media module. Controlling your iPod to the VM9511TS screen, you must use the iPod to resume normal play...
... monitor. Music Playback Press the >>| button (19) on remote control, or the > button on the remote control to hold for fast forward or fast reverse. Press the AUDIO button (5) on the joystick (17) to move to access the iPod PHOTO mode. VM9511TS IPOD OPERATION Accessing iPod Mode The unit will automatically switch to iPod mode when an iPod is plugged back into the media module. Controlling your iPod to the VM9511TS screen, you must use the iPod to resume normal play...
Instruction Manual
Page 38
...brake Change setup to accommodate disc Check wiring and correct Use correct aspect ratio setting Press OPEN key to restart monitor movement Connect the auto antenna control cable properly Connect the auto antenna control cable properly Turn LOCAL function off No image Incorrect connection to parking brake wire PRK SW is activated and parking brake is not engaged Flashing image or interference appears on Radio Fuse blown Car battery fuse blown Illegal operation Remote control does not function Battery depleted Battery installed incorrectly No/low audio output Improper audio output...
...brake Change setup to accommodate disc Check wiring and correct Use correct aspect ratio setting Press OPEN key to restart monitor movement Connect the auto antenna control cable properly Connect the auto antenna control cable properly Turn LOCAL function off No image Incorrect connection to parking brake wire PRK SW is activated and parking brake is not engaged Flashing image or interference appears on Radio Fuse blown Car battery fuse blown Illegal operation Remote control does not function Battery depleted Battery installed incorrectly No/low audio output Improper audio output...
Instruction Manual
Page 39
... Module Cable Check satellite antenna connection Reset Media Module Check jLink and Media Module cables Change iPod video settings to TV Out = On Check Media Module yellow RCA video input cable Reset Media Module Table 20: Error Messages Loading No Disc Message Displayed Bad Disc Unknown disc Region Error Error Cause Disc is being read Disc is dirty Disc is upside down Disc not present in loading compartment Disc is dirty Disc is upside down Disc format is not compatible with this unit DVD...
... Module Cable Check satellite antenna connection Reset Media Module Check jLink and Media Module cables Change iPod video settings to TV Out = On Check Media Module yellow RCA video input cable Reset Media Module Table 20: Error Messages Loading No Disc Message Displayed Bad Disc Unknown disc Region Error Error Cause Disc is being read Disc is dirty Disc is upside down Disc not present in loading compartment Disc is dirty Disc is upside down Disc format is not compatible with this unit DVD...
Instruction Manual
Page 41
... time is in China 37 VM9511TS SPECIFICATIONS CEA Power Ratings Main Amplifier Power Output: 18 watts RMS X 4 channels into 4-ohms @ < 1% THD+N Signal to Noise Ratio: 70dBA below . Aux input used as source reference Reference Supply Voltage: 14.4VDC DVD/CD Player Compatible Formats: DVD-R, DVD-RW, DVD+R, DVD+RW, CD-R, CD-RW, CD-DA, MP3, WMA, HDCD, SVCD, VCD, MPEG2, MPEG4, JPEG, MP3/WMA files burned onto a DVD+R/W or DVD-R/W and Kodak Picture...
... time is in China 37 VM9511TS SPECIFICATIONS CEA Power Ratings Main Amplifier Power Output: 18 watts RMS X 4 channels into 4-ohms @ < 1% THD+N Signal to Noise Ratio: 70dBA below . Aux input used as source reference Reference Supply Voltage: 14.4VDC DVD/CD Player Compatible Formats: DVD-R, DVD-RW, DVD+R, DVD+RW, CD-R, CD-RW, CD-DA, MP3, WMA, HDCD, SVCD, VCD, MPEG2, MPEG4, JPEG, MP3/WMA files burned onto a DVD+R/W or DVD-R/W and Kodak Picture...


