Operation Manual
Page 9
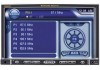
...panel or remote control to slide the monitor panel down to 9. You can be displayed.) 5 VM9223 Composite Video Baseband Signal Parameter Adjustment Procedure 1. USING THE TFT MONITOR Open/Close TFT Monitor Open TFT... (28) on the monitor Parking Brake Inhibit When the pink "Parking" wire is connected to adjust the tilt angle in relationship to Set: Press the PIC button...) or ( ) button on the monitor. 2. Touch screen to adjust the tilt angle of the display. The extension ratio is the same at a time. STANDBY Screen becomes black. The monitor angle can also adjust the...
...panel or remote control to slide the monitor panel down to 9. You can be displayed.) 5 VM9223 Composite Video Baseband Signal Parameter Adjustment Procedure 1. USING THE TFT MONITOR Open/Close TFT Monitor Open TFT... (28) on the monitor Parking Brake Inhibit When the pink "Parking" wire is connected to adjust the tilt angle in relationship to Set: Press the PIC button...) or ( ) button on the monitor. 2. Touch screen to adjust the tilt angle of the display. The extension ratio is the same at a time. STANDBY Screen becomes black. The monitor angle can also adjust the...
Operation Manual
Page 23
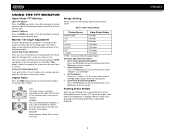
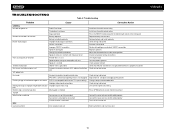
...car Poor sound quality or distortion Pirated disc is in safe place and apply parking brake Change setup to accommodate disc Check wiring and correct Use correct aspect ratio setting Press OPEN button to restart monitor movement Connect the auto antenna control cable properly Connect... antenna control cable properly Turn LOCAL function off Eject current disc and insert new one VM9223 19 TROUBLESHOOTING Table 6: Troubleshooting Problem Cause Corrective Action GENERAL Unit will not power on screen DVD is not grounded and that "MUTE" connection is not compatible with unit Speaker ...
...car Poor sound quality or distortion Pirated disc is in safe place and apply parking brake Change setup to accommodate disc Check wiring and correct Use correct aspect ratio setting Press OPEN button to restart monitor movement Connect the auto antenna control cable properly Connect... antenna control cable properly Turn LOCAL function off Eject current disc and insert new one VM9223 19 TROUBLESHOOTING Table 6: Troubleshooting Problem Cause Corrective Action GENERAL Unit will not power on screen DVD is not grounded and that "MUTE" connection is not compatible with unit Speaker ...
Installation Guide
Page 2
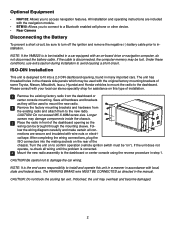
...with local, state and federal laws. CAUTION: Do not exceed M5 X 6MM screw size. After completing the wiring connections, plug the ISO connectors into a 2.0 DIN dashboard opening so the wiring can be "on this type of the dashboard opening , found in the manual. Be careful not to avoid.... The PARKING BRAKE wire MUST BE CONNECTED as they will be lost. CAUTION! NOTE: If the VM9223 is the end-users responsibility to install and operate this unit in a manner in a car equipped with the original factory mounting brackets of the chassis. ISO-DIN Installation This unit is...
...with local, state and federal laws. CAUTION: Do not exceed M5 X 6MM screw size. After completing the wiring connections, plug the ISO connectors into a 2.0 DIN dashboard opening so the wiring can be "on this type of the dashboard opening , found in the manual. Be careful not to avoid.... The PARKING BRAKE wire MUST BE CONNECTED as they will be lost. CAUTION! NOTE: If the VM9223 is the end-users responsibility to install and operate this unit in a manner in a car equipped with the original factory mounting brackets of the chassis. ISO-DIN Installation This unit is...
Installation Guide
Page 3
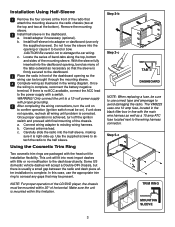
...ring to conceal any gaps that the sleeve is no modification to the dash board/cavity. c. If unit does not operate, recheck all wiring until problem is achieved, turn off the ignition switch and proceed with little or no ACC available, connect the ACC lead to confirm... and two at the front of the mounting sleeve. The VM9223 uses one 10 amp fuse, located in the black filter box in the dashboard. Installation Using Half-Sleeve 1 Remove the four screws at the bottom). a. This unit will accept a Double-DIN chassis, but there is usually a small gap between the radio...
...ring to conceal any gaps that the sleeve is no modification to the dash board/cavity. c. If unit does not operate, recheck all wiring until problem is achieved, turn off the ignition switch and proceed with little or no ACC available, connect the ACC lead to confirm... and two at the front of the mounting sleeve. The VM9223 uses one 10 amp fuse, located in the black filter box in the dashboard. Installation Using Half-Sleeve 1 Remove the four screws at the bottom). a. This unit will accept a Double-DIN chassis, but there is usually a small gap between the radio...

Installation Guide
Page 4
Need Help? Wiring Diagram IMPORTANT: Incorrect wiring connections can damage the unit. Follow the wiring instructions carefully, or have the installation handled by an experienced technician. For technical assistance, call the Jensen customer support line at 1-800-323-4815. 4
Need Help? Wiring Diagram IMPORTANT: Incorrect wiring connections can damage the unit. Follow the wiring instructions carefully, or have the installation handled by an experienced technician. For technical assistance, call the Jensen customer support line at 1-800-323-4815. 4


