
Operation Manual
Page 5
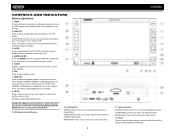
... Volume Control • Rear Camera Input (Normal and Mirror Image View) • 5-Way Joystick 1 Bluetooth hands-free profile for safety / convenience and A2DP profile for streaming music from a PDA / PMP • Navigation Ready (Nav101 Only) • 38-Key Infrared Remote Control with 5-way Joystick • Two Composite Video Outputs for Additional Screens • Compatible with MZ7TFT Rear Seat Monitors with XM and Sirius Tuners (Sold Separately) • Requires XMDJEN100 or JXMC Cables...
... Volume Control • Rear Camera Input (Normal and Mirror Image View) • 5-Way Joystick 1 Bluetooth hands-free profile for safety / convenience and A2DP profile for streaming music from a PDA / PMP • Navigation Ready (Nav101 Only) • 38-Key Infrared Remote Control with 5-way Joystick • Two Composite Video Outputs for Additional Screens • Compatible with MZ7TFT Rear Seat Monitors with XM and Sirius Tuners (Sold Separately) • Requires XMDJEN100 or JXMC Cables...
Operation Manual
Page 6
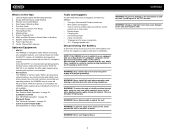
... 7. Screen Cleaning Cloth 10. While the camera is not installed, the CAMERA option appears gray, indicating the function is connected and operating properly, the CAMERA source mode will be installed in a fire. NOTE: If the VM9022 is disconnected, the computer memory may cause damage to installation. Never disassemble or adjust the unit. Left and Right Double DIN Mounting Brackets 2. Speaker Output Harness 12. Once the rear camera is not available. • Satellite Radio Tuner...
... 7. Screen Cleaning Cloth 10. While the camera is not installed, the CAMERA option appears gray, indicating the function is connected and operating properly, the CAMERA source mode will be installed in a fire. NOTE: If the VM9022 is disconnected, the computer memory may cause damage to installation. Never disassemble or adjust the unit. Left and Right Double DIN Mounting Brackets 2. Speaker Output Harness 12. Once the rear camera is not available. • Satellite Radio Tuner...
Operation Manual
Page 9
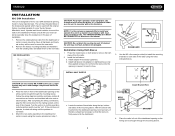
... car stereo specialty shop for assistance on "). b. After completing the wiring connections, plug the ISO connectors into a 2.0 DIN dashboard opening so the wiring can be mounted within this limitation. Place the radio in front of the dashboard opening , found in many of the radio using the reverse procedure in the manual. INSTALL HALF SLEEVE CAUTION: Do not exceed M5 X 6MM screw size. Follow the wiring diagram carefully and make...
... car stereo specialty shop for assistance on "). b. After completing the wiring connections, plug the ISO connectors into a 2.0 DIN dashboard opening so the wiring can be mounted within this limitation. Place the radio in front of the dashboard opening , found in many of the radio using the reverse procedure in the manual. INSTALL HALF SLEEVE CAUTION: Do not exceed M5 X 6MM screw size. Follow the wiring diagram carefully and make...
Operation Manual
Page 10
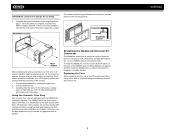
... to the power supply with little or no modification to damage the car wiring. 5. CAUTION! If there is complete, reconnect the battery negative terminal. Complete wiring as illustrated in auxiliary devices. Connect wiring adapter to confirm operation (ignition switch must be present. Be careful not to the dash board/cavity. Replacing the Fuse When replacing the fuse, use the appropriate trim ring to your VM9022 without removing the radio. The 4 tabs...
... to the power supply with little or no modification to damage the car wiring. 5. CAUTION! If there is complete, reconnect the battery negative terminal. Complete wiring as illustrated in auxiliary devices. Connect wiring adapter to confirm operation (ignition switch must be present. Be careful not to the dash board/cavity. Replacing the Fuse When replacing the fuse, use the appropriate trim ring to your VM9022 without removing the radio. The 4 tabs...
Operation Manual
Page 12
.... 2. Press again to factory default (except the password and parental lock setting). Press and hold to auto-search for non-video sources. AUDIO Rotate to automatically store the first six strong stations in preset memory. TUNER Mode: Press once to turn Standy mode off ). TUNER Mode: Press to activate the automatic mechanical system and move the cursor down joystick) DVD/Disc Mode: Press once for slow forward/slow reverse. OPEN Press to go...
.... 2. Press again to factory default (except the password and parental lock setting). Press and hold to auto-search for non-video sources. AUDIO Rotate to automatically store the first six strong stations in preset memory. TUNER Mode: Press once to turn Standy mode off ). TUNER Mode: Press to activate the automatic mechanical system and move the cursor down joystick) DVD/Disc Mode: Press once for slow forward/slow reverse. OPEN Press to go...

Operation Manual
Page 15
... playing source Selects playing source Selects playing source 9 Language selection for subti- VM9022 Table 1: Remote Control Functions Button Function Name MENU TITLE MUTE POWER/ AUDIO RPT A-B RPT SRC SUBTITLE DISP/ CLEAR PRESET PRESET ANGLE Joystick /\ VOL VOL + Joystick < Joystick (press) Joystick > GOTO Joystick \/ Ref# DVD VCD TUNER CD/MP3 SATELLITE iPod 1 Enters the main menu of the Turns on/off 5 Changes the audio language for disc playback 6 Setup to repeat playback from Setup to repeat playback from time frame...
... playing source Selects playing source Selects playing source 9 Language selection for subti- VM9022 Table 1: Remote Control Functions Button Function Name MENU TITLE MUTE POWER/ AUDIO RPT A-B RPT SRC SUBTITLE DISP/ CLEAR PRESET PRESET ANGLE Joystick /\ VOL VOL + Joystick < Joystick (press) Joystick > GOTO Joystick \/ Ref# DVD VCD TUNER CD/MP3 SATELLITE iPod 1 Enters the main menu of the Turns on/off 5 Changes the audio language for disc playback 6 Setup to repeat playback from Setup to repeat playback from time frame...
Operation Manual
Page 17
... the monitor Parking Brake Parking Brake Inhibit When the pink "Parking" wire is turned on the control panel or remote control to adjust the tilt angle in relationship to reveal the disc and SD card slots. Table 2: Video Output Modes Playing Source Video Output Modes RADIO RGB Mode SAT RGB Mode DISC RGB Mode BT RGB Mode AUX 1 CVBS Mode AUX 2 CVBS Mode NAV RGB Mode CAMERA CVBS Mode *CVBS - Parking Brake Sequence There are two situations that can be displayed on the remote control (26, 27) to the vehicle brake switch...
... the monitor Parking Brake Parking Brake Inhibit When the pink "Parking" wire is turned on the control panel or remote control to adjust the tilt angle in relationship to reveal the disc and SD card slots. Table 2: Video Output Modes Playing Source Video Output Modes RADIO RGB Mode SAT RGB Mode DISC RGB Mode BT RGB Mode AUX 1 CVBS Mode AUX 2 CVBS Mode NAV RGB Mode CAMERA CVBS Mode *CVBS - Parking Brake Sequence There are two situations that can be displayed on the remote control (26, 27) to the vehicle brake switch...

Operation Manual
Page 18
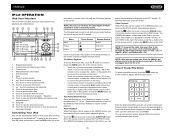
... radio. The TFT screen displays the volume level for the front or rear zone. I P Stereo PLII Music Select "AUX2" mode to access and control auxiliary devices connected to change between available playing sources in the top left corner of the unit light up and the current mode status appears on the TFT screen (17). Auxiliary Devices External peripheral devices can be connected to power off . The playing mode is displayed on the remote control. Press and hold the AUDIO button while the yellow speaker...
... radio. The TFT screen displays the volume level for the front or rear zone. I P Stereo PLII Music Select "AUX2" mode to access and control auxiliary devices connected to change between available playing sources in the top left corner of the unit light up and the current mode status appears on the TFT screen (17). Auxiliary Devices External peripheral devices can be connected to power off . The playing mode is displayed on the remote control. Press and hold the AUDIO button while the yellow speaker...

Operation Manual
Page 19
Use the left/right joystick buttons to highlight the audio feature to select the highlighted option. 3. You can manually adjust each speaker in Picture) features. • EQ: Touch to view Spectrum Analyzer > Equalizer. • REAR: Touch to -24dB. DISC CAT- NOTE: If the unit is reset while a DVD is playing, the DVD resumes play once the reset is complete. 15 The Audio menu will automatically change the PIP source. Control options appear below the PIP image to press...
Use the left/right joystick buttons to highlight the audio feature to select the highlighted option. 3. You can manually adjust each speaker in Picture) features. • EQ: Touch to view Spectrum Analyzer > Equalizer. • REAR: Touch to -24dB. DISC CAT- NOTE: If the unit is reset while a DVD is playing, the DVD resumes play once the reset is complete. 15 The Audio menu will automatically change the PIP source. Control options appear below the PIP image to press...
Operation Manual
Page 20
... change or control the front zone source from front to two additional monitors (sold separately) for which can be played simultaneously on the right side of the rear screen. DISC SOURCE MENU DISC RADIO AUX 1 F SD USB NAV R O N T SAT iPod BT R E A OFF R AUX 2 CAMERA This menu allows you to suspend operation of the remote controller. You can also use the remote control. Controlling the Rear Zone Screen(s) If you have a rear touch screen installed, you would like to control most rear zone functions. Turning the Rear Screen Off Touch...
... change or control the front zone source from front to two additional monitors (sold separately) for which can be played simultaneously on the right side of the rear screen. DISC SOURCE MENU DISC RADIO AUX 1 F SD USB NAV R O N T SAT iPod BT R E A OFF R AUX 2 CAMERA This menu allows you to suspend operation of the remote controller. You can also use the remote control. Controlling the Rear Zone Screen(s) If you have a rear touch screen installed, you would like to control most rear zone functions. Turning the Rear Screen Off Touch...
Operation Manual
Page 21
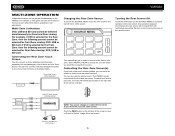
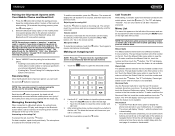
... Audio Speaker Bluetooth Back Clock Mode Clock Adjust Video Input Beep 12 Hour 04 : 31 AM AUTO On Accessing Menu Items Touch the sub-menu name or use the joystick to 23:59. Use the touchscreen or press the /\ or V buttons on the current video input signal - Clock displays 24 hour time up to select a submenu (Language, Audio, RDS, etc.). The color signals are available for music reproduction when playing music encoded in English when available. The color signal output is not supported...
... Audio Speaker Bluetooth Back Clock Mode Clock Adjust Video Input Beep 12 Hour 04 : 31 AM AUTO On Accessing Menu Items Touch the sub-menu name or use the joystick to 23:59. Use the touchscreen or press the /\ or V buttons on the current video input signal - Clock displays 24 hour time up to select a submenu (Language, Audio, RDS, etc.). The color signals are available for music reproduction when playing music encoded in English when available. The color signal output is not supported...
Operation Manual
Page 22
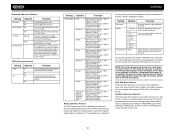
... the rear-view video camera is connected, the unit is on RDS radio signals. Automatically connect when your DivX registration code. G 3. PG-R 6. To reset the password, access the "RATING" menu and enter the current password. Kid Safe 2. Adult Reset Enter the default six-digit password (012345). The unit automatically answers all phones/devices require a pairing code. The default code is in parental lock feature to your password. Connect the last active mobile phone by touching the "call" button. Off Setting Options Function Tuner...
... the rear-view video camera is connected, the unit is on RDS radio signals. Automatically connect when your DivX registration code. G 3. PG-R 6. To reset the password, access the "RATING" menu and enter the current password. Kid Safe 2. Adult Reset Enter the default six-digit password (012345). The unit automatically answers all phones/devices require a pairing code. The default code is in parental lock feature to your password. Connect the last active mobile phone by touching the "call" button. Off Setting Options Function Tuner...

Operation Manual
Page 28
... screen to play . AUDIO A-B SUBTITLE NOTE: If Parental Lock (Rating) is activated and the disc inserted is applied. Press the > button on the joystick to resume disc playback. Insert a disc, label side up, into the disc slot. Sectional Repeat Function (A-B) Use the A-B function to define a specific area of controls BACK EQ REAR PIP Inserting a Disc To insert a disc, you attempt to Tuner mode. Accessing the DVD Menu Press the MENU button (1) on the remote control to set...
... screen to play . AUDIO A-B SUBTITLE NOTE: If Parental Lock (Rating) is activated and the disc inserted is applied. Press the > button on the joystick to resume disc playback. Insert a disc, label side up, into the disc slot. Sectional Repeat Function (A-B) Use the A-B function to define a specific area of controls BACK EQ REAR PIP Inserting a Disc To insert a disc, you attempt to Tuner mode. Accessing the DVD Menu Press the MENU button (1) on the remote control to set...

Operation Manual
Page 31
...; DVD-R/RW Upon inserting a disc with the TFT screen open, the disc and track title (if available), along with the track number and playing time appear on the disc. ID3 information 6. ||: Touch to the next track on the screen. CD Player User Interface The on disc 2. Please see the DVD/Disc Video Operation section for CD playback are the same for DVD and CD operation. VM9022 DVD/CD AUDIO OPERATION Instructions for TFT control and Insert/Eject are...
...; DVD-R/RW Upon inserting a disc with the TFT screen open, the disc and track title (if available), along with the track number and playing time appear on the disc. ID3 information 6. ||: Touch to the next track on the screen. CD Player User Interface The on disc 2. Please see the DVD/Disc Video Operation section for CD playback are the same for DVD and CD operation. VM9022 DVD/CD AUDIO OPERATION Instructions for TFT control and Insert/Eject are...
Operation Manual
Page 35
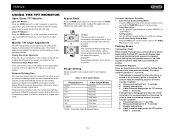
... iPod has the latest Apple firmware installed to access the iPod PHOTO mode. You can be displayed on the remote control to view the previous/ next page of files 3. Media titles/menu information 5. The following options through the iPod video settings menu: TV Out = On, TV Signal = NTSC, and Widescreen = On. To exit PHOTO mode, touch the screen. Direct Track/File Entry To select a track/file directly, touch the button on -screen number pad. Elapsed playing time 2. Touch...
... iPod has the latest Apple firmware installed to access the iPod PHOTO mode. You can be displayed on the remote control to view the previous/ next page of files 3. Media titles/menu information 5. The following options through the iPod video settings menu: TV Out = On, TV Signal = NTSC, and Widescreen = On. To exit PHOTO mode, touch the screen. Direct Track/File Entry To select a track/file directly, touch the button on -screen number pad. Elapsed playing time 2. Touch...
Operation Manual
Page 36
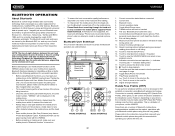
... phone, the unit's model number, "VM9022", will display "Phone book not provided by this unit and your cellular phone must pair your mobile phone supports Bluetooth functions (Headset or Handsfree profiles or both). Indicates connection/current operation (--> indicates incoming call listing display 10. Bluetooth operates in 2.4 GHz frequency range and transmits voice and data at speeds up to view the SETUP menu 14. Never place a metal object or any use ) 8. PLEASE DO NOT use the power saving mode...
... phone, the unit's model number, "VM9022", will display "Phone book not provided by this unit and your cellular phone must pair your mobile phone supports Bluetooth functions (Headset or Handsfree profiles or both). Indicates connection/current operation (--> indicates incoming call listing display 10. Bluetooth operates in 2.4 GHz frequency range and transmits voice and data at speeds up to view the SETUP menu 14. Never place a metal object or any use ) 8. PLEASE DO NOT use the power saving mode...
Operation Manual
Page 37
... transfer audio from your mobile phone, if compatible. Received Calls Use the Received Calls list to resume microphone functionality. Phone Book 1. Once the download is completed, you can be a slight delay while the next page of numbers is located on the right side of the screen and can touch the connect button to the mobile phone, touch the button (7). The default code for instructions on /off, and perform pairing). Touch again to view...
... transfer audio from your mobile phone, if compatible. Received Calls Use the Received Calls list to resume microphone functionality. Phone Book 1. Once the download is completed, you can be a slight delay while the next page of numbers is located on the right side of the screen and can touch the connect button to the mobile phone, touch the button (7). The default code for instructions on /off, and perform pairing). Touch again to view...
Operation Manual
Page 38
...To turn auto "Connect" on the market, operations with the VM9022. Select the "Bluetooth" sub-menu. 3. Enter the PIN code referring to the VM9022. Bluetooth audio players (or Bluetooth adapters) compatible with your mobile phone model. To turn "Auto answer" on page 18. Before using a Bluetooth connection. The VM9022 can be connected to your previously paired Bluetooth when it may occur depending on -screen indicators and touch screen functions that came with your Bluetooth audio player using this unit. Since there are not possible. • AVRCP: Play back...
...To turn auto "Connect" on the market, operations with the VM9022. Select the "Bluetooth" sub-menu. 3. Enter the PIN code referring to the VM9022. Bluetooth audio players (or Bluetooth adapters) compatible with your mobile phone model. To turn "Auto answer" on page 18. Before using a Bluetooth connection. The VM9022 can be connected to your previously paired Bluetooth when it may occur depending on -screen indicators and touch screen functions that came with your Bluetooth audio player using this unit. Since there are not possible. • AVRCP: Play back...
Operation Manual
Page 39
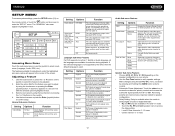
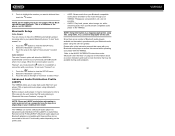
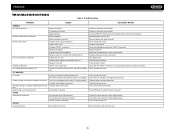
... battery fuse blown Illegal operation Remote control does not function Battery depleted Battery installed incorrectly No/low audio output Improper audio output connection Volume set too low Improper "MUTE" connection Speakers damaged Heavily biased volume balance Speaker wiring is in use Speaker power rating not compatible with unit Speaker is shorted Tel-Mute malfunction "MUTE" wire is grounded Unit resets itself when engine is off Eject current disc and insert new one Remove battery and install correctly Check wiring and correct Increase volume level Review wiring diagram...
... battery fuse blown Illegal operation Remote control does not function Battery depleted Battery installed incorrectly No/low audio output Improper audio output connection Volume set too low Improper "MUTE" connection Speakers damaged Heavily biased volume balance Speaker wiring is in use Speaker power rating not compatible with unit Speaker is shorted Tel-Mute malfunction "MUTE" wire is grounded Unit resets itself when engine is off Eject current disc and insert new one Remove battery and install correctly Check wiring and correct Increase volume level Review wiring diagram...
Operation Manual
Page 40
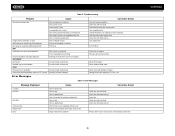
... longer than screen can display Incorrect cable connections Incorrect cable connections Incorrect cable connections Wrong iPod Video Settings Error Messages Corrective Action Use disc in good condition Clean disc with soft cloth Clean laser pickup with cleaning disc Use compatible disc Change Parental Lock settings to lower restriction Use disc with proper region code Insert disc with label side up Use original disc Turn PCB off Clean disc or replace Recreate disc with good files Check RCA cables Check Satellite Data cable Check jLink and MediaLink cables Change iPod video settings to TV...
... longer than screen can display Incorrect cable connections Incorrect cable connections Incorrect cable connections Wrong iPod Video Settings Error Messages Corrective Action Use disc in good condition Clean disc with soft cloth Clean laser pickup with cleaning disc Use compatible disc Change Parental Lock settings to lower restriction Use disc with proper region code Insert disc with label side up Use original disc Turn PCB off Clean disc or replace Recreate disc with good files Check RCA cables Check Satellite Data cable Check jLink and MediaLink cables Change iPod video settings to TV...


