Instruction Manual
Page 5
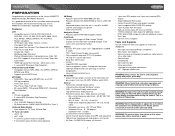
...artist and channel number Chassis • 6.5 inch TFT touch screen LCD - 280,800 pixels (1200W X 234H) • TSD - Features DVD • Compatible formats: DVD-R, DVD-RW, DVD+R, DVD+RW, CD-R, CD-RW, CD-DA, MP3, WMA, SVCD, VCD, MPEG1, MPEG2, MPEG4, AVI ...iPod TV Tuner (Included) • VHF 2-13 • UHF 14-69 • TV antenna (3.5mm antenna included) • F-Connector/Coaxial Antenna Input (optional) XM Ready • Requires optional Terk XMD1000 tuner box • Requires optional Terk XMDJEN100 or Jensen JXMC XM cables • Advanced display shows the artist, song title, and XM...
...artist and channel number Chassis • 6.5 inch TFT touch screen LCD - 280,800 pixels (1200W X 234H) • TSD - Features DVD • Compatible formats: DVD-R, DVD-RW, DVD+R, DVD+RW, CD-R, CD-RW, CD-DA, MP3, WMA, SVCD, VCD, MPEG1, MPEG2, MPEG4, AVI ...iPod TV Tuner (Included) • VHF 2-13 • UHF 14-69 • TV antenna (3.5mm antenna included) • F-Connector/Coaxial Antenna Input (optional) XM Ready • Requires optional Terk XMD1000 tuner box • Requires optional Terk XMDJEN100 or Jensen JXMC XM cables • Advanced display shows the artist, song title, and XM...
Instruction Manual
Page 18
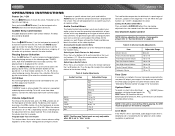
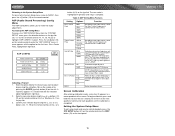
...cabin equalizer. When the volume level reaches "0" or "40", a triple beep sounds, indicating that the adjustment limit has been reached. Selecting an Audio Feature for 3 seconds. Mute Press the /MUTE button (1) on the front panel or remote (3) to mute the volume from "0" to "40". Playing Source...rear view video camera, connect the video input cable to change between available playing sources in the following order: TUNER, DVD, AUX IN or CAMERA (rear view video camera). The screen displays the volume level for Adjustment Press the () buttons (8, 9) on the joystick or the buttons (17, 19)...
...cabin equalizer. When the volume level reaches "0" or "40", a triple beep sounds, indicating that the adjustment limit has been reached. Selecting an Audio Feature for 3 seconds. Mute Press the /MUTE button (1) on the front panel or remote (3) to mute the volume from "0" to "40". Playing Source...rear view video camera, connect the video input cable to change between available playing sources in the following order: TUNER, DVD, AUX IN or CAMERA (rear view video camera). The screen displays the volume level for Adjustment Press the () buttons (8, 9) on the joystick or the buttons (17, 19)...
Instruction Manual
Page 19
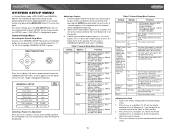
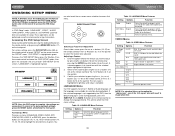
... the selected option highlighted in green. Press the Selecting a Feature for adjustment. "SYS SETUP" is highlighted in light blue. 2. For system settings, press the SYS SETUP button (31) on the remote control or touch "SETUP" on the screen to enter the "GENERAL SETUP" menu. VM9021TS SYSTEM SETUP MENU In "System Setup" mode, "ASP CONFIG...
... the selected option highlighted in green. Press the Selecting a Feature for adjustment. "SYS SETUP" is highlighted in light blue. 2. For system settings, press the SYS SETUP button (31) on the remote control or touch "SETUP" on the screen to enter the "GENERAL SETUP" menu. VM9021TS SYSTEM SETUP MENU In "System Setup" mode, "ASP CONFIG...
Instruction Manual
Page 20
A submenu appears in a second row with the option for the feature you to highlight "ASP CONFIG" in light blue. 2. Returning to the System Setup Menu To return to the System Setup menu, move to "BACK", then ... want to adjust by pressing the >/|| button (18) on the remote or by pressing the >> or Press the >/|| button (18) on the remote control. Adjusting a Feature 1. Enter the option field for the first item, "Bass Center Freq", highlighted in light blue. Select a new value by pressing the ENTER (joystick) button (5) on...
A submenu appears in a second row with the option for the feature you to highlight "ASP CONFIG" in light blue. 2. Returning to the System Setup Menu To return to the System Setup menu, move to "BACK", then ... want to adjust by pressing the >/|| button (18) on the remote or by pressing the >> or Press the >/|| button (18) on the remote control. Adjusting a Feature 1. Enter the option field for the first item, "Bass Center Freq", highlighted in light blue. Select a new value by pressing the ENTER (joystick) button (5) on...
Instruction Manual
Page 22
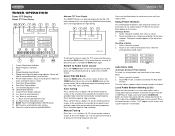
...Indicator 2. Front Zone Playing Mode 8. AS: Touch to stop searching. Press and hold to change between the following bands: FM1, FM2, FM3, AM1, and AM2. TUNER OPERATION Tuner TFT Display Default TFT Tuner Display VM9021TS Alternate TFT Tuner Display The VM9021TS offers an alternate display for the AM / FM...more appropriate for three seconds. Select a band (if needed ), then select a station. 2. Touch this area to return to the MAIN MENU To activate this feature, open the TFT screen and then press and hold the buttons to seek the next available radio station by increasing the ...
...Indicator 2. Front Zone Playing Mode 8. AS: Touch to stop searching. Press and hold to change between the following bands: FM1, FM2, FM3, AM1, and AM2. TUNER OPERATION Tuner TFT Display Default TFT Tuner Display VM9021TS Alternate TFT Tuner Display The VM9021TS offers an alternate display for the AM / FM...more appropriate for three seconds. Select a band (if needed ), then select a station. 2. Touch this area to return to the MAIN MENU To activate this feature, open the TFT screen and then press and hold the buttons to seek the next available radio station by increasing the ...
Instruction Manual
Page 24
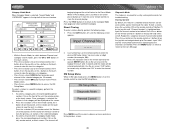
... the on the joystick and navigate back up to the radio. VM9021TS Diagnostic Mode This feature is unlocked and all channels can be entered automatically. Category Guide Mode When Category Mode is selected, "Search Mode" and "CATEGORY" appear in the touch screen. • Press the >> button (14) on the remote... 4 seconds and the station will be accessed by service professionals for troubleshooting. Press the MENU button (1) twice to return to the main XM page. • While in Search Mode, to switch between Channel and Category search modes, press the CH or CAT buttons in the ...
... the on the joystick and navigate back up to the radio. VM9021TS Diagnostic Mode This feature is unlocked and all channels can be entered automatically. Category Guide Mode When Category Mode is selected, "Search Mode" and "CATEGORY" appear in the touch screen. • Press the >> button (14) on the remote... 4 seconds and the station will be accessed by service professionals for troubleshooting. Press the MENU button (1) twice to return to the main XM page. • While in Search Mode, to switch between Channel and Category search modes, press the CH or CAT buttons in the ...
Instruction Manual
Page 26
..., playback starts from track one of the play the first ten seconds of the screen during DVD playback: • T : 5/8 - Enter a time into the field using ...GOTO button (21) on the DVD is selected. 6- Go to enter "GO TO" mode. 2. VM9021TS Multi-Language Discs (DVD Only) Changing Audio Language If ...During DVD, VCD and CD playback, you can use the GOTO feature to "4X", "8X", and "20X". Viewing an Alternate Picture Angle (DVD Only) Some DVDs contain ...for AM/FM tuner, TV tuner, Aux Input, XM, iPod and Navigation only. 6-channel audio support is activated, fast forward, ...
..., playback starts from track one of the play the first ten seconds of the screen during DVD playback: • T : 5/8 - Enter a time into the field using ...GOTO button (21) on the DVD is selected. 6- Go to enter "GO TO" mode. 2. VM9021TS Multi-Language Discs (DVD Only) Changing Audio Language If ...During DVD, VCD and CD playback, you can use the GOTO feature to "4X", "8X", and "20X". Viewing an Alternate Picture Angle (DVD Only) Some DVDs contain ...for AM/FM tuner, TV tuner, Aux Input, XM, iPod and Navigation only. 6-channel audio support is activated, fast forward, ...
Instruction Manual
Page 28
...are memorized. For system settings, press the DVD SETUP button (30) on the remote control or touch "SETUP" on the screen. NOTE: Once the DVD setup is highlighted in light blue. 2. Accessing the DVD Setup Screen Setup can be performed by pressing the dedicated... button on the remote control, or by pressing the ENTER (joystick) button (5) on the front panel. DIRECTION BUTTONS Selecting a Feature...
...are memorized. For system settings, press the DVD SETUP button (30) on the remote control or touch "SETUP" on the screen. NOTE: Once the DVD setup is highlighted in light blue. 2. Accessing the DVD Setup Screen Setup can be performed by pressing the dedicated... button on the remote control, or by pressing the ENTER (joystick) button (5) on the front panel. DIRECTION BUTTONS Selecting a Feature...
Instruction Manual
Page 29
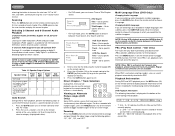
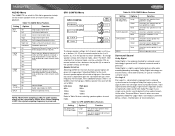
...Logic II uses simple servo circuits used to the speaker settings on the joystick (9) to move to derive the five audio channels. VM9021TS AUDIO Menu The VM9021TS has a built-in Pink Noise generator to previous menu. Adjust the time difference between 1 and 5 milliseconds, producing a more accurate...frequency is dependent upon the sub-woofer low pass filter frequency. Speaker Selection Selecting LARGE for each mode. Table 16: SPK CONFIG Menu Features Setting Options Function LR (Left Rear) / RR (Right Rear) Large Small None SUB (Subwoofer) Present None CTR (Center) Large ...
...Logic II uses simple servo circuits used to the speaker settings on the joystick (9) to move to derive the five audio channels. VM9021TS AUDIO Menu The VM9021TS has a built-in Pink Noise generator to previous menu. Adjust the time difference between 1 and 5 milliseconds, producing a more accurate...frequency is dependent upon the sub-woofer low pass filter frequency. Speaker Selection Selecting LARGE for each mode. Table 16: SPK CONFIG Menu Features Setting Options Function LR (Left Rear) / RR (Right Rear) Large Small None SUB (Subwoofer) Present None CTR (Center) Large ...

Instruction Manual
Page 30
... when the playback source is turned off. RATING (Parental Lock) Menu The DVD system has a built-in a safe place for the Rating system only. Table 17: Pro-Logic II Menu Features Setting Options Function Decode Mode Panorama (Only available when Pro-Logic II Music Mode... enter a new one. Play mono output with surround effect. Return to prevent unauthorized persons from front to rear to activate the "Rating" feature. 26 VM9021TS PG 4. PG-R 6. You may override higher ratings by entering the correct password. Select "Reset" to previous menu. Return to restore the...
... when the playback source is turned off. RATING (Parental Lock) Menu The DVD system has a built-in a safe place for the Rating system only. Table 17: Pro-Logic II Menu Features Setting Options Function Decode Mode Panorama (Only available when Pro-Logic II Music Mode... enter a new one. Play mono output with surround effect. Return to prevent unauthorized persons from front to rear to activate the "Rating" feature. 26 VM9021TS PG 4. PG-R 6. You may override higher ratings by entering the correct password. Select "Reset" to previous menu. Return to restore the...
Instruction Manual
Page 35
While the NAV100 is not installed, the NAVI option appears gray, indicating the function is connected and operating properly, the NAVI source mode will be included with the NAV100 navigation module. Once the NAV100 is not available. 31 Before accessing any navigation features, you must purchase and install the NAV100 module. All installation and operating instructions will become active. VM9021TS NAVIGATION SYSTEM The VM9021TS is "navigation ready."
While the NAV100 is not installed, the NAVI option appears gray, indicating the function is connected and operating properly, the NAVI source mode will be included with the NAV100 navigation module. Once the NAV100 is not available. 31 Before accessing any navigation features, you must purchase and install the NAV100 module. All installation and operating instructions will become active. VM9021TS NAVIGATION SYSTEM The VM9021TS is "navigation ready."
