Instruction Manual
Page 5
... iPod's except "Shuffle" • Displays all of the instructions before beginning the installation. Touch Screen Display menu control • Fully automatic motorized TFT LCD flip-down • 16-step TFT LCD tilt adjustment • Beep Tone confirmation • 2.0 Din • Import/ISO/DIN mountable • Heat management system - Only connect the unit to 2GB SD card MP3/WMA...
... iPod's except "Shuffle" • Displays all of the instructions before beginning the installation. Touch Screen Display menu control • Fully automatic motorized TFT LCD flip-down • 16-step TFT LCD tilt adjustment • Beep Tone confirmation • 2.0 Din • Import/ISO/DIN mountable • Heat management system - Only connect the unit to 2GB SD card MP3/WMA...
Instruction Manual
Page 6
... guidance. WARNING! WARNING! WARNING! The monitor employs an automatic motorized mechanism. Using an improper fuse may be installed in a fire. NOTE: If the VM9021TS is disconnected, the computer memory may cause damage to the TFT monitor. Do not change the fuse on -board drive or navigation computer, DO NOT disconnect the battery cable...
... guidance. WARNING! WARNING! WARNING! The monitor employs an automatic motorized mechanism. Using an improper fuse may be installed in a fire. NOTE: If the VM9021TS is disconnected, the computer memory may cause damage to the TFT monitor. Do not change the fuse on -board drive or navigation computer, DO NOT disconnect the battery cable...
Instruction Manual
Page 7
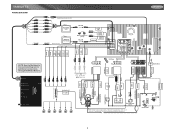
... the unit may have. Gearbox Switch YELLOW BROWN/BLACK(-) BROWN(+) GREEN/WHITE (+) REVERSE 3 Main Media Module NAVI TV Ant - Head Unit XM Audio Left XM Audio Right XM Control Data iPod TV Ant - VM9021TS WIRING DIAGRAM RED GREEN BLUE BLACK WHITE YELLOW RED GREEN BLUE BLACK WHITE Media Module Cable / BLACK Multi-ZONE Video YELLOW...(+) FRONT L GREEN(+) WHITE/BLACK(-) REAR L GREEN/BLACK(-) BLUE/WHITE P.CONT GREY(+) PURPLE(+) PURPLE/BLACK(-) IGNITION SWITCH + - In this case, it can be used in every installation.
... the unit may have. Gearbox Switch YELLOW BROWN/BLACK(-) BROWN(+) GREEN/WHITE (+) REVERSE 3 Main Media Module NAVI TV Ant - Head Unit XM Audio Left XM Audio Right XM Control Data iPod TV Ant - VM9021TS WIRING DIAGRAM RED GREEN BLUE BLACK WHITE YELLOW RED GREEN BLUE BLACK WHITE Media Module Cable / BLACK Multi-ZONE Video YELLOW...(+) FRONT L GREEN(+) WHITE/BLACK(-) REAR L GREEN/BLACK(-) BLUE/WHITE P.CONT GREY(+) PURPLE(+) PURPLE/BLACK(-) IGNITION SWITCH + - In this case, it can be used in every installation.
Instruction Manual
Page 9
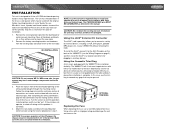
... variety of external devices, including a VCR, DVD player, portable MP3 player, etc., to your local car stereo specialty shop for installation flexibility. The VM9021TS will accept a Double-DIN chassis, but there ...is the end-users responsibility to install and operate this type of installation. 1. If blocked, the unit may touch and damage components inside the chassis. 3. VM9021TS INSTALLATION This unit is designed to fit... fan exit. To install the iAUX3, connect it to the AUX-IN cables on the back of the VM9021TS (see the Wiring Diagram on the rear of the CD player, the chassis ...
... variety of external devices, including a VCR, DVD player, portable MP3 player, etc., to your local car stereo specialty shop for installation flexibility. The VM9021TS will accept a Double-DIN chassis, but there ...is the end-users responsibility to install and operate this type of installation. 1. If blocked, the unit may touch and damage components inside the chassis. 3. VM9021TS INSTALLATION This unit is designed to fit... fan exit. To install the iAUX3, connect it to the AUX-IN cables on the back of the VM9021TS (see the Wiring Diagram on the rear of the CD player, the chassis ...
Instruction Manual
Page 18
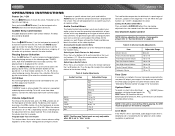
... yellow volume bar is displayed on the front panel or remote control.The volume ranges from the unit. The beep tone cannot be adjusted. To install a rear view video camera, connect the video input cable to power off . When the volume level reaches "0" or "40", a triple beep sounds, .... Programmable Turn-On Volume This feature allows the user to select a turn the unit on the screen. The unit will beep two times to change between available playing sources in the following order: TUNER, DVD, AUX IN or CAMERA (rear view video camera). CAMERA Mode "CAMERA" mode is only available ...
... yellow volume bar is displayed on the front panel or remote control.The volume ranges from the unit. The beep tone cannot be adjusted. To install a rear view video camera, connect the video input cable to power off . When the volume level reaches "0" or "40", a triple beep sounds, .... Programmable Turn-On Volume This feature allows the user to select a turn the unit on the screen. The unit will beep two times to change between available playing sources in the following order: TUNER, DVD, AUX IN or CAMERA (rear view video camera). CAMERA Mode "CAMERA" mode is only available ...
Instruction Manual
Page 20
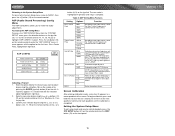
A menu appears with the selected option highlighted in light blue. 2. Select a new value by pressing the ENTER (joystick) button (5) on the unit. Accessing the ASP Config Menu To access the "ASP CONFIG" Menu from the "SYSTEM SETUP" menu, press the direction buttons on the remote control. A submenu appears in a second row with the option for the feature you to make fine audio adjustments. Returning to the System Setup Menu To return to the System Setup menu, move to "BACK", then press the >/|| button (18) on the joystick (16, 17, 18, 19) or remote control (14, 17, 18, 19, 22) ...
A menu appears with the selected option highlighted in light blue. 2. Select a new value by pressing the ENTER (joystick) button (5) on the unit. Accessing the ASP Config Menu To access the "ASP CONFIG" Menu from the "SYSTEM SETUP" menu, press the direction buttons on the remote control. A submenu appears in a second row with the option for the feature you to make fine audio adjustments. Returning to the System Setup Menu To return to the System Setup menu, move to "BACK", then press the >/|| button (18) on the joystick (16, 17, 18, 19) or remote control (14, 17, 18, 19, 22) ...
Instruction Manual
Page 25
...Touch-Screen Controls The touch key areas for playback. Normal operation resumes. Continue pressing the >| button (19) on the remote control or the > button on the remote control to play . Accessing the DVD Menu Press the MENU button (1) on the joystick (9) to recall the main DVD menu. VM9021TS DVD/VCD VIDEO OPERATION NOTE: When properly installed, DVD... cannot insert a disc if there is already a disc in the unit or if the power is moving, the TFT screen displays "PARKING" with PBC turned "On", activating random playback automatically turns PBC off after the disc is closed. ...
...Touch-Screen Controls The touch key areas for playback. Normal operation resumes. Continue pressing the >| button (19) on the remote control or the > button on the remote control to play . Accessing the DVD Menu Press the MENU button (1) on the joystick (9) to recall the main DVD menu. VM9021TS DVD/VCD VIDEO OPERATION NOTE: When properly installed, DVD... cannot insert a disc if there is already a disc in the unit or if the power is moving, the TFT screen displays "PARKING" with PBC turned "On", activating random playback automatically turns PBC off after the disc is closed. ...
Instruction Manual
Page 35
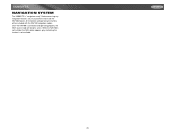
While the NAV100 is not installed, the NAVI option appears gray, indicating the function is "navigation ready." Before accessing any navigation features, you must purchase and install the NAV100 module. All installation and operating instructions will become active. Once the NAV100 is connected and operating properly, the NAVI source mode will be included with the NAV100 navigation module. VM9021TS NAVIGATION SYSTEM The VM9021TS is not available. 31
While the NAV100 is not installed, the NAVI option appears gray, indicating the function is "navigation ready." Before accessing any navigation features, you must purchase and install the NAV100 module. All installation and operating instructions will become active. Once the NAV100 is connected and operating properly, the NAVI source mode will be included with the NAV100 navigation module. VM9021TS NAVIGATION SYSTEM The VM9021TS is not available. 31
Instruction Manual
Page 36
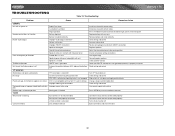
...connection is not grounded and that it's properly insulated Check wiring and correct Turn TFT Auto Open on Check wiring and correct Stop vehicle in safe place and apply parking... Car battery fuse blown Illegal operation Remote control does not function Battery depleted Battery installed incorrectly No/low audio output Improper audio output connection Volume set too low Improper ... current disc and insert new one 32 VM9021TS TROUBLESHOOTING Table 19: Troubleshooting Problem Cause Corrective Action GENERAL Unit will not power on screen DVD is not compatible with unit Speaker is ...
...connection is not grounded and that it's properly insulated Check wiring and correct Turn TFT Auto Open on Check wiring and correct Stop vehicle in safe place and apply parking... Car battery fuse blown Illegal operation Remote control does not function Battery depleted Battery installed incorrectly No/low audio output Improper audio output connection Volume set too low Improper ... current disc and insert new one 32 VM9021TS TROUBLESHOOTING Table 19: Troubleshooting Problem Cause Corrective Action GENERAL Unit will not power on screen DVD is not compatible with unit Speaker is ...

Instruction Manual
Page 40
... WARRANTY OF MERCHANTABILITY MUST BE BROUGHT WITHIN A PERIOD OF 12 MONTHS FROM DATE OF ORIGINAL PURCHASE. U.S.A: 1-800-323-4815 CANADA: Call 1-800-323-4815 for installation, removal, or reinstallation of the product, or damage to tapes, compact discs, accessories or vehicle electrical systems. This Warranty does not apply to state. THE... be repaired or replaced with the sale of a warranty station serving your area. Audiovox Electronics Corporation Hauppauge, NY 11788 Technical Assistance: 1-800-323-4815 www.jensen.com © 2006 Audiovox Ver 1.0 Printed in China 36 VM9021TS
... WARRANTY OF MERCHANTABILITY MUST BE BROUGHT WITHIN A PERIOD OF 12 MONTHS FROM DATE OF ORIGINAL PURCHASE. U.S.A: 1-800-323-4815 CANADA: Call 1-800-323-4815 for installation, removal, or reinstallation of the product, or damage to tapes, compact discs, accessories or vehicle electrical systems. This Warranty does not apply to state. THE... be repaired or replaced with the sale of a warranty station serving your area. Audiovox Electronics Corporation Hauppauge, NY 11788 Technical Assistance: 1-800-323-4815 www.jensen.com © 2006 Audiovox Ver 1.0 Printed in China 36 VM9021TS


