Operation Manual
Page 2
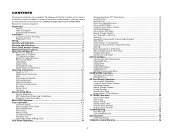
... the Battery 1 Installation ...2 Using the Cosmetic Trim Ring 2 Replacing the Fuse ...2 Wiring...3 Controls and Indicators 4 Controls and Indicators 5 Front ZONE Remote Control 6 Multi-Zone Remote Control 8 Using the TFT Monitor 9 Open/Close TFT Monitor 9 TFT Monitor Auto Open 9 Monitor Tilt Angle Adjustment 9 Rear Camera Mode...9 Aspect Ratio...9 Image Setting ...9 Parking Brake Inhibit ...9 Monitor Movement Mechanism 9 Operating Instructions 10 Power On / Off ...10 Audible Beep Confirmation 10 Mute ...10 Playing Source Selection 10 Volume Adjustment ...10 Audio Control Menu...
... the Battery 1 Installation ...2 Using the Cosmetic Trim Ring 2 Replacing the Fuse ...2 Wiring...3 Controls and Indicators 4 Controls and Indicators 5 Front ZONE Remote Control 6 Multi-Zone Remote Control 8 Using the TFT Monitor 9 Open/Close TFT Monitor 9 TFT Monitor Auto Open 9 Monitor Tilt Angle Adjustment 9 Rear Camera Mode...9 Aspect Ratio...9 Image Setting ...9 Parking Brake Inhibit ...9 Monitor Movement Mechanism 9 Operating Instructions 10 Power On / Off ...10 Audible Beep Confirmation 10 Mute ...10 Playing Source Selection 10 Volume Adjustment ...10 Audio Control Menu...
Operation Manual
Page 3
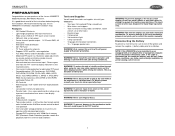
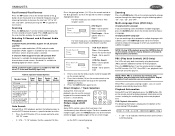
... display video from the front panel • Auto-activated rear view camera input - If the cable is a violation of the Jensen VM9020TS Mobile Multimedia AM/FM/DVD Receiver. WARNING! WARNING! WARNING! Never use the video display function while driving the vehicle. WARNING! To prevent damage to the core mechanism, please do not use extra caution during installation to moisture or water. Uses a password and disc rating set or other object to attempt to the touch screen display...
... display video from the front panel • Auto-activated rear view camera input - If the cable is a violation of the Jensen VM9020TS Mobile Multimedia AM/FM/DVD Receiver. WARNING! WARNING! WARNING! Never use the video display function while driving the vehicle. WARNING! To prevent damage to the core mechanism, please do not use extra caution during installation to moisture or water. Uses a password and disc rating set or other object to attempt to the touch screen display...
Operation Manual
Page 4
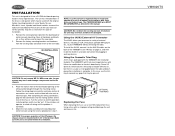
.... The PARKING BRAKE wire MUST BE CONNECTED as they will fit into the mating sockets on this unit in a manner in many imported cars. CAUTION: Do not block the cooling fan exit. Using the iAUX3 External AV Connector The iAUX3 allows you to connect a variety of external devices, including a VCR, DVD player, portable MP3 player, etc., to your local car stereo specialty shop for assistance on the rear of...
.... The PARKING BRAKE wire MUST BE CONNECTED as they will fit into the mating sockets on this unit in a manner in many imported cars. CAUTION: Do not block the cooling fan exit. Using the iAUX3 External AV Connector The iAUX3 allows you to connect a variety of external devices, including a VCR, DVD player, portable MP3 player, etc., to your local car stereo specialty shop for assistance on the rear of...

Operation Manual
Page 6
... volume. 5. Press and hold to turn the unit on the joystick to play the previous stored TV channel. 16. TUNER Press to access the radio tuner source and then to activate or deactivate the Local (LOC) setting. 3. MENU/SRC Press to access the TV tuner source. 17. Press and hold to change and/or confirm audio settings. TV Press to access the playing source menu. 12. TFT Display 18. IR Remote Control Receiver...
... volume. 5. Press and hold to turn the unit on the joystick to play the previous stored TV channel. 16. TUNER Press to access the radio tuner source and then to activate or deactivate the Local (LOC) setting. 3. MENU/SRC Press to access the TV tuner source. 17. Press and hold to change and/or confirm audio settings. TV Press to access the playing source menu. 12. TFT Display 18. IR Remote Control Receiver...
Operation Manual
Page 8
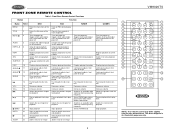
... Pauses playback/starts play- tle 10 Displays playing information 11 Continuously adjusts front panel tilt angle 12 Continuously adjusts front panel tilt angle 13 Plays back disc in /out on an image TUNER Turns the power on . plays/stores radio station; Toggles on /off audio output. Press and hold to turn the power off. Toggles on /off audio output. Toggles on . FRONT ZONE REMOTE CONTROL Table 1: Front Zone Remote Control Functions Button Function Name MENU TITLE MUTE/ AUDIO REPT A-B REPT...
... Pauses playback/starts play- tle 10 Displays playing information 11 Continuously adjusts front panel tilt angle 12 Continuously adjusts front panel tilt angle 13 Plays back disc in /out on an image TUNER Turns the power on . plays/stores radio station; Toggles on /off audio output. Press and hold to turn the power off. Toggles on /off audio output. Toggles on . FRONT ZONE REMOTE CONTROL Table 1: Front Zone Remote Control Functions Button Function Name MENU TITLE MUTE/ AUDIO REPT A-B REPT...
Operation Manual
Page 10
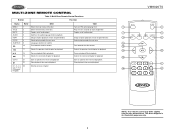
MULTI-ZONE REMOTE CONTROL Button Table 2: Multi-Zone Remote Control Functions Function Name Ref # DVD VCD MENU 1 Enters the main menu of the disc Turns on PBC when playing VCD 3 TITLE 2 Enters the title menu of the disc Plays first ten seconds of each chapter/title MUTE 3 Toggles on/off audio output Toggles on/off audio output 1 AUDIO 5 Switches the audio language for disc playback REPT 7 Setup to repeat playback of each chapter/title/disc Setup to repeat playback...
MULTI-ZONE REMOTE CONTROL Button Table 2: Multi-Zone Remote Control Functions Function Name Ref # DVD VCD MENU 1 Enters the main menu of the disc Turns on PBC when playing VCD 3 TITLE 2 Enters the title menu of the disc Plays first ten seconds of each chapter/title MUTE 3 Toggles on/off audio output Toggles on/off audio output 1 AUDIO 5 Switches the audio language for disc playback REPT 7 Setup to repeat playback of each chapter/title/disc Setup to repeat playback...
Operation Manual
Page 11
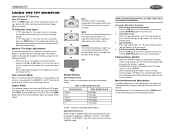
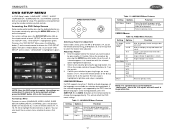
... the display. Table 3: Video Output Formats Playing Source Video Output Format TUNER DVD AUX IN CAMERA TV RGB Mode RGB Mode CVBS Mode CVBS Mode CVBS Mode *CVBS - Parking Brake Inhibit • When the "PRK SW" cable is active, the front monitor displays "Parking Is On", preventing the driver from watching content while driving. Composite Video Baseband Signal Adjustable Parameters While in DVD or TUNER mode, the only parameter that can be adjusted for each playing source. The monitor angle can be in AUX or CAMERA mode. WIDE The screen is brightness (BRIGHT...
... the display. Table 3: Video Output Formats Playing Source Video Output Format TUNER DVD AUX IN CAMERA TV RGB Mode RGB Mode CVBS Mode CVBS Mode CVBS Mode *CVBS - Parking Brake Inhibit • When the "PRK SW" cable is active, the front monitor displays "Parking Is On", preventing the driver from watching content while driving. Composite Video Baseband Signal Adjustable Parameters While in DVD or TUNER mode, the only parameter that can be adjusted for each playing source. The monitor angle can be in AUX or CAMERA mode. WIDE The screen is brightness (BRIGHT...
Operation Manual
Page 12
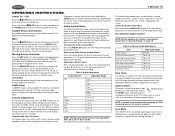
... +10 Rear Zone If a monitor is displayed on page 18. After a system reset, the unit restores all factory default settings. Line Mute If the "MUTE" wire is connected, audio output mutes when a telephone call is received by the car phone or when verbal navigation is complete. To install a rear view video camera, connect the video input cable to restore the volume. button (4) on volume setting regardless of the screen. Programmable Turn-On Volume This feature allows the user to select a turn the unit on the joystick (6, 7, 8, 9) or remote control...
... +10 Rear Zone If a monitor is displayed on page 18. After a system reset, the unit restores all factory default settings. Line Mute If the "MUTE" wire is connected, audio output mutes when a telephone call is received by the car phone or when verbal navigation is complete. To install a rear view video camera, connect the video input cable to restore the volume. button (4) on volume setting regardless of the screen. Programmable Turn-On Volume This feature allows the user to select a turn the unit on the joystick (6, 7, 8, 9) or remote control...
Operation Manual
Page 13
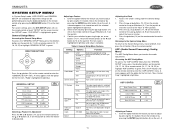
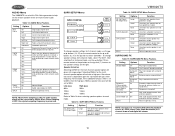
... the ENTER (joystick) button (5) on the unit. The color signal output is highlighted in which you to make fine audio adjustments. A menu appears with the selected option highlighted in green. The new value is switched automatically based on /off. Adjusting the Clock 1. Press the button (18) on the joystick to adjust the hour or minutes. 4. Table 6: General Setup Menu Features Setting Options Function Radio Clock Mode USA1 S. Return to open the TFT panel...
... the ENTER (joystick) button (5) on the unit. The color signal output is highlighted in which you to make fine audio adjustments. A menu appears with the selected option highlighted in green. The new value is switched automatically based on /off. Adjusting the Clock 1. Press the button (18) on the joystick to adjust the hour or minutes. 4. Table 6: General Setup Menu Features Setting Options Function Radio Clock Mode USA1 S. Return to open the TFT panel...
Operation Manual
Page 14
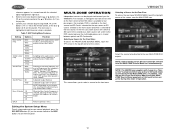
... SOURCE MENU, touch the TFT screen in light blue. 2. In the second case, both sources will switch to the rear Multi-ZONE RCA outputs. This menu allows you to the DVD source because the multimedia processor is set to achieve the best Treble effect. Select a new value by pressing the , , or buttons (14, 17, 19) on the remote control, or the or button (8, 9) on the joystick. Confirm your installation, reversing the subwoofer...
... SOURCE MENU, touch the TFT screen in light blue. 2. In the second case, both sources will switch to the rear Multi-ZONE RCA outputs. This menu allows you to the DVD source because the multimedia processor is set to achieve the best Treble effect. Select a new value by pressing the , , or buttons (14, 17, 19) on the remote control, or the or button (8, 9) on the joystick. Confirm your installation, reversing the subwoofer...
Operation Manual
Page 15
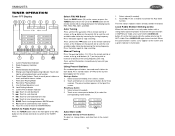
...: Touch to tune forward one step. Manual Tuning Press the or buttons (14, 22) on the remote control or screen, or the or buttons (6, 7) on the remote control (8) to switch to the TUNER source. Storing a Station 1. Select a band (if needed ). 2. The preset number appears at the top of Preset Stations To select six strong stations and store them . Local Radio Station Seeking (LOC) When the Local function is illuminated. 13 User Defined Equalizer Level 10. Auto...
...: Touch to tune forward one step. Manual Tuning Press the or buttons (14, 22) on the remote control or screen, or the or buttons (6, 7) on the remote control (8) to switch to the TUNER source. Storing a Station 1. Select a band (if needed ). 2. The preset number appears at the top of Preset Stations To select six strong stations and store them . Local Radio Station Seeking (LOC) When the Local function is illuminated. 13 User Defined Equalizer Level 10. Auto...
Operation Manual
Page 16
...) to turn random play . Accessing the DVD Menu Press the MENU button (1) on the remote control to close the TFT screen. Closing the TFT Screen Press the OPEN (12) button again to recall the main DVD menu. You may eject a disc with the power off and the unit remains off . Press the button (19) on the remote control or the button on the joystick (9) to Tuner mode. The unit automatically reverts to play , the repeat function is...
...) to turn random play . Accessing the DVD Menu Press the MENU button (1) on the remote control to close the TFT screen. Closing the TFT Screen Press the OPEN (12) button again to recall the main DVD menu. You may eject a disc with the power off and the unit remains off . Press the button (19) on the remote control or the button on the joystick (9) to Tuner mode. The unit automatically reverts to play , the repeat function is...
Operation Manual
Page 17
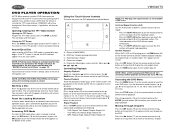
... the video image using the numeric keypad (29) on -screen image. For discs recorded with play back functionality, play the current chapter. Multi-Language Discs (DVD Only) Changing Audio Language If you are available. Go to specific time in X 6CH mode with Sur- "5 / 8" indicates the fifth of the on the remote control. 3. Selecting 2-Channel and 6-Channel Audio Playback 2-Channel Audio (Down Mix) Support for CD, SD Card and DVD Linear pulse code modulation...
... the video image using the numeric keypad (29) on -screen image. For discs recorded with play back functionality, play the current chapter. Multi-Language Discs (DVD Only) Changing Audio Language If you are available. Go to specific time in X 6CH mode with Sur- "5 / 8" indicates the fifth of the on the remote control. 3. Selecting 2-Channel and 6-Channel Audio Playback 2-Channel Audio (Down Mix) Support for CD, SD Card and DVD Linear pulse code modulation...

Operation Manual
Page 18
... (maximum of 6 (English) is set to the audio sound track from the VCD. The number inside the icon indicates the number languages on the screen during VCD playback in 2-Channel mode: • Front: DVD - VCD Playback Information The following information appears on the VCD is displayed on the disc (maximum of 8). The following information is currently playing. • 00:02:18 - "LB...
... (maximum of 6 (English) is set to the audio sound track from the VCD. The number inside the icon indicates the number languages on the screen during VCD playback in 2-Channel mode: • Front: DVD - VCD Playback Information The following information appears on the VCD is displayed on the disc (maximum of 8). The following information is currently playing. • 00:02:18 - "LB...
Operation Manual
Page 19
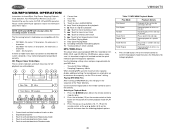
... menu. VIDEO Menu Table 12: VIDEO Menu Features Setting Options Function TV Shape (Aspect Ratio) Angle Mark View Mode BACK 4:3 PS 4:3 LB 16:9 On Off Fill Original H Fit W Fit Fit to access that menu. Angle indicator is shown. Accessing the DVD Setup Screen Setup can be performed using the remote control or joystick controls. A submenu appears in green. For system settings, press the DVD SETUP button (30) on the remote control or touch "SETUP" on the screen to adjust...
... menu. VIDEO Menu Table 12: VIDEO Menu Features Setting Options Function TV Shape (Aspect Ratio) Angle Mark View Mode BACK 4:3 PS 4:3 LB 16:9 On Off Fill Original H Fit W Fit Fit to access that menu. Angle indicator is shown. Accessing the DVD Setup Screen Setup can be performed using the remote control or joystick controls. A submenu appears in green. For system settings, press the DVD SETUP button (30) on the remote control or touch "SETUP" on the screen to adjust...
Operation Manual
Page 20
... Subwoofer pink noise Employ the Dynamic Range Control for better playback for 6-channel mode, select "Full 6CH". Use when center speaker has good bass output. Use Surround I Music On Off 0-6 0-6 Play original audio format. Shift audio output between front and rear speakers. SURR SETUP Menu To change speaker settings for low volumes. Table 14: SURR SETUP Menu Features Setting Options Function FL (Front Left) / FR (Front Right) Large Small Use when front speakers have good bass output. Play surround music effects. Shift audio output...
... Subwoofer pink noise Employ the Dynamic Range Control for better playback for 6-channel mode, select "Full 6CH". Use when center speaker has good bass output. Use Surround I Music On Off 0-6 0-6 Play original audio format. Shift audio output between front and rear speakers. SURR SETUP Menu To change speaker settings for low volumes. Table 14: SURR SETUP Menu Features Setting Options Function FL (Front Left) / FR (Front Right) Large Small Use when front speakers have good bass output. Play surround music effects. Shift audio output...
Operation Manual
Page 22
... the remote control to confirm the playback mode then press the button (18) to access files directly. Play a specific file and stop at the end. Press the button (14) on the remote control to begin playback. 20 CD Player User Interface The on the joystick to the maximum disc capacity, disable additional writing. Use the following settings when compressing audio data for CD playback are compatible with this unit: •...
... the remote control to confirm the playback mode then press the button (18) to access files directly. Play a specific file and stop at the end. Press the button (14) on the remote control to begin playback. 20 CD Player User Interface The on the joystick to the maximum disc capacity, disable additional writing. Use the following settings when compressing audio data for CD playback are compatible with this unit: •...
Operation Manual
Page 25
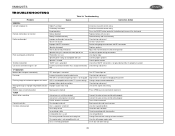
... Battery installed incorrectly No/low audio output Improper audio output connection Volume set too low Improper "MUTE" connection Speakers damaged Heavily biased volume balance Speaker wiring is in contact with metal part of the front panel Replace battery with new one Use disc in safe place and apply parking brake Change setup to accommodate disc Check wiring and correct Use correct aspect ratio setting Press OPEN key to restart monitor movement Connect the auto antenna control cable properly Connect the auto antenna control cable properly Turn LOCAL function off Eject current disc...
... Battery installed incorrectly No/low audio output Improper audio output connection Volume set too low Improper "MUTE" connection Speakers damaged Heavily biased volume balance Speaker wiring is in contact with metal part of the front panel Replace battery with new one Use disc in safe place and apply parking brake Change setup to accommodate disc Check wiring and correct Use correct aspect ratio setting Press OPEN key to restart monitor movement Connect the auto antenna control cable properly Connect the auto antenna control cable properly Turn LOCAL function off Eject current disc...
Operation Manual
Page 26
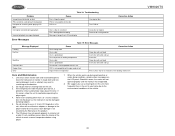
... suggest you use a 3" (8 cm) CD-Single disc in loading compartment Disc is dirty Disc is upside down Disc format is not compatible with this unit DVD is not compatible with region code of unit illegal mechanism operation Clean disc with soft cloth Insert disc with label side up Press EJECT key for 5 seconds to cool before using player. 7. If such conditions occur, allow the unit to reset loading mechanism Care...
... suggest you use a 3" (8 cm) CD-Single disc in loading compartment Disc is dirty Disc is upside down Disc format is not compatible with this unit DVD is not compatible with region code of unit illegal mechanism operation Clean disc with soft cloth Insert disc with label side up Press EJECT key for 5 seconds to cool before using player. 7. If such conditions occur, allow the unit to reset loading mechanism Care...
Operation Manual
Page 27
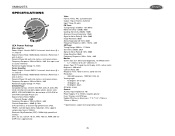
..., 800 sub pixels, 1200 (W) X 234 (H) Viewing angle: • 65 degrees left or right • 40 degrees up • 65 degrees down Anti-glare screen General Auxiliary Input impedance: 10k Power Supply: 11 to 16VDC, negative ground Fuse: 10-amp, mini ATM type Double-DIN chassis dimensions: 7" X 7" X 4" (178mm x 178mm x 100mm) ** Specifications subject to change without notice. 25 VM9020TS SPECIFICATIONS CEA Power Ratings Main Amplifier Power Output: 18...
..., 800 sub pixels, 1200 (W) X 234 (H) Viewing angle: • 65 degrees left or right • 40 degrees up • 65 degrees down Anti-glare screen General Auxiliary Input impedance: 10k Power Supply: 11 to 16VDC, negative ground Fuse: 10-amp, mini ATM type Double-DIN chassis dimensions: 7" X 7" X 4" (178mm x 178mm x 100mm) ** Specifications subject to change without notice. 25 VM9020TS SPECIFICATIONS CEA Power Ratings Main Amplifier Power Output: 18...


